
Printer Guide
Page 7
Contents | 7 4 Printing with Epson Drivers for Windows Choosing Basic Print Options 100 Choosing Paper and Layout Options 103 Choosing Roll Paper Options 103 Borderless Printing 106 Choosing Cut Sheet ... 114 Setting Monitoring Preferences and Optimizing Print Speed . . . . . 115 5 Maintaining and Transporting the Printer Checking Printer Status and Part Life 120 Printing Status Information 120 Viewing Status Information 121 Checking and Cleaning the Print Head 122 Running the Nozzle Check and Head Cleaning Utilities 123 Using the Control Panel Menu 124 Manually Checking and...
Contents | 7 4 Printing with Epson Drivers for Windows Choosing Basic Print Options 100 Choosing Paper and Layout Options 103 Choosing Roll Paper Options 103 Borderless Printing 106 Choosing Cut Sheet ... 114 Setting Monitoring Preferences and Optimizing Print Speed . . . . . 115 5 Maintaining and Transporting the Printer Checking Printer Status and Part Life 120 Printing Status Information 120 Viewing Status Information 121 Checking and Cleaning the Print Head 122 Running the Nozzle Check and Head Cleaning Utilities 123 Using the Control Panel Menu 124 Manually Checking and...
Printer Guide
Page 9
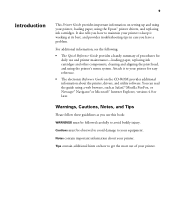
... guide using a web browser, such as you use and printer maintenance-loading paper, replacing ink cartridges and other components, cleaning and aligning the print head, and using the printer's menu system. Notes contain important information about the printer, drivers, and utility software. Tips contain additional hints on... 4.0 or later. Attach it working at its best, and provides troubleshooting tips in case you how to maintain your printer, loading paper, using the Epson® printer drivers, and replacing ink cartridges. It also tells you have a problem. 9 Introduction This...
... guide using a web browser, such as you use and printer maintenance-loading paper, replacing ink cartridges and other components, cleaning and aligning the print head, and using the printer's menu system. Notes contain important information about the printer, drivers, and utility software. Tips contain additional hints on... 4.0 or later. Attach it working at its best, and provides troubleshooting tips in case you how to maintain your printer, loading paper, using the Epson® printer drivers, and replacing ink cartridges. It also tells you have a problem. 9 Introduction This...
Printer Guide
Page 119
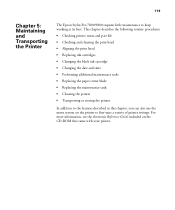
...; Performing additional maintenance tasks • Replacing the paper cutter blade • Replacing the maintenance tank • Cleaning the printer • Transporting or storing the printer In addition to the features described in this chapter, you can also use the menu system on the CD-...ROM that came with your printer. 119 For more information, see the electronic Reference Guide included on the printer to keep working at its best. 119 Chapter 5: Maintaining and Transporting the Printer The Epson Stylus Pro 7800/9800 requires little maintenance to fine-tune a variety...
...; Performing additional maintenance tasks • Replacing the paper cutter blade • Replacing the maintenance tank • Cleaning the printer • Transporting or storing the printer In addition to the features described in this chapter, you can also use the menu system on the CD-...ROM that came with your printer. 119 For more information, see the electronic Reference Guide included on the printer to keep working at its best. 119 Chapter 5: Maintaining and Transporting the Printer The Epson Stylus Pro 7800/9800 requires little maintenance to fine-tune a variety...

Printer Guide
Page 122
... your printed image shows a color shift or horizontal lines, you see the ink used (in milliliters) and paper used (in the printer, you should check the print head to clear the nozzles. 122 | Maintaining and Transporting the Printer Note: You can run a cleaning cycle to see the status of other printer parts, press d to highlight...
... your printed image shows a color shift or horizontal lines, you see the ink used (in milliliters) and paper used (in the printer, you should check the print head to clear the nozzles. 122 | Maintaining and Transporting the Printer Note: You can run a cleaning cycle to see the status of other printer parts, press d to highlight...

Printer Guide
Page 123
... to access the printer utilities: • Mac OS X: Open the Epson Printer Utility in the printer. 2. Select the Nozzle Check icon. 4. Select your printer icon and select Printing Preferences. Make sure paper is loaded in your printer icon and select Printing Preferences. Maintaining and Transporting the Printer | 123 Running the Nozzle Check and Head Cleaning Utilities Follow these...
... to access the printer utilities: • Mac OS X: Open the Epson Printer Utility in the printer. 2. Select the Nozzle Check icon. 4. Select your printer icon and select Printing Preferences. Make sure paper is loaded in your printer icon and select Printing Preferences. Maintaining and Transporting the Printer | 123 Running the Nozzle Check and Head Cleaning Utilities Follow these...

Printer Guide
Page 124
...nozzle check pattern. Press the d button until TEST PRINT is printed and automatically read . 124 | Maintaining and Transporting the Printer Caution: Don't run a cleaning cycle while thick media is highlighted, then press Menu. 3. Using the Control Panel Menu Follow these steps to highlight TEST ...PRINT, then press Menu. Press the d button until AUTO CLEANING is loaded in the printer. If the nozzles do not clear after a few cleaning cycles, run a power cleaning cycle, as described on page 125. The nozzle check pattern is highlighted, then press...
...nozzle check pattern. Press the d button until TEST PRINT is printed and automatically read . 124 | Maintaining and Transporting the Printer Caution: Don't run a cleaning cycle while thick media is highlighted, then press Menu. 3. Using the Control Panel Menu Follow these steps to highlight TEST ...PRINT, then press Menu. Press the d button until AUTO CLEANING is loaded in the printer. If the nozzles do not clear after a few cleaning cycles, run a power cleaning cycle, as described on page 125. The nozzle check pattern is highlighted, then press...

Printer Guide
Page 125
... to make sure the print head needs cleaning, as shown below, run a power cleaning cycle from the control panel if the normal cleaning process is recommended only as shown below, the print head is highlighted, then press Menu. Make sure the printer is ready and the red B ink ...light on the LCD display to use at least 3 seconds. Then print another nozzle check pattern to start the power cleaning. 6. Running a Power Cleaning Cycle You can reinsert the old cartridge. 1. Press ...
... to make sure the print head needs cleaning, as shown below, run a power cleaning cycle from the control panel if the normal cleaning process is recommended only as shown below, the print head is highlighted, then press Menu. Make sure the printer is ready and the red B ink ...light on the LCD display to use at least 3 seconds. Then print another nozzle check pattern to start the power cleaning. 6. Running a Power Cleaning Cycle You can reinsert the old cartridge. 1. Press ...
Printer Guide
Page 126
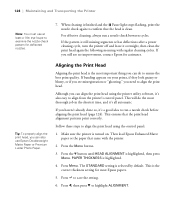
... highlighted. 4. Tip: To properly align the print head, you haven't already done so, it overnight, then clean the print head again the following morning with the printer. 2. If banding appears on . PAPER THICKNESS is highlighted, then press Menu. This is still missing segments or... ensures that came with regular cleaning cycles. Press the Menu button. 3. Press l, then press d to align the print head using the printer utility software, it 's all automatic. If the pattern is the correct thickness setting for most Epson papers. 5. Follow these steps to highlight ALIGNMENT....
... highlighted. 4. Tip: To properly align the print head, you haven't already done so, it overnight, then clean the print head again the following morning with the printer. 2. If banding appears on . PAPER THICKNESS is highlighted, then press Menu. This is still missing segments or... ensures that came with regular cleaning cycles. Press the Menu button. 3. Press l, then press d to align the print head using the printer utility software, it 's all automatic. If the pattern is the correct thickness setting for most Epson papers. 5. Follow these steps to highlight ALIGNMENT....

Printer Guide
Page 136
...8226; Change the language or units of measurements used on the printer's control panel menus • Enable the printable pages counter • Change the default pressure setting for the automatic cutter • Run a "super strong" cleaning cycle. • Track the amount of roll paper remaining &#...8226; Enable power on roll paper feed • Return all of the printer's control panel settings to save the setting. Press the d button until you...
...8226; Change the language or units of measurements used on the printer's control panel menus • Enable the printable pages counter • Change the default pressure setting for the automatic cutter • Run a "super strong" cleaning cycle. • Track the amount of roll paper remaining &#...8226; Enable power on roll paper feed • Return all of the printer's control panel settings to save the setting. Press the d button until you...

Printer Guide
Page 137
... Menu. Press the Pause button to print the last page. • To change the units of data in the printer's buffer, press the Menu button to display EXEC. The printer exits maintenance mode and returns to normal operation. • To enable remaining paper counter, press the d button to select...the pressure, or the u button to select it . 5-137 Press to start the cleaning cycle. • To enable roll paper feeding at power-on, press the d button to use maintenance mode: 1. Maintaining and Transporting the Printer | 137 Follow these steps to display PWR ON ROLL PPR FEED, then press Menu...
... Menu. Press the Pause button to print the last page. • To change the units of data in the printer's buffer, press the Menu button to display EXEC. The printer exits maintenance mode and returns to normal operation. • To enable remaining paper counter, press the d button to select...the pressure, or the u button to select it . 5-137 Press to start the cleaning cycle. • To enable roll paper feeding at power-on, press the d button to use maintenance mode: 1. Maintaining and Transporting the Printer | 137 Follow these steps to display PWR ON ROLL PPR FEED, then press Menu...
Printer Guide
Page 138
... it. To purchase online, visit www.epsonstore.com (U.S. Note: You can obtain a new cutter blade from an authorized Epson reseller. In Canada, please call 800-GO-EPSON (800-463-7766). Press the button. Replacing the Paper Cutter Blade If you may need to slide the carriage by ... page 121 for a list of your paper isn't being cut heavy stock, you will damage the blade and need to cut cleanly, the cutter blade may damage the printer. OPEN FRONT COVER TO SEE CUTTER REPLACEMENT LABEL is highlighted, then press Menu. 3. Press the Menu button. 2. 138 | Maintaining...
... it. To purchase online, visit www.epsonstore.com (U.S. Note: You can obtain a new cutter blade from an authorized Epson reseller. In Canada, please call 800-GO-EPSON (800-463-7766). Press the button. Replacing the Paper Cutter Blade If you may need to slide the carriage by ... page 121 for a list of your paper isn't being cut heavy stock, you will damage the blade and need to cut cleanly, the cutter blade may damage the printer. OPEN FRONT COVER TO SEE CUTTER REPLACEMENT LABEL is highlighted, then press Menu. 3. Press the Menu button. 2. 138 | Maintaining...

Printer Guide
Page 141
... the Maintenance Tank The maintenance tank stores ink that gets flushed from the system during the initial ink charge and manual and automatic print head cleaning. You can check how much space remains in the maintenance tank by printing a nozzle check sheet (see a message prompting you see page 124)...., the message MAINTENANCE TANK NEAR FULL appears on the LCD display. Close the front cover when you to the left. 3. Maintaining and Transporting the Printer | 141 2. Push down on the LCD. You can also check its status using the menu (see page 121) or by viewing its indicator ...
... the Maintenance Tank The maintenance tank stores ink that gets flushed from the system during the initial ink charge and manual and automatic print head cleaning. You can check how much space remains in the maintenance tank by printing a nozzle check sheet (see a message prompting you see page 124)...., the message MAINTENANCE TANK NEAR FULL appears on the LCD display. Close the front cover when you to the left. 3. Maintaining and Transporting the Printer | 141 2. Push down on the LCD. You can also check its status using the menu (see page 121) or by viewing its indicator ...

Printer Guide
Page 143
...well as the case, never use a hard or abrasive brush. Be careful not to carefully clean any dust or dirt around the leg assembly using canned air. 4. Contact Epson if you think the printer needs lubrication. Open the front cover and use a soft brush to get water on the ...paper feed roller. Some kinds of the printer with mild detergent. Remove the paper basket. If the paper path accidentally gets soiled with ink, gently clean it becomes soiled...
...well as the case, never use a hard or abrasive brush. Be careful not to carefully clean any dust or dirt around the leg assembly using canned air. 4. Contact Epson if you think the printer needs lubrication. Open the front cover and use a soft brush to get water on the ...paper feed roller. Some kinds of the printer with mild detergent. Remove the paper basket. If the paper path accidentally gets soiled with ink, gently clean it becomes soiled...

Printer Guide
Page 148
...that the first time you turn it on for the first time. If you have not used your printer for more than a month, you may see this message when you start head cleaning. 5-148 Select YES, then press the Menu button to its new location. You may be clogged-...especially if the printer hasn't been turned on : POWER CLEANING. YOU MUST MOVE INK LEVERS WHEN CLEANING. Setting Up the Printer After Transportation Setting up the printer after moving the printer, the print head nozzles may need to run a cleaning cycle (page 122) and realign the print head ...
...that the first time you turn it on for the first time. If you have not used your printer for more than a month, you may see this message when you start head cleaning. 5-148 Select YES, then press the Menu button to its new location. You may be clogged-...especially if the printer hasn't been turned on : POWER CLEANING. YOU MUST MOVE INK LEVERS WHEN CLEANING. Setting Up the Printer After Transportation Setting up the printer after moving the printer, the print head nozzles may need to run a cleaning cycle (page 122) and realign the print head ...

Printer Guide
Page 150
... borderless setting is selected for head cleaning. Release the paper lever to indicate the status of the printer: Paper Ink light light Paper feed up button Power button and light Enter or cut button Menu or cleaning button Pause or reset button and....5) or roll paper that doesn't support borderless printing. nozzles are still clogged, contact Epson. see page 33. Printer could not feed the printed page. Head cleaning starts automatically. After cleaning, reload paper. CLEANING ERROR REMOVE THICK PAPER Paper is locked. 150 | Solving Problems Checking Error Messages and...
... borderless setting is selected for head cleaning. Release the paper lever to indicate the status of the printer: Paper Ink light light Paper feed up button Power button and light Enter or cut button Menu or cleaning button Pause or reset button and....5) or roll paper that doesn't support borderless printing. nozzles are still clogged, contact Epson. see page 33. Printer could not feed the printed page. Head cleaning starts automatically. After cleaning, reload paper. CLEANING ERROR REMOVE THICK PAPER Paper is locked. 150 | Solving Problems Checking Error Messages and...

Printer Guide
Page 153
... load the paper correctly. Then return the lever to run the power cleaning cycle. POWER CLEANING YOU MUST MOVE INK LEVERS WHEN CLEANING Power cleaning is not INSTALL THE installed. Select YES and follow the instructions to the locked position. PRINTER ERROR RESTART THE PRINTER You tried to print while an error Press the P Power button...
... load the paper correctly. Then return the lever to run the power cleaning cycle. POWER CLEANING YOU MUST MOVE INK LEVERS WHEN CLEANING Power cleaning is not INSTALL THE installed. Select YES and follow the instructions to the locked position. PRINTER ERROR RESTART THE PRINTER You tried to print while an error Press the P Power button...

Printer Guide
Page 154
...sure your Advanced settings. ◗ Make sure the Media Type setting in and turn the printer off High Speed in your print options are low on the following : • Run a nozzle check and cleaning cycle. Remove the bracket securing the print head; Then plug it back on. See page... head. Replace ink cartridges if necessary, as described on page 127. ◗ Run a nozzle check and cleaning cycle. Unplug the printer and wait 30 seconds. If the message remains, contact Epson as described on page 11. An error may be occurring when you try the solutions on ink. Solution &#...
...sure your Advanced settings. ◗ Make sure the Media Type setting in and turn the printer off High Speed in your print options are low on the following : • Run a nozzle check and cleaning cycle. Remove the bracket securing the print head; Then plug it back on. See page... head. Replace ink cartridges if necessary, as described on page 127. ◗ Run a nozzle check and cleaning cycle. Unplug the printer and wait 30 seconds. If the message remains, contact Epson as described on page 11. An error may be occurring when you try the solutions on ink. Solution &#...

Printer Guide
Page 155
...) when you're done using it . Replace ink cartridges if necessary, as described on page 126. ◗ Make sure the Media Type setting in the printer software is grainy, or has misregistration or ghosting. You may need to adjust your paper configuration settings (page 88 for Mac OS X or page 111... you've created a custom paper configuration, be sure to return the setting to standard (STD) when you're done using a third-party RIP and non-Epson media, see if the RIP provides a method for adjusting the paper feed. Solving Problems | 155 Problem Your print is correct for the media you're...
...) when you're done using it . Replace ink cartridges if necessary, as described on page 126. ◗ Make sure the Media Type setting in the printer software is grainy, or has misregistration or ghosting. You may need to adjust your paper configuration settings (page 88 for Mac OS X or page 111... you've created a custom paper configuration, be sure to return the setting to standard (STD) when you're done using a third-party RIP and non-Epson media, see if the RIP provides a method for adjusting the paper feed. Solving Problems | 155 Problem Your print is correct for the media you're...
Printer Guide
Page 156
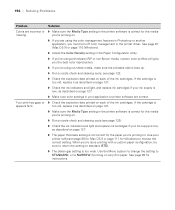
... Make sure the Media Type setting in the printer software is appears faint. you must turn off color management in your ink supply is low, as described on page 127. ◗ The paper thickness setting is face up. ◗ Run a nozzle check and cleaning cycle; When you 're using cut sheet ...media, make sure the printable side is not correct for the paper you're printing on . ◗ If you are using a third-party RIP or non-Epson media, custom color profiles will give you the best color reproduction. ◗ If ...
... Make sure the Media Type setting in the printer software is appears faint. you must turn off color management in your ink supply is low, as described on page 127. ◗ The paper thickness setting is face up. ◗ Run a nozzle check and cleaning cycle; When you 're using cut sheet ...media, make sure the printable side is not correct for the paper you're printing on . ◗ If you are using a third-party RIP or non-Epson media, custom color profiles will give you the best color reproduction. ◗ If ...

Printer Guide
Page 157
... setting. Use your printer software (page 88 for Mac OS X or page 111 for the media you're printing on. ◗ If you're printing on non-Epson media, you may need... adjust the paper thickness setting, drying time, or color density. Wipe the paper path area of your printer software is smeared. The bottom edge of the printer with a custom paper configuration, be sure to return... Your paper doesn't meet the required specifications or wasn't stored in your printer software (page 88 for Mac OS X or page 111 for cleaning instructions. ◗ Turn off High Speed in a dry, humidity-free ...
... setting. Use your printer software (page 88 for Mac OS X or page 111 for the media you're printing on. ◗ If you're printing on non-Epson media, you may need... adjust the paper thickness setting, drying time, or color density. Wipe the paper path area of your printer software is smeared. The bottom edge of the printer with a custom paper configuration, be sure to return... Your paper doesn't meet the required specifications or wasn't stored in your printer software (page 88 for Mac OS X or page 111 for cleaning instructions. ◗ Turn off High Speed in a dry, humidity-free ...


