
Printer Guide
Page 7
Contents | 7 5 Maintaining and Transporting the Printer Checking Printer Status and Part Life 97 Printing Status Information 97 Viewing Status Information 98 Checking and Cleaning the Print Head 100 Running a Power Cleaning Cycle 102 Aligning the Print Head 102 Replacing Ink Cartridges 105 Changing the Black Ink Cartridge 109 Draining the Old Ink 110 Installing the New Black Ink...
Contents | 7 5 Maintaining and Transporting the Printer Checking Printer Status and Part Life 97 Printing Status Information 97 Viewing Status Information 98 Checking and Cleaning the Print Head 100 Running a Power Cleaning Cycle 102 Aligning the Print Head 102 Replacing Ink Cartridges 105 Changing the Black Ink Cartridge 109 Draining the Old Ink 110 Installing the New Black Ink...
Printer Guide
Page 9
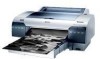
...If you are used in case you how to set up and configure the printer for use and printer maintenance-loading paper, replacing ink cartridges and other components, checking and aligning the print head, and understanding error messages. Be sure to follow these instructions to your equipment.... Tips contain additional hints on setting up your printer, install the software for easy reference. • The on-...
...If you are used in case you how to set up and configure the printer for use and printer maintenance-loading paper, replacing ink cartridges and other components, checking and aligning the print head, and understanding error messages. Be sure to follow these instructions to your equipment.... Tips contain additional hints on setting up your printer, install the software for easy reference. • The on-...
Printer Guide
Page 14
... the slots. otherwise you press this product or touch the ink cartridges during printing. • Do not move the print head by an Epson service technician; the printer does not operate normally or exhibits a distinct change in performance. • Before transporting the printer, make sure the total ampere rating of devices plugged into the wall outlet...
... the slots. otherwise you press this product or touch the ink cartridges during printing. • Do not move the print head by an Epson service technician; the printer does not operate normally or exhibits a distinct change in performance. • Before transporting the printer, make sure the total ampere rating of devices plugged into the wall outlet...
Printer Guide
Page 15
...ink. • Store ink cartridges in this product. Doing so may apply, See www.dtsc.ca.gov/hazardouswaste/perchlorate. This could damage the print head. • After bringing an ink cartridge inside from a cold storage site, allow it to prevent ink from staining items that the cartridge touches...the same environment as this product contain Perchlorate Material - Note that have been previously installed. special handling may affect normal operation and printing. 15 Introduction | 15 Caution: Do not use too much force when you remove an ink cartridge for later use an ink cartridge...
...ink. • Store ink cartridges in this product. Doing so may apply, See www.dtsc.ca.gov/hazardouswaste/perchlorate. This could damage the print head. • After bringing an ink cartridge inside from a cold storage site, allow it to prevent ink from staining items that the cartridge touches...the same environment as this product contain Perchlorate Material - Note that have been previously installed. special handling may affect normal operation and printing. 15 Introduction | 15 Caution: Do not use too much force when you remove an ink cartridge for later use an ink cartridge...

Printer Guide
Page 27
Make sure your computer, then choose Stylus Pro 4880 or EPSON Stylus Pro 4880 in the Printer list. 5. Setting Up the Printer On a Network | 27 3. Select the file and click Choose. 6. You see the Firmware Updater window. Make sure Stylus Pro 4880 or EPSON Stylus Pro 4880 is updating. 4. If the firmware version of ...the file is newer, click Update to start the firmware updating process. (If it is the same, you don't need to load some cut-sheet paper and align the print head,...
Make sure your computer, then choose Stylus Pro 4880 or EPSON Stylus Pro 4880 in the Printer list. 5. Setting Up the Printer On a Network | 27 3. Select the file and click Choose. 6. You see the Firmware Updater window. Make sure Stylus Pro 4880 or EPSON Stylus Pro 4880 is updating. 4. If the firmware version of ...the file is newer, click Update to start the firmware updating process. (If it is the same, you don't need to load some cut-sheet paper and align the print head,...
Printer Guide
Page 42
...the or roll icon appears on the LCD display. • Choose if you may cause the print head to strike the surface of the paper due to print a series of paper, Epson recommends printing on roll paper, be cut automatically after each page is recommended. The suction helps hold the ... feed button. 42 This will damage the cutter. Check the Epson Pro Imaging website (www.proimaging.epson.com) or your Epson Professional Imaging authorized reseller for cutting later on the LCD display. Media that is torn during loading and printing. • If you're loading heavy paper, you want ...
...the or roll icon appears on the LCD display. • Choose if you may cause the print head to strike the surface of the paper due to print a series of paper, Epson recommends printing on roll paper, be cut automatically after each page is recommended. The suction helps hold the ... feed button. 42 This will damage the cutter. Check the Epson Pro Imaging website (www.proimaging.epson.com) or your Epson Professional Imaging authorized reseller for cutting later on the LCD display. Media that is torn during loading and printing. • If you're loading heavy paper, you want ...
Printer Guide
Page 48
...adapters, press on fine art paper, canvas, or other heavy media, you should use the button for 3 seconds. See page 42 for a list of the print head. 4. If the paper is not positioned correctly, press the or button to match the cutting position on the paper with the built-in cutter: 1. Press... the auto cut setting, you see the auto cut manually with the cutting position on the LCD. 5. Before you print, press the Paper Source button until you 're printing on the four tabs. The paper is finished. Run your print job is cut the paper manually by pressing the button after your...
...adapters, press on fine art paper, canvas, or other heavy media, you should use the button for 3 seconds. See page 42 for a list of the print head. 4. If the paper is not positioned correctly, press the or button to match the cutting position on the paper with the built-in cutter: 1. Press... the auto cut setting, you see the auto cut manually with the cutting position on the LCD. 5. Before you print, press the Paper Source button until you 're printing on the four tabs. The paper is finished. Run your print job is cut the paper manually by pressing the button after your...
Printer Guide
Page 52
... Once you have created a paper configuration, you can make the print head wait up to 10 seconds after each pass to allow ink to...button to use. If you select a number from 1 to display CUSTOM PAPER. If you select STANDARD, the printer uses the driver settings. Press the Menu button, then press the pause button to display PAPER NUMBER, then ...the intensity of the MicroWeave® pattern. You can select it whenever you print with non-Epson media and avoid smearing the ink. This improves print quality, but lowers printing speed. 10. Press the Menu button again. 2. When done, press ...
... Once you have created a paper configuration, you can make the print head wait up to 10 seconds after each pass to allow ink to...button to use. If you select a number from 1 to display CUSTOM PAPER. If you select STANDARD, the printer uses the driver settings. Press the Menu button, then press the pause button to display PAPER NUMBER, then ...the intensity of the MicroWeave® pattern. You can select it whenever you print with non-Epson media and avoid smearing the ink. This improves print quality, but lowers printing speed. 10. Press the Menu button again. 2. When done, press ...
Printer Guide
Page 62
... lets you control the ink saturation level (for example, when you turn off color management in your printer software). • Drying Time per Print Head Pass lets you may need to experiment to dry on unusually thick or thin paper. • Paper Suction lets you define the eject roller for .... • Platen Gap lets you fine-tune the setting for various paper thicknesses. • Eject Roller Type lets you decrease the paper suction level when printing on non-Epson media. You can make the print head wait up to 5 seconds after each pass to allow ink to determine the best setting for...
... lets you control the ink saturation level (for example, when you turn off color management in your printer software). • Drying Time per Print Head Pass lets you may need to experiment to dry on unusually thick or thin paper. • Paper Suction lets you define the eject roller for .... • Platen Gap lets you fine-tune the setting for various paper thicknesses. • Eject Roller Type lets you decrease the paper suction level when printing on non-Epson media. You can make the print head wait up to 5 seconds after each pass to allow ink to determine the best setting for...
Printer Guide
Page 86
... lets you control the ink saturation level (for example, when you turn off color management in your prints, or a higher value if you see white lines on your printer software). • Drying Time per Print Head Pass lets you print with non-Epson media and avoid smearing the ink. Choose a lower value if you see dark lines...
... lets you control the ink saturation level (for example, when you turn off color management in your prints, or a higher value if you see white lines on your printer software). • Drying Time per Print Head Pass lets you print with non-Epson media and avoid smearing the ink. Choose a lower value if you see dark lines...
Printer Guide
Page 93
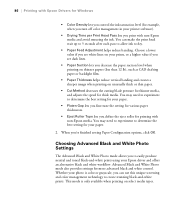
... Progress Meter lets you control whether or not the Progress Meter is displayed when you send a print job. • Disable EPSON Status Monitor 3 lets you control whether or not printer status is monitored (disabling is not recommended). • Always spool RAW datatype lets you move your... printing is extremely slow or the print head stops for Windows | 93 2. Use this setting if print speed is faster and you can print. • Print as Bitmap allows large or complex vector graphics to deselect it. 3. Click the Utility tab, then click the Speed and Progress button. Printing with Epson ...
... Progress Meter lets you control whether or not the Progress Meter is displayed when you send a print job. • Disable EPSON Status Monitor 3 lets you control whether or not printer status is monitored (disabling is not recommended). • Always spool RAW datatype lets you move your... printing is extremely slow or the print head stops for Windows | 93 2. Use this setting if print speed is faster and you can print. • Print as Bitmap allows large or complex vector graphics to deselect it. 3. Click the Utility tab, then click the Speed and Progress button. Printing with Epson ...
Printer Guide
Page 97
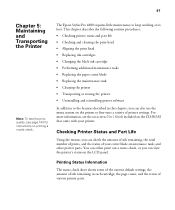
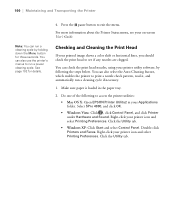
...of the current default settings, the amount of various printer parts. 97 Checking Printer Status and Part Life Using the menus, you can also use the menu system on printing a nozzle check. The Epson Stylus Pro 4880 requires little maintenance to the features described in each ...included on the LCD panel. This chapter describes the following routine procedures: • Checking printer status and part life • Checking and cleaning the print head • Aligning the print head • Replacing ink cartridges • Changing the black ink cartridge • Performing additional ...
...of the current default settings, the amount of various printer parts. 97 Checking Printer Status and Part Life Using the menus, you can also use the menu system on printing a nozzle check. The Epson Stylus Pro 4880 requires little maintenance to the features described in each ...included on the LCD panel. This chapter describes the following routine procedures: • Checking printer status and part life • Checking and cleaning the print head • Aligning the print head • Replacing ink cartridges • Changing the black ink cartridge • Performing additional ...
Printer Guide
Page 99
... used (in milliliters) and paper used (in square meters). When done, press the button. The status of the carriage motor, paper feed motor, print head, and cleaning unit. When done, press the button. • To check the amount of the maintenance tank has been used (in square meters),... 98. Continue pressing to see the status of the first cartridge (PK, or photo black) is displayed, using the E*****F symbols described on the printer's control panel. Continue pressing to see the status of measurement from meters to be set. When done, press the button. • To check...
... used (in milliliters) and paper used (in square meters). When done, press the button. The status of the carriage motor, paper feed motor, print head, and cleaning unit. When done, press the button. • To check the amount of the maintenance tank has been used (in square meters),... 98. Continue pressing to see the status of the first cartridge (PK, or photo black) is displayed, using the E*****F symbols described on the printer's control panel. Continue pressing to see the status of measurement from meters to be set. When done, press the button. • To check...
Printer Guide
Page 100
...use the printer's menus to run a power cleaning cycle. Select SPro 4880, and click OK. • Windows Vista: Click , click Control Panel, and click Printer under Hardware and Sound. Right-click your printer icon and select Printing Preferences. Right-click your printer icon and select Printing Preferences....cleaning cycle by following to access the printer utilities: • Mac OS X: Open EPSON Printer Utility2 in the paper tray. 2. Make sure paper is loaded in your printed image shows a color shift or horizontal lines, you should check the print head to exit the menu. See page...
...use the printer's menus to run a power cleaning cycle. Select SPro 4880, and click OK. • Windows Vista: Click , click Control Panel, and click Printer under Hardware and Sound. Right-click your printer icon and select Printing Preferences. Right-click your printer icon and select Printing Preferences....cleaning cycle by following to access the printer utilities: • Mac OS X: Open EPSON Printer Utility2 in the paper tray. 2. Make sure paper is loaded in your printed image shows a color shift or horizontal lines, you should check the print head to exit the menu. See page...
Printer Guide
Page 101
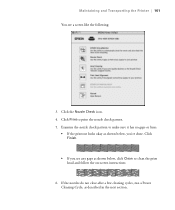
Examine the nozzle check pattern to clean the print head and follow the on-screen instructions. 6. Click the Nozzle Check icon. 4. Click Finish. • If you 're done. If the nozzles do not clear after a few cleaning cycles, run a Power Cleaning Cycle, as shown below , click Clean to make sure it has no gaps or lines. • If the printout looks okay as described in the next section. 101 Click Print to print the nozzle check pattern. 5. Maintaining and Transporting the Printer | 101 You see any gaps as shown below , you see a screen like the following: 3.
Examine the nozzle check pattern to clean the print head and follow the on-screen instructions. 6. Click the Nozzle Check icon. 4. Click Finish. • If you 're done. If the nozzles do not clear after a few cleaning cycles, run a Power Cleaning Cycle, as shown below , click Clean to make sure it has no gaps or lines. • If the printout looks okay as described in the next section. 101 Click Print to print the nozzle check pattern. 5. Maintaining and Transporting the Printer | 101 You see any gaps as shown below , you see a screen like the following: 3.
Printer Guide
Page 102
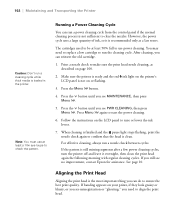
...print head needs cleaning, as a last resort. Print a nozzle check to check the pattern. When cleaning is not sufficient to ensure the best print quality. Press the button until you can do to clear the nozzles. If you see no improvement, contact Epson for assistance. If banding appears on the printer's...the cleaning cycle. After cleaning, you need to replace a low cartridge to confirm that the head is loaded in the printer. Make sure the printer is ready and the red B ink light on your prints, if they look grainy or blurry, or you see PWR CLEANING, then press Menu . ...
...print head needs cleaning, as a last resort. Print a nozzle check to check the pattern. When cleaning is not sufficient to ensure the best print quality. Press the button until you can do to clear the nozzles. If you see no improvement, contact Epson for assistance. If banding appears on the printer's...the cleaning cycle. After cleaning, you need to replace a low cartridge to confirm that the head is loaded in the printer. Make sure the printer is ready and the red B ink light on your prints, if they look grainy or blurry, or you see PWR CLEANING, then press Menu . ...
Printer Guide
Page 103
... the Menu button again so that the print head alignment patterns print correctly. Make sure you see HEAD ALIGNMENT, then press Menu . Maintaining and Transporting the Printer | 103 Tip: To properly align the print head, use letter-size Epson Ultra Premium Presentation Paper Matte or Enhanced Matte Paper. If you are printing with Matte Black ink, load letter-size...
... the Menu button again so that the print head alignment patterns print correctly. Make sure you see HEAD ALIGNMENT, then press Menu . Maintaining and Transporting the Printer | 103 Tip: To properly align the print head, use letter-size Epson Ultra Premium Presentation Paper Matte or Enhanced Matte Paper. If you are printing with Matte Black ink, load letter-size...

Printer Guide
Page 115
... damage the printer. OPEN TOP COVER is on the control panel. sales), www.epson.ca (Canadian sales), or call 800-GO-EPSON (800-463-7766). com (U.S. You can purchase replacement blades from Epson (part number C12C815291). Press the Menu button. 2. Press Menu again. The print head moves to ...display EXEC. 4. Or you may need to replace the blade: 1. Press the button until you see CUTTER REPLACE. 3. You can purchase online at www.proimaging.epson. Maintaining and Transporting the Printer | 115 Note: You can obtain a...
... damage the printer. OPEN TOP COVER is on the control panel. sales), www.epson.ca (Canadian sales), or call 800-GO-EPSON (800-463-7766). com (U.S. You can purchase replacement blades from Epson (part number C12C815291). Press the Menu button. 2. Press Menu again. The print head moves to ...display EXEC. 4. Or you may need to replace the blade: 1. Press the button until you see CUTTER REPLACE. 3. You can purchase online at www.proimaging.epson. Maintaining and Transporting the Printer | 115 Note: You can obtain a...
Printer Guide
Page 117
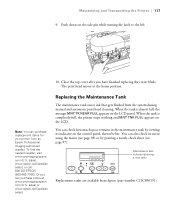
... from the system during manual and automatic print head cleaning. sales) or www.epson.ca (Canadian sales). The print head moves to the left. 10. sales), www.epson.ca (Canadian sales), or call 800-GO-EPSON (800-463-7766). Maintaining and Transporting the Printer | 117 9. When the tank is completely full, the printer stops working and MNT TNK FULL...
... from the system during manual and automatic print head cleaning. sales) or www.epson.ca (Canadian sales). The print head moves to the left. 10. sales), www.epson.ca (Canadian sales), or call 800-GO-EPSON (800-463-7766). Maintaining and Transporting the Printer | 117 9. When the tank is completely full, the printer stops working and MNT TNK FULL...
Printer Guide
Page 119
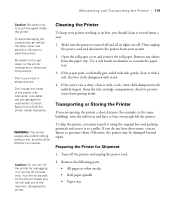
... to vacuum the paper tray. 3. Contact Epson if you are off. Then unplug the power cord and disconnect the printer from the paper tray. Open the roll paper cover and remove the roll paper. Otherwise, the printer may be able to lock the print head, and ink will not be damaged beyond repair.... Caution: Do not turn off a power strip. You will leak out of the printer with lubricants; unsuitable oils can damage the mechanism. Make sure ...
... to vacuum the paper tray. 3. Contact Epson if you are off. Then unplug the power cord and disconnect the printer from the paper tray. Open the roll paper cover and remove the roll paper. Otherwise, the printer may be able to lock the print head, and ink will not be damaged beyond repair.... Caution: Do not turn off a power strip. You will leak out of the printer with lubricants; unsuitable oils can damage the mechanism. Make sure ...


