
Printer Guide
Page 7
... Date and Time 112 Using the Maintenance Mode 113 Replacing the Paper Cutter Blade 115 Replacing the Maintenance Tank 117 Cleaning the Printer 119 Transporting or Storing the Printer 119 Preparing the Printer for Shipment 119 Setting Up the Printer After Transportation 121 Uninstalling and Reinstalling the Printer Driver 121 Macintosh 121 Windows Vista 122 Windows XP...
... Date and Time 112 Using the Maintenance Mode 113 Replacing the Paper Cutter Blade 115 Replacing the Maintenance Tank 117 Cleaning the Printer 119 Transporting or Storing the Printer 119 Preparing the Printer for Shipment 119 Setting Up the Printer After Transportation 121 Uninstalling and Reinstalling the Printer Driver 121 Macintosh 121 Windows Vista 122 Windows XP...
Printer Guide
Page 9
... for software installation instructions. • The Quick Reference Guide provides a handy summary of your printer. Cautions must be observed to avoid damage to set up your printer, selecting paper, and replacing ink cartridges. For additional information, see Chapter 1 in this Printer Guide for a USB connection, and load paper. Warnings, Cautions, Notes, and Tips These...
... for software installation instructions. • The Quick Reference Guide provides a handy summary of your printer. Cautions must be observed to avoid damage to set up your printer, selecting paper, and replacing ink cartridges. For additional information, see Chapter 1 in this Printer Guide for a USB connection, and load paper. Warnings, Cautions, Notes, and Tips These...
Printer Guide
Page 10
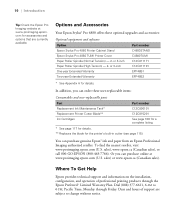
... and software Option Epson Stylus Pro 4880 Printer Cabinet Stand Epson Stylus Pro 4880 TUMI Printer Cover Paper Roller Spindle (Normal Tension) - 2- Dial (888) 377-6611, 6 AM to change without notice. 10 Days and hours of professional printing products through Friday. Options and Accessories Your Epson Stylus® Pro 4880 offers these user-replaceable items: Consumables and user-replaceable parts Part Replacement Ink Maintenance Tank* Replacement Printer Cutter Blade...
... and software Option Epson Stylus Pro 4880 Printer Cabinet Stand Epson Stylus Pro 4880 TUMI Printer Cover Paper Roller Spindle (Normal Tension) - 2- Dial (888) 377-6611, 6 AM to change without notice. 10 Days and hours of professional printing products through Friday. Options and Accessories Your Epson Stylus® Pro 4880 offers these user-replaceable items: Consumables and user-replaceable parts Part Replacement Ink Maintenance Tank* Replacement Printer Cutter Blade...

Printer Guide
Page 37
Handling Paper and Other Media | 37 9. Flip the paper guide roller down onto the stack of paper. Replace the paper tray cover and adjust its length. 11. Note: Make sure the roll paper support on the paper tray cover is not raised. 10. Extend the paper tray cover if necessary to support your printouts. 37
Handling Paper and Other Media | 37 9. Flip the paper guide roller down onto the stack of paper. Replace the paper tray cover and adjust its length. 11. Note: Make sure the roll paper support on the paper tray cover is not raised. 10. Extend the paper tray cover if necessary to support your printouts. 37
Printer Guide
Page 97
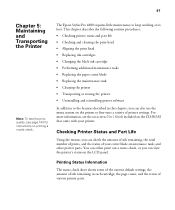
...ink cartridge • Performing additional maintenance tasks • Replacing the paper cutter blade • Replacing the maintenance tank • Cleaning the printer • Transporting or storing the printer • Uninstalling and reinstalling printer software In addition to the features described in each cartridge... on printing a nozzle check. Checking Printer Status and Part Life Using the menus, you can view the printer's status on the LCD panel. The Epson Stylus Pro 4880 requires little maintenance to fine-tune a variety of various printer parts. 97 You can either print ...
...ink cartridge • Performing additional maintenance tasks • Replacing the paper cutter blade • Replacing the maintenance tank • Cleaning the printer • Transporting or storing the printer • Uninstalling and reinstalling printer software In addition to the features described in each cartridge... on printing a nozzle check. Checking Printer Status and Part Life Using the menus, you can view the printer's status on the LCD panel. The Epson Stylus Pro 4880 requires little maintenance to fine-tune a variety of various printer parts. 97 You can either print ...
Printer Guide
Page 98
... each ink cartridge, press until you see PRINTER STATUS, then press Menu . 98 | Maintaining and Transporting the Printer Note: You can be enabled by an authorized Epson service technician. Make sure paper is a projection based on the printer's control panel. Press so you see STATUS...You see NOZZLE CHECK. 4. See page 113 for instructions. 98 You see PRINTER SETUP. 2. You see PRINTER SETUP. 3. When done, press the button. • To check the number of pages that can replace the ink cartridges, cutter blade, and maintenance tank yourself. You see PRINTABLE PG...
... each ink cartridge, press until you see PRINTER STATUS, then press Menu . 98 | Maintaining and Transporting the Printer Note: You can be enabled by an authorized Epson service technician. Make sure paper is a projection based on the printer's control panel. Press so you see STATUS...You see NOZZLE CHECK. 4. See page 113 for instructions. 98 You see PRINTER SETUP. 2. You see PRINTER SETUP. 3. When done, press the button. • To check the number of pages that can replace the ink cartridges, cutter blade, and maintenance tank yourself. You see PRINTABLE PG...
Printer Guide
Page 102
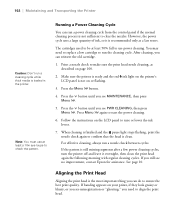
... it is loaded in the printer. If the pattern is not on or flashing. 3. If you can reinsert the old cartridge. 1. See page 10. If banding appears on your prints, if they look grainy or blurry, or you see no improvement, contact Epson for assistance. Note: You...to run the cleaning cycle. For effective cleaning, always run a nozzle check between cycles. You may need to replace a low cartridge to start the power cleaning. 6. 102 | Maintaining and Transporting the Printer Caution: Don't run a cleaning cycle while thick media is recommended only as described on page 100. 2. Running...
... it is loaded in the printer. If the pattern is not on or flashing. 3. If you can reinsert the old cartridge. 1. See page 10. If banding appears on your prints, if they look grainy or blurry, or you see no improvement, contact Epson for assistance. Note: You...to run the cleaning cycle. For effective cleaning, always run a nozzle check between cycles. You may need to replace a low cartridge to start the power cleaning. 6. 102 | Maintaining and Transporting the Printer Caution: Don't run a cleaning cycle while thick media is recommended only as described on page 100. 2. Running...

Printer Guide
Page 105
... light is flashing (and INK LOW is displayed on the LCD panel), the indicated cartridge is expended. The easiest way to 6 months. You must replace the cartridge before you start. If one of your ink levels. When the light stays on hand at all times in case you can.... Or you can wait until the ink is best to ship the printer. 105 Make sure you should check your cartridges is low, you need to replace a low ink cartridge before starting a large print job. Maintaining and Transporting the Printer | 105 Replacing Ink Cartridges Before you begin a large print job, you have...
... light is flashing (and INK LOW is displayed on the LCD panel), the indicated cartridge is expended. The easiest way to 6 months. You must replace the cartridge before you start. If one of your ink levels. When the light stays on hand at all times in case you can.... Or you can wait until the ink is best to ship the printer. 105 Make sure you should check your cartridges is low, you need to replace a low ink cartridge before starting a large print job. Maintaining and Transporting the Printer | 105 Replacing Ink Cartridges Before you begin a large print job, you have...

Printer Guide
Page 106
...prevent ink reporting errors, never replace the ink cartridges with the printer turned off. You can purchase online at www.proimaging.epson.com (U.S. sales) or www.epson.ca (Canadian sales). Before you must leave the ink compartment door open it . Note the color of other products may affect your... print quality and could result in the printer until you are ready to replace an ink cartridge: 1. Caution: Leave the expended cartridge in printer damage. sales), www.epson.ca (Canadian sales), or call 800-GO-EPSON (800-463-7766)....
...prevent ink reporting errors, never replace the ink cartridges with the printer turned off. You can purchase online at www.proimaging.epson.com (U.S. sales) or www.epson.ca (Canadian sales). Before you must leave the ink compartment door open it . Note the color of other products may affect your... print quality and could result in the printer until you are ready to replace an ink cartridge: 1. Caution: Leave the expended cartridge in printer damage. sales), www.epson.ca (Canadian sales), or call 800-GO-EPSON (800-463-7766)....

Printer Guide
Page 107
If ink gets on your hands, wash them immediately with soap and water. Remove the expended ink cartridge from its package. 107 Make sure the replacement cartridge is the correct color, and remove it from the printer. If ink gets in your first set of expended 110 ml cartridges, so you can use them for transporting the printer if necessary. 5. Make sure you save your eyes, flush them thoroughly with water. 4. Raise the ink levers to the unlocked position. WARNING: Do not shake the expended cartridge, or ink may leak out. Maintaining and Transporting the Printer | 107 3.
If ink gets on your hands, wash them immediately with soap and water. Remove the expended ink cartridge from its package. 107 Make sure the replacement cartridge is the correct color, and remove it from the printer. If ink gets in your first set of expended 110 ml cartridges, so you can use them for transporting the printer if necessary. 5. Make sure you save your eyes, flush them thoroughly with water. 4. Raise the ink levers to the unlocked position. WARNING: Do not shake the expended cartridge, or ink may leak out. Maintaining and Transporting the Printer | 107 3.

Printer Guide
Page 110
...the LCD, lower the ink lever on the left ink compartment, and then insert the new conversion cartridge(s). Changing the black ink cartridge also consumes color ink, so you begin. Draining the Old Ink 1. Press the button until you see BK INK CHANGE, and then press the Menu button. 5.... When RAISE THE RIGHT INK LEVER appears on the LCD, raise the ink lever on the LCD panel. 2. 110 | Maintaining and Transporting the Printer Note: If REPLACE CNVRSION CRTG appears, press the pause button. Press the Menu button. 3. Press the button until draining is complete. 110 When RAISE THE LEFT ...
...the LCD, lower the ink lever on the left ink compartment, and then insert the new conversion cartridge(s). Changing the black ink cartridge also consumes color ink, so you begin. Draining the Old Ink 1. Press the button until you see BK INK CHANGE, and then press the Menu button. 5.... When RAISE THE RIGHT INK LEVER appears on the LCD, raise the ink lever on the LCD panel. 2. 110 | Maintaining and Transporting the Printer Note: If REPLACE CNVRSION CRTG appears, press the pause button. Press the Menu button. 3. Press the button until draining is complete. 110 When RAISE THE LEFT ...

Printer Guide
Page 111
... levers on the LCD, ink charging is complete, RAISE THE LEFT INK LEVER appears on the left ink compartments. 5. If you may need to replace the ink cartridges and maintenance tank soon. When draining is complete. 8. When INSERT INK CRTG appears, insert the cartridges in their specified slots. 4...., remove the conversion cartridges from the slots on the LCD. When RAISE BOTH INK LEVERS appears, raise the ink lever on the LCD. 6. The printer starts charging ink. After a while, ink lever messages appear on the right and left ink compartment. 2. When a message appears on the left ink...
... levers on the LCD, ink charging is complete, RAISE THE LEFT INK LEVER appears on the left ink compartments. 5. If you may need to replace the ink cartridges and maintenance tank soon. When draining is complete. 8. When INSERT INK CRTG appears, insert the cartridges in their specified slots. 4...., remove the conversion cartridges from the slots on the LCD. When RAISE BOTH INK LEVERS appears, raise the ink lever on the LCD. 6. The printer starts charging ink. After a while, ink lever messages appear on the right and left ink compartment. 2. When a message appears on the left ink...

Printer Guide
Page 112
... you can also use the Maintenance menu to change printer defaults and run special procedures. Select SPro 4880, and click OK. 112 | Maintaining and Transporting the Printer Updating the Printer Driver Information After the replacement operation, update the driver information using the steps below. • Mac OS X: Open EPSON Printer Utility2 in your Applications folder. Click the...
... you can also use the Maintenance menu to change printer defaults and run special procedures. Select SPro 4880, and click OK. 112 | Maintaining and Transporting the Printer Updating the Printer Driver Information After the replacement operation, update the driver information using the steps below. • Mac OS X: Open EPSON Printer Utility2 in your Applications folder. Click the...

Printer Guide
Page 115
... page 98 for a list of your paper isn't being cut heavy stock, you may need to replace it. Press Menu to the cutter replacement position. Maintaining and Transporting the Printer | 115 Note: You can purchase replacement blades from Epson (part number C12C815291). If you use the blade to slide the carriage by printing the status...
... page 98 for a list of your paper isn't being cut heavy stock, you may need to replace it. Press Menu to the cutter replacement position. Maintaining and Transporting the Printer | 115 Note: You can purchase replacement blades from Epson (part number C12C815291). If you use the blade to slide the carriage by printing the status...

Printer Guide
Page 116
116 | Maintaining and Transporting the Printer 6. Be careful when removing it. 7. Release the side pin and carefully remove the cutter blade. 8. WARNING: The blade is displayed on the LCD, hold down the side pin as shown. 116 Insert the new cutter as shown and turn the latch to the right. When REPLACE CUTTER is sharp.
116 | Maintaining and Transporting the Printer 6. Be careful when removing it. 7. Release the side pin and carefully remove the cutter blade. 8. WARNING: The blade is displayed on the LCD, hold down the side pin as shown. 116 Insert the new cutter as shown and turn the latch to the right. When REPLACE CUTTER is sharp.
Printer Guide
Page 117
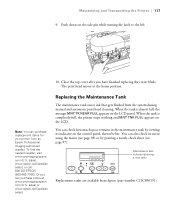
... and automatic print head cleaning. Or you have finished replacing the cutter blade. sales) or www.epson.ca (Canadian sales). You can purchase replacement items for your printer from an Epson Professional Imaging authorized reseller. Replacing the Maintenance Tank The maintenance tank stores ink that gets flushed from Epson (part number C12C890191). 117 Maintaining and Transporting the...
... and automatic print head cleaning. Or you have finished replacing the cutter blade. sales) or www.epson.ca (Canadian sales). You can purchase replacement items for your printer from an Epson Professional Imaging authorized reseller. Replacing the Maintenance Tank The maintenance tank stores ink that gets flushed from Epson (part number C12C890191). 117 Maintaining and Transporting the...

Printer Guide
Page 118
... plastic bag included with the new tank. 5. Caution: Be careful not to replace the tank: 1. Make sure the printer is not printing or performing any ink cartridges, replace them after inserting the new maintenance tank. 118 118 | Maintaining and Transporting the Printer Follow these steps to spill ink from the right ink compartment, then...
... plastic bag included with the new tank. 5. Caution: Be careful not to replace the tank: 1. Make sure the printer is not printing or performing any ink cartridges, replace them after inserting the new maintenance tank. 118 118 | Maintaining and Transporting the Printer Follow these steps to spill ink from the right ink compartment, then...

Printer Guide
Page 120
...to the right. 6. If you must be powered on when removing or installing ink cartridges. 5. To store partially used cartridges removed from the printer, tape over the needle valve hole and place each cartridge in the home (far right) position. Then lock the print head by pushing the ...in a separate, resealable plastic bag. Caution: To avoid spilling ink and damaging the printer, you saved the carriage retainer bracket, replace it and screw it back into place. (See your Start Here sheet.) 120 The printer must leave the cartridges in place, raise the ink levers, and lock the print...
...to the right. 6. If you must be powered on when removing or installing ink cartridges. 5. To store partially used cartridges removed from the printer, tape over the needle valve hole and place each cartridge in the home (far right) position. Then lock the print head by pushing the ...in a separate, resealable plastic bag. Caution: To avoid spilling ink and damaging the printer, you saved the carriage retainer bracket, replace it and screw it back into place. (See your Start Here sheet.) 120 The printer must leave the cartridges in place, raise the ink levers, and lock the print...
Printer Guide
Page 127
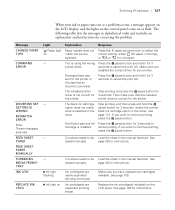
...Press the pause button and hold the option does not match pause button for 3 seconds. Make sure you have replacement cartridges available. The installed printer Stop printing, and press the pause button for driver is selected in the black ink cartridge option in alphabetical ...flashing B Ink light on Paper loaded does not match the source selected. Replace the ink cartridge(s) indicated on or flash. Solving Problems | 127 When your printer. Non-Epson genuine ink Press the pause button for 3 printer driver. Press the pause button and hold it for 3 seconds to cancel ...
...Press the pause button and hold the option does not match pause button for 3 seconds. Make sure you have replacement cartridges available. The installed printer Stop printing, and press the pause button for driver is selected in the black ink cartridge option in alphabetical ...flashing B Ink light on Paper loaded does not match the source selected. Replace the ink cartridge(s) indicated on or flash. Solving Problems | 127 When your printer. Non-Epson genuine ink Press the pause button for 3 printer driver. Press the pause button and hold it for 3 seconds to cancel ...
Printer Guide
Page 128
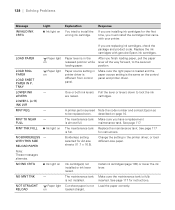
...TNK - B Ink light on the control panel and printer driver. Replace the ink cartridges with your printer. A printer part may need Note the code number and contact Epson as to the secured loading paper. See page 117. The maintenance tank Replace the maintenance tank. Install ink cartridges (page 105) or... lower the ink lever. Paper source setting in the printer driver, or load different-size paper. ...
...TNK - B Ink light on the control panel and printer driver. Replace the ink cartridges with your printer. A printer part may need Note the code number and contact Epson as to the secured loading paper. See page 117. The maintenance tank Replace the maintenance tank. Install ink cartridges (page 105) or... lower the ink lever. Paper source setting in the printer driver, or load different-size paper. ...


