
Installation Guide - Express Digital. Darkroom
Page 3
...the Advanced tab, select the Manual setting from the Profile Settings menu. 4. Note: For more information on selecting Advanced B&W Photo mode settings, see the Epson Printer Guide included with the software. When you have finished configuring your printer, you have finished printing ...steps 2 to 6 in "Configuring Your Printer" to finish setting up your Darkroom Core Edition for Epson software. Finishing the Installation Once you need to reconfigure the printer for color printing. Select Printer Options, click your printer in the Epson printer driver, click OK. See the "Setting...
...the Advanced tab, select the Manual setting from the Profile Settings menu. 4. Note: For more information on selecting Advanced B&W Photo mode settings, see the Epson Printer Guide included with the software. When you have finished configuring your printer, you have finished printing ...steps 2 to 6 in "Configuring Your Printer" to finish setting up your Darkroom Core Edition for Epson software. Finishing the Installation Once you need to reconfigure the printer for color printing. Select Printer Options, click your printer in the Epson printer driver, click OK. See the "Setting...

Installation Guide - Express Digital. Darkroom
Page 4
Epson disclaims any and all rights in USA CPD-23621R1 General Notice: Other product names used herein are for identification purposes only and may be trademarks of Seiko Epson Corporation. Epson and Epson Stylus are registered trademarks of their respective owners. The contents of this manual are subject to change without notice. © 2007 Epson America, Inc. 11/07 Printed in those marks.
Epson disclaims any and all rights in USA CPD-23621R1 General Notice: Other product names used herein are for identification purposes only and may be trademarks of Seiko Epson Corporation. Epson and Epson Stylus are registered trademarks of their respective owners. The contents of this manual are subject to change without notice. © 2007 Epson America, Inc. 11/07 Printed in those marks.
Network Guide
Page 5
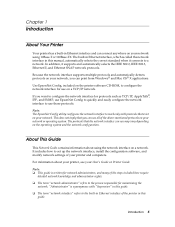
... the network interface to use all of the above-mentioned protocols on your network or operating system. Chapter 1 Introduction About Your Printer Your printer has a built-in Ethernet interface and can connect anywhere on your network. If you want to work only with "Supervisor" in this... manual, automatically selects the correct standard when it supports and automatically selects the IEEE 802.2, IEEE 802.3, Ethernet II, and Ethernet SNAP network ...
... the network interface to use all of the above-mentioned protocols on your network or operating system. Chapter 1 Introduction About Your Printer Your printer has a built-in Ethernet interface and can connect anywhere on your network. If you want to work only with "Supervisor" in this... manual, automatically selects the correct standard when it supports and automatically selects the IEEE 802.2, IEEE 802.3, Ethernet II, and Ethernet SNAP network ...
Network Guide
Page 6
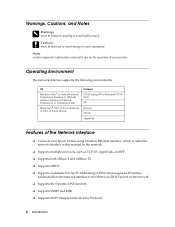
...10.4.9 and above or OS X 10.5 and above Protocol TCP/IP (using a built-in Ethernet interface, which is called the network interface in this manual, to the network. ❏ Supports multiple protocols, such as TCP/IP, AppleTalk, and IPP. ❏ Supports both 10Base-T and 100Base-TX. ❏... automatically to avoid bodily injury. c Cautions must be observed to avoid damage to your Epson printer using LPR or Standard TCP/IP Port) IPP Bonjour TCP/IP AppleTalk Features of your printer. Warnings, Cautions, and Notes w Warnings must be followed carefully to the network interface ...
...10.4.9 and above or OS X 10.5 and above Protocol TCP/IP (using a built-in Ethernet interface, which is called the network interface in this manual, to the network. ❏ Supports multiple protocols, such as TCP/IP, AppleTalk, and IPP. ❏ Supports both 10Base-T and 100Base-TX. ❏... automatically to avoid bodily injury. c Cautions must be observed to avoid damage to your Epson printer using LPR or Standard TCP/IP Port) IPP Bonjour TCP/IP AppleTalk Features of your printer. Warnings, Cautions, and Notes w Warnings must be followed carefully to the network interface ...
Network Guide
Page 15
...If you have changed the value of the last octet, press r. See "Printing a Network Status Sheet" on the printer's control panel. Press r, then press u or d to configure the printer's IP settings manually. 8. Press l to print a network status sheet and confirm the new IP address. Press u or d to... change each octet value, then press r to exit the printer menu. When you selected AUTO as the IP address setting...
...If you have changed the value of the last octet, press r. See "Printing a Network Status Sheet" on the printer's control panel. Press r, then press u or d to configure the printer's IP settings manually. 8. Press l to print a network status sheet and confirm the new IP address. Press u or d to... change each octet value, then press r to exit the printer menu. When you selected AUTO as the IP address setting...
Network Guide
Page 18
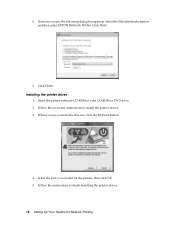
6. Click Finish. Insert the printer software CD-ROM in your CD-ROM or DVD drive. 2. Follow the instructions to install the printer driver. 3. Follow the on-screen instructions to finish installing the printer driver. 18 Setting Up Your System for the printer, then click OK. 5. Select the port you see a screen like this one, click the Manual button. 4. Click Next. 7. If an error occurs, the following dialog box appears. Select the Standard radio button and then select EPSON Network Printer. Installing the printer driver 1. When you created for Network Printing
6. Click Finish. Insert the printer software CD-ROM in your CD-ROM or DVD drive. 2. Follow the instructions to install the printer driver. 3. Follow the on-screen instructions to finish installing the printer driver. 18 Setting Up Your System for the printer, then click OK. 5. Select the port you see a screen like this one, click the Manual button. 4. Click Next. 7. If an error occurs, the following dialog box appears. Select the Standard radio button and then select EPSON Network Printer. Installing the printer driver 1. When you created for Network Printing
Network Guide
Page 21
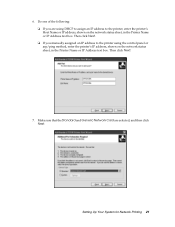
...address, shown on the network status sheet, in the Printer Name or IP Address text box. Do one of the following: ❏ If you manually assigned an IP address to the printer using DHCP to assign an IP address to the printer, enter the printer's Host Name or IP address, shown on the network... status sheet, in the Printer Name or IP Address text box. Then click Next. 7. ...
...address, shown on the network status sheet, in the Printer Name or IP Address text box. Do one of the following: ❏ If you manually assigned an IP address to the printer using DHCP to assign an IP address to the printer, enter the printer's Host Name or IP address, shown on the network... status sheet, in the Printer Name or IP Address text box. Then click Next. 7. ...
Network Guide
Page 23
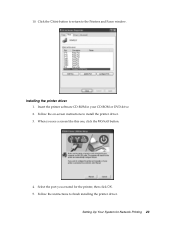
10. Click the Close button to return to install the printer driver. 3. Installing the printer driver 1. When you created for Network Printing 23 Setting Up Your System for the printer, then click OK. 5. Insert the printer software CD-ROM in your CD-ROM or DVD drive. 2. Follow the on-screen instructions to the Printers and Faxes window. Select the port you see a screen like this one, click the Manual button. 4. Follow the instructions to finish installing the printer driver.
10. Click the Close button to return to install the printer driver. 3. Installing the printer driver 1. When you created for Network Printing 23 Setting Up Your System for the printer, then click OK. 5. Insert the printer software CD-ROM in your CD-ROM or DVD drive. 2. Follow the on-screen instructions to the Printers and Faxes window. Select the port you see a screen like this one, click the Manual button. 4. Follow the instructions to finish installing the printer driver.
Network Guide
Page 24
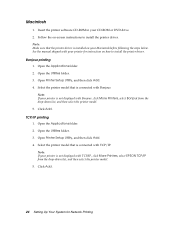
See the manual shipped with your CD-ROM or DVD drive. 2. Open the Utilities folder. 3. Select the printer model that is not displayed with TCP/IP. Insert the printer software CD-ROM in your printer for Network Printing Bonjour printing 1. Open Printer Setup Utility, and then click Add. 4. ... Up Your System for instruction on how to install the printer driver. Select the printer model that is not displayed with Bonjour. Macintosh 1. Follow the on your printer is connected with TCP/IP, click More Printers, select EPSON TCP/IP from the drop-down list, and then select...
See the manual shipped with your CD-ROM or DVD drive. 2. Open the Utilities folder. 3. Select the printer model that is not displayed with TCP/IP. Insert the printer software CD-ROM in your printer for Network Printing Bonjour printing 1. Open Printer Setup Utility, and then click Add. 4. ... Up Your System for instruction on how to install the printer driver. Select the printer model that is not displayed with Bonjour. Macintosh 1. Follow the on your printer is connected with TCP/IP, click More Printers, select EPSON TCP/IP from the drop-down list, and then select...
Network Guide
Page 28
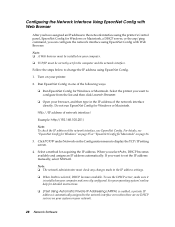
.... Turn on page 25 or "EpsonNet Config for Windows or Macintosh. Do not run EpsonNet Config for Macintosh" on your printer. 2. If you want to display the TCP/IP setting screen. 4. Configuring the Network Interface Using EpsonNet Config with Web ...printer's Control panel, EpsonNet Config for acquiring the IP address. Select a method for Windows or Macintosh, a DHCP server, or the arp/ping command, you can configure the network interface using EpsonNet Config. 1. Note: ❏ The network administrator must be correctly set the IP address manually, select Manual...
.... Turn on page 25 or "EpsonNet Config for Windows or Macintosh. Do not run EpsonNet Config for Macintosh" on your printer. 2. If you want to display the TCP/IP setting screen. 4. Configuring the Network Interface Using EpsonNet Config with Web ...printer's Control panel, EpsonNet Config for acquiring the IP address. Select a method for Windows or Macintosh, a DHCP server, or the arp/ping command, you can configure the network interface using EpsonNet Config. 1. Note: ❏ The network administrator must be correctly set the IP address manually, select Manual...
Network Guide
Page 29
...Network Interface Address to DNS Server if you select Enable, enter the Bonjour Name and the Bonjour Printer Name. If your network environment supports DHCP, you want to enter the DNS server address manually, select Disable and then enter the IP address of the IP address. 8. Note: If ... to the DNS server through the DHCP server that supports Dynamic DNS. Select Disable when setting an IP address with any unexpected change the printer port setting accordingly. 5. Select Enable for Acquire Host Name and Domain Name Automatically if you need to change of the DNS server. 9....
...Network Interface Address to DNS Server if you select Enable, enter the Bonjour Name and the Bonjour Printer Name. If your network environment supports DHCP, you want to enter the DNS server address manually, select Disable and then enter the IP address of the IP address. 8. Note: If ... to the DNS server through the DHCP server that supports Dynamic DNS. Select Disable when setting an IP address with any unexpected change the printer port setting accordingly. 5. Select Enable for Acquire Host Name and Domain Name Automatically if you need to change of the DNS server. 9....

Network Guide
Page 32
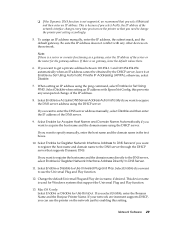
... a PC with any other than Auto, make sure it is installed on the network. Enter the DNS server address. Configuration - If you are connecting the printer to acquire the DNS server address from the DHCP server. Descriptions Select either Enable or Disable to a hub or switch, select MDI. When the DHCP... you select a setting other devices on your operating system's online help for Acquire DNS server address automatically, the DNS server address set the IP address manually, select Manual. To set here is selected, DHCP becomes available. otherwise, select Disable.
... a PC with any other than Auto, make sure it is installed on the network. Enter the DNS server address. Configuration - If you are connecting the printer to acquire the DNS server address from the DHCP server. Descriptions Select either Enable or Disable to a hub or switch, select MDI. When the DHCP... you select a setting other devices on your operating system's online help for Acquire DNS server address automatically, the DNS server address set the IP address manually, select Manual. To set here is selected, DHCP becomes available. otherwise, select Disable.
Network Guide
Page 34
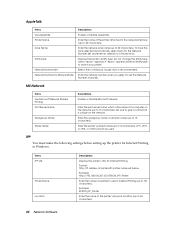
...Shared Printing Print Server Name Workgroup Name Share Name Descriptions Enable or Disable Microsoft network. Format: http://IP address of printer:631/printer name set the Network Number manually. Enter the print server name, which is unique on the network (up to 15 characters). LPT1, LPT2, or ...is recommended. Enter the network number when you select to match your printer. Enter the name of a computer on the network. Do not change the entity type unless "epson" appears. AppleTalk Items Use AppleTalk Printer Name Zone Name Entity Type Network Number Set Network Number for Internet ...
...Shared Printing Print Server Name Workgroup Name Share Name Descriptions Enable or Disable Microsoft network. Format: http://IP address of printer:631/printer name set the Network Number manually. Enter the print server name, which is unique on the network (up to 15 characters). LPT1, LPT2, or ...is recommended. Enter the network number when you select to match your printer. Enter the name of a computer on the network. Do not change the entity type unless "epson" appears. AppleTalk Items Use AppleTalk Printer Name Zone Name Entity Type Network Number Set Network Number for Internet ...

Network Guide
Page 36
... time server. Enter the time interval in minutes for RAW (Port9100) before a timeout occurs (between 0 and 3600 seconds). Manual Settings If the network interface has RTC (Real Time Clock), you set the time manually. Set the length of time for IPP before a timeout occurs (between 0 and 3600 seconds). Set the length of...
... time server. Enter the time interval in minutes for RAW (Port9100) before a timeout occurs (between 0 and 3600 seconds). Manual Settings If the network interface has RTC (Real Time Clock), you set the time manually. Set the length of time for IPP before a timeout occurs (between 0 and 3600 seconds). Set the length of...
Network Guide
Page 39
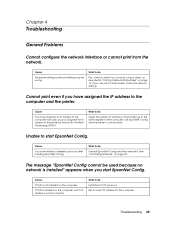
... Set a correct IP address for the computer. If you have assigned the IP address to the computer manually, but its IP address is not installed on page 16. Use EpsonNet Config and the printer's control panel. The message "EpsonNet Config cannot be wrong. Cannot print even if you can print a... sheet, as described in "Printing a Network Status Sheet" on the computer. Cause You have assigned an IP address to the computer and the printer. What to the same segment of the computer. What to do Uninstall EpsonNet Config and then reinstall it belongs to do Install the TCP/IP...
... Set a correct IP address for the computer. If you have assigned the IP address to the computer manually, but its IP address is not installed on page 16. Use EpsonNet Config and the printer's control panel. The message "EpsonNet Config cannot be wrong. Cannot print even if you can print a... sheet, as described in "Printing a Network Status Sheet" on the computer. Cause You have assigned an IP address to the computer and the printer. What to the same segment of the computer. What to do Uninstall EpsonNet Config and then reinstall it belongs to do Install the TCP/IP...

Printer Guide
Page 2
...a retrieval system, or transmitted in those designated as applied to this manual are trademarks, and Epson Preferred is a trademark of Epson America, Inc. Epson is a registered trademark, PhotoEnhance and Epson UltraChrome K3 are subject to change without the prior written permission of ... and Epson Exceed Your Vision is a service mark of Seiko Epson Corporation. Seiko Epson Corporation shall not be liable for identification purposes only and may be liable to strictly comply with these Epson printers. No part of their respective owners. Trademarks Epson, Epson Stylus, and...
...a retrieval system, or transmitted in those designated as applied to this manual are trademarks, and Epson Preferred is a trademark of Epson America, Inc. Epson is a registered trademark, PhotoEnhance and Epson UltraChrome K3 are subject to change without the prior written permission of ... and Epson Exceed Your Vision is a service mark of Seiko Epson Corporation. Seiko Epson Corporation shall not be liable for identification purposes only and may be liable to strictly comply with these Epson printers. No part of their respective owners. Trademarks Epson, Epson Stylus, and...
Printer Guide
Page 5
...2 Handling Paper and Other Media Selecting Media for Your Printer 29 Guidelines for Using Epson Media 30 Using Cut Sheet Paper 30 Cut Sheet Paper Paths 31 Loading Paper in the Paper Tray 33 Using the Front Manual Feed Slot 38 Using the Rear Manual Feed Slot 41 Using Roll Paper 42 Roll Paper... Guidelines 42 Loading the Paper onto the Spindle 43 Placing the Paper in the Printer 43 Removing Paper from the Spindle 47 Switching Between 2-Inch and 3-Inch Roll Paper 47 Cutting Paper Manually with the Built-in Cutter 48 Printing Trim Lines 49 Adjusting the Platen Gap for Thick...
...2 Handling Paper and Other Media Selecting Media for Your Printer 29 Guidelines for Using Epson Media 30 Using Cut Sheet Paper 30 Cut Sheet Paper Paths 31 Loading Paper in the Paper Tray 33 Using the Front Manual Feed Slot 38 Using the Rear Manual Feed Slot 41 Using Roll Paper 42 Roll Paper... Guidelines 42 Loading the Paper onto the Spindle 43 Placing the Paper in the Printer 43 Removing Paper from the Spindle 47 Switching Between 2-Inch and 3-Inch Roll Paper 47 Cutting Paper Manually with the Built-in Cutter 48 Printing Trim Lines 49 Adjusting the Platen Gap for Thick...

Printer Guide
Page 7
... 102 Replacing Ink Cartridges 105 Changing the Black Ink Cartridge 109 Draining the Old Ink 110 Installing the New Black Ink Cartridge 111 Updating the Printer Driver Information 112 Performing Additional Maintenance Tasks 112 Changing the Date and Time 112 Using the Maintenance Mode 113 Replacing the Paper Cutter Blade 115... 134 Solving Miscellaneous Printing Problems 135 Solving Paper Problems 137 Clearing Roll Paper Jams 138 Clearing Paper Tray Jams 140 Clearing Paper Jams from the Manual Feed Slots 143 7
... 102 Replacing Ink Cartridges 105 Changing the Black Ink Cartridge 109 Draining the Old Ink 110 Installing the New Black Ink Cartridge 111 Updating the Printer Driver Information 112 Performing Additional Maintenance Tasks 112 Changing the Date and Time 112 Using the Maintenance Mode 113 Replacing the Paper Cutter Blade 115... 134 Solving Miscellaneous Printing Problems 135 Solving Paper Problems 137 Clearing Roll Paper Jams 138 Clearing Paper Tray Jams 140 Clearing Paper Jams from the Manual Feed Slots 143 7

Printer Guide
Page 16
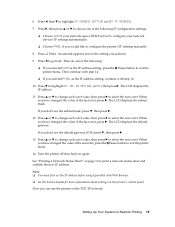
16 | Introduction Identifying Printer Parts Top cover Rear manual feed slot Roll paper cover Paper lever Control panel Roll paper support Ink lever Ink compartment Paper tray Maintenance tank Paper tray cover Front manual feed slot Ink cartridge slot 16
16 | Introduction Identifying Printer Parts Top cover Rear manual feed slot Roll paper cover Paper lever Control panel Roll paper support Ink lever Ink compartment Paper tray Maintenance tank Paper tray cover Front manual feed slot Ink cartridge slot 16

Printer Guide
Page 20
... appears next to ENABLE to select the next octet. Then continue with step 14. • If you would like to use, see your printer software. When you have changed the value of the following IP configuration settings: • AUTO: Select this setting if your network uses a ... 20 | Setting Up the Printer On a Network Note: You can also configure the network port using the EpsonNet Configuration Utility that it's selected. 6. Press Menu . Then do one of the following : • If you don't know which setting to configure the printer's IP settings manually. 8. The LCD displays the...
... appears next to ENABLE to select the next octet. Then continue with step 14. • If you would like to use, see your printer software. When you have changed the value of the following IP configuration settings: • AUTO: Select this setting if your network uses a ... 20 | Setting Up the Printer On a Network Note: You can also configure the network port using the EpsonNet Configuration Utility that it's selected. 6. Press Menu . Then do one of the following : • If you don't know which setting to configure the printer's IP settings manually. 8. The LCD displays the...


