Printer Guide
Page 6
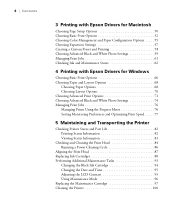
... the Progress Meter 76 Setting Monitoring Preferences and Optimizing Print Speed . . . . . 77 5 Maintaining and Transporting the Printer Checking Printer Status and Part Life 82 Printing Status Information 82 Viewing Status Information 83 Checking and Cleaning the Print Head 84 Running a Power Cleaning Cycle 86 Aligning the Print Head 87 Replacing Ink Cartridges 88 Performing Additional Maintenance Tasks 93...
... the Progress Meter 76 Setting Monitoring Preferences and Optimizing Print Speed . . . . . 77 5 Maintaining and Transporting the Printer Checking Printer Status and Part Life 82 Printing Status Information 82 Viewing Status Information 83 Checking and Cleaning the Print Head 84 Running a Power Cleaning Cycle 86 Aligning the Print Head 87 Replacing Ink Cartridges 88 Performing Additional Maintenance Tasks 93...
Printer Guide
Page 13
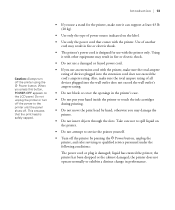
..., POWER OFF appears on the label. • Use only the power cord that the print head is safely capped. • If you use a stand for use an extension cord with the printer, make sure the total ampere rating of all devices plugged into the extension cord does not...you use with the printer. the printer does not operate normally or exhibits a distinct change in the printer's case. • Do not put your hand inside the printer or touch the ink cartridges during printing. • Do not move the print head by pressing the P Power button, unplug the printer, and refer servicing to...
..., POWER OFF appears on the label. • Use only the power cord that the print head is safely capped. • If you use a stand for use an extension cord with the printer, make sure the total ampere rating of all devices plugged into the extension cord does not...you use with the printer. the printer does not operate normally or exhibits a distinct change in the printer's case. • Do not put your hand inside the printer or touch the ink cartridges during printing. • Do not move the print head by pressing the P Power button, unplug the printer, and refer servicing to...

Printer Guide
Page 14
... ink cartridge retains a variety of cartridge information, which allows you remove an ink cartridge for later use an ink cartridge beyond the date printed on the side of installation for best results. • Do not dismantle the ink cartridges or try to refill them. 14 | Introduction...six months of the ink cartridge. This could damage the print head. • After bringing an ink cartridge inside from dirt and dust, and store it freely. However, each time the cartridge is inserted, some ink is consumed because the printer automatically performs a reliability check. • If you ...
... ink cartridge retains a variety of cartridge information, which allows you remove an ink cartridge for later use an ink cartridge beyond the date printed on the side of installation for best results. • Do not dismantle the ink cartridges or try to refill them. 14 | Introduction...six months of the ink cartridge. This could damage the print head. • After bringing an ink cartridge inside from dirt and dust, and store it freely. However, each time the cartridge is inserted, some ink is consumed because the printer automatically performs a reliability check. • If you ...
Printer Guide
Page 47
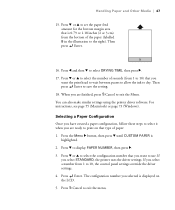
...d or u to select the configuration number that you want the print head to wait between passes to allow the ink to exit the Menu. The configuration number you are ready to the right). You can also make similar settings using the printer driver software. Press the Menu r button, then press d until... CUSTOM PAPER is 0.79 or 1.18 inches (2 or 3 cm) from the bottom of the paper (labelled B in the illustration to print on the LCD. 5. Press d to exit the menu....
...d or u to select the configuration number that you want the print head to wait between passes to allow the ink to exit the Menu. The configuration number you are ready to the right). You can also make similar settings using the printer driver software. Press the Menu r button, then press d until... CUSTOM PAPER is 0.79 or 1.18 inches (2 or 3 cm) from the bottom of the paper (labelled B in the illustration to print on the LCD. 5. Press d to exit the menu....
Printer Guide
Page 56
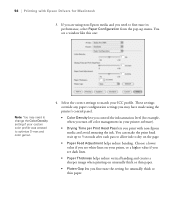
... or thin paper. 3-56 56 | Printing with non-Epson media and avoid smearing the ink. You see a window like this one: Note: You may have made using non-Epson media and you need to dry on your printer software). • Drying Time per Print Head Pass lets you fine-tune the setting... for Macintosh 3. If you are using the printer's control panel. • Color Density lets you control the ink saturation level (...
... or thin paper. 3-56 56 | Printing with non-Epson media and avoid smearing the ink. You see a window like this one: Note: You may have made using non-Epson media and you need to dry on your printer software). • Drying Time per Print Head Pass lets you fine-tune the setting... for Macintosh 3. If you are using the printer's control panel. • Color Density lets you control the ink saturation level (...

Printer Guide
Page 73
... lines on the page. • Paper Feed Adjustment helps reduce banding. Note: You may have your advanced settings available for example, when you turn off color management in your printer software). • Drying Time per Print Head Pass lets you print with Epson Drivers for the group of custom settings. 10.
... lines on the page. • Paper Feed Adjustment helps reduce banding. Note: You may have your advanced settings available for example, when you turn off color management in your printer software). • Drying Time per Print Head Pass lets you print with Epson Drivers for the group of custom settings. 10.
Printer Guide
Page 78
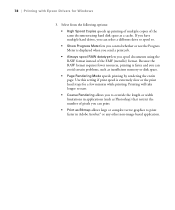
... or the print head stops for Windows 3. Printing will take longer to start. • Coarse Rendering allows you to override the length or width limitations in Adobe Acrobat® or any other non-image based application. 4-78 Because the RAW format requires fewer resources, printing is displayed when you send a print job. •...format instead of the same document using hard disk space as a cache. Select from the following options: • High Speed Copies speeds up printing of multiple copies of the EMF (metafile) format. 78 | Printing with Epson Drivers for a few minutes while...
... or the print head stops for Windows 3. Printing will take longer to start. • Coarse Rendering allows you to override the length or width limitations in Adobe Acrobat® or any other non-image based application. 4-78 Because the RAW format requires fewer resources, printing is displayed when you send a print job. •...format instead of the same document using hard disk space as a cache. Select from the following options: • High Speed Copies speeds up printing of multiple copies of the EMF (metafile) format. 78 | Printing with Epson Drivers for a few minutes while...
Printer Guide
Page 81
...describes the following routine procedures: • Checking printer status and part life • Checking and cleaning the print head • Aligning the print head • Replacing ink cartridges • Performing additional...printer • Uninstalling and reinstalling printer software • Updating the printer firmware In addition to the features described in this chapter, you can also use the printer's menu system to keep working at its best. For more information, see the on-screen User's Guide. 81 81 Chapter 5: Maintaining and Transporting the Printer The Epson Stylus Pro 3800...
...describes the following routine procedures: • Checking printer status and part life • Checking and cleaning the print head • Aligning the print head • Replacing ink cartridges • Performing additional...printer • Uninstalling and reinstalling printer software • Updating the printer firmware In addition to the features described in this chapter, you can also use the printer's menu system to keep working at its best. For more information, see the on-screen User's Guide. 81 81 Chapter 5: Maintaining and Transporting the Printer The Epson Stylus Pro 3800...
Printer Guide
Page 84
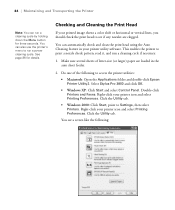
...loaded in your printer icon and select Printing Preferences. Double-click Printers and Faxes. Select Stylus Pro 3800 and click OK. • Windows XP: Click Start and select Control Panel. Right-click your printer utility software. Click...printer's menu to run a cleaning cycle by holding down the Menu button for details. See page 86 for three seconds. Right-click your printed image shows a color shift or horizontal or vertical lines, you should check the print head to access the printer utilities: • Macintosh: Open the Applications folder and double-click Epson Printer...
...loaded in your printer icon and select Printing Preferences. Double-click Printers and Faxes. Select Stylus Pro 3800 and click OK. • Windows XP: Click Start and select Control Panel. Right-click your printer utility software. Click...printer's menu to run a cleaning cycle by holding down the Menu button for details. See page 86 for three seconds. Right-click your printed image shows a color shift or horizontal or vertical lines, you should check the print head to access the printer utilities: • Macintosh: Open the Applications folder and double-click Epson Printer...

Printer Guide
Page 85
...any gaps as shown below , you want to be cleaned. Or click Auto if you 're done. Click Finish. • If you see if the print head needs to run a Power Cleaning Cycle, as shown below , click Clean to make sure it has no gaps or lines. • If the printout ...section. 5-85 If the nozzles do not clear after a few cleaning cycles, run the nozzle check and have the printer automatically clean the print head if necessary. Examine the nozzle check pattern to clean the print head and follow the on-screen instructions. 6. Note: You must use at least a 10× eye loupe to check...
...any gaps as shown below , you want to be cleaned. Or click Auto if you 're done. Click Finish. • If you see if the print head needs to run a Power Cleaning Cycle, as shown below , click Clean to make sure it has no gaps or lines. • If the printout ...section. 5-85 If the nozzles do not clear after a few cleaning cycles, run the nozzle check and have the printer automatically clean the print head if necessary. Examine the nozzle check pattern to clean the print head and follow the on-screen instructions. 6. Note: You must use at least a 10× eye loupe to check...

Printer Guide
Page 86
... make sure the print head needs cleaning, as a last resort. Then clean the print head again the following morning with regular cleaning cycles. Running a Power Cleaning Cycle You can reinsert the old cartridge. 1. After cleaning, you still see no improvement, contact Epson for assistance. 5-...it sit overnight. Press d until MAINTENANCE is recommended only as described on or flashing. 3. Print a nozzle check to start the power cleaning. 7. 86 | Maintaining and Transporting the Printer Caution: Don't run the cleaning cycle. The cartridges need to replace a low cartridge to ...
... make sure the print head needs cleaning, as a last resort. Then clean the print head again the following morning with regular cleaning cycles. Running a Power Cleaning Cycle You can reinsert the old cartridge. 1. After cleaning, you still see no improvement, contact Epson for assistance. 5-...it sit overnight. Press d until MAINTENANCE is recommended only as described on or flashing. 3. Print a nozzle check to start the power cleaning. 7. 86 | Maintaining and Transporting the Printer Caution: Don't run the cleaning cycle. The cartridges need to replace a low cartridge to ...
Printer Guide
Page 87
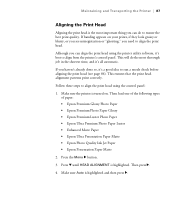
... panel. Maintaining and Transporting the Printer | 87 Aligning the Print Head Aligning the print head is turned on your prints, if they look grainy or blurry, or you need to align the print head. Although you can align the print head using the control panel: 1. Then load one of the following types of paper: • Epson Premium Glossy Photo Paper •...
... panel. Maintaining and Transporting the Printer | 87 Aligning the Print Head Aligning the print head is turned on your prints, if they look grainy or blurry, or you need to align the print head. Although you can align the print head using the control panel: 1. Then load one of the following types of paper: • Epson Premium Glossy Photo Paper •...

Printer Guide
Page 88
...If one of your on-screen User's Guide for instructions. See your cartridges is best to check ink levels is complete, the printer starts aligning the print head. It takes several minutes to start . If you want to verify or fine-tune the alignment process, you can wait until... the ink cartridge needs to select the type of print quality. Or you can replace it before starting a large print job. However, it is low, you can perform a manual head alignment. GLOSSY/LUSTER, P Q INK JET PAPER (Epson Presentation Paper Matte), or ENHANCED MATTE PAPER (Ultra Premium Presentation ...
...If one of your on-screen User's Guide for instructions. See your cartridges is best to check ink levels is complete, the printer starts aligning the print head. It takes several minutes to start . If you want to verify or fine-tune the alignment process, you can wait until... the ink cartridge needs to select the type of print quality. Or you can replace it before starting a large print job. However, it is low, you can perform a manual head alignment. GLOSSY/LUSTER, P Q INK JET PAPER (Epson Presentation Paper Matte), or ENHANCED MATTE PAPER (Ultra Premium Presentation ...

Printer Guide
Page 97
... FULL appears on the LCD. sales) or www.epson.ca (Canadian sales). Or you can purchase replacement items for your printer from an authorized Epson reseller. Maintenance cartridge indicator (showing a new cartridge) Replacement cartridges are available from the system during print head cleaning. Maintaining and Transporting the Printer | 97 Replacing the Maintenance Cartridge The maintenance cartridge...
... FULL appears on the LCD. sales) or www.epson.ca (Canadian sales). Or you can purchase replacement items for your printer from an authorized Epson reseller. Maintenance cartridge indicator (showing a new cartridge) Replacement cartridges are available from the system during print head cleaning. Maintaining and Transporting the Printer | 97 Replacing the Maintenance Cartridge The maintenance cartridge...

Printer Guide
Page 101
... need to run a cleaning cycle (see page 84) and realign the print head (see page 87) to setting it using the original box and packing materials. To ship the printer, you do not have these items, contact Epson to request them . Turn the printer on for example, in the home (far right) position. Unplug the...
... need to run a cleaning cycle (see page 84) and realign the print head (see page 87) to setting it using the original box and packing materials. To ship the printer, you do not have these items, contact Epson to request them . Turn the printer on for example, in the home (far right) position. Unplug the...
Printer Guide
Page 109
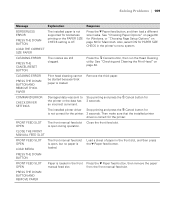
...system. The installed printer driver Stop printing and press the + Cancel button for is not supported for Macintosh. is open , but no paper is loaded in the front slot, and then press the d Paper feed button. Press the + Cancel button, then run the Head Cleaning utility. ...Problems | 109 Message Explanation Response BORDERLESS ERROR PRESS THE DOWN BUTTON. Also, select ON for the printer. 3 seconds. See "Checking and Cleaning the Print Head" on page 50 for borderless printing or the PAPER SIZE CHECK setting is loaded. CLEANING ERROR PRESS THE DOWN BUTTON AND REMOVE THICK ...
...system. The installed printer driver Stop printing and press the + Cancel button for is not supported for Macintosh. is open , but no paper is loaded in the front slot, and then press the d Paper feed button. Press the + Cancel button, then run the Head Cleaning utility. ...Problems | 109 Message Explanation Response BORDERLESS ERROR PRESS THE DOWN BUTTON. Also, select ON for the printer. 3 seconds. See "Checking and Cleaning the Print Head" on page 50 for borderless printing or the PAPER SIZE CHECK setting is loaded. CLEANING ERROR PRESS THE DOWN BUTTON AND REMOVE THICK ...

Printer Guide
Page 112
...correctly. See "Aligning the Print Head" on page 87 for details. Press the + Cancel button, and then load the paper that has just been ejected, and then press the d Paper feed button. The printer cannot detect the loaded media because the color of genuine Epson paper. PAPER REMOVE REMOVE PAPER... FROM THE REAR You need to remove the Remove the paper from the rear manual feed slot. LOAD PAPER CORRECTLY The printer cannot detect the loaded media ...
...correctly. See "Aligning the Print Head" on page 87 for details. Press the + Cancel button, and then load the paper that has just been ejected, and then press the d Paper feed button. The printer cannot detect the loaded media because the color of genuine Epson paper. PAPER REMOVE REMOVE PAPER... FROM THE REAR You need to remove the Remove the paper from the rear manual feed slot. LOAD PAPER CORRECTLY The printer cannot detect the loaded media ...
Printer Guide
Page 114
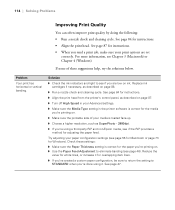
...if you 're done using a third-party RIP and non-Epson media, see page 46). Check these suggestions help, try the solutions below. If none of your media is correct for instructions. ◗ Align the print head from the printer's control panel, as described on ink. See page 84 ...for the paper you're printing on. ◗ Use the Paper Feed Adjustment to STANDARD when you are set correctly. 114 ...
...if you 're done using a third-party RIP and non-Epson media, see page 46). Check these suggestions help, try the solutions below. If none of your media is correct for instructions. ◗ Align the print head from the printer's control panel, as described on ink. See page 84 ...for the paper you're printing on. ◗ Use the Paper Feed Adjustment to STANDARD when you are set correctly. 114 ...

Printer Guide
Page 115
... tray. ◗ Choose a higher resolution, such as SuperPhoto - 2880. ◗ Turn off High Speed in the printer software is grainy, or has misregistration or ghosting. See page 84 for instructions. ◗ Align the print head from the printer's control panel, as described on page 88. ◗ Run a nozzle check and cleaning cycle. Try adjusting...
... tray. ◗ Choose a higher resolution, such as SuperPhoto - 2880. ◗ Turn off High Speed in the printer software is grainy, or has misregistration or ghosting. See page 84 for instructions. ◗ Align the print head from the printer's control panel, as described on page 88. ◗ Run a nozzle check and cleaning cycle. Try adjusting...
Printer Guide
Page 117
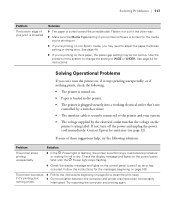
... the display message and lights on page 84 to the printer and your print is securely connected to clean the print head. Solution ◗ The paper is plugged securely into a working electrical outlet that's not controlled by the electrical outlet matches the voltage on non-Epson media, you can't turn off the power and unplug...
... the display message and lights on page 84 to the printer and your print is securely connected to clean the print head. Solution ◗ The paper is plugged securely into a working electrical outlet that's not controlled by the electrical outlet matches the voltage on non-Epson media, you can't turn off the power and unplug...


