Technical Brief (Scanners)
Page 9
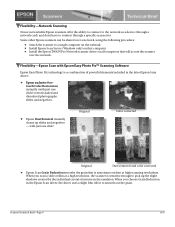
... Color corrected Original Dust removed and color corrected Epson Scan Grain Reduction smooths the grain that will access the scanner over a network, using the following procedure: Attach the scanner to pick up slides and negatives - with Epson Easy Photo Fix™ Scanning Software Epson Easy Photo Fix technology is sometimes evident at a high resolution, the...
... Color corrected Original Dust removed and color corrected Epson Scan Grain Reduction smooths the grain that will access the scanner over a network, using the following procedure: Attach the scanner to pick up slides and negatives - with Epson Easy Photo Fix™ Scanning Software Epson Easy Photo Fix technology is sometimes evident at a high resolution, the...
Technical Brief (Scanners)
Page 10
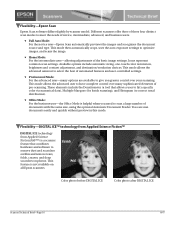
... include automatic sizing, one-touch color restoration, brightness and contrast adjustment, and destination/resolution choices. Flexibility-Epson Scan Epson Scan software differs slightly by scanner model. This mode allows the advanced user to meet the needs of the basic image settings. These elements...™ DIGITAL ICE technology from Applied Science Fiction(ASF™) is not available on photos. Scratch Fold Color photo before DIGITAL ICE Color photo after DIGITAL ICE Scanner Technical Brief-Page 10 6/07 Icons represent common scan settings. This mode allows the advanced...
... include automatic sizing, one-touch color restoration, brightness and contrast adjustment, and destination/resolution choices. Flexibility-Epson Scan Epson Scan software differs slightly by scanner model. This mode allows the advanced user to meet the needs of the basic image settings. These elements...™ DIGITAL ICE technology from Applied Science Fiction(ASF™) is not available on photos. Scratch Fold Color photo before DIGITAL ICE Color photo after DIGITAL ICE Scanner Technical Brief-Page 10 6/07 Icons represent common scan settings. This mode allows the advanced...

Technical Brief (Scanners)
Page 11
... film holders Reduction of grain and prevention of their respective companies. Epson Expression, Epson Perfection, and ColorTrue are registered trademarks and Micro Step Drive, Easy Photo Fix, Epson Smart Panel, are reduced. DIGITAL ICE is a trademark of Eastman Kodak Company. ©2007 Epson America, Inc. Scanner Technical Brief-Page 11 6/07 This version of the...
... film holders Reduction of grain and prevention of their respective companies. Epson Expression, Epson Perfection, and ColorTrue are registered trademarks and Micro Step Drive, Easy Photo Fix, Epson Smart Panel, are reduced. DIGITAL ICE is a trademark of Eastman Kodak Company. ©2007 Epson America, Inc. Scanner Technical Brief-Page 11 6/07 This version of the...
Scanner Basics
Page 3
... to Finish Placing Your Document Using the Scanner Buttons Using EPSON Smart Panel Scanning and Printing with Photo Print Scanning to E-mail Scanning a Photo to a File Scanning to the EPSON PhotoCenter Selecting TWAIN Settings Recommended Settings Scanning Transparencies Using Film Holders Scanning with the EPSON Perfection 1650 PHOTO Scanning with the EPSON Perfection 1250 PHOTO Scanning Reflective Documents or Photographs Problem Solving...
... to Finish Placing Your Document Using the Scanner Buttons Using EPSON Smart Panel Scanning and Printing with Photo Print Scanning to E-mail Scanning a Photo to a File Scanning to the EPSON PhotoCenter Selecting TWAIN Settings Recommended Settings Scanning Transparencies Using Film Holders Scanning with the EPSON Perfection 1650 PHOTO Scanning with the EPSON Perfection 1250 PHOTO Scanning Reflective Documents or Photographs Problem Solving...
Scanner Basics
Page 6
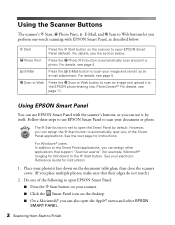
... the Smart Panel icon on the document table glass; Using the Scanner Buttons The scanner's ] Start, { Photo Print, | E-Mail, and } Scan to Web buttons let you perform one of the Smart Panel applications. The ] Start button is set to open EPSON Smart Panel (default). See the next page for instructions. I Press the ] Start button...
... the Smart Panel icon on the document table glass; Using the Scanner Buttons The scanner's ] Start, { Photo Print, | E-Mail, and } Scan to Web buttons let you perform one of the Smart Panel applications. The ] Start button is set to open EPSON Smart Panel (default). See the next page for instructions. I Press the ] Start button...

Scanner Basics
Page 7
...the on and the correct paper type and size is turned on -screen steps for your printer. For instructions on using each application. Using EPSON Smart Panel 3 Click the icon for each of Smart Panel, select the application here. If you adjust settings for that application appears and ...lets you select Copy or Photo Print, make sure your printer is loaded in your desired Smart Panel scanning application. The ] icon appears next to open a Smart Panel...
...the on and the correct paper type and size is turned on -screen steps for your printer. For instructions on using each application. Using EPSON Smart Panel 3 Click the icon for each of Smart Panel, select the application here. If you adjust settings for that application appears and ...lets you select Copy or Photo Print, make sure your printer is loaded in your desired Smart Panel scanning application. The ] icon appears next to open a Smart Panel...
Scanner Basics
Page 8
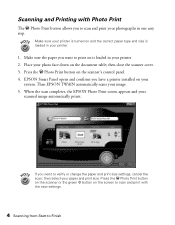
...settings. 4 Scanning from Start to Finish When the scan completes, the EPSON Photo Print screen appears and your photo face down on your image. 5. Press the { Photo Print button on the screen to scan and print with Photo Print The { Photo Print button allows you want to scan and print your paper and ... type and size is loaded in your printer. 2. Make sure your printer is turned on is loaded in your printer. 1. Press the { Photo Print button on the scanner or the green x button on the scanner's control panel. 4. Place your scanned image automatically prints.
...settings. 4 Scanning from Start to Finish When the scan completes, the EPSON Photo Print screen appears and your photo face down on your image. 5. Press the { Photo Print button on the screen to scan and print with Photo Print The { Photo Print button allows you want to scan and print your paper and ... type and size is loaded in your printer. 2. Make sure your printer is turned on is loaded in your printer. 1. Press the { Photo Print button on the scanner or the green x button on the scanner's control panel. 4. Place your scanned image automatically prints.

Scanner Basics
Page 9
...your electronic Smart Panel manual for details. Press the | E-Mail button. See your settings, close the scanner cover. See your steps are connected to the Internet. 2. To send a photo using the | E-Mail button, your e-mail documentation for details. If you are slightly different. Your ...Panel to automatically scan your scan settings, click Cancel. (See page 16 for example Microsoft Exchange or Outlook. EPSON Smart Panel opens, then EPSON TWAIN automatically scans your photo(s) face down on the document table, make sure that their edges do not touch. 3. AOL® is ...
...your electronic Smart Panel manual for details. Press the | E-Mail button. See your settings, close the scanner cover. See your steps are connected to the Internet. 2. To send a photo using the | E-Mail button, your e-mail documentation for details. If you are slightly different. Your ...Panel to automatically scan your scan settings, click Cancel. (See page 16 for example Microsoft Exchange or Outlook. EPSON Smart Panel opens, then EPSON TWAIN automatically scans your photo(s) face down on the document table, make sure that their edges do not touch. 3. AOL® is ...

Scanner Basics
Page 10
An e-mail dialog box opens with your e-mail program click Launch 5. Enter the recipient's e-mail address, type in a message, and then click Send. For subsequent scans, it is automatically selected.) select your photo(s) attached. click Send to deliver your e-mail program the first time you use EPSON Smart Panel. 4. When the scan completes, the Scan to Finish Select your e-mail program and then click Launch. (You only need to select your e-mail recipient's e-mail address attached photos 6 Scanning from Start to E-mail dialog box opens.
An e-mail dialog box opens with your e-mail program click Launch 5. Enter the recipient's e-mail address, type in a message, and then click Send. For subsequent scans, it is automatically selected.) select your photo(s) attached. click Send to deliver your e-mail program the first time you use EPSON Smart Panel. 4. When the scan completes, the Scan to Finish Select your e-mail program and then click Launch. (You only need to select your e-mail recipient's e-mail address attached photos 6 Scanning from Start to E-mail dialog box opens.
Scanner Basics
Page 11
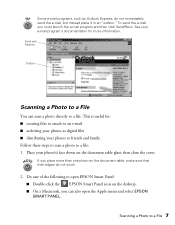
...open the Apple menu and select EPSON SMART PANEL. then close the cover. If you must launch the e-mail program and then click Send/Recv. Follow these steps to scan a photo to a File 7 I distributing your photos to friends and family. Do one photo on the document table, make...files to attach to an e-mail I archiving your photo(s) face down on the desktop. Send and Receive Outbox Scanning a Photo to a File You can also open EPSON Smart Panel: I Double-click the EPSON Smart Panel icon on the document table glass; Place your photos as Outlook Express, do not touch. 2. To ...
...open the Apple menu and select EPSON SMART PANEL. then close the cover. If you must launch the e-mail program and then click Send/Recv. Follow these steps to scan a photo to a File 7 I distributing your photos to friends and family. Do one photo on the document table, make...files to attach to an e-mail I archiving your photo(s) face down on the desktop. Send and Receive Outbox Scanning a Photo to a File You can also open EPSON Smart Panel: I Double-click the EPSON Smart Panel icon on the document table glass; Place your photos as Outlook Express, do not touch. 2. To ...

Scanner Basics
Page 13
When the scan completes, the Scan to a File 9 When you have more photos, place them on the document table glass, close the scanner cover, and then click Scan More. 4. Scanning a Photo to File dialog box opens. if you don't want to scan more photos to rename it . If you want to save a file, click the checkbox to deselect it click File0001 to scan You can see a larger version of an image by double-clicking it click Scan More if you 're finished scanning, click Finish.
When the scan completes, the Scan to a File 9 When you have more photos, place them on the document table glass, close the scanner cover, and then click Scan More. 4. Scanning a Photo to File dialog box opens. if you don't want to scan more photos to rename it . If you want to save a file, click the checkbox to deselect it click File0001 to scan You can see a larger version of an image by double-clicking it click Scan More if you 're finished scanning, click Finish.

Scanner Basics
Page 14
... folder. Bitmap is saved. JPEG format allows you are high quality, but have a large file size. To send a photo through the Web or by e-mail, try the JPEG file format instead. The photo is selected 10 Scanning from Start to save your files in a different path, click Browse, then select the new... path select a file format available only if JPEG is saved in Windows. current folder for saved photos to Finish 5. When you may specify a file path and file format. At the next dialog box, you 're finished, click Save.
... folder. Bitmap is saved. JPEG format allows you are high quality, but have a large file size. To send a photo through the Web or by e-mail, try the JPEG file format instead. The photo is selected 10 Scanning from Start to save your files in a different path, click Browse, then select the new... path select a file format available only if JPEG is saved in Windows. current folder for saved photos to Finish 5. When you may specify a file path and file format. At the next dialog box, you 're finished, click Save.

Scanner Basics
Page 15
... Press the } Scan to the EPSON PhotoCenter: 1. If you'd rather scan in Manual mode so you can scan photos and upload them to the EPSON PhotoCenter at http://photo.epson.com. If you access Scan to Web from the Web I order prints and custom photo gifts. If you are connected to ... log on selecting TWAIN settings.) After adjusting your settings, close the cover. Go to http://photo.epson.com and register your steps are using the } Scan to the EPSON PhotoCenter 11 Scanning to the EPSON PhotoCenter With the } Scan to Web button, you can adjust your scan settings, click Cancel...
... Press the } Scan to the EPSON PhotoCenter: 1. If you'd rather scan in Manual mode so you can scan photos and upload them to the EPSON PhotoCenter at http://photo.epson.com. If you access Scan to Web from the Web I order prints and custom photo gifts. If you are connected to ... log on selecting TWAIN settings.) After adjusting your settings, close the cover. Go to http://photo.epson.com and register your steps are using the } Scan to the EPSON PhotoCenter 11 Scanning to the EPSON PhotoCenter With the } Scan to Web button, you can adjust your scan settings, click Cancel...

Scanner Basics
Page 16
5. When the scan completes, the Scan to the EPSON PhotoCenter. The photos upload to Web dialog box opens. For subsequent scans, these are automatically selected.) I Select USA under Site Name, and enter the same User ID (e-mail ... to do this once. I Click Upload. select USA User ID (e-mail address) and password for the EPSON PhotoCenter click Select File, then browse to add more files click Upload to transfer files to the EPSON PhotoCenter If you have other digital images on your hard drive that you want to upload, click...
5. When the scan completes, the Scan to the EPSON PhotoCenter. The photos upload to Web dialog box opens. For subsequent scans, these are automatically selected.) I Select USA under Site Name, and enter the same User ID (e-mail ... to do this once. I Click Upload. select USA User ID (e-mail address) and password for the EPSON PhotoCenter click Select File, then browse to add more files click Upload to transfer files to the EPSON PhotoCenter If you have other digital images on your hard drive that you want to upload, click...

Scanner Basics
Page 17
... here to create a new album available albums If you don't see your photos. Member Sign In box 7. You are automatically logged into the EPSON PhotoCenter and receive a message stating that you see your photos, increase the size of your browser window or use the scroll bar to scroll down ...until you have new photos in your photos. Click Photo Inbox to the EPSON PhotoCenter 13 Scanning to view your Photo Inbox. Click OK to connect to confirm your e-mail address and password, and then click go. 6. When...
... here to create a new album available albums If you don't see your photos. Member Sign In box 7. You are automatically logged into the EPSON PhotoCenter and receive a message stating that you see your photos, increase the size of your browser window or use the scroll bar to scroll down ...until you have new photos in your photos. Click Photo Inbox to the EPSON PhotoCenter 13 Scanning to view your Photo Inbox. Click OK to connect to confirm your e-mail address and password, and then click go. 6. When...

Scanner Basics
Page 18
.... After you click Move or Copy, you want others to see another window where you can name the album and add a password.) Now that your photos are in an album, you can view them at any time and share them individually 9. Select the album you want to . 8. Then click Move or... Copy to move your photos, you want to move the photos to the album. (If you must move them individually by clicking Select photo for each picture or click Select All to share. Either select them to Finish
.... After you click Move or Copy, you want others to see another window where you can name the album and add a password.) Now that your photos are in an album, you can view them at any time and share them individually 9. Select the album you want to . 8. Then click Move or... Copy to move your photos, you want to move the photos to the album. (If you must move them individually by clicking Select photo for each picture or click Select All to share. Either select them to Finish
Scanner Basics
Page 19
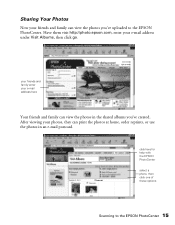
...After viewing your photos, they can print the photos at home, order reprints, or use the photos in the shared albums you 've uploaded to the EPSON PhotoCenter 15 click here for help with the EPSON PhotoCenter select a photo, then click one of these options Scanning to the EPSON PhotoCenter. your ...friends and family enter your e-mail address here Your friends and family can view the photos in an e-mail postcard. Sharing Your Photos Now your friends and family can view the photos you 've created. Have them visit http://photo.epson.com, enter your...
...After viewing your photos, they can print the photos at home, order reprints, or use the photos in the shared albums you 've uploaded to the EPSON PhotoCenter 15 click here for help with the EPSON PhotoCenter select a photo, then click one of these options Scanning to the EPSON PhotoCenter. your ...friends and family enter your e-mail address here Your friends and family can view the photos in an e-mail postcard. Sharing Your Photos Now your friends and family can view the photos you 've created. Have them visit http://photo.epson.com, enter your...

Scanner Basics
Page 22
...400 dpi 300 to 3200 dpi 300 to 3200 dpi 300 to Finish Film TPU: Monochrome Neg. Film Resolution for your scanning software (EPSON TWAIN), however, major photo retouching will be enlarged Magazine Newspaper (text only) Text for OCR Text with images Line art 35 mm film (negative) 35 mm... slide Recommended Image Type Color Photo Color Photo Color Photo Text Text Color Document Line Art TPU: Color Neg. You can make many corrections in programs such as Adobe Photoshop Elements or ArcSoft ...
...400 dpi 300 to 3200 dpi 300 to 3200 dpi 300 to Finish Film TPU: Monochrome Neg. Film Resolution for your scanning software (EPSON TWAIN), however, major photo retouching will be enlarged Magazine Newspaper (text only) Text for OCR Text with images Line art 35 mm film (negative) 35 mm... slide Recommended Image Type Color Photo Color Photo Color Photo Text Text Color Document Line Art TPU: Color Neg. You can make many corrections in programs such as Adobe Photoshop Elements or ArcSoft ...
Scanner Basics
Page 23
... Transparencies This section gives basic information on using this TPU, see your electronic Reference Guide. The base side of your TPU: I EPSON Perfection 1250 TPU: B12B813321 I EPSON Perfection 1650 TPU: B813172 The EPSON Perfection 1650 PHOTO TPU is not built into the scanner lid. Hold the film by the edges or use the film holders that came with your...
... Transparencies This section gives basic information on using this TPU, see your electronic Reference Guide. The base side of your TPU: I EPSON Perfection 1250 TPU: B12B813321 I EPSON Perfection 1650 TPU: B813172 The EPSON Perfection 1650 PHOTO TPU is not built into the scanner lid. Hold the film by the edges or use the film holders that came with your...

Scanner Basics
Page 24
Remove the reflective document mat. To do this, grasp the top of the mat and then slide it up gently. 3. Make sure the TPU cable is built into the scanner's transparency unit connector. 4. Plug in the AC adapter. 20 Scanning from Start to use the transparency unit: 1. Unplug the AC adapter. 2. Scanning with the EPSON Perfection 1650 PHOTO If you have an EPSON Perfection 1650 PHOTO scanner, the transparency unit is plugged into the scanner lid. Follow these steps to Finish
Remove the reflective document mat. To do this, grasp the top of the mat and then slide it up gently. 3. Make sure the TPU cable is built into the scanner's transparency unit connector. 4. Plug in the AC adapter. 20 Scanning from Start to use the transparency unit: 1. Unplug the AC adapter. 2. Scanning with the EPSON Perfection 1650 PHOTO If you have an EPSON Perfection 1650 PHOTO scanner, the transparency unit is plugged into the scanner lid. Follow these steps to Finish


