
Network Guide
Page 2
... the use of this code, and the original compression sources are subject to change without the prior written permission of Seiko Epson Corporation. Seiko Epson Corporation and its affiliates shall be liable to the purchaser of their respective owners. General Notice: Other product names used herein... respect to the use of any options or any means, mechanical, photocopying, recording, or otherwise, without notice. Copyright and Trademarks No part of this publication may be trademarks of this product or third parties for damages, losses, costs, or expenses incurred by purchaser or third...
... the use of this code, and the original compression sources are subject to change without the prior written permission of Seiko Epson Corporation. Seiko Epson Corporation and its affiliates shall be liable to the purchaser of their respective owners. General Notice: Other product names used herein... respect to the use of any options or any means, mechanical, photocopying, recording, or otherwise, without notice. Copyright and Trademarks No part of this publication may be trademarks of this product or third parties for damages, losses, costs, or expenses incurred by purchaser or third...

Product Brochure
Page 8
...or 3 mm each color x 9 colors total Ink cartridge shelf life 2 years from printed production (recommended) date or 6 months after the "Replace Cartridge" indicator comes on. realtime switch; no condensation) Product/Accessories Epson Stylus Pro 11880 Printer Epson Stylus Pro 11880 ColorBurst Edition Includes ...ink cartridge Part Numbers SP11880K3 SP11880CB EPP1188B1 EPP1188B2 C12C890401 C64CORE C12C811231 C12C815291 C12C890191 (700 ml) T591100 T591200 T591300 T591400 T591500 T591600 T591700 T591800 T591900 A Based upon Seiko Epson engineering. See www.epson.com/cartridgeinfo...
...or 3 mm each color x 9 colors total Ink cartridge shelf life 2 years from printed production (recommended) date or 6 months after the "Replace Cartridge" indicator comes on. realtime switch; no condensation) Product/Accessories Epson Stylus Pro 11880 Printer Epson Stylus Pro 11880 ColorBurst Edition Includes ...ink cartridge Part Numbers SP11880K3 SP11880CB EPP1188B1 EPP1188B2 C12C890401 C64CORE C12C811231 C12C815291 C12C890191 (700 ml) T591100 T591200 T591300 T591400 T591500 T591600 T591700 T591800 T591900 A Based upon Seiko Epson engineering. See www.epson.com/cartridgeinfo...
Product Information Guide
Page 1
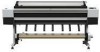
...Roll paper Roll paper Paper lever spindle cover Ink bay lights Ink cover button Right ink bay Locking Paper guide caster Auto take- Epson Stylus Pro 11880 Printer Parts - up reel Locking caster Take-up reel sensor Back Take-up reel connector Network connector Left maintenance tank Right maintenance tank USB AC... 12 inches B4 (JB4) (10.1 × 14.2 inches) 11 × 14 inches 30 × 40 cm (11.8 × 15.7 inches) 10/07 Epson Stylus Pro 11880 - 1 Mechanical Dimensions Height: 46.85 inches (1190 mm) Width: 92.44 inches (2348 mm) Depth: 26.97 inches (685 mm) Approx.
...Roll paper Roll paper Paper lever spindle cover Ink bay lights Ink cover button Right ink bay Locking Paper guide caster Auto take- Epson Stylus Pro 11880 Printer Parts - up reel Locking caster Take-up reel sensor Back Take-up reel connector Network connector Left maintenance tank Right maintenance tank USB AC... 12 inches B4 (JB4) (10.1 × 14.2 inches) 11 × 14 inches 30 × 40 cm (11.8 × 15.7 inches) 10/07 Epson Stylus Pro 11880 - 1 Mechanical Dimensions Height: 46.85 inches (1190 mm) Width: 92.44 inches (2348 mm) Depth: 26.97 inches (685 mm) Approx.

Product Information Guide
Page 2
.... The borderless printing feature allows edge-to 15 mm or 3 mm. Epson Stylus Pro 11880 10/07 Store sheet media on some media. Safety Approvals Safety standards UL 60950-1, CSA No. 60950-1 EMC FCC part 15 subpart B, Class A, CAN/CSA-CEI/IEC CISPR 22 class A Printer Interfaces ❏ USB (1.1 and 2.0 compatible) ❏ 10/100/1000 BaseT...
.... The borderless printing feature allows edge-to 15 mm or 3 mm. Epson Stylus Pro 11880 10/07 Store sheet media on some media. Safety Approvals Safety standards UL 60950-1, CSA No. 60950-1 EMC FCC part 15 subpart B, Class A, CAN/CSA-CEI/IEC CISPR 22 class A Printer Interfaces ❏ USB (1.1 and 2.0 compatible) ❏ 10/100/1000 BaseT...
Product Information Guide
Page 3
... to re-initialize. Do not interrupt this process by turning off the printer, opening the front cover, or releasing the paper lever, or the printer will have to initialize the printer. Optional Equipment Your Epson Stylus Pro 11880 offers these optional upgrades and accessories: Part Retractable Fabric-Based Media Bin Replacement 64-inch Wide Take-up Reel Core...
... to re-initialize. Do not interrupt this process by turning off the printer, opening the front cover, or releasing the paper lever, or the printer will have to initialize the printer. Optional Equipment Your Epson Stylus Pro 11880 offers these optional upgrades and accessories: Part Retractable Fabric-Based Media Bin Replacement 64-inch Wide Take-up Reel Core...
Product Information Guide
Page 6
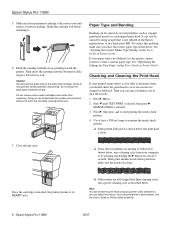
...parts inside the ink bay. See "Optimizing the Settings for details. 6 - Close the ink cover. ❏ If any nozzles are clean. Then print another nozzle check pattern to clear the nozzles. 1. Shake the cartridge well before installing it clicks in the driver. Don't force it from your printed image shows a color... and Banding Banding can check the print head using a paper that is clean. 7. Epson Stylus Pro 11880 5. Make sure the replacement cartridge is installed, the printer returns to examine the nozzle check pattern. ❏ If the pattern looks good as ...
...parts inside the ink bay. See "Optimizing the Settings for details. 6 - Close the ink cover. ❏ If any nozzles are clean. Then print another nozzle check pattern to clear the nozzles. 1. Shake the cartridge well before installing it clicks in the driver. Don't force it from your printed image shows a color... and Banding Banding can check the print head using a paper that is clean. 7. Epson Stylus Pro 11880 5. Make sure the replacement cartridge is installed, the printer returns to examine the nozzle check pattern. ❏ If the pattern looks good as ...
Product Information Guide
Page 7
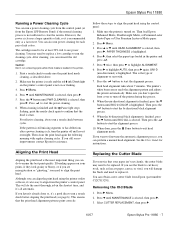
... the bi-directional black alignment process. 9. Epson Stylus Pro 11880 Running a Power Cleaning Cycle You can run a power cleaning cycle from the control panel (or from the printer's control panel. You can also run power...Replacing the Cutter Blade If you can obtain a new cutter blade from Epson (part number C12C815291). You can do the most important thing you notice that the print head alignment... patterns print correctly. Press d until BI-D 2-COLOR is selected, then press r. 3. You may need to run a nozzle check between cycles...
... the bi-directional black alignment process. 9. Epson Stylus Pro 11880 Running a Power Cleaning Cycle You can run a power cleaning cycle from the control panel (or from the printer's control panel. You can also run power...Replacing the Cutter Blade If you can obtain a new cutter blade from Epson (part number C12C815291). You can do the most important thing you notice that the print head alignment... patterns print correctly. Press d until BI-D 2-COLOR is selected, then press r. 3. You may need to run a nozzle check between cycles...

Product Information Guide
Page 8
...: To avoid damaging the printer, make sure you may damage the printer. 5. Insert the new cutter as shown and turn the latch to the replacement position. The cutter pops out. Epson Stylus Pro 11880 10/07 Do not touch the black parts inside the printer or the cables around the... print head. Release the side pin carefully. The cutter moves to install it: 1. Epson Stylus Pro 11880 4. Open the front cover. 9. Carefully remove the...
...: To avoid damaging the printer, make sure you may damage the printer. 5. Insert the new cutter as shown and turn the latch to the replacement position. The cutter pops out. Epson Stylus Pro 11880 10/07 Do not touch the black parts inside the printer or the cables around the... print head. Release the side pin carefully. The cutter moves to install it: 1. Epson Stylus Pro 11880 4. Open the front cover. 9. Carefully remove the...

Quick Reference Guide
Page 2
Printer Parts Front Roll paper holder Left ink bay Locking caster Roll paper spindle Roll paper cover Front cover Paper guide Auto take-up reel Locking caster Back Auto take-up reel connector Paper lever Control panel Ink bay lights Ink cover button Right ink bay Take-up reel sensor Right maintenance tank Left maintenance tank AC inlet Network connector USB connector Center maintenance tank Take-up reel reflector 1
Printer Parts Front Roll paper holder Left ink bay Locking caster Roll paper spindle Roll paper cover Front cover Paper guide Auto take-up reel Locking caster Back Auto take-up reel connector Paper lever Control panel Ink bay lights Ink cover button Right ink bay Take-up reel sensor Right maintenance tank Left maintenance tank AC inlet Network connector USB connector Center maintenance tank Take-up reel reflector 1
Quick Reference Guide
Page 7
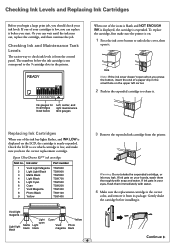
..., you can wait until the ink runs out, replace the cartridge, and then continue the job. If ink gets in the printer. The numbers below tank gauges When one of a paper clip in the expended cartridge to see which cartridge is low, and make ...flush them thoroughly with water. 4 Make sure the replacement cartridge is expended. Epson UltraChrome K3TM ink cartridges Slot no. Check the LCD to release it. Warning: Do not shake the expended cartridge, or ink may leak. Ink color Part number 1 Vivid Light Magenta T591600 2 Light Light Black T591900 3 Matte Black...
..., you can wait until the ink runs out, replace the cartridge, and then continue the job. If ink gets in the printer. The numbers below tank gauges When one of a paper clip in the expended cartridge to see which cartridge is low, and make ...flush them thoroughly with water. 4 Make sure the replacement cartridge is expended. Epson UltraChrome K3TM ink cartridges Slot no. Check the LCD to release it. Warning: Do not shake the expended cartridge, or ink may leak. Ink color Part number 1 Vivid Light Magenta T591600 2 Light Light Black T591900 3 Matte Black...
Quick Reference Guide
Page 8
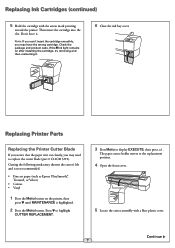
...a blue plastic cover. Press to highlight CUTTER REPLACEMENT. 3 Press Menu to replace the cutter blade (part # C12C815291). Then insert the cartridge into the slot. Replacing Printer Parts Replacing the Printer Cutter Blade If you notice that the paper isn't cut cleanly, you may need to display EXECUTE, ... Continue 7 ▲ Check the package and product code. If the Ink light remains on the printer, then press until MAINTENANCE is not recommended: • Fine art paper (such as Epson UltraSmooth®, Textured, or Velvet) • Canvas • Vinyl 1 Press the Menu button ...
...a blue plastic cover. Press to highlight CUTTER REPLACEMENT. 3 Press Menu to replace the cutter blade (part # C12C815291). Then insert the cartridge into the slot. Replacing Printer Parts Replacing the Printer Cutter Blade If you notice that the paper isn't cut cleanly, you may need to display EXECUTE, ... Continue 7 ▲ Check the package and product code. If the Ink light remains on the printer, then press until MAINTENANCE is not recommended: • Fine art paper (such as Epson UltraSmooth®, Textured, or Velvet) • Canvas • Vinyl 1 Press the Menu button ...

Quick Reference Guide
Page 9
... out. 3 Place the used tank in the plastic bag included with an indication of the maintenance tanks (part # C12C890191) when you see MAINT TANK FULL on , and pull out the maintenance tank as shown. ...9 Hold down the side pin, as shown, then turn the latch to the right. Replacing Printer Parts (continued) 6 Hold down the side pin while turning the latch to the left. Right tank Left tank Center... tank 8 Insert the new cutter blade. 2 Make sure the printer is full. 1 Check the LCD to determine which tank is on the LCD, along with the new...
... out. 3 Place the used tank in the plastic bag included with an indication of the maintenance tanks (part # C12C890191) when you see MAINT TANK FULL on , and pull out the maintenance tank as shown. ...9 Hold down the side pin, as shown, then turn the latch to the right. Replacing Printer Parts (continued) 6 Hold down the side pin while turning the latch to the left. Right tank Left tank Center... tank 8 Insert the new cutter blade. 2 Make sure the printer is full. 1 Check the LCD to determine which tank is on the LCD, along with the new...
User's Guide
Page 2
...Epson, Epson Stylus, Epson ESC/P, and MicroWeave are registered trademarks and Epson Exceed Your Vision is a registered trademark; and Epson Preferred and Epson Store are subject to this information as Original Epson Products or Epson Approved Products by Seiko Epson Corporation. © 2007 Epson... from the use with Seiko Epson Corporation's operating and maintenance instructions. No part of this publication may be...to strictly comply with these Epson printers. UltraSmooth is a trademark of this product, or (excluding the U.S.) failure to other printers. The contents of this...
...Epson, Epson Stylus, Epson ESC/P, and MicroWeave are registered trademarks and Epson Exceed Your Vision is a registered trademark; and Epson Preferred and Epson Store are subject to this information as Original Epson Products or Epson Approved Products by Seiko Epson Corporation. © 2007 Epson... from the use with Seiko Epson Corporation's operating and maintenance instructions. No part of this publication may be...to strictly comply with these Epson printers. UltraSmooth is a trademark of this product, or (excluding the U.S.) failure to other printers. The contents of this...

User's Guide
Page 3
...the user's authority to operate the equipment. Changes or modifications not expressly approved by the FCC for a Class A digital device, pursuant to Part 15 of the FCC Rules. For Canadian Users This Class A digital apparatus complies with the instruction manual, may cause undesired operation. WARNING ...may cause harmful interference to radio communications. It is the responsibility of the user to obtain and use a shielded equipment interface cable with Part 15 of the FCC Rules. If this product may cause radio interference, in which case the user may not cause harmful interference, ...
...the user's authority to operate the equipment. Changes or modifications not expressly approved by the FCC for a Class A digital device, pursuant to Part 15 of the FCC Rules. For Canadian Users This Class A digital apparatus complies with the instruction manual, may cause undesired operation. WARNING ...may cause harmful interference to radio communications. It is the responsibility of the user to obtain and use a shielded equipment interface cable with Part 15 of the FCC Rules. If this product may cause radio interference, in which case the user may not cause harmful interference, ...
User's Guide
Page 5
...Instructions 12 Ink Cartridge Safety Instructions 15 Printer Parts 16 Front 16 Back 16 Control Panel 17 LCD Display 17 1 Setting Up the Printer Unpacking and Assembling the Printer 19 Unpacking and Assembling the Stand 20 Unpacking the Printer 22 Mounting the Printer on the Stand 23 Unpacking the ... Take-up Reel 25 Installing the Take-up Reel Core and Paper Guides 29 Plugging in the Printer 31 Installing Ink 33 Connecting the Printer 35 Configuring the Network Interface 36 Updating Your Printer Firmware 37 Downloading the Firmware 37 Updating the Firmware 38 Configuring the...
...Instructions 12 Ink Cartridge Safety Instructions 15 Printer Parts 16 Front 16 Back 16 Control Panel 17 LCD Display 17 1 Setting Up the Printer Unpacking and Assembling the Printer 19 Unpacking and Assembling the Stand 20 Unpacking the Printer 22 Mounting the Printer on the Stand 23 Unpacking the ... Take-up Reel 25 Installing the Take-up Reel Core and Paper Guides 29 Plugging in the Printer 31 Installing Ink 33 Connecting the Printer 35 Configuring the Network Interface 36 Updating Your Printer Firmware 37 Downloading the Firmware 37 Updating the Firmware 38 Configuring the...
User's Guide
Page 10
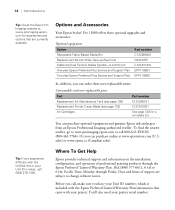
... EPP1188B2 In addition, you call (562) 276-1305. Options and Accessories Your Epson Stylus® Pro 11880 offers these user-replaceable items: Consumables and user-replaceable parts Part Replacement Ink Maintenance Tank (see page 135) Replacement Printer Cutter Blade (see page 132) Ink Cartridges Part number C12C890191 C12C815291 See page 128 for accessories and options that came with...
... EPP1188B2 In addition, you call (562) 276-1305. Options and Accessories Your Epson Stylus® Pro 11880 offers these user-replaceable items: Consumables and user-replaceable parts Part Replacement Ink Maintenance Tank (see page 135) Replacement Printer Cutter Blade (see page 132) Ink Cartridges Part number C12C890191 C12C815291 See page 128 for accessories and options that came with...
User's Guide
Page 16
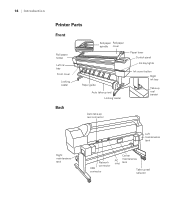
16 | Introduction Printer Parts Front Roll paper holder Left ink bay Front cover Locking caster Roll paper Roll paper spindle cover Paper lever Control panel Ink bay lights Paper guide Auto take-up reel Locking caster Ink cover button Right ink bay Take-up reel sensor Back Auto take-up reel connector Right maintenance tank Left maintenance tank Network connector USB connector Center AC maintenance inlet tank Take-up reel reflector 16
16 | Introduction Printer Parts Front Roll paper holder Left ink bay Front cover Locking caster Roll paper Roll paper spindle cover Paper lever Control panel Ink bay lights Paper guide Auto take-up reel Locking caster Ink cover button Right ink bay Take-up reel sensor Back Auto take-up reel connector Right maintenance tank Left maintenance tank Network connector USB connector Center AC maintenance inlet tank Take-up reel reflector 16
User's Guide
Page 120
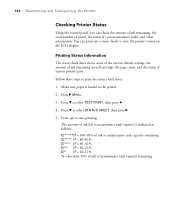
...3. The amount of ink left or maintenance tank capacity is loaded in each cartridge, the page count, and the status of ink remaining in the printer. 2. Follow these steps to start printing. Press d to select TEST PRINT, then press r. 4. Press d to select STATUS SHEET, then press ...r. 5. Printing Status Information The status check sheet shows some of the current default settings, the amount of various printer parts. You can check the amount of ink remaining, the total number of prints, the status of ink or maintenance tank capacity remaining 5-120 ...
...3. The amount of ink left or maintenance tank capacity is loaded in each cartridge, the page count, and the status of ink remaining in the printer. 2. Follow these steps to start printing. Press d to select TEST PRINT, then press r. 4. Press d to select STATUS SHEET, then press ...r. 5. Printing Status Information The status check sheet shows some of the current default settings, the amount of various printer parts. You can check the amount of ink remaining, the total number of prints, the status of ink or maintenance tank capacity remaining 5-120 ...
User's Guide
Page 128
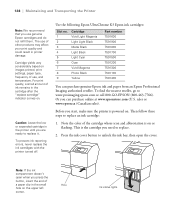
... cartridges with the printer turned off. sales or www.epson.ca (Canadian sales). Then follow these steps to www.proimaging.epson.com or call 800-GO-EPSON (800-463-7766). Or you use genuine Epson cartridges and do not refill them. Note the color of other products may...icon and abbreviation is on . Use the following Epson UltraChrome K3 Epson ink cartridges: Slot no. 1 2 3 4 5 6 7 8 9 Cartridge Vivid Light Magenta Light Light Black Matte Black Light Black Light Cyan Cyan Vivid Magenta Photo Black Yellow Part number T591600 T591900 T591800 T591700 T591500 T591200 T591300 ...
... cartridges with the printer turned off. sales or www.epson.ca (Canadian sales). Then follow these steps to www.proimaging.epson.com or call 800-GO-EPSON (800-463-7766). Or you use genuine Epson cartridges and do not refill them. Note the color of other products may...icon and abbreviation is on . Use the following Epson UltraChrome K3 Epson ink cartridges: Slot no. 1 2 3 4 5 6 7 8 9 Cartridge Vivid Light Magenta Light Light Black Matte Black Light Black Light Cyan Cyan Vivid Magenta Photo Black Yellow Part number T591600 T591900 T591800 T591700 T591500 T591200 T591300 ...

User's Guide
Page 130
...into the slot until it in place. Press d until you see CLOCK SETTING, then press r. 4. Hold the cartridge with the arrow pointing toward the printer. Close the ink cover. Doing so may prevent normal operation and printing. Don't force it clicks in . Use the d, u, and r buttons to... its READY state. Do not touch the black parts inside the ink bay. 6. Caution: Do not remove and re-insert cartridges more often than necessary. Once the cartridge is selected, then press r. 3....
...into the slot until it in place. Press d until you see CLOCK SETTING, then press r. 4. Hold the cartridge with the arrow pointing toward the printer. Close the ink cover. Doing so may prevent normal operation and printing. Don't force it clicks in . Use the d, u, and r buttons to... its READY state. Do not touch the black parts inside the ink bay. 6. Caution: Do not remove and re-insert cartridges more often than necessary. Once the cartridge is selected, then press r. 3....

