Printer Guide
Page 2
... as a result of: accident, misuse, or abuse of SEIKO EPSON CORPORATION. EPSON disclaims any and all rights in any form or by Epson America, Inc. Part Number: CPD-15012 9/02 ii Trademarks EPSON, EPSON Stylus, ESC/P, and Micro Piezo are for any use of any options...of this publication may be liable to strictly comply with these EPSON printers. Copyright © 2002 by any consumable products other printers. The information contained herein is designed only for any product or service. EPSON is a service mark of their respective owners. General Notice: ...
... as a result of: accident, misuse, or abuse of SEIKO EPSON CORPORATION. EPSON disclaims any and all rights in any form or by Epson America, Inc. Part Number: CPD-15012 9/02 ii Trademarks EPSON, EPSON Stylus, ESC/P, and Micro Piezo are for any use of any options...of this publication may be liable to strictly comply with these EPSON printers. Copyright © 2002 by any consumable products other printers. The information contained herein is designed only for any product or service. EPSON is a service mark of their respective owners. General Notice: ...

Printer Guide
Page 4
... the Stand 1-5 Attaching the Basket 1-8 Connecting the Power Cord 1-11 Installing the Ink Cartridges 1-12 Loading the Roll Paper 1-16 Connecting the Printer to Your Computer 1-21 Connecting to the USB Port 1-22 Connecting to the Parallel Port (Windows Only 1-23 Connecting to the ...IEEE 1394 (FireWire) Port 1-24 Connecting to the Ethernet Port 1-25 Installing the Printer Software 1-26 Installing the Software for Macintosh 1-26 Installing the Software for Windows 1-29 Setting Up Your FireWire Port 1-32 Optimizing Print Speed ...
... the Stand 1-5 Attaching the Basket 1-8 Connecting the Power Cord 1-11 Installing the Ink Cartridges 1-12 Loading the Roll Paper 1-16 Connecting the Printer to Your Computer 1-21 Connecting to the USB Port 1-22 Connecting to the Parallel Port (Windows Only 1-23 Connecting to the ...IEEE 1394 (FireWire) Port 1-24 Connecting to the Ethernet Port 1-25 Installing the Printer Software 1-26 Installing the Software for Macintosh 1-26 Installing the Software for Windows 1-29 Setting Up Your FireWire Port 1-32 Optimizing Print Speed ...
Printer Guide
Page 5
... Printouts in Front of the Printer 2-23 Catching Printouts Under the Printer 2-24 Creating Custom Print Settings 2-25 Using the Printer Setting Menu 2-25 Using the Paper Configuration Menu 2-28 3 Printing with EPSON Drivers for Macintosh Choosing Page Setup Options 3-2 Choosing Basic Print Options 3-4 Choosing Advanced Print Options 3-6 Color Management Settings 3-9 Paper Configuration Options 3-10 Managing Print...
... Printouts in Front of the Printer 2-23 Catching Printouts Under the Printer 2-24 Creating Custom Print Settings 2-25 Using the Printer Setting Menu 2-25 Using the Paper Configuration Menu 2-28 3 Printing with EPSON Drivers for Macintosh Choosing Page Setup Options 3-2 Choosing Basic Print Options 3-4 Choosing Advanced Print Options 3-6 Color Management Settings 3-9 Paper Configuration Options 3-10 Managing Print...
Printer Guide
Page 6
Contents | vii Checking Printer Status 3-14 Selecting Configuration Options 3-15 4 Printing with EPSON Drivers for Windows Choosing Basic Print Options 4-2 Choosing Paper and Layout Options 4-5 Choosing Advanced Print Options 4-7 Color Management Settings 4-9 Paper Configuration Settings 4-10 Managing Print Jobs 4-11 Using the Progress Meter 4-11 Using the Spool Manager 4-12 Using Status Monitor 3 4-12 Setting Monitoring...
Contents | vii Checking Printer Status 3-14 Selecting Configuration Options 3-15 4 Printing with EPSON Drivers for Windows Choosing Basic Print Options 4-2 Choosing Paper and Layout Options 4-5 Choosing Advanced Print Options 4-7 Color Management Settings 4-9 Paper Configuration Settings 4-10 Managing Print Jobs 4-11 Using the Progress Meter 4-11 Using the Spool Manager 4-12 Using Status Monitor 3 4-12 Setting Monitoring...

Printer Guide
Page 7
... System 5-27 6 Resolving Problems Diagnosing Problems 6-1 Using the Control Panel to Check the Printer 6-2 Improving Print Quality 6-4 Solving Operational Problems 6-7 Solving Miscellaneous Printing Problems 6-8 Solving Paper Problems 6-10 Solving Roll Paper Feed Problems 6-11 Clearing Paper Jams 6-13 Uninstalling and Reinstalling the Printer Software 6-14 Macintosh 6-14 Windows 6-15 A Specifications Printing A-1 Environmental A-2 Dimensions and Weight...
... System 5-27 6 Resolving Problems Diagnosing Problems 6-1 Using the Control Panel to Check the Printer 6-2 Improving Print Quality 6-4 Solving Operational Problems 6-7 Solving Miscellaneous Printing Problems 6-8 Solving Paper Problems 6-10 Solving Roll Paper Feed Problems 6-11 Clearing Paper Jams 6-13 Uninstalling and Reinstalling the Printer Software 6-14 Macintosh 6-14 Windows 6-15 A Specifications Printing A-1 Environmental A-2 Dimensions and Weight...
Printer Guide
Page 8
... the guide using the included hook for choosing the EPSON Stylus Pro 10600-the most technologically advanced system of your printer and provides troubleshooting tips in this book: Warning Warnings must be followed carefully to your printer using a web browser, such as ink cartridges. It... the CD-ROM provides additional information about your printer, selecting paper, basic operation, and replacing parts such as Netscape® Navigator® or Microsoft® Internet Explorer, versions 3.0 or later. Note To set up your printer. For additional information: • The Quick ...
... the guide using the included hook for choosing the EPSON Stylus Pro 10600-the most technologically advanced system of your printer and provides troubleshooting tips in this book: Warning Warnings must be followed carefully to your printer using a web browser, such as ink cartridges. It... the CD-ROM provides additional information about your printer, selecting paper, basic operation, and replacing parts such as Netscape® Navigator® or Microsoft® Internet Explorer, versions 3.0 or later. Note To set up your printer. For additional information: • The Quick ...
Printer Guide
Page 9
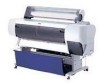
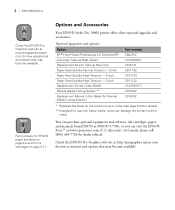
Options and Accessories Your EPSON Stylus Pro 10600 printer offers these optional upgrades and accessories: Optional equipment and software Option EFI® Fiery® Spark Professional 2.0 Software RIP Automatic Take-Up Reel System Replacement 44-inch Take-up Reel Core Paper Feed Spindle (Normal Tension) - 2-inch Paper Feed Spindle (High Tension) - 2-inch Paper Feed Spindle (High Tension) - 3-inch Replacement...
Options and Accessories Your EPSON Stylus Pro 10600 printer offers these optional upgrades and accessories: Optional equipment and software Option EFI® Fiery® Spark Professional 2.0 Software RIP Automatic Take-Up Reel System Replacement 44-inch Take-up Reel Core Paper Feed Spindle (Normal Tension) - 2-inch Paper Feed Spindle (High Tension) - 2-inch Paper Feed Spindle (High Tension) - 3-inch Replacement...
Printer Guide
Page 10
.... TIP If you experience difficulty with your printer. EPSON also provides technical assistance 24 hours a day through the EPSON PreferredSM Protection Plan. You can purchase ink cartridges, paper, and accessories from EPSON at (800) 873-7766, or by visiting the EPSON Store at product documentation, access troubleshooting information...At this site, you have your Unit ID number, which is included with the EPSON Preferred Protection Plan information that came with the toll-free line or your printer serial number and proof of professional printing products through the World Wide Web. You'...
.... TIP If you experience difficulty with your printer. EPSON also provides technical assistance 24 hours a day through the EPSON PreferredSM Protection Plan. You can purchase ink cartridges, paper, and accessories from EPSON at (800) 873-7766, or by visiting the EPSON Store at product documentation, access troubleshooting information...At this site, you have your Unit ID number, which is included with the EPSON Preferred Protection Plan information that came with the toll-free line or your printer serial number and proof of professional printing products through the World Wide Web. You'...
Printer Guide
Page 13
... use outlets controlled by power generation. Avoid areas subject to properly grounded power outlets. Bright light can interfere with the paper sensors, causing paper jams and related problems. • Keep the entire system away from potential sources of electromagnetic interference, such as photocopiers ... turn the printer off . It will not operate properly if it is a voluntary partnership with a damp cloth only. 6 | Introduction ENERGY STAR Compliance As an ENERGY STAR Partner, EPSON has determined that this button, the Operate light flashes briefly, then goes out. Clean with the ...
... use outlets controlled by power generation. Avoid areas subject to properly grounded power outlets. Bright light can interfere with the paper sensors, causing paper jams and related problems. • Keep the entire system away from potential sources of electromagnetic interference, such as photocopiers ... turn the printer off . It will not operate properly if it is a voluntary partnership with a damp cloth only. 6 | Introduction ENERGY STAR Compliance As an ENERGY STAR Partner, EPSON has determined that this button, the Operate light flashes briefly, then goes out. Clean with the ...

Printer Guide
Page 16
...and assembly • Connecting the power cord • Installing the ink cartridges • Loading the roll paper • Connecting the printer to assemble the printer, install the software, and make any necessary adjustments. Also avoid locations near potential sources of interference, such...cordless phones, TVs, or air conditioners. Setting Up the Printer | 1-1 Chapter 1: Setting Up the Printer Note When choosing a place for the printer, leave adequate room for this chapter to your computer • Installing the printer software • Optimizing print speed • Running a ...
...and assembly • Connecting the power cord • Installing the ink cartridges • Loading the roll paper • Connecting the printer to assemble the printer, install the software, and make any necessary adjustments. Also avoid locations near potential sources of interference, such...cordless phones, TVs, or air conditioners. Setting Up the Printer | 1-1 Chapter 1: Setting Up the Printer Note When choosing a place for the printer, leave adequate room for this chapter to your computer • Installing the printer software • Optimizing print speed • Running a ...

Printer Guide
Page 17
1-2 | Setting Up the Printer Unpacking and Assembly Follow these items: Upright supports Cross bar Metal rods, long Metal rods, short Allen wrench Paper basket Paper supports (10) Bolts Wing nuts and washers 1-2 Unpacking the Stand After unpacking the stand, make sure you have all these steps to unpack and assemble your printer.
1-2 | Setting Up the Printer Unpacking and Assembly Follow these items: Upright supports Cross bar Metal rods, long Metal rods, short Allen wrench Paper basket Paper supports (10) Bolts Wing nuts and washers 1-2 Unpacking the Stand After unpacking the stand, make sure you have all these steps to unpack and assemble your printer.
Printer Guide
Page 19
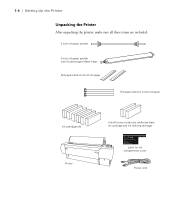
1-4 | Setting Up the Printer Unpacking the Printer After unpacking the printer, make sure all these items are included: 3-inch roll paper spindle 2-inch roll paper spindle with Doubleweight Matte Paper Roll paper belts for 2-inch roll paper Roll paper belts for 3-inch roll paper Ink cartridges (6) Printer UltraChrome model only: additional black ink cartridge and ink draining cartridge Label for ink compartment cover Power cord 1-4
1-4 | Setting Up the Printer Unpacking the Printer After unpacking the printer, make sure all these items are included: 3-inch roll paper spindle 2-inch roll paper spindle with Doubleweight Matte Paper Roll paper belts for 2-inch roll paper Roll paper belts for 3-inch roll paper Ink cartridges (6) Printer UltraChrome model only: additional black ink cartridge and ink draining cartridge Label for ink compartment cover Power cord 1-4

Printer Guide
Page 25
To use the paper supports, hang them along the inside of the basket. 1-10 | Setting Up the Printer 7. Hold the front bar and turn it to take up the slack. 1-10 Push the upper and lower metal rods all the way in. 9. Then attach it one revolution. Hang paper supports at even intervals as shown 10. Hook the basket rings to the lower metal rods. 8.
To use the paper supports, hang them along the inside of the basket. 1-10 | Setting Up the Printer 7. Hold the front bar and turn it to take up the slack. 1-10 Push the upper and lower metal rods all the way in. 9. Then attach it one revolution. Hang paper supports at even intervals as shown 10. Hook the basket rings to the lower metal rods. 8.
Printer Guide
Page 27
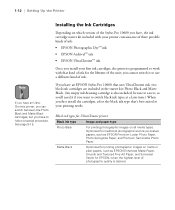
...EPSON UltraChrome™ ink Once you install your printing needs: Black ink types for UltraChrome printer Black ink type Image and paper type Photo Black For printing photographic images on all media types. See page 5-15. Optimized for the lifetime of ink. Installing the Ink Cartridges Depending on which version of the Stylus Pro 10600...ink type that's best suited to your first ink cartridges, the printer is desired. 1-12 be sure to save it to follow a special procedure. you have an EPSON Stylus Pro 10600 that uses UltraChrome ink, two black ink cartridges are included in ...
...EPSON UltraChrome™ ink Once you install your printing needs: Black ink types for UltraChrome printer Black ink type Image and paper type Photo Black For printing photographic images on all media types. See page 5-15. Optimized for the lifetime of ink. Installing the Ink Cartridges Depending on which version of the Stylus Pro 10600...ink type that's best suited to your first ink cartridges, the printer is desired. 1-12 be sure to save it to follow a special procedure. you have an EPSON Stylus Pro 10600 that uses UltraChrome ink, two black ink cartridges are included in ...

Printer Guide
Page 30
... lever, or open the lower cover or ink compartment cover while the printer is pointing toward the printer. When the Pause light stops flashing and Paper Out appears on your eyes, flush them thoroughly with water. If ink gets on the control panel display, you may have the wrong cartridge. Push ...the clamp back up into the slot. If you can't insert the cartridge smoothly, you 're ready to load the roll paper. 1-15 Repeat step 4 through step 7 for the other ink cartridges. The Pause light on its left side is charging ink. 8. If ink gets in ...
... lever, or open the lower cover or ink compartment cover while the printer is pointing toward the printer. When the Pause light stops flashing and Paper Out appears on your eyes, flush them thoroughly with water. If ink gets on the control panel display, you may have the wrong cartridge. Push ...the clamp back up into the slot. If you can't insert the cartridge smoothly, you 're ready to load the roll paper. 1-15 Repeat step 4 through step 7 for the other ink cartridges. The Pause light on its left side is charging ink. 8. If ink gets in ...

Printer Guide
Page 31
...these steps to print the test patterns described later in the printer: 1. Place the white end on the right 1-16 Open the printer's roll paper cover. 2. 1-16 | Setting Up the Printer Note Avoid touching the printable surface of the paper as much as possible. Insert the white end into the... right mounting bracket inside the printer. Oils from your printer. (It should already be loaded onto...
...these steps to print the test patterns described later in the printer: 1. Place the white end on the right 1-16 Open the printer's roll paper cover. 2. 1-16 | Setting Up the Printer Note Avoid touching the printable surface of the paper as much as possible. Insert the white end into the... right mounting bracket inside the printer. Oils from your printer. (It should already be loaded onto...

Printer Guide
Page 32
Place the black end of the spindle into the corresponding left mounting bracket. 4. Setting Up the Printer | 1-17 3. Note To avoid feeding excess paper, make sure you don't select Sheet when you're using roll paper. 1-17 Press the Paper Source button on the control panel until the Roll Auto Cut light comes on.
Place the black end of the spindle into the corresponding left mounting bracket. 4. Setting Up the Printer | 1-17 3. Note To avoid feeding excess paper, make sure you don't select Sheet when you're using roll paper. 1-17 Press the Paper Source button on the control panel until the Roll Auto Cut light comes on.

Printer Guide
Page 33
1-18 | Setting Up the Printer 5. Pull the paper set lever out, to the released position. The Paper Out light on the control panel comes on and LOAD PAPER appears on . 1-18 You hear the paper suction fans come on the control panel display. 6. Feed the paper into the paper slot.
1-18 | Setting Up the Printer 5. Pull the paper set lever out, to the released position. The Paper Out light on the control panel comes on and LOAD PAPER appears on . 1-18 You hear the paper suction fans come on the control panel display. 6. Feed the paper into the paper slot.

Printer Guide
Page 34
Pull the paper down so it extends all the way through the slot. 1-19 If you're using the roll paper that came with the printer, decrease the suction by pressing the Paper Feed - This makes is easier to feed lighter-weight papers. 8. button. Setting Up the Printer | 1-19 7.
Pull the paper down so it extends all the way through the slot. 1-19 If you're using the roll paper that came with the printer, decrease the suction by pressing the Paper Feed - This makes is easier to feed lighter-weight papers. 8. button. Setting Up the Printer | 1-19 7.

Printer Guide
Page 35
Turn the roll back to remove any slack. Caution To avoid damaging the printer, never move into printing position automatically. The print head moves and the paper feeds into printing position automatically after 10 seconds.) 1-20 Press the Pause button. PRESS PAUSE BUTTON appears briefly on the control... panel display. (Even if you don't press Pause, the paper and printer move the paper set lever all the way in, then close the roll paper cover. READY appears on the control panel display. Push the paper set lever while the Operate or Pause light is flashing. 11. ...
Turn the roll back to remove any slack. Caution To avoid damaging the printer, never move into printing position automatically. The print head moves and the paper feeds into printing position automatically after 10 seconds.) 1-20 Press the Pause button. PRESS PAUSE BUTTON appears briefly on the control... panel display. (Even if you don't press Pause, the paper and printer move the paper set lever all the way in, then close the roll paper cover. READY appears on the control panel display. Push the paper set lever while the Operate or Pause light is flashing. 11. ...

