

Technical Brief (Scanners)
Page 2
... 10-bit gray scale 210 = 1,024 shades of data captured for each different scan mode. Image Quality-Resolution (cont.) 3. It is required to capture and print the sharp lines and edges of images without using interpolation. It uses a complex algorithm to "add" pixels to the... printed dots. Therefore, high resolution is always better to use true image data than the hardware resolution. 4. For example, if a scanner has a hardware resolution of 1200 x ...
... 10-bit gray scale 210 = 1,024 shades of data captured for each different scan mode. Image Quality-Resolution (cont.) 3. It is required to capture and print the sharp lines and edges of images without using interpolation. It uses a complex algorithm to "add" pixels to the... printed dots. Therefore, high resolution is always better to use true image data than the hardware resolution. 4. For example, if a scanner has a hardware resolution of 1200 x ...
Basics
Page 2
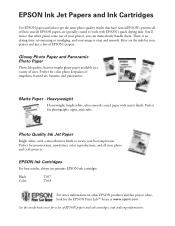
... and inks to get the same photo quality results that when prints come out of your printer, you can immediately handle them. Here are specially coated to create your printer and just a few of EPSON's papers: Glossy Photo Paper and Panoramic Photo Paper Photo lab quality, heavier weight glossy... for photographs, signs, and crafts. Perfect for presentations, newsletters, color reproductions, and all of sizes. You'll notice that have earned EPSON's printers all your image is crisp and smooth. There is no drying time, no smearing or smudging, and your photo and craft projects. Perfect...
... and inks to get the same photo quality results that when prints come out of your printer, you can immediately handle them. Here are specially coated to create your printer and just a few of EPSON's papers: Glossy Photo Paper and Panoramic Photo Paper Photo lab quality, heavier weight glossy... for photographs, signs, and crafts. Perfect for presentations, newsletters, color reproductions, and all of sizes. You'll notice that have earned EPSON's printers all your image is crisp and smooth. There is no drying time, no smearing or smudging, and your photo and craft projects. Perfect...

Basics
Page 3
... is not responsible for damages, losses, costs, or expenses incurred by improper copying or printing of the copyright laws when using digital cameras, scanners, and ink jet printers. Neither SEIKO EPSON CORPORATION nor its affiliates shall be responsible and respectful of copyrighted material. EPSON disclaims any product or service. Copyright Notice All rights reserved...
... is not responsible for damages, losses, costs, or expenses incurred by improper copying or printing of the copyright laws when using digital cameras, scanners, and ink jet printers. Neither SEIKO EPSON CORPORATION nor its affiliates shall be responsible and respectful of copyrighted material. EPSON disclaims any product or service. Copyright Notice All rights reserved...

Basics
Page 4
Heavyweight EPSON Glossy Photo Paper Printing on Envelopes Selecting the Correct Media Type Scanning Placing Your Original Document Scanning to a File in EPSON Smart Panel One-Touch Scanning Advanced Scanning With EPSON TWAIN 1 1 1 1 2 3 3 4 5 7 7 8 9 10 10 11 12 12 13 14 14 14...Stand-alone Copying Changing Copy Settings Making Copies With the Computer Printing Loading Paper Opening the Printer Software Selecting Printer Software Settings Selecting Default Print Settings for All Applications Controlling Printing Using PhotoEnhance, Custom, and Advanced Settings Enhancing Photos Using Custom...
Heavyweight EPSON Glossy Photo Paper Printing on Envelopes Selecting the Correct Media Type Scanning Placing Your Original Document Scanning to a File in EPSON Smart Panel One-Touch Scanning Advanced Scanning With EPSON TWAIN 1 1 1 1 2 3 3 4 5 7 7 8 9 10 10 11 12 12 13 14 14 14...Stand-alone Copying Changing Copy Settings Making Copies With the Computer Printing Loading Paper Opening the Printer Software Selecting Printer Software Settings Selecting Default Print Settings for All Applications Controlling Printing Using PhotoEnhance, Custom, and Advanced Settings Enhancing Photos Using Custom...

Basics
Page 5
... 28 Purchasing Ink Cartridges 28 Ink Cartridge Precautions 29 Removing and Installing Ink Cartridges 29 Cleaning the EPSON 1000 ICS 31 Transporting the EPSON 1000 ICS 33 Problem Solving 35 Identifying Parts 35 Diagnosing Problems 37 Checking the Control Panel Error Messages 37 Printing a Nozzle Check 39 Problems and Solutions 39 Setup and Software Installation Problems 39...
... 28 Purchasing Ink Cartridges 28 Ink Cartridge Precautions 29 Removing and Installing Ink Cartridges 29 Cleaning the EPSON 1000 ICS 31 Transporting the EPSON 1000 ICS 33 Problem Solving 35 Identifying Parts 35 Diagnosing Problems 37 Checking the Control Panel Error Messages 37 Printing a Nozzle Check 39 Problems and Solutions 39 Setup and Software Installation Problems 39...
Basics
Page 6
... additional hints for editing, retouching, or enhancing images and printing images with powerful features for controlling every aspect of your EPSON 1000 ICS and install its software, see your EPSON 1000 ICS. EPSON Smart Panel,™ by NewSoft™ An easy, step-by-step interface for copying, scanning, and printing. Your EPSON® 1000 ICS is an ideal device for scanning, copying...
... additional hints for editing, retouching, or enhancing images and printing images with powerful features for controlling every aspect of your EPSON 1000 ICS and install its software, see your EPSON 1000 ICS. EPSON Smart Panel,™ by NewSoft™ An easy, step-by-step interface for copying, scanning, and printing. Your EPSON® 1000 ICS is an ideal device for scanning, copying...
Basics
Page 8
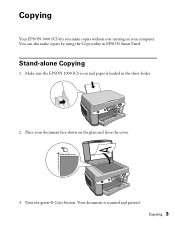
Press the green x Copy button. Place your computer. Copying Your EPSON 1000 ICS lets you make copies by using the Copy utility in the sheet feeder. 2. Make sure the EPSON 1000 ICS is on the glass and close the cover. 3. Stand-alone Copying 1. Your document is loaded in EPSON Smart Panel. Copying 3 You can also make copies without ever turning on your document face-down on and paper is scanned and printed.
Press the green x Copy button. Place your computer. Copying Your EPSON 1000 ICS lets you make copies by using the Copy utility in the sheet feeder. 2. Make sure the EPSON 1000 ICS is on the glass and close the cover. 3. Stand-alone Copying 1. Your document is loaded in EPSON Smart Panel. Copying 3 You can also make copies without ever turning on your document face-down on and paper is scanned and printed.
Basics
Page 9
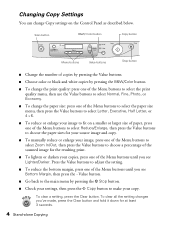
... the − Value button. ■ Go back to the main menu by pressing the B&W/Color button. ■ To change the print quality: press one of the Menu buttons to select the print quality menu, then use the Value buttons to select Normal, Fine, Photo, or Economy. ■ To change Copy settings on a... button Scan Clear Clear all the setting changes you've made, press the Clear button and hold it down for the resulting print. ■ To lighten or darken your copies, press one of the Menu buttons until you see Lighter/Darker. Changing Copy Settings You can change the paper size: press...
... the − Value button. ■ Go back to the main menu by pressing the B&W/Color button. ■ To change the print quality: press one of the Menu buttons to select the print quality menu, then use the Value buttons to select Normal, Fine, Photo, or Economy. ■ To change Copy settings on a... button Scan Clear Clear all the setting changes you've made, press the Clear button and hold it down for the resulting print. ■ To lighten or darken your copies, press one of the Menu buttons until you see Lighter/Darker. Changing Copy Settings You can change the paper size: press...
Basics
Page 11
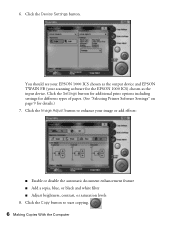
... 6 Making Copies With the Computer 6. Click the Settings button for additional print options including settings for different types of paper. (See "Selecting Printer Software Settings" on page 9 for the EPSON 1000 ICS) chosen as the output device and EPSON TWAIN FB (your image or add effects: ■ Enable or disable ...blue, or black and white filter ■ Adjust brightness, contrast, or saturation levels 8. Click the Device Settings button. You should see your EPSON 1000 ICS chosen as the input device. Click the Copy button to enhance your scanning software for details.) 7.
... 6 Making Copies With the Computer 6. Click the Settings button for additional print options including settings for different types of paper. (See "Selecting Printer Software Settings" on page 9 for the EPSON 1000 ICS) chosen as the output device and EPSON TWAIN FB (your image or add effects: ■ Enable or disable ...blue, or black and white filter ■ Adjust brightness, contrast, or saturation levels 8. Click the Device Settings button. You should see your EPSON 1000 ICS chosen as the input device. Click the Copy button to enhance your scanning software for details.) 7.
Basics
Page 12
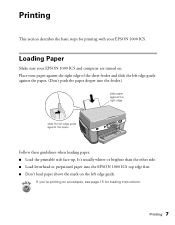
... when loading paper: ■ Load the printable side face-up. Printing 7 Printing This section describes the basic steps for loading instructions. Place your EPSON 1000 ICS. If you're printing on envelopes, see page 15 for printing with your paper against the right edge of the sheet feeder and ...slide the left edge guide against the paper. (Don't push the paper deeper into the EPSON 1000 ICS top edge first. &#...
... when loading paper: ■ Load the printable side face-up. Printing 7 Printing This section describes the basic steps for loading instructions. Place your EPSON 1000 ICS. If you're printing on envelopes, see page 15 for printing with your paper against the right edge of the sheet feeder and ...slide the left edge guide against the paper. (Don't push the paper deeper into the EPSON 1000 ICS top edge first. &#...
Basics
Page 13
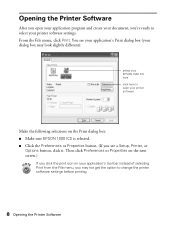
... menu, you may look slightly different): select your EPSON 1000 ICS here click here to open your application program and create your printer software settings. Then click Preferences or Properties on the next screen.) If you click the print icon on the Print dialog box: ■ Make sure EPSON 1000 ICS is selected. ■ Click the Preferences or Properties...
... menu, you may look slightly different): select your EPSON 1000 ICS here click here to open your application program and create your printer software settings. Then click Preferences or Properties on the next screen.) If you click the print icon on the Print dialog box: ■ Make sure EPSON 1000 ICS is selected. ■ Click the Preferences or Properties...

Basics
Page 14
... the paper you see page 16. ■ Set the Ink option to Color to print a color document. It's the easiest way to get good printing results on (click the arrow to your printer software dialog box. The most important thing to remember is to set the correct Media ...to scroll through the Media Type list). To print a black text document, click Black. ■ Set the Mode option to select, see your application's Print dialog box. Printing 9 Selecting Printer Software Settings Once you click Properties, you 're using. If you 're printing on all types of paper you loaded select...
... the paper you see page 16. ■ Set the Ink option to Color to print a color document. It's the easiest way to get good printing results on (click the arrow to your printer software dialog box. The most important thing to remember is to set the correct Media ...to scroll through the Media Type list). To print a black text document, click Black. ■ Set the Mode option to select, see your application's Print dialog box. Printing 9 Selecting Printer Software Settings Once you click Properties, you 're using. If you 're printing on all types of paper you loaded select...

Basics
Page 15
... documents with black ink-you want to print different types of document in your applications. Right-click the EPSON 1000 ICS icon. 3. Select the default settings you can always change the default printer settings for all your application when you ...Printers and Other Hardware > Printers and Faxes. Then click the Main tab. 4. If you usually print one type of documents. Controlling Printing At the Print dialog box, click Print (or OK) to start printing. 10 Controlling Printing click Print to start printing Selecting Default Print Settings for All Applications The printer...
... documents with black ink-you want to print different types of document in your applications. Right-click the EPSON 1000 ICS icon. 3. Select the default settings you can always change the default printer settings for all your application when you ...Printers and Other Hardware > Printers and Faxes. Then click the Main tab. 4. If you usually print one type of documents. Controlling Printing At the Print dialog box, click Print (or OK) to start printing. 10 Controlling Printing click Print to start printing Selecting Default Print Settings for All Applications The printer...

Basics
Page 16
... these settings, see the electronic Reference Guide, as described in these sections below. For more advanced printer settings, see your printer software settings, as described on page 2. Using PhotoEnhance, Custom, and Advanced Settings When you're printing special projects, you have left. After a moment, the Progress Meter appears and shows the progress of...
... these settings, see the electronic Reference Guide, as described in these sections below. For more advanced printer settings, see your printer software settings, as described on page 2. Using PhotoEnhance, Custom, and Advanced Settings When you're printing special projects, you have left. After a moment, the Progress Meter appears and shows the progress of...

Basics
Page 17
... Camera Correction to add special effects. For more fine-tuning, you cannot turn on PhotoEnhance with preset printing options. Then select one of low-resolution and improperly exposed photos. it . Using Custom Project Types Your printer software includes custom project types with Black ink selected. Saves ink. 12 Using PhotoEnhance, Custom, and Advanced...
... Camera Correction to add special effects. For more fine-tuning, you cannot turn on PhotoEnhance with preset printing options. Then select one of low-resolution and improperly exposed photos. it . Using Custom Project Types Your printer software includes custom project types with Black ink selected. Saves ink. 12 Using PhotoEnhance, Custom, and Advanced...
Basics
Page 18
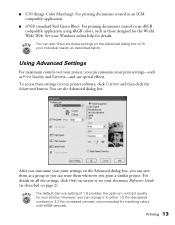
...created in an ICM compatible application. ■ sRGB (standard Red Green Blue): For printing documents created in your print settings on the Advanced dialog box, you can save them whenever you customize your printer software, click Custom and then click the Advanced button. You can change it to ...fit your electronic Reference Guide (as those designed for matching colors with sRGB devices). For details on all the settings, click Help on page 2). Printing 13 To access ...
...created in an ICM compatible application. ■ sRGB (standard Red Green Blue): For printing documents created in your print settings on the Advanced dialog box, you can save them whenever you customize your printer software, click Custom and then click the Advanced button. You can change it to ...fit your electronic Reference Guide (as those designed for matching colors with sRGB devices). For details on all the settings, click Help on page 2). Printing 13 To access ...

Basics
Page 19
...a support sheet if it is included in the package. ■ Select Glossy Photo Paper as the ones you get from heat, humidity, and direct sunlight. For a list of EPSON special ink jet papers and ordering information, see the electronic Reference Guide, as described on a non-...-looking photos, most popular papers are given below. Return unused paper to 20 sheets as described on a couple of Panoramic paper. EPSON Matte Paper - Instructions for printing photos and graphics on page 7, including a support sheet beneath the stack. Load up to 20 sheets of 4 × 6-inch...
...a support sheet if it is included in the package. ■ Select Glossy Photo Paper as the ones you get from heat, humidity, and direct sunlight. For a list of EPSON special ink jet papers and ordering information, see the electronic Reference Guide, as described on a non-...-looking photos, most popular papers are given below. Return unused paper to 20 sheets as described on a couple of Panoramic paper. EPSON Matte Paper - Instructions for printing photos and graphics on page 7, including a support sheet beneath the stack. Load up to 20 sheets of 4 × 6-inch...
Basics
Page 20
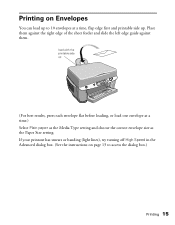
.... load with the printable side up (For best results, press each envelope flat before loading, or load one envelope at a time, flap edge first and printable side up to access the dialog box.) Printing 15 If your printout has smears or banding (light lines), try turning off High Speed in the Advanced... dialog box. (See the instructions on Envelopes You can load up . Printing on page 13 to 10 envelopes at a time.) Select Plain paper as the Media Type setting and choose the correct envelope size as the Paper...
.... load with the printable side up (For best results, press each envelope flat before loading, or load one envelope at a time, flap edge first and printable side up to access the dialog box.) Printing 15 If your printout has smears or banding (light lines), try turning off High Speed in the Advanced... dialog box. (See the instructions on Envelopes You can load up . Printing on page 13 to 10 envelopes at a time.) Select Plain paper as the Media Type setting and choose the correct envelope size as the Paper...

Basics
Page 30
... your EPSON 1000 ICS at least once a month to maintain good print quality. 1. Make sure the EPSON 1000 ICS is flashing, unless the EPSON 1000 ICS hasn't moved or made noise for a long time, the print quality can deliver ink properly. Never turn on but not printing, and the Error light is off the EPSON 1000 ICS while the POperate light is turned on your EPSON 1000 ICS...
... your EPSON 1000 ICS at least once a month to maintain good print quality. 1. Make sure the EPSON 1000 ICS is flashing, unless the EPSON 1000 ICS hasn't moved or made noise for a long time, the print quality can deliver ink properly. Never turn on but not printing, and the Error light is off the EPSON 1000 ICS while the POperate light is turned on your EPSON 1000 ICS...

Basics
Page 31
...on and plain letter-size paper is loaded in the dot pattern. Make sure the EPSON 1000 ICS is turned on page 39. Aligning the Print Head If your printouts contain misaligned vertical lines, you print. 3. Examine the nozzle check pattern you may need to soften-and then try cleaning...clean: make sure paper is loaded. 26 Aligning the Print Head When the POperate light stops flashing, run a nozzle check to prevent ink from the EPSON 1000 ICS control panel. You can align the print head directly from spraying inside the EPSON 1000 ICS and smudging your printout looks okay, you don't see...
...on and plain letter-size paper is loaded in the dot pattern. Make sure the EPSON 1000 ICS is turned on page 39. Aligning the Print Head If your printouts contain misaligned vertical lines, you print. 3. Examine the nozzle check pattern you may need to soften-and then try cleaning...clean: make sure paper is loaded. 26 Aligning the Print Head When the POperate light stops flashing, run a nozzle check to prevent ink from the EPSON 1000 ICS control panel. You can align the print head directly from spraying inside the EPSON 1000 ICS and smudging your printout looks okay, you don't see...


