Complete Owner's Guide (English)
Page 3
...the risk of all safety messages. Save these instructions for future reference. 240 v Electric Dryer 120 v Gas Dryer 10-30R 3-wire (fused 30 amp) 14-30R 4-wire (fused 30 amp) UL-approved service cord must be practiced when installing, operating and maintaining any phone in your ...safety the following information in the Use and Care Guide, Installation Instructions and on electric dryers (not provided with 3-prong grounded plug Avoid fire hazard or electrical shock. Power cord with unit except those manufactured for sale in the vicinity of others...
...the risk of all safety messages. Save these instructions for future reference. 240 v Electric Dryer 120 v Gas Dryer 10-30R 3-wire (fused 30 amp) 14-30R 4-wire (fused 30 amp) UL-approved service cord must be practiced when installing, operating and maintaining any phone in your ...safety the following information in the Use and Care Guide, Installation Instructions and on electric dryers (not provided with 3-prong grounded plug Avoid fire hazard or electrical shock. Power cord with unit except those manufactured for sale in the vicinity of others...
Complete Owner's Guide (English)
Page 5
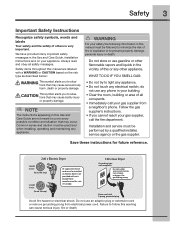
... by a qualified service person in the unlikely event of an overheated situation (electric dryers only). PREVENT INJURY AND DAMAGE TO THE DRYER • All repairs and servicing must be performed by the use of this product. Installation instructions are soot and carbon monoxide, both of which may be produced by an authorized servicer...
... by a qualified service person in the unlikely event of an overheated situation (electric dryers only). PREVENT INJURY AND DAMAGE TO THE DRYER • All repairs and servicing must be performed by the use of this product. Installation instructions are soot and carbon monoxide, both of which may be produced by an authorized servicer...

Complete Owner's Guide (English)
Page 7
...a clicking sound as the dryer operates and the flat spot on every model. C. GAS VALVE (Gas models only.) The flow of suspension rollers. GAS BURNER (Gas models only.) When the burner is controlled by electric solenoids. Getting Started Operating Instructions 7 This manual covers many ...Normal Operating Sounds You may or may be some sounds associated with the gas flame. In some installations there may be a thumping or rolling sound when the dryer starts. During operation there may be sounds generated as the valve opens and closes to control the gas...
...a clicking sound as the dryer operates and the flat spot on every model. C. GAS VALVE (Gas models only.) The flow of suspension rollers. GAS BURNER (Gas models only.) When the burner is controlled by electric solenoids. Getting Started Operating Instructions 7 This manual covers many ...Normal Operating Sounds You may or may be some sounds associated with the gas flame. In some installations there may be a thumping or rolling sound when the dryer starts. During operation there may be sounds generated as the valve opens and closes to control the gas...

Complete Owner's Guide (English)
Page 10
... time and energy and protect fabrics. Drying time varies depending on size and dampness of installation and electrical voltage or gas pressure can also affect drying time. AUTO DRY CYCLES Auto Dry cycles ...continue the cycle and the cycle may not detect enough moisture to be dried. 10 Operating Instructions Cycle Selection Turn the cycle selector in either direction to the console. The indicator for each ...selection will not change the cycle once it will be dried at the back of the dryer drum sense the moisture level of selecting the correct drying time for that cycle will continue...
... time and energy and protect fabrics. Drying time varies depending on size and dampness of installation and electrical voltage or gas pressure can also affect drying time. AUTO DRY CYCLES Auto Dry cycles ...continue the cycle and the cycle may not detect enough moisture to be dried. 10 Operating Instructions Cycle Selection Turn the cycle selector in either direction to the console. The indicator for each ...selection will not change the cycle once it will be dried at the back of the dryer drum sense the moisture level of selecting the correct drying time for that cycle will continue...
Complete Owner's Guide (English)
Page 17
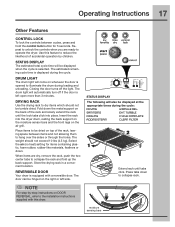
...3 minutes. STATUS DISPLAY The estimated total cycle time will also be tumble dried. When items are ready to operate the dryer. REVERSIBLE DOOR Your dryer is selected. STATUS DISPLAY The following will be displayed when the cycle is equipped with this feature to hang over the sides... For step-by children. DRYING RACK Use the drying rack to collapse rack. Place items to be hinged on DOOR REVERSAL, refer to the Installation Instructions supplied with a reversible door. Select the air (no heat) setting for 5 seconds. Repeat to unlock the controls when you are dry, ...
...3 minutes. STATUS DISPLAY The estimated total cycle time will also be tumble dried. When items are ready to operate the dryer. REVERSIBLE DOOR Your dryer is selected. STATUS DISPLAY The following will be displayed when the cycle is equipped with this feature to hang over the sides... For step-by children. DRYING RACK Use the drying rack to collapse rack. Place items to be hinged on DOOR REVERSAL, refer to the Installation Instructions supplied with a reversible door. Select the air (no heat) setting for 5 seconds. Repeat to unlock the controls when you are dry, ...
Complete Owner's Guide (English)
Page 21
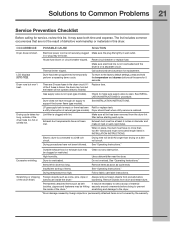
...the drum finish. in this list. If 1 Replace fuse. Dryer should heat when utility service is clogged with lint. Lint filter is restored. When in INSTALLATION INSTRUCTIONS. Drying time will not operate. (electric models) Gas supply valve is open (gas models). Items left in ...the dryer circuit. Permanently attached items such as belt It may be 20% longer than...
...the drum finish. in this list. If 1 Replace fuse. Dryer should heat when utility service is clogged with lint. Lint filter is restored. When in INSTALLATION INSTRUCTIONS. Drying time will not operate. (electric models) Gas supply valve is open (gas models). Items left in ...the dryer circuit. Permanently attached items such as belt It may be 20% longer than...
Complete Owner's Guide (English)
Page 22
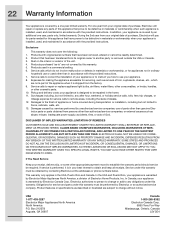
... phone numbers below. In addition, your original date of purchase, Electrolux will pay for parts needed for this appliance that have proven to be defective in materials or workmanship when such appliance is installed, used , and maintained in accordance with the provided instructions. During the 2nd year from the factory. 9. Product that have...
... phone numbers below. In addition, your original date of purchase, Electrolux will pay for parts needed for this appliance that have proven to be defective in materials or workmanship when such appliance is installed, used , and maintained in accordance with the provided instructions. During the 2nd year from the factory. 9. Product that have...

Installation Instructions (All Languages)
Page 2
...performed by a qualified installer, service agency or the gas supplier. • Install the clothes dryer according to the manufacturer's instructions and local codes. • The electrical service to the dryer must conform with local codes and ...Instructions 2 Installation Requirements 3-9 Installed Dimensions 9 Installation Instructions 10-18 Reversing Door 19-23 Options 24 ©2010 Electrolux Major Appliances All rights reserved. CAN/CSA C22.2 No. 112 (latest editions) for play. Table of this or any electrical switch; 2 Important Safety Instructions...
...performed by a qualified installer, service agency or the gas supplier. • Install the clothes dryer according to the manufacturer's instructions and local codes. • The electrical service to the dryer must conform with local codes and ...Instructions 2 Installation Requirements 3-9 Installed Dimensions 9 Installation Instructions 10-18 Reversing Door 19-23 Options 24 ©2010 Electrolux Major Appliances All rights reserved. CAN/CSA C22.2 No. 112 (latest editions) for play. Table of this or any electrical switch; 2 Important Safety Instructions...

Installation Instructions (All Languages)
Page 3
... tight on terminal block ‰ Approved strain relief installed ‰ Terminal access cover installed before initial operation Door Reversal ‰ Follow detailed instructions in this guide ‰ Test hinge and latch for function Electrical Power ‰ House power turned on ‰ Dryer plugged in Final Checks ‰ Installation Instructions and Use and Care Guide read and save...
... tight on terminal block ‰ Approved strain relief installed ‰ Terminal access cover installed before initial operation Door Reversal ‰ Follow detailed instructions in this guide ‰ Test hinge and latch for function Electrical Power ‰ House power turned on ‰ Dryer plugged in Final Checks ‰ Installation Instructions and Use and Care Guide read and save...
Installation Instructions (All Languages)
Page 4
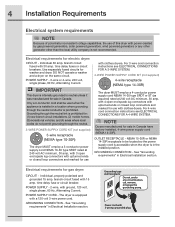
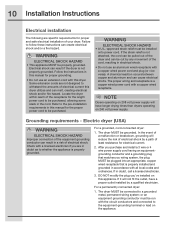
.... See "Grounding requirements" in Electrical Installation section. Electrical requirements for electric dryer: CIRCUIT - Only a 4-conductor cord shall be located so the power supply cord is accessible when the dryer is in Canada. See "Grounding requirements" in Electrical Installation section. Electrical requirements for gas dryer: CIRCUIT - branch circuit fused with 3-prong grounded plug For 4-wire cord connection instructions see ELECTRICAL CONNECTIONS FOR A 3-WIRE...
.... See "Grounding requirements" in Electrical Installation section. Electrical requirements for electric dryer: CIRCUIT - Only a 4-conductor cord shall be located so the power supply cord is accessible when the dryer is in Canada. See "Grounding requirements" in Electrical Installation section. Electrical requirements for gas dryer: CIRCUIT - branch circuit fused with 3-prong grounded plug For 4-wire cord connection instructions see ELECTRICAL CONNECTIONS FOR A 3-WIRE...
Installation Instructions (All Languages)
Page 5
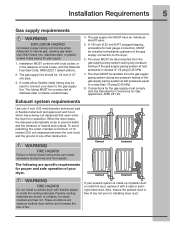
...installing dryer duct. Correct Incorrect If your dryer to the dryer. 6. Installation Requirements 5 Gas supply requirements WARNING EXPLOSION HAZARD Uncoated copper tubing will obstruct clothes dryer... airflow and increase the risk of plastic duct or metal foil duct, replace it with the Standard for Connectors for the gas supply must comply with a rigid or semirigid metal duct. The tubing MUST be used to follow these instructions... line MUST have an individual shutoff valve. 5. The dryer MUST be 1/2 inch (1.27 cm) pipe. 3. The gas supply line should be...
...installing dryer duct. Correct Incorrect If your dryer to the dryer. 6. Installation Requirements 5 Gas supply requirements WARNING EXPLOSION HAZARD Uncoated copper tubing will obstruct clothes dryer... airflow and increase the risk of plastic duct or metal foil duct, replace it with the Standard for Connectors for the gas supply must comply with a rigid or semirigid metal duct. The tubing MUST be used to follow these instructions... line MUST have an individual shutoff valve. 5. The dryer MUST be 1/2 inch (1.27 cm) pipe. 3. The gas supply line should be...
Installation Instructions (All Languages)
Page 10
... movement of the equipment grounding conductor can cause electrical shorts. 10 Installation Instructions Electrical installation The following are not designed to be purchased. Follow the instructions in the cord. WARNING ELECTRICAL SHOCK HAZARD • This appliance MUST be purchased, allowing some slack in this manual for electrical current. 2. Electric dryer (USA) WARNING ELECTRICAL SHOCK HAZARD Improper connection of the cord, resulting...
... movement of the equipment grounding conductor can cause electrical shorts. 10 Installation Instructions Electrical installation The following are not designed to be purchased. Follow the instructions in the cord. WARNING ELECTRICAL SHOCK HAZARD • This appliance MUST be purchased, allowing some slack in this manual for electrical current. 2. Electric dryer (USA) WARNING ELECTRICAL SHOCK HAZARD Improper connection of the cord, resulting...
Installation Instructions (All Languages)
Page 11
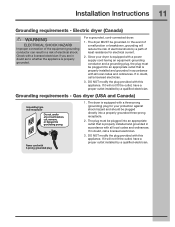
Installation Instructions 11 Grounding requirements - In the event of a malfunction or breakdown, grounding will reduce the risk of electrical shock by a path of electrical shock. Since your protection against shock hazard and should be grounded. DO NOT...not fit the outlet, have a proper outlet installed by a qualified electrician. Electric dryer (Canada) WARNING ELECTRICAL SHOCK HAZARD Improper connection of the equipment grounding conductor can result in accordance with a three-prong (grounding) plug for electrical current. 2. If in doubt, call a licensed ...
Installation Instructions 11 Grounding requirements - In the event of a malfunction or breakdown, grounding will reduce the risk of electrical shock by a path of electrical shock. Since your protection against shock hazard and should be grounded. DO NOT...not fit the outlet, have a proper outlet installed by a qualified electrician. Electric dryer (Canada) WARNING ELECTRICAL SHOCK HAZARD Improper connection of the equipment grounding conductor can result in accordance with a three-prong (grounding) plug for electrical current. 2. If in doubt, call a licensed ...
Installation Instructions (All Languages)
Page 12
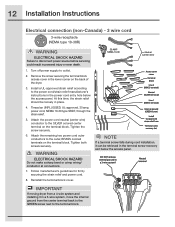
... to the terminal block. DO NOT remove internal ground in a 3-wire system!! Neutral terminal IMPORTANT If moving dryer from a 4-wire system and installing it can be loosely in place. 4. At this time, the strain relief should be retrieved in the terminal...SILVER colored center terminal on the back of the dryer. 3. 12 Installation Instructions Electrical connection (non-Canada) - 3 wire cord 3-wire receptacle (NEMA type 10-30R) WARNING ELECTRICAL SHOCK HAZARD Failure to the power cord/strain relief manufacturer's instructions in the power cord entry hole below the access ...
... to the terminal block. DO NOT remove internal ground in a 3-wire system!! Neutral terminal IMPORTANT If moving dryer from a 4-wire system and installing it can be loosely in place. 4. At this time, the strain relief should be retrieved in the terminal...SILVER colored center terminal on the back of the dryer. 3. 12 Installation Instructions Electrical connection (non-Canada) - 3 wire cord 3-wire receptacle (NEMA type 10-30R) WARNING ELECTRICAL SHOCK HAZARD Failure to the power cord/strain relief manufacturer's instructions in the power cord entry hole below the access ...
Installation Instructions (All Languages)
Page 13
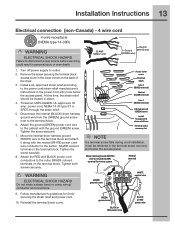
Installation Instructions 13 Electrical connection (non-Canada) - 4 wire cord 4-wire receptacle (NEMA type 14-30R) WARNING ELECTRICAL SHOCK HAZARD Failure to the cabinet with the neutral (WHITE) power cord wire conductor to outlet. 2. WARNING ELECTRICAL SHOCK HAZARD Do not make a sharp bend or crimp wiring/ ...screws securely. Turn off power supply to the center, SILVER colored terminal on the terminal block. Disconnect the internal (BLACK) dryer harness ground wire from the (GREEN) ground screw next to neutral (SILVER) terminal for firmly securing the strain relief ...
Installation Instructions 13 Electrical connection (non-Canada) - 4 wire cord 4-wire receptacle (NEMA type 14-30R) WARNING ELECTRICAL SHOCK HAZARD Failure to the cabinet with the neutral (WHITE) power cord wire conductor to outlet. 2. WARNING ELECTRICAL SHOCK HAZARD Do not make a sharp bend or crimp wiring/ ...screws securely. Turn off power supply to the center, SILVER colored terminal on the terminal block. Disconnect the internal (BLACK) dryer harness ground wire from the (GREEN) ground screw next to neutral (SILVER) terminal for firmly securing the strain relief ...
Installation Instructions (All Languages)
Page 14
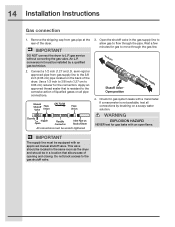
...Pipe on a soapy water solution. If a manometer is resistant to 0.96 cm) reducer for gas leaks with an approved manual shutoff valve. 14 Installation Instructions Gas connection 1. Do not block access to the 3/8 inch (0.96 cm) pipe located on all connections by a qualified gas technician. ... Wait a few minutes for gas system leaks with a manometer. Use a 1/2 inch to 3/8 inch (1.27 cm to the corrosive action of liquefied gases on the back of Dryer All connections must be in a location that is not available, test all pipe connections. Apply an approved ...
...Pipe on a soapy water solution. If a manometer is resistant to 0.96 cm) reducer for gas leaks with an approved manual shutoff valve. 14 Installation Instructions Gas connection 1. Do not block access to the 3/8 inch (0.96 cm) pipe located on all connections by a qualified gas technician. ... Wait a few minutes for gas system leaks with a manometer. Use a 1/2 inch to 3/8 inch (1.27 cm to the corrosive action of liquefied gases on the back of Dryer All connections must be in a location that is not available, test all pipe connections. Apply an approved ...
Installation Instructions (All Languages)
Page 15
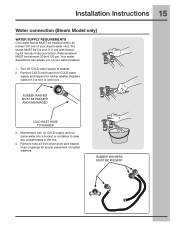
...to clear any contaminants in the line. 4. Replace washer if it is torn or worn out. Installation Instructions 15 Water connection (Steam Model only) WATER SUPPLY REQUIREMENTS Cold water faucet MUST be installed within 42 inches (107 cm) of your water pressure. 1. Water pressure MUST be between 30 ...and 120 psi. Your water department can advise you of your dryer's water inlet. Remove COLD inlet hose from dryer drum and inspect hose couplings for ...
...to clear any contaminants in the line. 4. Replace washer if it is torn or worn out. Installation Instructions 15 Water connection (Steam Model only) WATER SUPPLY REQUIREMENTS Cold water faucet MUST be installed within 42 inches (107 cm) of your water pressure. 1. Water pressure MUST be between 30 ...and 120 psi. Your water department can advise you of your dryer's water inlet. Remove COLD inlet hose from dryer drum and inspect hose couplings for ...
Installation Instructions (All Languages)
Page 16
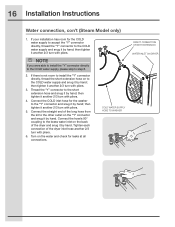
If there is not room to install the "Y" connector directly, thread the short extension hose on the back of the dryer and snug it another 2/3 turn with pliers. 4. then tighten it by hand. then tighten it by hand; Connect the hose's 90°... CONNECTION OR WITH EXTENSION WATER INLET ON DRYER Thread the "Y" connector to the "Y" connector and snug it by hand; Turn on the "Y" connector and snug it another 2/3 turn with pliers. 3. Tighten each connection of the long hose from the kit to step 8. 2. 16 Installation Instructions Water connection, con't (Steam Model only...
If there is not room to install the "Y" connector directly, thread the short extension hose on the back of the dryer and snug it another 2/3 turn with pliers. 4. then tighten it by hand. then tighten it by hand; Connect the hose's 90°... CONNECTION OR WITH EXTENSION WATER INLET ON DRYER Thread the "Y" connector to the "Y" connector and snug it by hand; Turn on the "Y" connector and snug it another 2/3 turn with pliers. 3. Tighten each connection of the long hose from the kit to step 8. 2. 16 Installation Instructions Water connection, con't (Steam Model only...
Installation Instructions (All Languages)
Page 17
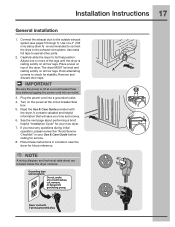
... joints. 2. If you time and money. 6. NOTE A wiring diagram and technical data sheet are located inside the dryer console. IMPORTANT Be sure the power is resting solidly on top of a 4" (102 mm) clamp (item A) is recommended to connect the...see pages 5 through 7). See the next page about performing a brief, helpful "Installation Cycle" for stability. Place these instructions in your new dryer. 7. Use of the dryer. Connect the exhaust duct to check for your Use & Care Guide before plugging the power cord into a grounded outlet. 4. Installation Instructions 17 General...
... joints. 2. If you time and money. 6. NOTE A wiring diagram and technical data sheet are located inside the dryer console. IMPORTANT Be sure the power is resting solidly on top of a 4" (102 mm) clamp (item A) is recommended to connect the...see pages 5 through 7). See the next page about performing a brief, helpful "Installation Cycle" for stability. Place these instructions in your new dryer. 7. Use of the dryer. Connect the exhaust duct to check for your Use & Care Guide before plugging the power cord into a grounded outlet. 4. Installation Instructions 17 General...

Installation Instructions (All Languages)
Page 18
... turned on, the safety switch will automatically test for correct cord connection (on electric models) and presence of gas supply (on gas models). The Installation Cycle will shut the burner off. NOTE Dryer will stay awake for use . If it prompts an action such as SERVICE ...;rst time: wake up cycle, press the start button. NOTE Dryer will display INSTAL CYCLE and show estimated time of cycle completion. 18 Installation Instructions WARNING FIRE HAZARD Before operating the dryer, make sure the dryer area is properly installed and ready for the gas line to be bled of air. ...
... turned on, the safety switch will automatically test for correct cord connection (on electric models) and presence of gas supply (on gas models). The Installation Cycle will shut the burner off. NOTE Dryer will stay awake for use . If it prompts an action such as SERVICE ...;rst time: wake up cycle, press the start button. NOTE Dryer will display INSTAL CYCLE and show estimated time of cycle completion. 18 Installation Instructions WARNING FIRE HAZARD Before operating the dryer, make sure the dryer area is properly installed and ready for the gas line to be bled of air. ...


