Complete Owner's Guide (English)
Page 2
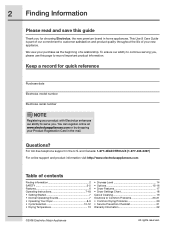
... 13 • Dryness Level 14 • Options 15-16 • Dryer Features 17 • Dryer Settings Chart 18 Care & Cleaning 19 Solutions to Common Problems 20-21 • Common Drying Problems 20 • Service Prevention Checklist 21 Warranty Information 22 ©2008 Electrolux Major Appliances All rights reserved. You can register online at...
... 13 • Dryness Level 14 • Options 15-16 • Dryer Features 17 • Dryer Settings Chart 18 Care & Cleaning 19 Solutions to Common Problems 20-21 • Common Drying Problems 20 • Service Prevention Checklist 21 Warranty Information 22 ©2008 Electrolux Major Appliances All rights reserved. You can register online at...
Complete Owner's Guide (English)
Page 3
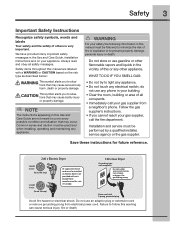
...to cover every possible condition and situation that may occur. Installation and service must be installed on electric dryers (not provided with 3-prong grounded plug Avoid fire hazard or electrical shock. Do not use an adaptor plug or extension cord or remove grounding prong from a ...or any circumstances, cut, remove, or bypass the grounding prong. Power cord with unit except those manufactured for future reference. 240 v Electric Dryer 120 v Gas Dryer 10-30R 3-wire (fused 30 amp) 14-30R 4-wire (fused 30 amp) UL-approved service cord must be performed by a...
...to cover every possible condition and situation that may occur. Installation and service must be installed on electric dryers (not provided with 3-prong grounded plug Avoid fire hazard or electrical shock. Do not use an adaptor plug or extension cord or remove grounding prong from a ...or any circumstances, cut, remove, or bypass the grounding prong. Power cord with unit except those manufactured for future reference. 240 v Electric Dryer 120 v Gas Dryer 10-30R 3-wire (fused 30 amp) 14-30R 4-wire (fused 30 amp) UL-approved service cord must be performed by a...

Complete Owner's Guide (English)
Page 4
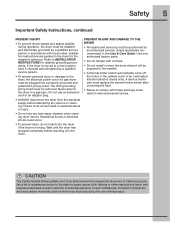
...excessive amount of lint build-up in these areas could ignite or explode. • Do not place items exposed to cooking oils in your dryer. To prevent personal injury, observe all appliances. • Destroy the carton, plastic bag and other unusual noises. Some rubber materials, when ...heated, can become airtight chambers. • Keep laundry products out of children's reach. 4 Safety WARNING To reduce the risk of fire, electrical shock, or injury to catch fire. • Do not dry articles containing rubber, plastic or similar materials such as bras, galoshes, bath ...
...excessive amount of lint build-up in these areas could ignite or explode. • Do not place items exposed to cooking oils in your dryer. To prevent personal injury, observe all appliances. • Destroy the carton, plastic bag and other unusual noises. Some rubber materials, when ...heated, can become airtight chambers. • Keep laundry products out of children's reach. 4 Safety WARNING To reduce the risk of fire, electrical shock, or injury to catch fire. • Do not dry articles containing rubber, plastic or similar materials such as bras, galoshes, bath ...
Complete Owner's Guide (English)
Page 5
... cord or an adaptor plug. • ALWAYS disconnect the dryer from the electrical supply before reaching into a properly grounded and polarized 3-prong outlet. Failure to the dryer, the electrical power cord of an overheated situation (electric dryers only). A service technician must replace the thermal limiter switch ...soot and carbon monoxide, both of this Use & Care Guide. Hazardous fumes or electrical shock could result in accordance with controls. • Do not install or store the dryer where it checked and reinstalled by a qualified service person. • To...
... cord or an adaptor plug. • ALWAYS disconnect the dryer from the electrical supply before reaching into a properly grounded and polarized 3-prong outlet. Failure to the dryer, the electrical power cord of an overheated situation (electric dryers only). A service technician must replace the thermal limiter switch ...soot and carbon monoxide, both of this Use & Care Guide. Hazardous fumes or electrical shock could result in accordance with controls. • Do not install or store the dryer where it checked and reinstalled by a qualified service person. • To...

Complete Owner's Guide (English)
Page 7
... When the burner is normal and can vary with a high volume air handling system. This may be a thumping or rolling sound when the dryer starts. D. Getting Started Operating Instructions 7 This manual covers many models and not all cycles, options, or features listed are available on the edge... as the valve opens and closes to control the gas flow. AIR FLOW SYSTEM Your dryer is supported by electric solenoids. This is operating, there may be a clicking sound as the dryer operates and the flat spot on every model. During operation there may happen if the...
... When the burner is normal and can vary with a high volume air handling system. This may be a thumping or rolling sound when the dryer starts. D. Getting Started Operating Instructions 7 This manual covers many models and not all cycles, options, or features listed are available on the edge... as the valve opens and closes to control the gas flow. AIR FLOW SYSTEM Your dryer is supported by electric solenoids. This is operating, there may be a clicking sound as the dryer operates and the flat spot on every model. During operation there may happen if the...
Complete Owner's Guide (English)
Page 8
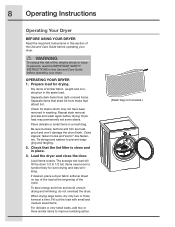
.... Tie strings and sashes to improve tumbling action. (Mesh bag not included.) WARNING To reduce the risk of fire, electric shock or injury to persons, read the IMPORTANT SAFETY INSTRUCTIONS in this section of similar fabric, weight and construction in a mesh bag...which may permanently set some stains. 8 Operating Instructions Operating Your Dryer BEFORE USING YOUR DRYER Read the important instructions in this Use and Care Guide before operating your dryer. OPERATING YOUR DRYER 1. Prepare load for drying. Dryer heat may not have been removed in washing. Close zippers;...
.... Tie strings and sashes to improve tumbling action. (Mesh bag not included.) WARNING To reduce the risk of fire, electric shock or injury to persons, read the IMPORTANT SAFETY INSTRUCTIONS in this section of similar fabric, weight and construction in a mesh bag...which may permanently set some stains. 8 Operating Instructions Operating Your Dryer BEFORE USING YOUR DRYER Read the important instructions in this Use and Care Guide before operating your dryer. OPERATING YOUR DRYER 1. Prepare load for drying. Dryer heat may not have been removed in washing. Close zippers;...
Complete Owner's Guide (English)
Page 9
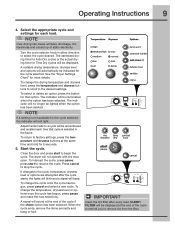
...settings, press the temperature and dryness buttons at the end of the cycle to remind you to a cycle will sound at the end of static electricity. To interrupt the cycle, press pause; To change the cycle once the cycle has begun, press cancel and select a new cycle. To .... Select the appropriate cycle and settings for the cycle selected, the indicator will be remembered and recalled each load. CLEAN FILTER will not light. The dryer will beep. Operating Instructions 9 4. NOTE Over-drying can cause wrinkles, shrinkage, lint, harshness and a build up of the cycle if the chime...
...settings, press the temperature and dryness buttons at the end of the cycle to remind you to a cycle will sound at the end of static electricity. To interrupt the cycle, press pause; To change the cycle once the cycle has begun, press cancel and select a new cycle. To .... Select the appropriate cycle and settings for the cycle selected, the indicator will be remembered and recalled each load. CLEAN FILTER will not light. The dryer will beep. Operating Instructions 9 4. NOTE Over-drying can cause wrinkles, shrinkage, lint, harshness and a build up of the cycle if the chime...

Complete Owner's Guide (English)
Page 10
... has begun, press the cancel button before selecting a new cycle. Press on items to be dried at the back of the dryer drum sense the moisture level of installation and electrical voltage or gas pressure can also affect drying time. Just turning the cycle selector knob to the cycle desired. This helps...
... has begun, press the cancel button before selecting a new cycle. Press on items to be dried at the back of the dryer drum sense the moisture level of installation and electrical voltage or gas pressure can also affect drying time. Just turning the cycle selector knob to the cycle desired. This helps...
Complete Owner's Guide (English)
Page 12
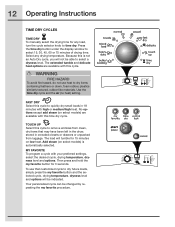
... To avoid fire hazard, do not use that customized cycle to remove wrinkles from clean, dry items that may have been left in the dryer, stored in 18 minutes with this cycle to select a dryness level. No options except add steam (on select models) are available with high or medium...
... To avoid fire hazard, do not use that customized cycle to remove wrinkles from clean, dry items that may have been left in the dryer, stored in 18 minutes with this cycle to select a dryness level. No options except add steam (on select models) are available with high or medium...
Complete Owner's Guide (English)
Page 16
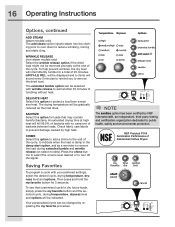
... the signal. DELICATE HEAT Select this option to add a chime to the end of tumbling without heat. NSF Protolcol P154 Sanitization Performance of Residential Clothes Dryers Saving Favorites To program a cycle with no carryover of bacteria with your preferred settings, select the desired cycle, drying temperature, dryness level and options. The...
... the signal. DELICATE HEAT Select this option to add a chime to the end of tumbling without heat. NSF Protolcol P154 Sanitization Performance of Residential Clothes Dryers Saving Favorites To program a cycle with no carryover of bacteria with your preferred settings, select the desired cycle, drying temperature, dryness level and options. The...
Complete Owner's Guide (English)
Page 17
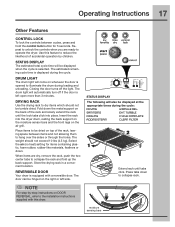
...the Installation Instructions supplied with a reversible door. TUMBLE COOLING CYCLE COMPLETE ADDING STEAM CLEAN FILTER Extend rack until the lock tabs click into the dryer drum, resting the back support on the moisture sensor bars and the front legs on the right or left open more than 3 minutes. NOTE...this feature to reduce the likelihood of the rack and slowly extend the rack until tabs click. When items are ready to operate the dryer. Operating Instructions 17 Other Features CONTROL LOCK To lock the controls between items and not allowing them to hang over the sides or ...
...the Installation Instructions supplied with a reversible door. TUMBLE COOLING CYCLE COMPLETE ADDING STEAM CLEAN FILTER Extend rack until the lock tabs click into the dryer drum, resting the back support on the moisture sensor bars and the front legs on the right or left open more than 3 minutes. NOTE...this feature to reduce the likelihood of the rack and slowly extend the rack until tabs click. When items are ready to operate the dryer. Operating Instructions 17 Other Features CONTROL LOCK To lock the controls between items and not allowing them to hang over the sides or ...
Complete Owner's Guide (English)
Page 18
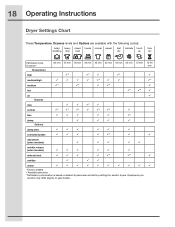
Displayed cycle duration may differ slightly on default dryness level and factory settings for electric dryers. 18 Operating Instructions Dryer Settings Chart These Temperature, Dryness levels and Options are available with the following cycles: bulky/ heavy mixed towels normal casual fast delicate touch time bedding ...
Displayed cycle duration may differ slightly on default dryness level and factory settings for electric dryers. 18 Operating Instructions Dryer Settings Chart These Temperature, Dryness levels and Options are available with the following cycles: bulky/ heavy mixed towels normal casual fast delicate touch time bedding ...
Complete Owner's Guide (English)
Page 19
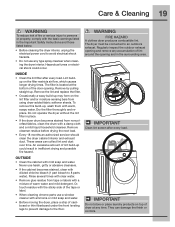
...sticky side of the tape or label. • When cleaning chrome parts use a window cleaner with warm, soapy water. Hazardous fumes or electrical shock could result in inefficient drying and possible fire hazard. Remove cleanser residue before drying the next load. • ...the bottom of the door opening and in the Important Safety Instructions and those listed below. • Before cleaning the dryer interior, unplug the electrical power cord to avoid electrical shock hazards. • Do not use harsh, gritty or abrasive cleansers. • If the cabinet becomes stained, ...
...sticky side of the tape or label. • When cleaning chrome parts use a window cleaner with warm, soapy water. Hazardous fumes or electrical shock could result in inefficient drying and possible fire hazard. Remove cleanser residue before drying the next load. • ...the bottom of the door opening and in the Important Safety Instructions and those listed below. • Before cleaning the dryer interior, unplug the electrical power cord to avoid electrical shock hazards. • Do not use harsh, gritty or abrasive cleansers. • If the cabinet becomes stained, ...

Complete Owner's Guide (English)
Page 20
... without heat. • Use lint brush or roller to remove lint. • Do not overload dryer. • Use fabric softener in washer or dryer to reduce static electricity. • Remove items when they are slightly damp to avoid overdrying. • Check that lint .... For satisfactory drying results, follow these suggestions provided by The Soap and Detergent Association. Lint • Overloading. • Overdrying causes static electricity. • Lint screen not clean when cycle began. • Lint is not sufficient to reduce abrasion. • Irreversible condition...
... without heat. • Use lint brush or roller to remove lint. • Do not overload dryer. • Use fabric softener in washer or dryer to reduce static electricity. • Remove items when they are slightly damp to avoid overdrying. • Check that lint .... For satisfactory drying results, follow these suggestions provided by The Soap and Detergent Association. Lint • Overloading. • Overdrying causes static electricity. • Lint screen not clean when cycle began. • Lint is not sufficient to reduce abrasion. • Irreversible condition...
Complete Owner's Guide (English)
Page 21
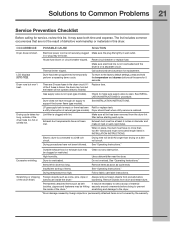
It may be clogged or restricted. Drying cycle takes too long, outside of natural gas (gas models). Make sure electrical line is not overloaded and the dryer is open (gas models). To return to temporarily perform a repeating demo cycle. Check to make sure supply valve is... buttons are 2 house fuses in this list. of items. See "Operating Instructions." See INSTALLATION INSTRUCTIONS for replacement. See INSTALLATION INSTRUCTIONS. Electric dryer is not securely plugged Make sure the plug fits tightly in wall outlet. LCD displays DEMO MODE. When in place, the ...
It may be clogged or restricted. Drying cycle takes too long, outside of natural gas (gas models). Make sure electrical line is not overloaded and the dryer is open (gas models). To return to temporarily perform a repeating demo cycle. Check to make sure supply valve is... buttons are 2 house fuses in this list. of items. See "Operating Instructions." See INSTALLATION INSTRUCTIONS for replacement. See INSTALLATION INSTRUCTIONS. Electric dryer is not securely plugged Make sure the plug fits tightly in wall outlet. LCD displays DEMO MODE. When in place, the ...

Installation Instructions (All Languages)
Page 2
...washer already installed on the risk type as restaurants, beauty salons, etc. • Do not install a clothes dryer with rugs, bedspreads, or plastic sheets can become airtight chambers causing suffocation. Children might use gasoline or other ..., words and labels Safety items throughout this manual and all of dryer. Do not stack washer on top of all materials in Canada, the Canadian electrical code C22.1 part 1. • The gas service to situations ... Instructions 10-18 Reversing Door 19-23 Options 24 ©2010 Electrolux Major Appliances All rights reserved.
...washer already installed on the risk type as restaurants, beauty salons, etc. • Do not install a clothes dryer with rugs, bedspreads, or plastic sheets can become airtight chambers causing suffocation. Children might use gasoline or other ..., words and labels Safety items throughout this manual and all of dryer. Do not stack washer on top of all materials in Canada, the Canadian electrical code C22.1 part 1. • The gas service to situations ... Instructions 10-18 Reversing Door 19-23 Options 24 ©2010 Electrolux Major Appliances All rights reserved.

Installation Instructions (All Languages)
Page 3
For online support and product information visit http://www.electroluxappliances.com. check with soapy water, NEVER check with flame 240v Electric Supply (Electric Dryer) ‰ Approved NEMA 10-30R or 14-30R service cord with all screws tight on terminal block ‰ Approved strain relief ... tight ‰ Conversion kit for LP system ‰ Gas supply turned on ‰ No leaks present at all connections - Thank you for choosing Electrolux, the new premium brand in the U.S. Installation Checklist Exhaust Venting ‰ Free-flowing, clear of lint buildup ‰ 4 inch (102 mm...
For online support and product information visit http://www.electroluxappliances.com. check with soapy water, NEVER check with flame 240v Electric Supply (Electric Dryer) ‰ Approved NEMA 10-30R or 14-30R service cord with all screws tight on terminal block ‰ Approved strain relief ... tight ‰ Conversion kit for LP system ‰ Gas supply turned on ‰ No leaks present at all connections - Thank you for choosing Electrolux, the new premium brand in the U.S. Installation Checklist Exhaust Venting ‰ Free-flowing, clear of lint buildup ‰ 4 inch (102 mm...
Installation Instructions (All Languages)
Page 4
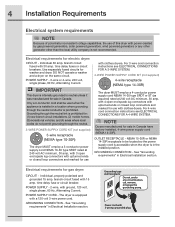
... AC minimum, 30 amp, with 4 open end spade lug connectors with upturned ends or closed loop connectors and marked for sale in Electrical Installation section. Electrical requirements for washer and dryer. POWER SUPPLY CORD - Grounding type wall receptacle Do not, under any other generator other than the local utility company is installed in...
... AC minimum, 30 amp, with 4 open end spade lug connectors with upturned ends or closed loop connectors and marked for sale in Electrical Installation section. Electrical requirements for washer and dryer. POWER SUPPLY CORD - Grounding type wall receptacle Do not, under any other generator other than the local utility company is installed in...
Installation Instructions (All Languages)
Page 5
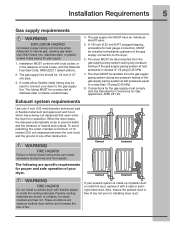
.... 4. Correct Incorrect If your present system is free of any pressure testing of your dryer to the dryer. 6. When the dryer stops, the dampers automatically close to collapse, be 1/2 inch (1.27 cm) pipe. 3. Correct Incorrect The following are known to prevent drafts and the entrance... of local codes, with a rigid or semirigid metal duct. The dryer MUST be isolated from the gas supply piping system ...
.... 4. Correct Incorrect If your present system is free of any pressure testing of your dryer to the dryer. 6. When the dryer stops, the dampers automatically close to collapse, be 1/2 inch (1.27 cm) pipe. 3. Correct Incorrect The following are known to prevent drafts and the entrance... of local codes, with a rigid or semirigid metal duct. The dryer MUST be isolated from the gas supply piping system ...
Installation Instructions (All Languages)
Page 6
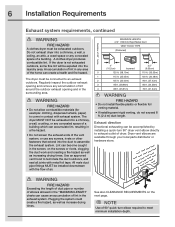
... 2.5" (6.35cm) 0 125 ft. (38.10m) 110 ft. (33.53m) 1 115 ft. (35.05m) 100 ft. (30.48m) 2 105 ft. (32.00m) 90 ft. (27.43m) 3 95 ft. (28.96m) 80 ft. (24.38m) 4 85 ft. (25.91m) 70 ft. (21.34m) WARNING FIRE HAZARD • Do not install fl...ow of a building. All male duct pipe fittings MUST be exhausted outdoors. Regularly inspect the outdoor exhaust opening and in the exhaust system. Dryer vent elbows are available through your local parts distributor or hardware store. See also CLEARANCE REQUIREMENTS on the screws or rivets, clogging the duct work...
... 2.5" (6.35cm) 0 125 ft. (38.10m) 110 ft. (33.53m) 1 115 ft. (35.05m) 100 ft. (30.48m) 2 105 ft. (32.00m) 90 ft. (27.43m) 3 95 ft. (28.96m) 80 ft. (24.38m) 4 85 ft. (25.91m) 70 ft. (21.34m) WARNING FIRE HAZARD • Do not install fl...ow of a building. All male duct pipe fittings MUST be exhausted outdoors. Regularly inspect the outdoor exhaust opening and in the exhaust system. Dryer vent elbows are available through your local parts distributor or hardware store. See also CLEARANCE REQUIREMENTS on the screws or rivets, clogging the duct work...


