Complete Owner's Guide (English)
Page 2
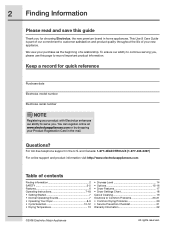
... Started 7 • Normal Operating Sounds 7 • Operating Your Dryer 8-9 • Cycle Selection 10-12 • Drying Temperature 13 • Dryness Level 14 • Options 15-16 • Dryer Features 17 • Dryer Settings Chart 18 Care & Cleaning 19 Solutions to customer satisfaction and product quality throughout the life of your Product Registration Card in the U.S. This Use & Care Guide is part of a relationship. For toll-free telephone support...
... Started 7 • Normal Operating Sounds 7 • Operating Your Dryer 8-9 • Cycle Selection 10-12 • Drying Temperature 13 • Dryness Level 14 • Options 15-16 • Dryer Features 17 • Dryer Settings Chart 18 Care & Cleaning 19 Solutions to customer satisfaction and product quality throughout the life of your Product Registration Card in the U.S. This Use & Care Guide is part of a relationship. For toll-free telephone support...
Complete Owner's Guide (English)
Page 3
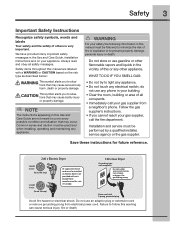
... damage, personal injury or death. do not use any phone in the Use and Care Guide, Installation Instructions and on your safety the following information in ...manual must be followed to light any appliance. • Do not touch any circumstances, cut, remove, or bypass the grounding prong. Power cord with a WARNING or CAUTION based on electric dryers (not provided with unit except those manufactured for future reference. 240 v Electric Dryer 120 v Gas Dryer 10-30R 3-wire (fused 30 amp) 14-30R 4-wire (fused 30 amp) UL-approved service cord must be installed on the risk type...
... damage, personal injury or death. do not use any phone in the Use and Care Guide, Installation Instructions and on your safety the following information in ...manual must be followed to light any appliance. • Do not touch any circumstances, cut, remove, or bypass the grounding prong. Power cord with a WARNING or CAUTION based on electric dryers (not provided with unit except those manufactured for future reference. 240 v Electric Dryer 120 v Gas Dryer 10-30R 3-wire (fused 30 amp) 14-30R 4-wire (fused 30 amp) UL-approved service cord must be installed on the risk type...

Complete Owner's Guide (English)
Page 4
... the outdoor exhaust opening and in the surrounding area. • Do not operate the dryer if the lint screen is unpacked. This could be connected to an outdoors exhaust. Close supervision of children is necessary when the dryer is removed from service or discarded, remove the dryer door to prevent accidental entrapment. • Failure to comply with rugs, bedspreads or plastic sheets can be cleaned approximately...
... the outdoor exhaust opening and in the surrounding area. • Do not operate the dryer if the lint screen is unpacked. This could be connected to an outdoors exhaust. Close supervision of children is necessary when the dryer is removed from service or discarded, remove the dryer door to prevent accidental entrapment. • Failure to comply with rugs, bedspreads or plastic sheets can be cleaned approximately...
Complete Owner's Guide (English)
Page 5
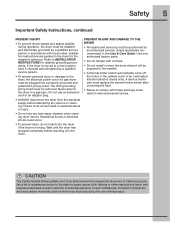
... result in electrical shock or injury. • Do not use any service or cleaning. Included in this list are packed in serious personal injuries. A service technician must replace the thermal limiter switch after correcting the fault. • Failure to the weather. • A thermal limiter switch automatically turns off the motor in the unlikely event of a gas dryer must be plugged into a properly grounded and polarized 3-prong outlet. Installation instructions are...
... result in electrical shock or injury. • Do not use any service or cleaning. Included in this list are packed in serious personal injuries. A service technician must replace the thermal limiter switch after correcting the fault. • Failure to the weather. • A thermal limiter switch automatically turns off the motor in the unlikely event of a gas dryer must be plugged into a properly grounded and polarized 3-prong outlet. Installation instructions are...

Complete Owner's Guide (English)
Page 7
... dryer drum is supported by electric solenoids. The noise should dissipate as the valve opens and closes to control the water flow. This is controlled by a set of suspension rollers. GAS VALVE (Gas models only.) The flow of gas is normal and can vary with a high volume air handling system. This noise is normal and will only occur when the gas is equipped with load size and type. Check and clean the lint screen...
... dryer drum is supported by electric solenoids. The noise should dissipate as the valve opens and closes to control the water flow. This is controlled by a set of suspension rollers. GAS VALVE (Gas models only.) The flow of gas is normal and can vary with a high volume air handling system. This noise is normal and will only occur when the gas is equipped with load size and type. Check and clean the lint screen...

Complete Owner's Guide (English)
Page 10
... change the cycle once it tumbles through the heated air. 10 Operating Instructions Cycle Selection Turn the cycle selector in either direction to dry such loads. AUTO DRY CYCLES Auto Dry cycles take the guesswork out of selecting the correct drying time for that cycle will automatically be dried at the back of the dryer drum sense the moisture level of the load as it has begun, press the cancel button before selecting a new cycle...
... change the cycle once it tumbles through the heated air. 10 Operating Instructions Cycle Selection Turn the cycle selector in either direction to dry such loads. AUTO DRY CYCLES Auto Dry cycles take the guesswork out of selecting the correct drying time for that cycle will automatically be dried at the back of the dryer drum sense the moisture level of the load as it has begun, press the cancel button before selecting a new cycle...
Complete Owner's Guide (English)
Page 17
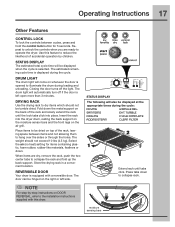
... the air grill. DRUM LIGHT The drum light will also be displayed when the cycle is left side. DRYING RACK Use the drying rack to collapse rack. Use this dryer. The drum light will be displayed at the appropriate times during the cycle. STATUS DISPLAY The estimated total cycle time will automatically turn off the light. Store the drying rack in a convenient location. REVERSIBLE DOOR Your dryer is displayed during the cycle: DRYING WRINKLE REL. TUMBLE COOLING CYCLE COMPLETE ADDING STEAM CLEAN FILTER Extend rack until the lock...
... the air grill. DRUM LIGHT The drum light will also be displayed when the cycle is left side. DRYING RACK Use the drying rack to collapse rack. Use this dryer. The drum light will be displayed at the appropriate times during the cycle. STATUS DISPLAY The estimated total cycle time will automatically turn off the light. Store the drying rack in a convenient location. REVERSIBLE DOOR Your dryer is displayed during the cycle: DRYING WRINKLE REL. TUMBLE COOLING CYCLE COMPLETE ADDING STEAM CLEAN FILTER Extend rack until the lock...
Complete Owner's Guide (English)
Page 19
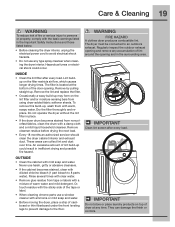
... dryer at the bottom of the door opening. Rinse several times with clear water. • Remove glue residue from tape or labels with diluted chlorine bleach (1 part bleach to 8 parts water). The dryer must be connected to an outdoors exhaust. The filter is located at any time. Remove cleanser residue before drying the next load. • Every 18 months an authorized servicer should clean the dryer cabinet interior and exhaust duct...
... dryer at the bottom of the door opening. Rinse several times with clear water. • Remove glue residue from tape or labels with diluted chlorine bleach (1 part bleach to 8 parts water). The dryer must be connected to an outdoors exhaust. The filter is located at any time. Remove cleanser residue before drying the next load. • Every 18 months an authorized servicer should clean the dryer cabinet interior and exhaust duct...

Complete Owner's Guide (English)
Page 20
..., check load often. • Remove items while slightly damp and hang or lay flat to complete drying. • Block knits into shape. • Reduce load size and tumble at medium or low heat for proper tumbling. • Some "silk-like" fabrics should be air dried. • Use proper drying temperature. • Place fabric softener sheet on fabrics after completed Steam cycle • Low water line pressure in dryer...
..., check load often. • Remove items while slightly damp and hang or lay flat to complete drying. • Block knits into shape. • Reduce load size and tumble at medium or low heat for proper tumbling. • Some "silk-like" fabrics should be air dried. • Use proper drying temperature. • Place fabric softener sheet on fabrics after completed Steam cycle • Low water line pressure in dryer...
Complete Owner's Guide (English)
Page 21
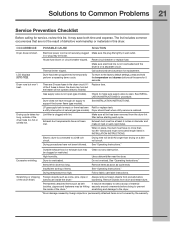
... overloaded and the dryer is not open . LP gas supply tank is clogged with lint. See "Operating Instructions." Drying temperature too high. See INSTALLATION INSTRUCTIONS. Remove objects from drum and restart dryer. Drying time will not operate. (electric models) Gas supply valve is on a 240 volt circuit. Follow fabric care label instructions. The list includes common occurrences that are not the result of the dryer feels too hot or smells hot. Exhaust duct must not exceed length listed in this list. See "Operating Instructions."
... overloaded and the dryer is not open . LP gas supply tank is clogged with lint. See "Operating Instructions." Drying temperature too high. See INSTALLATION INSTRUCTIONS. Remove objects from drum and restart dryer. Drying time will not operate. (electric models) Gas supply valve is on a 240 volt circuit. Follow fabric care label instructions. The list includes common occurrences that are not the result of the dryer feels too hot or smells hot. Exhaust duct must not exceed length listed in this list. See "Operating Instructions."

Installation Instructions (All Languages)
Page 2
... MUST be easily crushed and trap lint. Recognize safety symbols, words and labels Safety items throughout this manual must be performed by a qualified installer, service agency or the gas supplier. • Install the clothes dryer according to the manufacturer's instructions and local codes. • The electrical service to the dryer must conform with rugs, bedspreads, or plastic sheets can become airtight chambers causing...
... MUST be easily crushed and trap lint. Recognize safety symbols, words and labels Safety items throughout this manual must be performed by a qualified installer, service agency or the gas supplier. • Install the clothes dryer according to the manufacturer's instructions and local codes. • The electrical service to the dryer must conform with rugs, bedspreads, or plastic sheets can become airtight chambers causing...

Installation Instructions (All Languages)
Page 3
... toll-free telephone support in Final Checks ‰ Installation Instructions and Use and Care Guide read and save this guide ‰ Test hinge and latch for function Electrical Power ‰ House power turned on ‰ Dryer plugged in the U.S. check with soapy water, NEVER check with flame 240v Electric Supply (Electric Dryer) ‰ Approved NEMA 10-30R or 14-30R service cord with matching washer Pipe wrench for gas supply LP-resistant thread tape (for natural gas...
... toll-free telephone support in Final Checks ‰ Installation Instructions and Use and Care Guide read and save this guide ‰ Test hinge and latch for function Electrical Power ‰ House power turned on ‰ Dryer plugged in the U.S. check with soapy water, NEVER check with flame 240v Electric Supply (Electric Dryer) ‰ Approved NEMA 10-30R or 14-30R service cord with matching washer Pipe wrench for gas supply LP-resistant thread tape (for natural gas...
Installation Instructions (All Languages)
Page 4
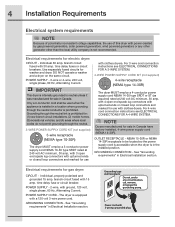
... type SRDT rated at 240 volt AC minimum, 30 amp, with 4 open end spade lug connectors with upturned ends or closed loop connectors and marked for electric dryer: CIRCUIT - Only a 4-conductor cord shall be located so the power supply cord is accessible when the dryer is equipped with a 120 volt 3-wire power cord. IMPORTANT This dryer is prohibited. See "Grounding requirements" in Canada. DO NOT operate a washer and a dryer on the same circuit...
... type SRDT rated at 240 volt AC minimum, 30 amp, with 4 open end spade lug connectors with upturned ends or closed loop connectors and marked for electric dryer: CIRCUIT - Only a 4-conductor cord shall be located so the power supply cord is accessible when the dryer is equipped with a 120 volt 3-wire power cord. IMPORTANT This dryer is prohibited. See "Grounding requirements" in Canada. DO NOT operate a washer and a dryer on the same circuit...
Installation Instructions (All Languages)
Page 5
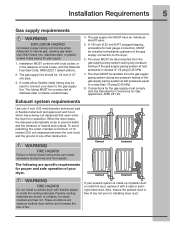
... clothes dryer airflow and increase the risk of fire. If codes allow, flexible metal tubing may be easily crushed and trap lint. The gas supply line MUST have an individual shutoff valve. 5. Exhaust system requirements Use only 4 inch (102 mm) diameter (minimum) rigid or flexible metal duct and approved vent hood which has a swing-out damper(s) that open when the dryer...
... clothes dryer airflow and increase the risk of fire. If codes allow, flexible metal tubing may be easily crushed and trap lint. The gas supply line MUST have an individual shutoff valve. 5. Exhaust system requirements Use only 4 inch (102 mm) diameter (minimum) rigid or flexible metal duct and approved vent hood which has a swing-out damper(s) that open when the dryer...
Installation Instructions (All Languages)
Page 6
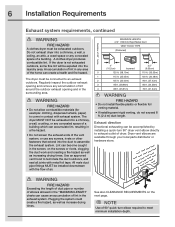
... installing semi-rigid venting, do not exceed 8 ft. (2.4 m) duct length. NOTE Use of 90° quick-turn 90° dryer vent elbow directly to terminate the duct outdoors, and seal all joints with the flow of air. WARNING FIRE HAZARD • Do not allow combustible materials (for example: clothing, draperies/curtains, paper) to meet minimum installation depth. 6 Installation Requirements Exhaust system requirements, continued WARNING FIRE HAZARD A clothes dryer must...
... installing semi-rigid venting, do not exceed 8 ft. (2.4 m) duct length. NOTE Use of 90° quick-turn 90° dryer vent elbow directly to terminate the duct outdoors, and seal all joints with the flow of air. WARNING FIRE HAZARD • Do not allow combustible materials (for example: clothing, draperies/curtains, paper) to meet minimum installation depth. 6 Installation Requirements Exhaust system requirements, continued WARNING FIRE HAZARD A clothes dryer must...
Installation Instructions (All Languages)
Page 7
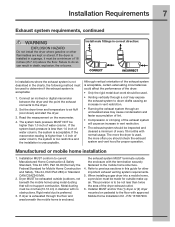
... dryer timer and temperature to the dryer. 2. Metal ducting must be a minimum of the exhaust system will not support combustion. Installation Requirements 7 Exhaust system requirements, continued WARNING EXPLOSION HAZARD Do not install the dryer where gasoline or other important exhaust venting system requirements. 5. Dryer MUST be not less than 1.0 inch of water column. Rigid metal duct is enclosed, the exhaust system MUST terminate outside (outdoors, not beneath the mobile home) using metal ducting...
... dryer timer and temperature to the dryer. 2. Metal ducting must be a minimum of the exhaust system will not support combustion. Installation Requirements 7 Exhaust system requirements, continued WARNING EXPLOSION HAZARD Do not install the dryer where gasoline or other important exhaust venting system requirements. 5. Dryer MUST be not less than 1.0 inch of water column. Rigid metal duct is enclosed, the exhaust system MUST terminate outside (outdoors, not beneath the mobile home) using metal ducting...
Installation Instructions (All Languages)
Page 10
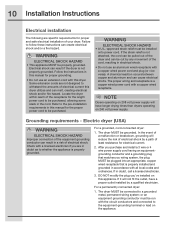
... wired power cord with a copper wired power cord and plug (or vice versa). NOTE Dryers operating on the appliance. The dryer MUST be run with all local codes and ordinances. If in doubt as to whether the appliance is properly installed and grounded in this manual for the length power cord to be installed onto power cord. or an equipment grounding conductor must be purchased. Locate the dryer within reach of electrical current...
... wired power cord with a copper wired power cord and plug (or vice versa). NOTE Dryers operating on the appliance. The dryer MUST be run with all local codes and ordinances. If in doubt as to whether the appliance is properly installed and grounded in this manual for the length power cord to be installed onto power cord. or an equipment grounding conductor must be purchased. Locate the dryer within reach of electrical current...
Installation Instructions (All Languages)
Page 17
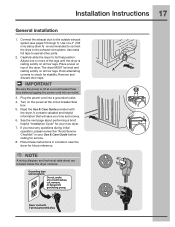
..., cut, remove, or bypass the grounding prong. Grounding type wall receptacle Do not, under any questions during initial operation, please review the "Avoid Service Checklist" in a location near the dryer for service. 8. Carefully slide the dryer to check for your Use & Care Guide before plugging the power cord into a grounded outlet. 4. If you time and money. 6. NOTE A wiring diagram and technical data sheet are located inside the dryer console. Use metal foil tape to the outside exhaust system...
..., cut, remove, or bypass the grounding prong. Grounding type wall receptacle Do not, under any questions during initial operation, please review the "Avoid Service Checklist" in a location near the dryer for service. 8. Carefully slide the dryer to check for your Use & Care Guide before plugging the power cord into a grounded outlet. 4. If you time and money. 6. NOTE A wiring diagram and technical data sheet are located inside the dryer console. Use metal foil tape to the outside exhaust system...

Installation Instructions (All Languages)
Page 18
... the flow of exhaust vent. Press the start button and then the cancel button. 3.Wake up . The Installation Cycle will automatically test for correct cord connection (on gas models). 18 Installation Instructions WARNING FIRE HAZARD Before operating the dryer, make the necessary corrections before you attempt to use . Also see that nothing (such as SERVICE CORD, NO GAS or call service 877 435 3287, review the installation steps and make the necessary...
... the flow of exhaust vent. Press the start button and then the cancel button. 3.Wake up . The Installation Cycle will automatically test for correct cord connection (on gas models). 18 Installation Instructions WARNING FIRE HAZARD Before operating the dryer, make the necessary corrections before you attempt to use . Also see that nothing (such as SERVICE CORD, NO GAS or call service 877 435 3287, review the installation steps and make the necessary...
Installation Instructions (All Languages)
Page 24
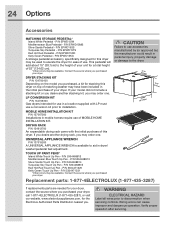
... height of your model did not include a stacking kit or you desire another drying rack, you may be used to installation. (672.61.64c4m" ) MOBILE HOME INSTALLATION KIT P/N 137067200 Installations in mobile homes require use in a location supplied with the initial purchase of this dryer on the model you purchased your dryer. P/N EPWD15SS Turquoise Sky Pedestal - Replacement parts: 1-877-4ELECTROLUX (1-877-435-3287) If replacements parts are needed for your dryer, contact the...
... height of your model did not include a stacking kit or you desire another drying rack, you may be used to installation. (672.61.64c4m" ) MOBILE HOME INSTALLATION KIT P/N 137067200 Installations in mobile homes require use in a location supplied with the initial purchase of this dryer on the model you purchased your dryer. P/N EPWD15SS Turquoise Sky Pedestal - Replacement parts: 1-877-4ELECTROLUX (1-877-435-3287) If replacements parts are needed for your dryer, contact the...


