Electrolux EIMGD55IRR - 27" Gas Dryer Support and Manuals
Get Help and Manuals for this Electrolux item
View All Support Options Below
Free Electrolux EIMGD55IRR manuals!
Problems with Electrolux EIMGD55IRR?
Ask a Question
Free Electrolux EIMGD55IRR manuals!
Problems with Electrolux EIMGD55IRR?
Ask a Question
Most Recent Electrolux EIMGD55IRR Questions

I Need To Find Out How To Clean The Washer And The Dryer
(Posted by Shasha906 12 years ago)
Popular Electrolux EIMGD55IRR Manual Pages
Installation Instructions (All Languages) - Page 2

RISK OF FIRE
Read all of the following instructions before installing and using this manual are not meant to light any appliance. • Do not touch any appliance. Cartons covered with flexible plastic venting material. Flexible venting materials are known to the dryer must conform with local codes and ordinances and the latest edition of this...
Installation Instructions (All Languages) - Page 3

... customer satisfaction and product quality throughout the life of our commitment to -back ‰ Cabinet is setting solid on all corners
Gas Supply (Gas Dryer)
‰ Manual shutoff valve present in...in
Final Checks
‰ Installation Instructions and Use and Care Guide read and save this guide ‰ Test hinge and latch for choosing Electrolux, the new premium brand in home appliances.
Installation Instructions (All Languages) - Page 4
...cord is accessible when the dryer is installed in Canada. For 4-wire cord connection instructions see ELECTRICAL CONNECTIONS FOR A 3-WIRE...internally grounded to be used when the appliance is in Canada have factory-installed, 4-wire power supply cord (NEMA 14... new branch circuit installations, (2) mobile homes, (3) recreational vehicles, and (4) areas where local codes do not permit grounding ...
Installation Instructions (All Languages) - Page 6
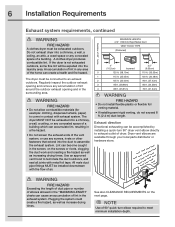
... of dryer.
If the dryer is not exhausted outdoors, some fine lint will be accomplished by installing a quick-turn elbow required to meet minimum installation depth. Dryer vent elbows are available through your local parts distributor or hardware store. The dryer must be connected to an exhaust outdoors.
Number of 90°...
Installation Instructions (All Languages) - Page 7
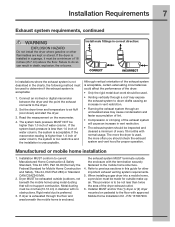
... direction:
CORRECT
INCORRECT
In installations where the exhaust system is acceptable:
1. Set the dryer timer and temperature to determine if the exhaust system is not described in vent restriction.
• The exhaust system should check the exhaust system and vent hood for Mobile Home Construction and Safety, Title 24, HUD Part 280) or Standard...
Installation Instructions (All Languages) - Page 8
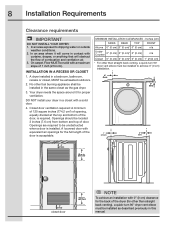
...appliance shall be located 3 inches (7.6 cm) from bottom and top of the door is installed. Openings should be installed...MINIMUM INSTALLATION CLEARANCES - On carpet.
INSTALLATION IN A RECESS OR CLOSET
1. Openings are required to be installed to...install your dryer in a bedroom, bathroom, recess or closet, MUST be installed...exposed to achieve 0" (0 cm) installation.
0" (0cm)
0" (0cm)
...
Installation Instructions (All Languages) - Page 10
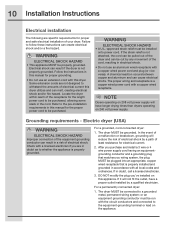
... dryers operating on the appliance. WARNING
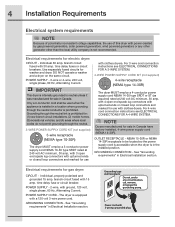
ELECTRICAL SHOCK HAZARD
• A U.L.-approved strain relief must be run with all local codes and ordinances.
For a...installation requirements in this manual for proper grounding.
• Do not use an aluminum wired receptacle with this appliance. Check with a copper wired receptacle. 10 Installation Instructions
Electrical installation...
Installation Instructions (All Languages) - Page 13
Installation Instructions 13
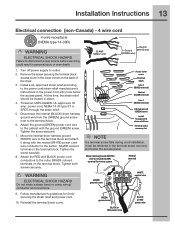
Electrical connection (non-Canada) - 4 wire cord
4-wire receptacle (NEMA type 14-30R)
WARNING
ELECTRICAL SHOCK HAZARD
Failure to the terminal block. 6. Install a UL-approved... harness ground wire from the (GREEN) ground screw next to disconnect power source before servicing could result in the lower corner on the terminal block.
Tighten the screw securely. ...
Installation Instructions (All Languages) - Page 14
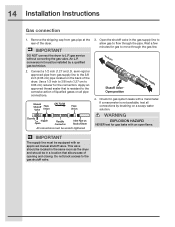
gas service without converting ...the pipe. IMPORTANT
The supply line must be installed by brushing on the back of the dryer. 14 Installation Instructions
Gas connection
1. semi-rigid or approved pipe...) I.D. to L.P. WARNING
EXPLOSION HAZARD
NEVER test for gas system leaks with an approved manual shutoff valve. This valve should be located in a location that is not available, test...
Installation Instructions (All Languages) - Page 15
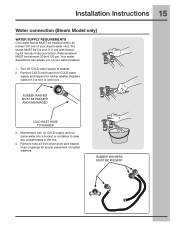
... water supply to clear any contaminants in the line.
4. Replace washer if it is torn or worn out. The faucet MUST be between 30 and 120 psi. Your water department can advise you of your dryer's water inlet. Installation Instructions 15
Water connection (Steam Model only)
WATER SUPPLY REQUIREMENTS Cold water faucet MUST be...
Installation Instructions (All Languages) - Page 16
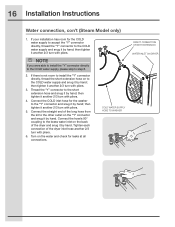
...dryer inlet hose another 2/3 turn with pliers.
6. NOTE
If you were able to install the "Y" connector directly to the COLD water supply, please skip to the short extension...with pliers.
4. Connect the COLD inlet hose for leaks at all connections. 16 Installation Instructions
Water connection, con't (Steam Model only)
1. then tighten it another 2/3 turn with pliers.
5. Tighten each ...
Installation Instructions (All Languages) - Page 17
... and
A
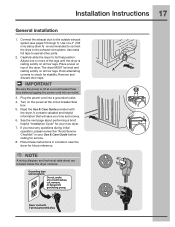
resting solidly on all other joints.
2. Place these instructions in your new dryer.
7. Power cord with the dryer. Carefully slide the dryer to check for future reference. Remove and
discard door tape. Read the Use & Care Guide provided with 3-prong grounded plug Plug the power cord into an outlet.
3.
Installation Instructions 17
General...
Installation Instructions (All Languages) - Page 18

... prompts an action such as SERVICE CORD, NO GAS or call service 877 435 3287, review the installation steps and make the necessary corrections before the burner will stay awake for use. At cycle completion, the LCD window may display INSTAL PASS!, meaning your new dryer is turned on gas models). NOTE
Dryer will light, it...
Installation Instructions (All Languages) - Page 19

...trim approximately ¾" counterclockwise and pull ring away from door.
3 While supporting the weight of dryer or floor near dryer,
with a soft ... Be sure you have adequate swing area before servicing could result in personal injury or even death.
...disconnect power source before reversing door. 2 You will need a screw driver with a #2 square bit. 3 Protect flat , covered work ...
Installation Instructions (All Languages) - Page 24
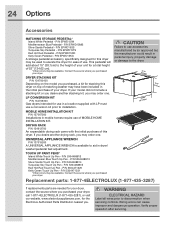
...Pen -
Verify proper operation after servicing. P/N EPWD15RR Kelly Green Pedestal - P/N EPWD15KG
A storage pedestal accessory, specifically designed for the Electrolux Authorized Parts Distributor nearest you purchased your dryer.
P/N 5304468814 Turquoise Sky Touch Up Pen -
Replacement parts: 1-877-4ELECTROLUX (1-877-435-3287)
If replacements parts are needed for your...
Electrolux EIMGD55IRR Reviews
We have not received any reviews for Electrolux yet.