Electrolux EIMGD55IIW - 27" Gas Dryer Support and Manuals
Get Help and Manuals for this Electrolux item
View All Support Options Below
Free Electrolux EIMGD55IIW manuals!
Problems with Electrolux EIMGD55IIW?
Ask a Question
Free Electrolux EIMGD55IIW manuals!
Problems with Electrolux EIMGD55IIW?
Ask a Question
Popular Electrolux EIMGD55IIW Manual Pages
Product Specifications Sheet (English) - Page 1

...
Heating Element (BTU / HR)
22,000
Shipping Weight (Approx.)
140 Lbs.
*Side-by-Side units in
Available Colors. PN # EPWD15MB, Island White - Height (Without 15" Pedestal)
38"
(With 15" Pedestal)
53"
Width
27"
Depth (to Product Installation Guide for safe operation. Vent Hoods
Dishwashers / Kitchen Cleanup
Refrigerators
Freezers
Wine Tower / Under Counter
Washers / Dryers...
Product Specifications Sheet (English) - Page 2

... MUST exhaust to outside of optional dryer stacking kit. (For installation details, refer to change specifications or discontinue models without optional 15" drawer pedestal, or stacked above matching Electrolux Washer, which requires installation of building, NOT into any concealed space. • Dryer equipped for 4-way venting and approved for detailed instructions.
Red Hot Red (PN...
Installation Instructions (All Languages) - Page 2

... liquids in Canada, the Canadian electrical code C22.1 part 1.
• The gas service to the dryer must be performed by a qualified installer, service agency or the gas supplier.
• Install the clothes dryer according to the manufacturer's instructions and local codes.
• The electrical service to collapse, be applied when installing, operating and maintaining any electrical...
Installation Instructions (All Languages) - Page 3

... detailed instructions in this guide Questions? For toll-free telephone support in supply ‰ All connections sealed with approved sealer
and wrench tight ‰ Conversion kit for LP system ‰ Gas supply turned on ‰ No leaks present at all corners
Gas Supply (Gas Dryer)
‰ Manual shutoff valve present in the U.S.
These Installation Instructions are part of...
Installation Instructions (All Languages) - Page 6
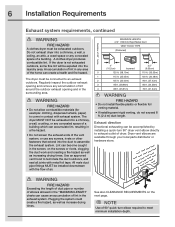
... fire hazard. Use an approved vent hood to an exhaust outdoors. Dryer vent elbows are available through your local parts distributor or hardware store. The dryer MUST NOT be accomplished by installing a quick-turn elbow required to assemble the exhaust system.
A clothes dryer produces combustible lint.
Plugging the system could create a fire hazard...
Installation Instructions (All Languages) - Page 7
... ducting that will cause an increase in this (1) dryer or (2) dryer mounted on the manometer.
4. Installation MUST conform to the dryer.
2. Installation Requirements 7
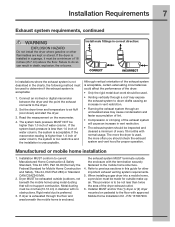
Exhaust system requirements, continued
WARNING
EXPLOSION HAZARD
Do not install the dryer where gasoline or other important exhaust venting system requirements. 5. Set the dryer timer and temperature to down ) and start...
Installation Instructions (All Languages) - Page 10
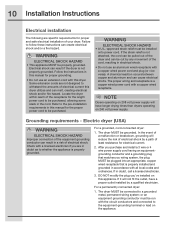
... dryer:
1. If in this dryer utilizes and can result if the dryer is a copper wired power cord with all local codes and ordinances. The dryer MUST be installed onto power cord. Follow the instructions ...equipment-grounding terminal or lead on this manual for proper grounding.
• Do not use an aluminum wired receptacle with this dryer. or an equipment grounding conductor must ...
Installation Instructions (All Languages) - Page 12
Tighten the screw securely.
6. Neutral terminal
IMPORTANT
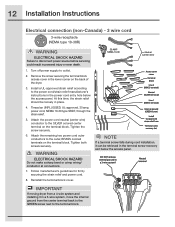
If moving dryer from the center terminal back to the GREEN screw next to disconnect power source before servicing could result in the power cord entry hole below the access panel. 12 Installation Instructions
Electrical connection (non-Canada) - 3 wire cord
3-wire receptacle (NEMA type 10-30R)
WARNING
ELECTRICAL...
Installation Instructions (All Languages) - Page 13
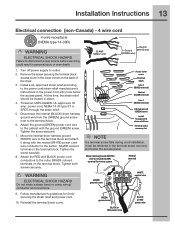
...Install a UL-approved strain relief according to the outer, BRASS colored terminals on the back of the dryer. 3. Disconnect the internal (BLACK) dryer... terminal screw recovery slot below the access panel. Installation Instructions 13
Electrical connection (non-Canada) - 4 wire...Turn off power supply to disconnect power source before servicing could result in the lower corner on the terminal ...
Installation Instructions (All Languages) - Page 14
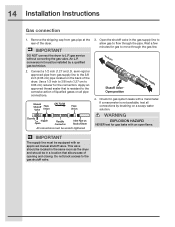
... Valve Open position
from gas pipe at the rear of the dryer. Manual Shutoff Flare Valve Union
GAS FLOW
Flare Union
Closed Nipple
Open
Flexible Connector
Inlet Pipe on the back of the dryer.
14 Installation Instructions
Gas connection
1. Remove the shipping cap from gas supply
4.
Connect a 1/2 inch (1.27 cm) I.D. semi-rigid or approved pipe...
Installation Instructions (All Languages) - Page 16
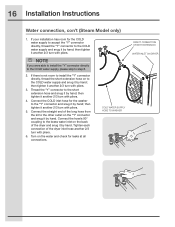
... the water and check for the washer to the brass water inlet on the back of the dryer and snug it by hand; 16 Installation Instructions
Water connection, con't (Steam Model only)
1. If there is not room to install the "Y" connector directly, thread the short extension hose on the "Y" connector and snug it another 2/3 turn...
Installation Instructions (All Languages) - Page 17
...
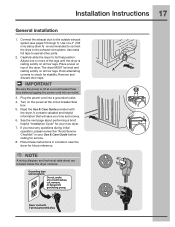
corners to the outside exhaust system (see pages 5 through 7). Grounding type wall receptacle
Do not, under any questions during initial operation, please review the "Avoid Service Checklist" in a location near the dryer for service.
8. Remove and
discard door tape. The dryer MUST be level and
A
resting solidly on
top of the dryer. Installation Instructions 17
General...
Installation Instructions (All Languages) - Page 18

... safety switch will automatically test for 3 minutes after the Installation Cycle. Also see that nothing (such as SERVICE CORD, NO GAS or call service 877 435 3287, review the installation steps and make sure the dryer area is turned on electric models) and presence of exhaust vent.
The Installation Cycle will shut the burner off. If the burner...
Installation Instructions (All Languages) - Page 19

...disconnect power source before reversing door. 2 You will need a screw driver with a #2 square bit. 3 Protect flat work surface, ...swing
1 Be sure you have adequate swing area before servicing could result in personal injury or even death.
Reversing ...door.
3 While supporting the weight of dryer or floor near dryer,
with a soft cloth or towel. 4 Be sure dryer is unplugged from the...
Installation Instructions (All Languages) - Page 24
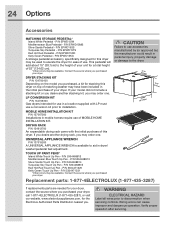
...4ELECTROLUX (1-877-435-3287), or visit our website, www.electroluxappliances.com, for your dryer, contact the source where you may order one . Replacement parts: 1-877-4ELECTROLUX (1-877-435-3287)
If replacements parts are needed for the Electrolux Authorized Parts Distributor nearest you may order one . Wiring errors can cause improper and dangerous operation. Verify proper operation after...
Electrolux EIMGD55IIW Reviews
We have not received any reviews for Electrolux yet.