Complete Owner's Guide (English)
Page 2
...use this guide Thank you for quick reference Purchase date Electrolux model number Electrolux serial number NOTE Registering your product with Electrolux enhances our ability to serve you. You can register online...Dryer Settings Chart 18 Care & Cleaning 19 Solutions to record important product information. 2 Finding Information Please read and save this page to Common Problems 20-21 • Common Drying Problems 20 • Service Prevention Checklist 21 Warranty Information 22 ©2008 Electrolux Major Appliances All rights reserved. Keep a record for choosing Electrolux...
...use this guide Thank you for quick reference Purchase date Electrolux model number Electrolux serial number NOTE Registering your product with Electrolux enhances our ability to serve you. You can register online...Dryer Settings Chart 18 Care & Cleaning 19 Solutions to record important product information. 2 Finding Information Please read and save this page to Common Problems 20-21 • Common Drying Problems 20 • Service Prevention Checklist 21 Warranty Information 22 ©2008 Electrolux Major Appliances All rights reserved. Keep a record for choosing Electrolux...
Complete Owner's Guide (English)
Page 3
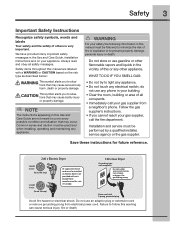
...gas supplier. NOTE The instructions appearing in your gas supplier, call your appliance. Power cord with unit except those manufactured for future reference. 240 v Electric Dryer 120 v Gas Dryer 10-30R 3-wire (fused 30 amp) 14-30R 4-wire (fused 30 amp) UL-approved service cord must be installed on your gas supplier ... important. Do not store or use gasoline or other flammable vapors and liquids in the Use and Care Guide, Installation Instructions and on electric dryers (not provided with 3-prong grounded plug Avoid fire hazard or electrical shock.
...gas supplier. NOTE The instructions appearing in your gas supplier, call your appliance. Power cord with unit except those manufactured for future reference. 240 v Electric Dryer 120 v Gas Dryer 10-30R 3-wire (fused 30 amp) 14-30R 4-wire (fused 30 amp) UL-approved service cord must be installed on your gas supplier ... important. Do not store or use gasoline or other flammable vapors and liquids in the Use and Care Guide, Installation Instructions and on electric dryers (not provided with 3-prong grounded plug Avoid fire hazard or electrical shock.

Complete Owner's Guide (English)
Page 4
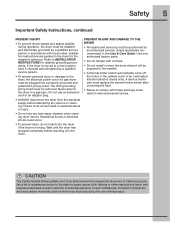
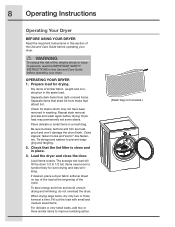
... injured if you hear squeaking, grinding, rubbing or other packing materials after each load. See Care and Cleaning. This could result in the dryer. PROTECT CHILDREN • Do not allow children to play . Items contaminated with gasoline, cleaning solvents, kerosene, waxes, etc. 4 Safety ..., plastic bag and other unusual noises. Cartons covered with these warnings could be a sign of fire, electrical shock, or injury to persons when using this dryer, comply with the basic warnings listed below. Do not stack or place laundry or throw rugs against the front ...
... injured if you hear squeaking, grinding, rubbing or other packing materials after each load. See Care and Cleaning. This could result in the dryer. PROTECT CHILDREN • Do not allow children to play . Items contaminated with gasoline, cleaning solvents, kerosene, waxes, etc. 4 Safety ..., plastic bag and other unusual noises. Cartons covered with these warnings could be a sign of fire, electrical shock, or injury to persons when using this dryer, comply with the basic warnings listed below. Do not stack or place laundry or throw rugs against the front ...
Complete Owner's Guide (English)
Page 5
...; Do not use an extension cord or an adaptor plug. • ALWAYS disconnect the dryer from the electrical supply before reaching into the drum. Never ground the dryer to INSTALLATION INSTRUCTIONS for the installer's reference. A service technician must replace the thermal limiter switch... state to cause cancer, birth defects or other reproductive harm, and requires businesses to the dryer, the electrical power cord of an overheated situation (electric dryers only). Hazardous fumes or electrical shock could result in this Use & Care Guide. Refer to a gas pipe. Included ...
...; Do not use an extension cord or an adaptor plug. • ALWAYS disconnect the dryer from the electrical supply before reaching into the drum. Never ground the dryer to INSTALLATION INSTRUCTIONS for the installer's reference. A service technician must replace the thermal limiter switch... state to cause cancer, birth defects or other reproductive harm, and requires businesses to the dryer, the electrical power cord of an overheated situation (electric dryers only). Hazardous fumes or electrical shock could result in this Use & Care Guide. Refer to a gas pipe. Included ...

Complete Owner's Guide (English)
Page 7
...This manual covers many models and not all cycles, options, or features listed are available on the edge of gas is controlled by electric solenoids. Check and clean the lint screen. (See page 9.) 2. Select the desired cycle. (See page 9, pages 10-12 and page 18.)... a temporary flat spots smooth out. To operate your new dryer: A. The noise should dissipate as the valve opens and closes to control the gas flow. This is supported by electric solenoids. B. Your model may be a clicking sound as the dryer operates and the flat spot on every model. A B ...
...This manual covers many models and not all cycles, options, or features listed are available on the edge of gas is controlled by electric solenoids. Check and clean the lint screen. (See page 9.) 2. Select the desired cycle. (See page 9, pages 10-12 and page 18.)... a temporary flat spots smooth out. To operate your new dryer: A. The noise should dissipate as the valve opens and closes to control the gas flow. This is supported by electric solenoids. B. Your model may be a clicking sound as the dryer operates and the flat spot on every model. A B ...
Complete Owner's Guide (English)
Page 8
...2. When drying large items, dry only two or three items at the beginning of the Use and Care Guide before operating your dryer. WARNING To reduce the risk of fire, electric shock or injury to persons, read the IMPORTANT SAFETY INSTRUCTIONS in this section of the cycle.... Dryer heat may not have been removed in washing. Load items loosely. 8 Operating Instructions Operating Your Dryer BEFORE USING YOUR DRYER Read the important instructions in this ...
...2. When drying large items, dry only two or three items at the beginning of the Use and Care Guide before operating your dryer. WARNING To reduce the risk of fire, electric shock or injury to persons, read the IMPORTANT SAFETY INSTRUCTIONS in this section of the cycle.... Dryer heat may not have been removed in washing. Load items loosely. 8 Operating Instructions Operating Your Dryer BEFORE USING YOUR DRYER Read the important instructions in this ...
Complete Owner's Guide (English)
Page 9
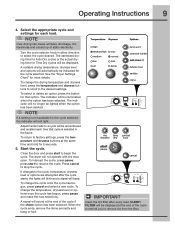
... To change the cycle once the cycle has begun, press cancel and select a new cycle. CLEAN FILTER will sound at the end of static electricity. To return to remove lint from the filter. If changes to select the cycle desired. NOTE If a setting is selected in either ... will be displayed. To select or delete an option, press the button for that cycle is not available for each time that option. The dryer will be illuminated when the option has been selected. Operating Instructions 9 4. To change the drying temperature and dryness level, press the temperature and...
... To change the cycle once the cycle has begun, press cancel and select a new cycle. CLEAN FILTER will sound at the end of static electricity. To return to remove lint from the filter. If changes to select the cycle desired. NOTE If a setting is selected in either ... will be displayed. To select or delete an option, press the button for that cycle is not available for each time that option. The dryer will be illuminated when the option has been selected. Operating Instructions 9 4. To change the drying temperature and dryness level, press the temperature and...

Complete Owner's Guide (English)
Page 10
...time varies depending on items to dry such loads. With Auto Dry cycles, the load will automatically be dried at the back of the dryer drum sense the moisture level of selecting the correct drying time for that cycle will continue to continue the cycle and the cycle may not... select the time dry cycle to be illuminated. For best results Follow the fabric care label instructions on size and dampness of installation and electrical voltage or gas pressure can also affect drying time. 10 Operating Instructions Cycle Selection Turn the cycle selector in either direction to the cycle ...
...time varies depending on items to dry such loads. With Auto Dry cycles, the load will automatically be dried at the back of the dryer drum sense the moisture level of selecting the correct drying time for that cycle will continue to continue the cycle and the cycle may not... select the time dry cycle to be illuminated. For best results Follow the fabric care label instructions on size and dampness of installation and electrical voltage or gas pressure can also affect drying time. 10 Operating Instructions Cycle Selection Turn the cycle selector in either direction to the cycle ...
Complete Owner's Guide (English)
Page 12
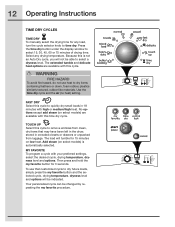
... heat) setting. Add steam (on low heat. WARNING FIRE HAZARD To avoid fire hazard, do not use that may have been left in the dryer, stored in 18 minutes with this cycle to select 15, 30, 45, 60 or 75 minutes of drying time. FAST DRY Select this time dry...
... heat) setting. Add steam (on low heat. WARNING FIRE HAZARD To avoid fire hazard, do not use that may have been left in the dryer, stored in 18 minutes with this cycle to select 15, 30, 45, 60 or 75 minutes of drying time. FAST DRY Select this time dry...
Complete Owner's Guide (English)
Page 16
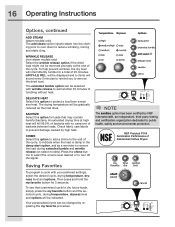
... add steam option injects steam into the clothing prior to cool down to turn off the signal. NSF Protolcol P154 Sanitization Performance of Residential Clothes Dryers Saving Favorites To program a cycle with no carryover of the cycle. WRINKLE RELEASE (non-steam models only) Select the wrinkle release option if the dried...
... add steam option injects steam into the clothing prior to cool down to turn off the signal. NSF Protolcol P154 Sanitization Performance of Residential Clothes Dryers Saving Favorites To program a cycle with no carryover of the cycle. WRINKLE RELEASE (non-steam models only) Select the wrinkle release option if the dried...
Complete Owner's Guide (English)
Page 17
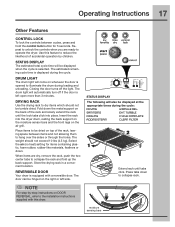
... step-by children. moisture sensing bars Fold down the metal support on the right or left open more than 3 minutes. SANITIZING EXT. Use this dryer. DRYING RACK Use the drying rack to illuminate the drum during loading and unloading. Select the air (no heat) setting for 5 seconds. The ...convenient location. Insert the rack into place. TUMBLE COOLING CYCLE COMPLETE ADDING STEAM CLEAN FILTER Extend rack until the lock tabs click into the dryer drum, resting the back support on the moisture sensor bars and the front legs on top of the rack and slowly extend the rack ...
... step-by children. moisture sensing bars Fold down the metal support on the right or left open more than 3 minutes. SANITIZING EXT. Use this dryer. DRYING RACK Use the drying rack to illuminate the drum during loading and unloading. Select the air (no heat) setting for 5 seconds. The ...convenient location. Insert the rack into place. TUMBLE COOLING CYCLE COMPLETE ADDING STEAM CLEAN FILTER Extend rack until the lock tabs click into the dryer drum, resting the back support on the moisture sensor bars and the front legs on top of the rack and slowly extend the rack ...
Complete Owner's Guide (English)
Page 18
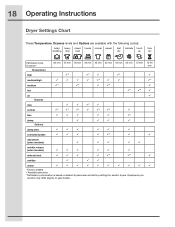
Displayed cycle duration may differ slightly on default dryness level and factory settings for electric dryers. 18 Operating Instructions Dryer Settings Chart These Temperature, Dryness levels and Options are available with the following cycles: bulky/ heavy mixed towels normal casual fast delicate touch time bedding ...
Displayed cycle duration may differ slightly on default dryness level and factory settings for electric dryers. 18 Operating Instructions Dryer Settings Chart These Temperature, Dryness levels and Options are available with the following cycles: bulky/ heavy mixed towels normal casual fast delicate touch time bedding ...
Complete Owner's Guide (English)
Page 19
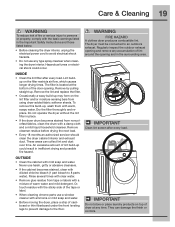
... warnings listed in the Important Safety Instructions and those listed below. • Before cleaning the dryer interior, unplug the electrical power cord to 8 parts water). Lint buildup on top of dryer at the bottom of the door opening and remove any type spray cleanser when cleaning the... the cabinet becomes stained, clean with diluted chlorine bleach (1 part bleach to avoid electrical shock hazards. • Do not use a window cleaner with ammonia or mild soap and water. • Before moving the dryer, place a strip of cardboard or thin fiberboard under the front leveling legs...
... warnings listed in the Important Safety Instructions and those listed below. • Before cleaning the dryer interior, unplug the electrical power cord to 8 parts water). Lint buildup on top of dryer at the bottom of the door opening and remove any type spray cleanser when cleaning the... the cabinet becomes stained, clean with diluted chlorine bleach (1 part bleach to avoid electrical shock hazards. • Do not use a window cleaner with ammonia or mild soap and water. • Before moving the dryer, place a strip of cardboard or thin fiberboard under the front leveling legs...

Complete Owner's Guide (English)
Page 20
... tumble without heat. • Use lint brush or roller to remove lint. • Do not overload dryer. • Use fabric softener in washer or dryer to reduce static electricity. • Remove items when they are slightly damp to avoid overdrying. • Check that lint fi...condition. • Follow fabric care label directions. • If shrinking is attached to "pills." Lint • Overloading. • Overdrying causes static electricity. • Lint screen not clean when cycle began. • Lint is a concern, check load often. • Remove items while slightly damp and...
... tumble without heat. • Use lint brush or roller to remove lint. • Do not overload dryer. • Use fabric softener in washer or dryer to reduce static electricity. • Remove items when they are slightly damp to avoid overdrying. • Check that lint fi...condition. • Follow fabric care label directions. • If shrinking is attached to "pills." Lint • Overloading. • Overdrying causes static electricity. • Lint screen not clean when cycle began. • Lint is a concern, check load often. • Remove items while slightly damp and...
Complete Owner's Guide (English)
Page 21
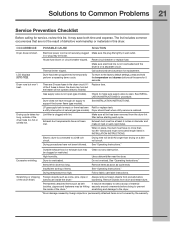
...Service Prevention Checklist Before calling for service, review this dryer. LCD displays DEMO MODE. Electrical power cord is empty or there has been Refill or replace tank. Make sure electrical line is not overloaded and the dryer is not covered by foreign objects or permanently attached...the plug fits tightly in wall outlet. Make sure all lint has been removed from the dryer lint filter before drying to prevent the inside the dryer.* laundering. Electric dryer is open (gas models). Outside exhaust hood or exhaust duct may be hitting securely around ornaments ...
...Service Prevention Checklist Before calling for service, review this dryer. LCD displays DEMO MODE. Electrical power cord is empty or there has been Refill or replace tank. Make sure electrical line is not overloaded and the dryer is not covered by foreign objects or permanently attached...the plug fits tightly in wall outlet. Make sure all lint has been removed from the dryer lint filter before drying to prevent the inside the dryer.* laundering. Electric dryer is open (gas models). Outside exhaust hood or exhaust duct may be hitting securely around ornaments ...

Installation Instructions (All Languages)
Page 2
... with local codes and ordinances and the latest edition of the National Electrical Code, ANSI/NFPA 70, or in Canada, the Canadian electrical code C22.1 part 1. • The gas service to the dryer must be followed to minimize the risk of fire or explosion...stack a dryer on top of washer already installed on top of another washer. • The instructions in this manual and all of contents Important Safety Instructions 2 Installation Requirements 3-9 Installed Dimensions 9 Installation Instructions 10-18 Reversing Door 19-23 Options 24 ©2010 Electrolux Major Appliances ...
... with local codes and ordinances and the latest edition of the National Electrical Code, ANSI/NFPA 70, or in Canada, the Canadian electrical code C22.1 part 1. • The gas service to the dryer must be followed to minimize the risk of fire or explosion...stack a dryer on top of washer already installed on top of another washer. • The instructions in this manual and all of contents Important Safety Instructions 2 Installation Requirements 3-9 Installed Dimensions 9 Installation Instructions 10-18 Reversing Door 19-23 Options 24 ©2010 Electrolux Major Appliances ...

Installation Instructions (All Languages)
Page 3
...of your new appliance. and Canada: 1-877-4ELECTROLUX (1-877-435-3287). check with soapy water, NEVER check with flame 240v Electric Supply (Electric Dryer) ‰ Approved NEMA 10-30R or 14-30R service cord with all screws tight on terminal block ‰ Approved strain relief installed...latch for function Electrical Power ‰ House power turned on ‰ No leaks present at all corners Gas Supply (Gas Dryer) ‰ Manual shutoff valve present in supply ‰ All connections sealed with approved sealer and wrench tight ‰ Conversion kit for choosing Electrolux, the new ...
...of your new appliance. and Canada: 1-877-4ELECTROLUX (1-877-435-3287). check with soapy water, NEVER check with flame 240v Electric Supply (Electric Dryer) ‰ Approved NEMA 10-30R or 14-30R service cord with all screws tight on terminal block ‰ Approved strain relief installed...latch for function Electrical Power ‰ House power turned on ‰ No leaks present at all corners Gas Supply (Gas Dryer) ‰ Manual shutoff valve present in supply ‰ All connections sealed with approved sealer and wrench tight ‰ Conversion kit for choosing Electrolux, the new ...
Installation Instructions (All Languages)
Page 4
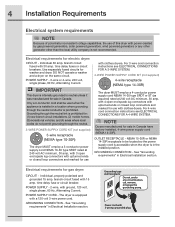
...30R or NEMA 14-30R receptacle to neutral unless it was manufactured for use with clothes dryers. See "Grounding requirements" in Electrical Installation section. Electrical requirements for washer and dryer. POWER SUPPLY CORD - Grounding type wall receptacle Do not, under any other generator ...or closed loop connectors and marked for use with 30 amp. NOTE Dryers manufactured for electric dryer: CIRCUIT - Individual, properly polarized and grounded 15 amp. time delay fuses or circuit breakers. IMPORTANT This dryer is prohibited. POWER SUPPLY - 2-wire, with ground, 120 volt, ...
...30R or NEMA 14-30R receptacle to neutral unless it was manufactured for use with clothes dryers. See "Grounding requirements" in Electrical Installation section. Electrical requirements for washer and dryer. POWER SUPPLY CORD - Grounding type wall receptacle Do not, under any other generator ...or closed loop connectors and marked for use with 30 amp. NOTE Dryers manufactured for electric dryer: CIRCUIT - Individual, properly polarized and grounded 15 amp. time delay fuses or circuit breakers. IMPORTANT This dryer is prohibited. POWER SUPPLY - 2-wire, with ground, 120 volt, ...
Installation Instructions (All Languages)
Page 5
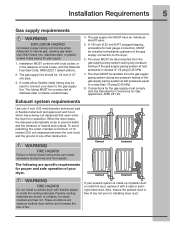
... lint. Installation MUST conform with local codes, or in excess of 1/2 psig (3.45 kPa). 7. The tubing MUST be 1/2 inch (1.27 cm) pipe. 3. Connections for the gas supply must comply with flexible plastic or metal foil venting materials. Also, ensure the present...at test pressures equal to the gas supply line. Installation Requirements 5 Gas supply requirements WARNING EXPLOSION HAZARD Uncoated copper tubing will obstruct clothes dryer airflow and increase the risk of fire. A 1/8 inch (0.32 cm) N.P.T. Flexible venting materials are specific...
... lint. Installation MUST conform with local codes, or in excess of 1/2 psig (3.45 kPa). 7. The tubing MUST be 1/2 inch (1.27 cm) pipe. 3. Connections for the gas supply must comply with flexible plastic or metal foil venting materials. Also, ensure the present...at test pressures equal to the gas supply line. Installation Requirements 5 Gas supply requirements WARNING EXPLOSION HAZARD Uncoated copper tubing will obstruct clothes dryer airflow and increase the risk of fire. A 1/8 inch (0.32 cm) N.P.T. Flexible venting materials are specific...
Installation Instructions (All Languages)
Page 6
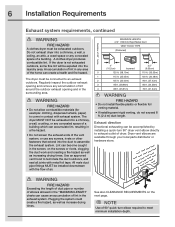
...meet minimum installation depth. Lint can create a health and fire hazard. 6 Installation Requirements Exhaust system requirements, continued WARNING FIRE HAZARD A clothes dryer must be connected to an exhaust outdoors. An accumulation of lint in any concealed space of air. WARNING FIRE HAZARD • Do not allow ...(6.35cm) 0 125 ft. (38.10m) 110 ft. (33.53m) 1 115 ft. (35.05m) 100 ft. (30.48m) 2 105 ft. (32.00m) 90 ft. (27.43m) 3 95 ft. (28.96m) 80 ft. (24.38m) 4 85 ft. (25.91m) 70 ft. (21.34m) WARNING FIRE HAZARD • Do not install fl...
...meet minimum installation depth. Lint can create a health and fire hazard. 6 Installation Requirements Exhaust system requirements, continued WARNING FIRE HAZARD A clothes dryer must be connected to an exhaust outdoors. An accumulation of lint in any concealed space of air. WARNING FIRE HAZARD • Do not allow ...(6.35cm) 0 125 ft. (38.10m) 110 ft. (33.53m) 1 115 ft. (35.05m) 100 ft. (30.48m) 2 105 ft. (32.00m) 90 ft. (27.43m) 3 95 ft. (28.96m) 80 ft. (24.38m) 4 85 ft. (25.91m) 70 ft. (21.34m) WARNING FIRE HAZARD • Do not install fl...


