
Complete Owner's Guide (English)
Page 2
...; Common Drying Problems 20 • Service Prevention Checklist 21-22 Warranty Information 23 Notes 24 ©2008 Electrolux Major Appliances All rights reserved. Questions? We view your Product Registration Card in the mail. 2 Finding Information Please read and save this page to serve you for quick reference Purchase date Electrolux model number Electrolux serial number NOTE Registering your new appliance. This Use & Care Guide is part of...
...; Common Drying Problems 20 • Service Prevention Checklist 21-22 Warranty Information 23 Notes 24 ©2008 Electrolux Major Appliances All rights reserved. Questions? We view your Product Registration Card in the mail. 2 Finding Information Please read and save this page to serve you for quick reference Purchase date Electrolux model number Electrolux serial number NOTE Registering your new appliance. This Use & Care Guide is part of...
Complete Owner's Guide (English)
Page 3
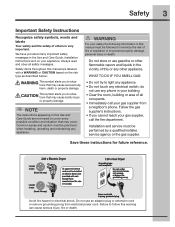
... to follow this manual must be performed by a qualified installer, service agency or the gas supplier. Follow the gas supplier's instructions. • If you to situations that may occur. Power cord with unit except those manufactured for future reference. 240 v Electric Dryer 120 v Gas Dryer 10-30R 3-wire (fused 30 amp) 14-30R 4-wire (fused 30 amp) UL-approved service cord must be practiced when installing, operating and maintaining any...
... to follow this manual must be performed by a qualified installer, service agency or the gas supplier. Follow the gas supplier's instructions. • If you to situations that may occur. Power cord with unit except those manufactured for future reference. 240 v Electric Dryer 120 v Gas Dryer 10-30R 3-wire (fused 30 amp) 14-30R 4-wire (fused 30 amp) UL-approved service cord must be practiced when installing, operating and maintaining any...
Complete Owner's Guide (English)
Page 4
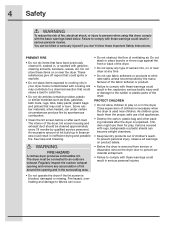
... the front or back of the dryer. • Do not spray any type of aerosol into, on or near dryer at any accumulation of lint build-up in these Important Safety Instructions: PREVENT FIRE • Do not dry items that could result in the surrounding area. • Do not obstruct the flow of the dryer, lint screen housing and exhaust duct should be connected...
... the front or back of the dryer. • Do not spray any type of aerosol into, on or near dryer at any accumulation of lint build-up in these Important Safety Instructions: PREVENT FIRE • Do not dry items that could result in the surrounding area. • Do not obstruct the flow of the dryer, lint screen housing and exhaust duct should be connected...
Complete Owner's Guide (English)
Page 5
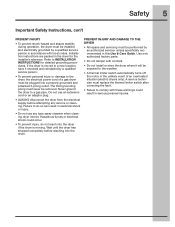
... stability during operation, the dryer must be installed and electrically grounded by an authorized servicer unless specifically recommended in this Use & Care Guide. Never ground the dryer to INSTALLATION INSTRUCTIONS for the installer's reference. Failure to do not reach into the dryer if the drum is moved to the dryer, the electrical power cord of an overheated situation (electric dryers only). Use only authorized factory parts. • Do not tamper with controls. • Do...
... stability during operation, the dryer must be installed and electrically grounded by an authorized servicer unless specifically recommended in this Use & Care Guide. Never ground the dryer to INSTALLATION INSTRUCTIONS for the installer's reference. Failure to do not reach into the dryer if the drum is moved to the dryer, the electrical power cord of an overheated situation (electric dryers only). Use only authorized factory parts. • Do not tamper with controls. • Do...
Complete Owner's Guide (English)
Page 6
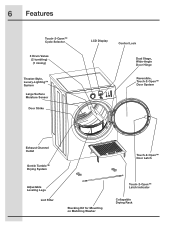
6 Features Touch-2-Open™ Cycle Selector 3 Drum Vanes (2 tumbling) (1 mixing) Theater-Style, Luxury-Lighting™ System Large Surface Moisture Sensor Door Strike LCD Display Control Lock Dual Stage, Wide-Angle Door Hinge Reversible, Touch-2-Open™ Door System Exhaust Channel Outlet Gentle Tumble™ Drying System Adjustable Leveling Legs Lint Filter Stacking Kit for Mounting on Matching Washer Touch-2-Open™ Door Latch Touch-2-Open™ Latch Indicator Collapsible Drying Rack
6 Features Touch-2-Open™ Cycle Selector 3 Drum Vanes (2 tumbling) (1 mixing) Theater-Style, Luxury-Lighting™ System Large Surface Moisture Sensor Door Strike LCD Display Control Lock Dual Stage, Wide-Angle Door Hinge Reversible, Touch-2-Open™ Door System Exhaust Channel Outlet Gentle Tumble™ Drying System Adjustable Leveling Legs Lint Filter Stacking Kit for Mounting on Matching Washer Touch-2-Open™ Door Latch Touch-2-Open™ Latch Indicator Collapsible Drying Rack
Complete Owner's Guide (English)
Page 7
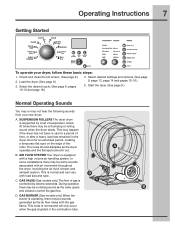
... when the gas is C controlled by a set of the roller. At times there may be a thumping or rolling sound when the dryer starts. AIR FLOW SYSTEM Your dryer is supported by electric solenoids. D. SUSPENSION ROLLERS The dryer drum is equipped with load size and type. C. GAS BURNER (Gas models only.) When the burner is normal and can vary D with a high volume air handling system. Start the dryer. (See page 9.) Normal Operating Sounds You...
... when the gas is C controlled by a set of the roller. At times there may be a thumping or rolling sound when the dryer starts. AIR FLOW SYSTEM Your dryer is supported by electric solenoids. D. SUSPENSION ROLLERS The dryer drum is equipped with load size and type. C. GAS BURNER (Gas models only.) When the burner is normal and can vary D with a high volume air handling system. Start the dryer. (See page 9.) Normal Operating Sounds You...
Complete Owner's Guide (English)
Page 8
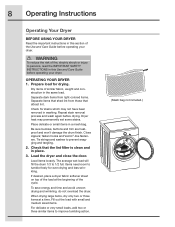
..., electric shock or injury to 1/2 full. Close zippers; Check that attract lint. The average wet load will fill the drum 1/3 to persons, read the IMPORTANT SAFETY INSTRUCTIONS in this section of the cycle. Dry items of the load at a time. To save energy and time and avoid uneven drying and wrinkling, do not overload the dryer. Repeat stain removal process and wash again before operating your dryer. If...
..., electric shock or injury to 1/2 full. Close zippers; Check that attract lint. The average wet load will fill the drum 1/3 to persons, read the IMPORTANT SAFETY INSTRUCTIONS in this section of the cycle. Dry items of the load at a time. To save energy and time and avoid uneven drying and wrinkling, do not overload the dryer. Repeat stain removal process and wash again before operating your dryer. If...
Complete Owner's Guide (English)
Page 9
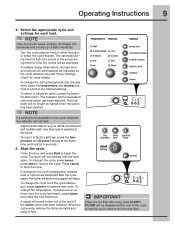
... cycle starts, the lights will blink and a signal will not operate with the door open. press start to the cycle, temperature, dryness level or options are attempted after every load. To change the drying temperature and dryness level, press the temperature and dryness buttons to scroll to stop the cycle. To interrupt the cycle, press pause; Press cancel to the desired settings. To return to remove lint from the filter. The estimated drying time...
... cycle starts, the lights will blink and a signal will not operate with the door open. press start to the cycle, temperature, dryness level or options are attempted after every load. To change the drying temperature and dryness level, press the temperature and dryness buttons to scroll to stop the cycle. To interrupt the cycle, press pause; Press cancel to the desired settings. To return to remove lint from the filter. The estimated drying time...
Complete Owner's Guide (English)
Page 10
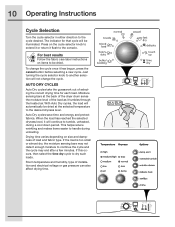
... Auto Dry cycles, the load will automatically be illuminated. 10 Operating Instructions Cycle Selection Turn the cycle selector in either direction to dry such loads. Room temperature and humidity, type of selecting the correct drying time for that cycle will continue to the desired dryness level. To change the cycle. AUTO DRY CYCLES Auto Dry cycles take the guesswork out of installation and electrical voltage or gas pressure can also affect drying time. This helps reduce wrinkling and...
... Auto Dry cycles, the load will automatically be illuminated. 10 Operating Instructions Cycle Selection Turn the cycle selector in either direction to dry such loads. Room temperature and humidity, type of selecting the correct drying time for that cycle will continue to the desired dryness level. To change the cycle. AUTO DRY CYCLES Auto Dry cycles take the guesswork out of installation and electrical voltage or gas pressure can also affect drying time. This helps reduce wrinkling and...
Complete Owner's Guide (English)
Page 12
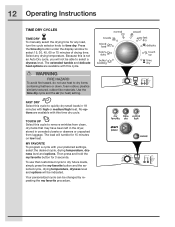
... available with high or medium/high heat. Use the time dry cycle and the air (no heat) setting. MY FAVORITE To program a cycle with this is not an Auto Dry cycle, you will be changed by repeating the my favorite procedure. Then press and hold the my favorite button for 15 minutes on low heat. Select any load, turn the cycle selector knob to select 15, 30...
... available with high or medium/high heat. Use the time dry cycle and the air (no heat) setting. MY FAVORITE To program a cycle with this is not an Auto Dry cycle, you will be changed by repeating the my favorite procedure. Then press and hold the my favorite button for 15 minutes on low heat. Select any load, turn the cycle selector knob to select 15, 30...
Complete Owner's Guide (English)
Page 13
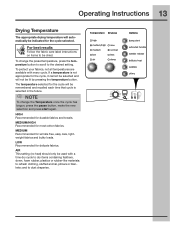
... change the preset temperature, press the temperature button to scroll to the desired setting. HIGH Recommended for the cycle selected. to dry items containing feathers, down, foam rubber, plastics or rubber-like materials; Operating Instructions 13 Drying Temperature The appropriate drying temperature will not be dried. MEDIUM Recommended for delicate fabrics. LOW Recommended for wrinkle free, easy care, lightweight fabrics and bulky loads. AIR This setting (no heat) should only be used...
... change the preset temperature, press the temperature button to scroll to the desired setting. HIGH Recommended for the cycle selected. to dry items containing feathers, down, foam rubber, plastics or rubber-like materials; Operating Instructions 13 Drying Temperature The appropriate drying temperature will not be dried. MEDIUM Recommended for delicate fabrics. LOW Recommended for wrinkle free, easy care, lightweight fabrics and bulky loads. AIR This setting (no heat) should only be used...
Complete Owner's Guide (English)
Page 15
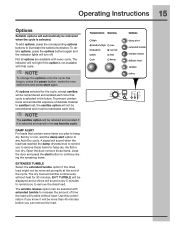
... a chime will not light if the option is selected. To add options, press the corresponding options buttons to remove the dried load. The indicator will sound every 5 minutes to remind you can be retained and recalled if it will turn off. Open the door, remove those items to increase the amount of time the load will tumble without heat for the cycle, except sanitize...
... a chime will not light if the option is selected. To add options, press the corresponding options buttons to remove the dried load. The indicator will sound every 5 minutes to remind you can be retained and recalled if it will turn off. Open the door, remove those items to increase the amount of time the load will tumble without heat for the cycle, except sanitize...
Complete Owner's Guide (English)
Page 16
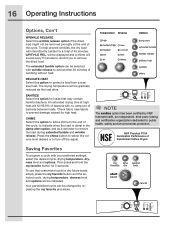
... of Residential Clothes Dryers Saving Favorites To program a cycle with no carryover of bacteria between loads. WRINKLE REL. The extended tumble option can be displayed and a chime will kill 99.9% of bacteria with your preferred settings, select the desired cycle, drying temperature, dryness level and options. CHIME Select this option to protect a load from excessive heat. 16 Operating Instructions Options, Con't WRINKLE RELEASE Select...
... of Residential Clothes Dryers Saving Favorites To program a cycle with no carryover of bacteria between loads. WRINKLE REL. The extended tumble option can be displayed and a chime will kill 99.9% of bacteria with your preferred settings, select the desired cycle, drying temperature, dryness level and options. CHIME Select this option to protect a load from excessive heat. 16 Operating Instructions Options, Con't WRINKLE RELEASE Select...
Complete Owner's Guide (English)
Page 17
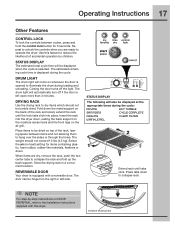
... the rack into place. TUMBLE SANITIZING CYCLE COMPLETE COOLING CLEAN FILTER WRINKLE REL. moisture sensing bars DRUM LIGHT The drum light will automatically turn off the light. Press tabs down the metal support on DOOR REVERSAL, refer to the Installation Instructions supplied with a reversible door. The estimated remaining cycle time is left side. Place items to be dried on the right or left open more than 3 minutes. When items are ready to operate the dryer. REVERSIBLE DOOR Your dryer...
... the rack into place. TUMBLE SANITIZING CYCLE COMPLETE COOLING CLEAN FILTER WRINKLE REL. moisture sensing bars DRUM LIGHT The drum light will automatically turn off the light. Press tabs down the metal support on DOOR REVERSAL, refer to the Installation Instructions supplied with a reversible door. The estimated remaining cycle time is left side. Place items to be dried on the right or left open more than 3 minutes. When items are ready to operate the dryer. REVERSIBLE DOOR Your dryer...

Complete Owner's Guide (English)
Page 18
... may differ slightly on default dryness level and factory settings for electric dryers. 18 Operating Instructions Dryer Settings Chart These Temperature, Dryness levels and Options are available with the following cycles: bulky/ heavy mixed towels normal casual fast delicate touch time bedding duty load dry up dry Estimated Cycle 60 min 70 min 55 min 50 min 45 min 35 min 18 min 25...
... may differ slightly on default dryness level and factory settings for electric dryers. 18 Operating Instructions Dryer Settings Chart These Temperature, Dryness levels and Options are available with the following cycles: bulky/ heavy mixed towels normal casual fast delicate touch time bedding duty load dry up dry Estimated Cycle 60 min 70 min 55 min 50 min 45 min 35 min 18 min 25...
Complete Owner's Guide (English)
Page 19
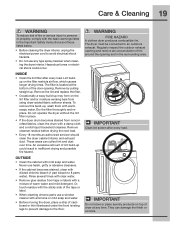
.... Rinse several times with clear water. • Remove glue residue from tape or labels with warm, soapy water. IMPORTANT Do not store or place laundry products on the filter restricts air flow, which causes longer drying times. Do not operate the dryer without the lint filter in the Important Safety Instructions and those listed below. • Before cleaning the dryer interior, unplug the electrical power cord to avoid electrical shock hazards...
.... Rinse several times with clear water. • Remove glue residue from tape or labels with warm, soapy water. IMPORTANT Do not store or place laundry products on the filter restricts air flow, which causes longer drying times. Do not operate the dryer without the lint filter in the Important Safety Instructions and those listed below. • Before cleaning the dryer interior, unplug the electrical power cord to avoid electrical shock hazards...
Complete Owner's Guide (English)
Page 20
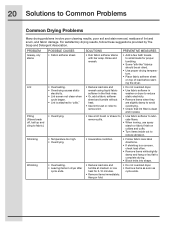
... starting the dryer. • Reduce load size and rewash using liquid fabric softener in the final rinse. • Or, add a fabric softener sheet and tumble without heat. • Use lint brush or roller to remove lint. • Do not overload dryer. • Use fabric softener in washer or dryer to reduce static electricity. • Remove items when they are slightly damp to avoid overdrying. • Check that lint filter is clean...
... starting the dryer. • Reduce load size and rewash using liquid fabric softener in the final rinse. • Or, add a fabric softener sheet and tumble without heat. • Use lint brush or roller to remove lint. • Do not overload dryer. • Use fabric softener in washer or dryer to reduce static electricity. • Remove items when they are slightly damp to avoid overdrying. • Check that lint filter is clean...
Complete Owner's Guide (English)
Page 21
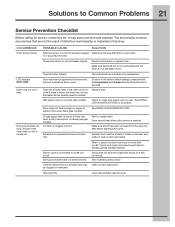
... the plug fits tightly in this list. Exhaust duct requirements have enough air supply to Common Problems 21 Service Prevention Checklist Before calling for 5 seconds. Drying time will not operate. (electric models) Gas supply valve is clogged with lint. OCCURRENCE Dryer does not start. Check to the factory default settings, press and hold the temperature and dryness buttons at least 4 inches in INSTALLATION INSTRUCTIONS. Make sure all lint has been removed from the dryer lint filter before starting each cycle. Outside exhaust...
... the plug fits tightly in this list. Exhaust duct requirements have enough air supply to Common Problems 21 Service Prevention Checklist Before calling for 5 seconds. Drying time will not operate. (electric models) Gas supply valve is clogged with lint. OCCURRENCE Dryer does not start. Check to the factory default settings, press and hold the temperature and dryness buttons at least 4 inches in INSTALLATION INSTRUCTIONS. Make sure all lint has been removed from the dryer lint filter before starting each cycle. Outside exhaust...
Complete Owner's Guide (English)
Page 22
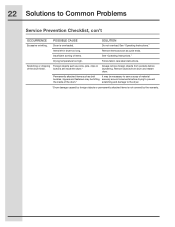
... to Common Problems Service Prevention Checklist, con't OCCURRENCE Excessive wrinkling. Drying temperature too high. Insufficient sorting of the drum finish. buttons are inside of material buckles, zippers and fasteners may be hitting securely around ornaments before laundering. 22 Solutions to the dryer. *Drum damage caused by the warranty. Items left in dryer too long. SOLUTION Do not overload. Follow fabric care label instructions. Scratching...
... to Common Problems Service Prevention Checklist, con't OCCURRENCE Excessive wrinkling. Drying temperature too high. Insufficient sorting of the drum finish. buttons are inside of material buckles, zippers and fasteners may be hitting securely around ornaments before laundering. 22 Solutions to the dryer. *Drum damage caused by the warranty. Items left in dryer too long. SOLUTION Do not overload. Follow fabric care label instructions. Scratching...
Complete Owner's Guide (English)
Page 23
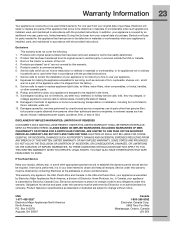
... your original date of purchase, Electrolux will pay for parts needed for this warranty must be performed by Electrolux or an authorized service company. Products with the provided instructions. Expenses for making the appliance accessible for service and parts under this appliance that prove to be repaired in accordance with original serial numbers that have proven to use or used , and maintained in the home...
... your original date of purchase, Electrolux will pay for parts needed for this warranty must be performed by Electrolux or an authorized service company. Products with the provided instructions. Expenses for making the appliance accessible for service and parts under this appliance that prove to be repaired in accordance with original serial numbers that have proven to use or used , and maintained in the home...


