Electrolux EWFLW65H - 27'' Front-Load Washer Support and Manuals
Get Help and Manuals for this Electrolux item

View All Support Options Below
Free Electrolux EWFLW65H manuals!
Problems with Electrolux EWFLW65H?
Ask a Question
Free Electrolux EWFLW65H manuals!
Problems with Electrolux EWFLW65H?
Ask a Question
Most Recent Electrolux EWFLW65H Questions

Part Fell Off In Soap Dispenser Area??
It appears a part fell off inside the soap dispensing area. It has three parts to it.A straight stic...
It appears a part fell off inside the soap dispensing area. It has three parts to it.A straight stic...
(Posted by chassidycamp 12 years ago)

Are There Any Known Problems With This Washer?
Electrolux EWFLW65HTS
Electrolux EWFLW65HTS
(Posted by coooker1 13 years ago)
Popular Electrolux EWFLW65H Manual Pages
Installation Instructions - Page 2
... use this guide
Thank you for quick reference
Purchase date
Electrolux model number
Electrolux serial number
For toll-free telephone support in home appliances. We view your purchase as the beginning of your washer 9
Connecting inlet water 10
Connecting drain & electrical 11
Performing installation cycle 12 Reversing door 13-18
Options
19
Accessories 19
Replacement parts 19...
Installation Instructions - Page 3

...any appliance. Save these instructions for installation:
OR
OR
OR
Universal wrench
supplied wkh washer
Adjustable wrench
3/8" or 10 mm box wrench
Ratchet and socket set
AND
Adjustable plbrs
AND... or area of all occupants. Safety
[mpoAant Safety Instructions
Recognize safety symbols, words and labels
Safety items throughout this manual are labeled with a WARNING or CAUTION based on ...
Installation Instructions - Page 4
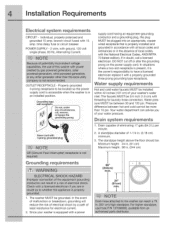
... all local codes and ordinances or in . (244 cm)
Grounding requirements
1. Properly grounded 3-prong receptacle to have a licensed electrician replace it is equipped with
supply cord having an equipment-grounding conductor and a grounding plug, the plug MUST be located so the power supply cord is accessible when the washer is properly installed and grounded...
Installation Instructions - Page 5
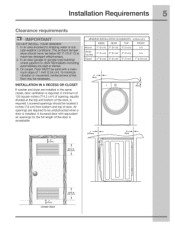
... with equivalent air openings for the full length of door. Installation Requirements
Clearance requirements
MINIMUM INSTALLATION CLEARANCES - Inches (cm)
SIDES
REAR
TOP
FRONT
Alcove
0" (0 cm) 0" (0 cm)* 0" (0 cm)
n/a
Under- Air openings are installed in the same closet, door ventilation is required: A minimum of 120 square inches (774.2 cm 2)of opening, equally divided at the top...
Installation Instructions - Page 6
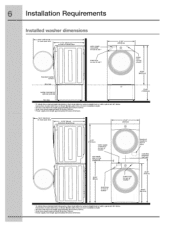
... cord length approximately
60 inches (152.5cm). installation Requirements
Installed washer dimensions
(128.53cm)* to clear open door
31.50" (80cm)* -to front of closed door
water supply connection on rear of unit 1
drain hose on rear of unit 2
(68.58cm)
freestand
washer on floor
floor line
washer mounted on optional pedestal
floor line
* To obtain these minimal...
Installation Instructions - Page 7
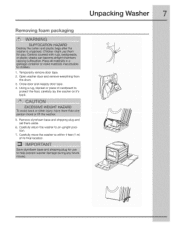
... base and shipping plug and set them aside.
6. Carefully return the washer to protect the floor, carefully lay the washer on it's back.
!
5. Using a rug, blanket or piece of its final location. Removing foam packaging
Unpackin Washer
1. Carefully move the washer to within 4 feet (1 m) of cardboard to an upright position.
7. Open washer door and remove everything from...
Installation Instructions - Page 8
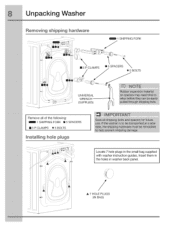
... holes in the small bag supplied with washer instruction guides. Unpacking Washer
Removing shipping hardware
1 SHIPPING FORK
[] 5 P CLAMPS
sX
® 5 SPACER
• BOLTS
UNWERSAI WRENCH
" ®_
(SUPPLIED)
_/_
Remove all of the following: 1 SHIPPING FORK ® 5 SPACERS
[]5PCLAMPS
05BOLTS
Installing hole pmugs
Locate 7 hole plugs in washer back panel.
/
A 7 HOLE PLUGS (IN BAG...
Installation Instructions - Page 12
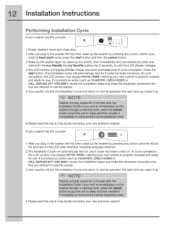
... LCD window may display INSTAL PASS!, meaning your new washer is properly installed and ready for use the washer.
3.Your washer will exit the Installation Cycle and return to hand wash cycle, press the start button. If it up.
6.Please read the Use & Care Guide and enjoy your new premium washer!
liooo i ioo°
1. Installation Instructions
Pe#ormin9 Installation Cycle
If your...
Installation Instructions - Page 13
...:
%
Screwdrivers with #2 square & straight bit
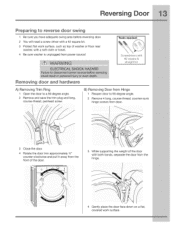
Removing door and hardware
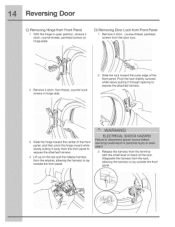
A) Removing Trim Ring 1 Open the door to a 90 degree angle. 2 Remove and save the trim plug and long, course-thread, panhead screw.
Reversing Door
Preparing to reverse door swing
1 Be sure you have adequate swing area before reversing door. 2 You will need a screw driver with a #2 square bit. 3 Protect flat work...
Installation Instructions - Page 14
Reversing Door
C) Removing Hinge from the terminal with the small lever on hinge plate. S0eparate the harness from the...screws from the retainer, allowing the harness to expose the attached harness.
4 Lift up on the tab and the release harness from the door lock.
2 Remove 3 short, fine-thread, counter-sunk screws in open position, remove 2 short, course-thread, panhead screws on back...
Installation Instructions - Page 15
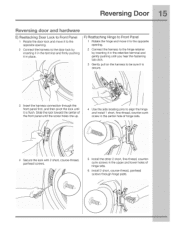
... short, course-thread, panhead screws.
5 Install the other 2 short, fine-thread, countersunk screws in the upper and lower holes of hinge side.
6 Install 2 short, course-thread, panhead screws through... the harness connection through hinge plate. Reversing Door
Reversing door and hardware
E) Reattaching Door Lock to Front Panel 1 Rotate the door lock and move it to the opposite opening . 2...
Installation Instructions - Page 16
... of latch indicator.
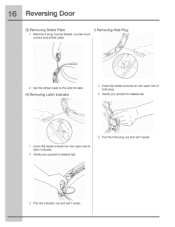
2 Gently pry upward to the side for later. counter-sunk
I) Removing Hole Plug
iI_I_I i iii_ii_
2 Set the striker plate to release tab.
3 Pull the hole plug out and set it aside.
3 Pull the indicator out and set it aside. Reversing Door
G) Removing Striker Plate 1 Remove 2 long, course-thread, screws and striker plate.
Installation Instructions - Page 17
... snap
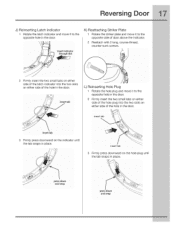
L) Reinserting Hole Plug
1 Rotate the hole plug and move it to the opposite hole in the door. Reversing Door
J) Reinserting Latch Indicator 1 Rotate the latch indicator and move it to the opposite hole in the door.
2 Firmly insert the two small tabs on either side of the hole plug into the two slots...
Installation Instructions - Page 18
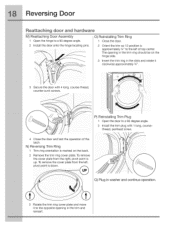
...point is down.
Reversing Door
Reattaching door and hardware
M) Reattaching Door Assembly 1 Open the hinge to a 90 degree angle. 2 Install the trim plug with 4 long, course-thread.
N) Reversing Trim Ring 1 .... O) Reinstalling Trim Ring 1 CIosethe door.
2 Orient the trim so 12 position is marked on the hinge side.
3 Insert the trim ring in washer and continue operation.
3 Rotate the ...
Installation Instructions - Page 19
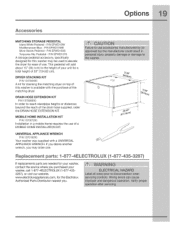
... supplied with the purchase of 53" (134.62 cm). P/N EPWD15SS
Turquoise Sky Pedestal - DRYER STACKING KiT P/N 134700400
A kit for the Electrolux Authorized Parts Distributor nearest you.
(1-877-435-3287}
Repmacement paAs: 1-877-4ELECTROLUX
If replacements parts are needed for your washer, contact the source where you may be used to elevate the dryer for a total height...
Electrolux EWFLW65H Reviews
We have not received any reviews for Electrolux yet.