
Electrolux EWFLW65H Support Question
Electrolux EWFLW65H Support Question
Find answers below for this question about Electrolux EWFLW65H - 27'' Front-Load Washer.Need a Electrolux EWFLW65H manual? We have 1 online manual for this item!
Question posted by chassidycamp on July 15th, 2011
Part Fell Off In Soap Dispenser Area??
It appears a part fell off inside the soap dispensing area. It has three parts to it. A straight stick piece with a small ledge halfway down, a round but flat on one side casing with a slit in it that the straight stick piece fits into and a spring. I can not locate where this came from and I would hate to pay a ton of money for someone to come tell me it was an easy fix. Is this easily put back in? If so, how?
Current Answers
Answer #1: Posted by OnlineOutreachSpecialist on July 18th, 2011 7:15 AM
OnlineOutreachSpecialist

Member since:
March 30th, 2011 Points: 2,848,320

Member since:
March 30th, 2011 Points: 2,848,320
If you would like to try and contact me directly I can possibly help you see what part(s) may be needed. This dispenser has 5 total parts that can be replaced via the model's parts manual guide. You can possibly obtain a copy of this online, or via the manufacturer's site and then enter your model number. The parts you would need would then be on page 2. of the guide. It is all plastic so you would need to be careful replacing or handling it so you do not damage more of the components.
Online Outreach Specialist
Answer #2: Posted by danmiller on October 22nd, 2012 12:14 AM
danmiller

Member since:
October 22nd, 2012 Points: 0
Member since:
October 22nd, 2012 Points: 0
funny, when I found this forum, all of the questions that were asked have also happened to me. Must be my good luck...
Anyway, you probably noticed that the drawer doesnt ppop out when you press the button. The spring fits around the rod inside the housing and the part with the "L" sticks out. If you look inside the housing at the "ceiling" you will see where it fits. There is a little hole in the back of the housing that allows the rod to go through it whan the drawer is closed and the spring is loaded. It just "snaps" into place. It will fall out again. Mine does about every 2 months. Poor design.
Related Electrolux EWFLW65H Manual Pages
Installation Instructions - Page 2
... you for quick reference
Purchase date
Electrolux model number
Electrolux serial number
For toll-free telephone support in home appliances. These Installation Instructions are part of a relationship. We view your washer 9
Connecting inlet water 10
Connecting drain & electrical 11
Performing installation cycle 12 Reversing door 13-18
Options
19
Accessories 19
Replacement...
Installation Instructions - Page 3

... your gas supplier from a neighbor's phone. If you to light any electrical switch;
Save these instructions for installation:
OR
OR
OR
Universal wrench
supplied wkh washer
Adjustable wrench
3/8" or 10 mm box wrench
Ratchet and socket set
AND
Adjustable plbrs
AND
Carpenter's level Do not touch any appliance. Clear the room...
Installation Instructions - Page 4
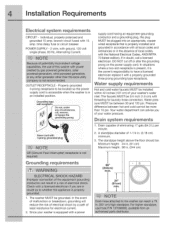
... - Water pressure MUST be more than 10 psi. A standpipe diameter of least resistance for laundry hose connection. POWER SUPPLY - 2 wire, with 15 amp. In situations where a two-... with a properly grounded three prong grounding type receptacle. The washer MUST be located so the power supply cord is accessible when the washer is equipped with the National Electrical Codes, ANSI/NFPA 70...
Installation Instructions - Page 5
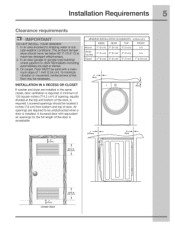
...SIDES
REAR
TOP
FRONT
Alcove
0" (0 cm) 0" (0 cm)* 0" (0 cm)
n/a
Under- Counter 0" (0 cm) 0" (0 cm)* 0" (0 cm)
n/a
Closet
0" (0 cm) 0" (0 cm)* 0" (0 cm) 1" (2.54 cm)
iNSTALLATiON iN A RECESS OR CLOSET
If washer and dryer are required to be located 3 inches (7.6 cm) from bottom and top of the door is installed. Installation Requirements
Clearance requirements
MINIMUM INSTALLATION...
Installation Instructions - Page 6
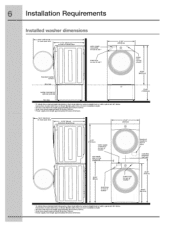
...° elbow.
50.6" (128.5cm) _ to clear open door
(80.01cm) to front of closed door
27.00 (68.5cm)
power cord on rear of unit 3
38.00"
!(96.52cm)
53.00" (134.62cm... (150cm).
3 Power supply cord length approximately
60 inches (152.5cm).
straight installation
back or with depth. installation Requirements
Installed washer dimensions
(128.53cm)* to clear open door
31.50" (80cm)* -to...
Installation Instructions - Page 7
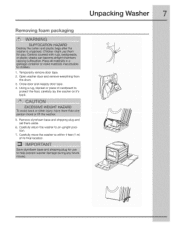
... base and shipping plug and set them aside.
6. Carefully move the washer to protect the floor, carefully lay the washer on it's back.
!
5. Close door and reapply door tape.
4. Open washer door and remove everything from the drum.
3. Using a rug, blanket or piece of cardboard to within 4 feet (1 m) of its final location. Removing foam...
Installation Instructions - Page 8
Unpacking Washer
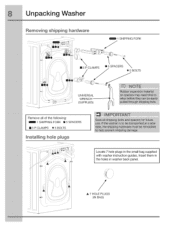
Removing shipping hardware
1 SHIPPING FORK
[] 5 P CLAMPS
sX
® 5 SPACER
• BOLTS
UNWERSAI WRENCH
" ®_
(SUPPLIED)
_/_
Remove all of the following: 1 SHIPPING FORK ® 5 SPACERS
[]5PCLAMPS
05BOLTS
Installing hole pmugs
Locate 7 hole plugs in washer back panel.
/
A 7 HOLE PLUGS (IN BAG) Insert them in the holes in the small bag supplied with washer ...
Installation Instructions - Page 9
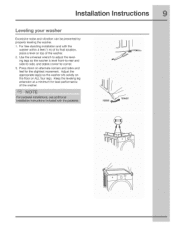
... on alternate corners and sides and feel for best performance of the washer. 2. Installation instructions
Leveling your washer
Excessive noise and vibration can be prevented by properly leveling the washer. 1. Use the universal wrench to adjust the leveling legs so the washer is level front-to-rear and side-to-side, and stable corner...
Installation Instructions - Page 10
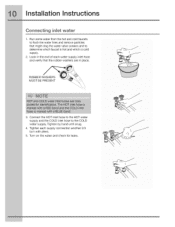
...hose to the HOT water supply and the COLD inlet hose to flush the water lines and remove particles that the rubber washers are in place.
Tighten each water supply inlet hose and verify that might clog the water valve screens and to determine ... Tighten by hand until snug.
4. Run some water from the hot and cold faucets to the COLD water supply. RUBBER WASHERS MUST BE PRESENT
3.
Installation Instructions - Page 11
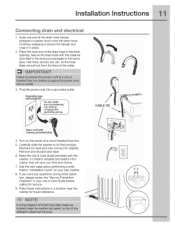
... with the cable tie (provided in washer drum) onto the drain hose. so the hose does not pull out from the force of the drain hose in place.
. Snap one end of the drain hose hanger (shipped in the enclosure package) to the standpipe, inlet hose, laundry tub, etc. Installation Instructions
Connecting...
Installation Instructions - Page 12
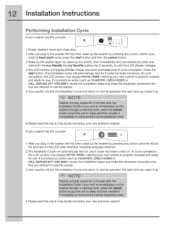
...the LCD window may display INSTAL PASS!, meaning your new washer is properly installed and ready for use . At cycle completion, the LCD window may display ...Installation Instructions
Pe#ormin9 Installation Cycle
If your washer has this console:
{
f
L_ _@
=,=_=,=o Oo
1 .After you plug in the washer the first time: wake up the washer by pressing any button, rotate cycle knob to...
Installation Instructions - Page 13
... work surface, such as top of washer or floor near
washer, with #2 square & straight bit
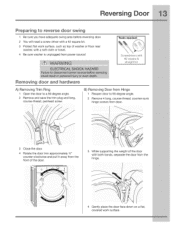
Removing door and hardware
A) Removing Trim Ring 1 Open the door to reverse door swing
1 Be sure you have adequate swing area before reversing door. 2 You will need a screw driver with a #2 square bit. 3 Protect flat work surface.
Tools needed:
%
Screwdrivers with...
Installation Instructions - Page 14
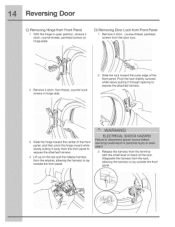
Release the harness from the terminal with the small lever on back of the front panel, and then pivot the hinge inward while slowly pulling it through opening to expose the attached harness.
3 Slide ...
Installation Instructions - Page 16
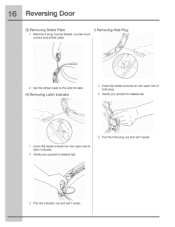
... hole plug out and set it aside.
3 Pull the indicator out and set it aside.
H) Removing Latch Indicator
1 Insert flat blade screwdriver into open slot of hole plug.
2 Gently pry upward to release tab.
1 Insert flat blade screwdriver into open slot of latch indicator.
2 Gently pry upward to the side for later.
Installation Instructions - Page 17
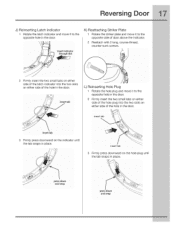
...the latch indicator and move it to the opposite hole in the door.
2 Firmly insert the two small tabs on either side of the hole plug into the two slots
on either side of the hole ... above the indicator.
2 Reattach with 2 long, course-thread, counter-sunk screws.
2 Firmly insert the two small tabs on either side of the latch indicator into the two slots on either side of the hole in the door...
Installation Instructions - Page 18
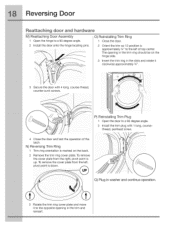
...-sun k screws.
O) Reinstalling Trim Ring 1 CIosethe door.
2 Orient the trim so 12 position is up.
N) Reversing Trim Ring 1 Trim ring orientation is down.
Q) Plug in washer and continue operation.
3 Rotate the trim ring cover plate and move it to the left , pivot point is marked on the hinge side.
3 Insert the...
Installation Instructions - Page 19
... purchase of 53" (134.62 cm).
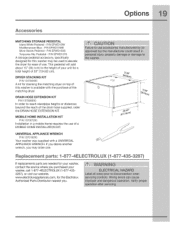
P/N EPWD15SS
Turquoise Sky Pedestal -
Repmacement paAs: 1-877-4ELECTROLUX
If replacements parts are needed for your washer, contact the source where you may be used to the height of your washer, call 1-877-4ELECTROLUX (1-877-4353287), or visit our website, www.electroluxappliances.com, for a total height of the...
Similar Questions

Activate Clean Tub Cycle On My Electrolux Front Load Washer
how do I manually activate the clean tub cycle on my Electrolux front load washer
how do I manually activate the clean tub cycle on my Electrolux front load washer
(Posted by suesmet20 2 years ago)

Electrolux Front Load Washer Soap Dispenser Wont Close
(Posted by sarganimes 9 years ago)

How To Clean Cold Water Filter Electrolux Front Load Washer
(Posted by franksteve3 10 years ago)
What To Do If Your Front Load Washer Will Not Dispense The Fabric Softener
(Posted by peacelraymon 10 years ago)

Are There Any Known Problems With This Washer?
Electrolux EWFLW65HTS
Electrolux EWFLW65HTS
(Posted by coooker1 13 years ago)