
Installation Instructions
Page 2
.... We view your washer 9 Connecting inlet water 10 Connecting drain & electrical 11 Performing installation cycle 12 Reversing door 13-18 Options 19 Accessories 19 Replacement parts 19 Notes 20 ©2008 Electrolux Major Appliances All rights reserved. To ensure our ability to continue serving you for quick reference Purchase date Electrolux model number Electrolux serial number For toll-free telephone support in home appliances. These Installation Instructions are part of our commitment to...
.... We view your washer 9 Connecting inlet water 10 Connecting drain & electrical 11 Performing installation cycle 12 Reversing door 13-18 Options 19 Accessories 19 Replacement parts 19 Notes 20 ©2008 Electrolux Major Appliances All rights reserved. To ensure our ability to continue serving you for quick reference Purchase date Electrolux model number Electrolux serial number For toll-free telephone support in home appliances. These Installation Instructions are part of our commitment to...

Installation Instructions
Page 3
..., death or property damage. Save these instructions for installation: OR OR OR Universal wrench supplied wkh washer Adjustable wrench 3/8" or 10 mm box wrench Ratchet and socket set AND Adjustable plbrs AND Carpenter's level do not use any electrical switch; If you to light any appliance. Do not touch any phone in your gas supplier from a neighbor's phone. Follow the...
..., death or property damage. Save these instructions for installation: OR OR OR Universal wrench supplied wkh washer Adjustable wrench 3/8" or 10 mm box wrench Ratchet and socket set AND Adjustable plbrs AND Carpenter's level do not use any electrical switch; If you to light any appliance. Do not touch any phone in your gas supplier from a neighbor's phone. Follow the...
Installation Instructions
Page 4
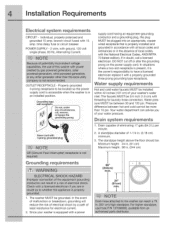
... the power supply cord. DO NOT cut , remove, / or bypassthe | grounding prong, j) Powercord with supply cord having an equipment-grounding conductor and a grounding plug, the plug MUST be plugged into an appropriate, copper wired receptacle that is properly installed and grounded in accordance with all local codes and ordinances or in the absence of your washer's water inlet. Water pressure MUST be between hot and cold...
... the power supply cord. DO NOT cut , remove, / or bypassthe | grounding prong, j) Powercord with supply cord having an equipment-grounding conductor and a grounding plug, the plug MUST be plugged into an appropriate, copper wired receptacle that is properly installed and grounded in accordance with all local codes and ordinances or in the absence of your washer's water inlet. Water pressure MUST be between hot and cold...
Installation Instructions
Page 5
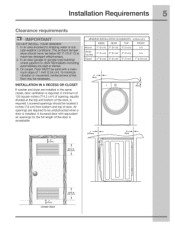
... If washer and dryer are required to be located 3 inches (7.6 cm) from bottom and top of the door is installed. A Iouvered door with equivalent air openings for the full length of door. Louvered openings should be unobstructed when a door is acceptable. 1" ""='€_ (2.54cm) lo io H i i_ _=''= ii O0 II H 0 li_i i_II,._ (Ocrn} ii i r (7.6crn] closet door Inches (cm) SIDES REAR TOP FRONT...
... If washer and dryer are required to be located 3 inches (7.6 cm) from bottom and top of the door is installed. A Iouvered door with equivalent air openings for the full length of door. Louvered openings should be unobstructed when a door is acceptable. 1" ""='€_ (2.54cm) lo io H i i_ _=''= ii O0 II H 0 li_i i_II,._ (Ocrn} ii i r (7.6crn] closet door Inches (cm) SIDES REAR TOP FRONT...
Installation Instructions
Page 6
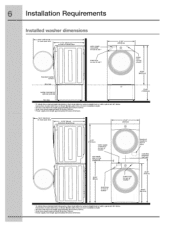
... depth dimensions, dryer must either be vented straight Connection of water inlet hose on Steam Models adds 3/4 in . (2 cm) to installation I Hot and cold inlet hose length approximately 48.5 inches (123cm) 2 Drain hose length approximately 59 inches (150cm). 3 Power supply cord length approximately 60 inches (152.5cm). straight installation back or with depth. back or with depth. installation Requirements Installed washer dimensions (128.53cm)* to clear open door 31.50" (80cm)* -to front of closed door water...
... depth dimensions, dryer must either be vented straight Connection of water inlet hose on Steam Models adds 3/4 in . (2 cm) to installation I Hot and cold inlet hose length approximately 48.5 inches (123cm) 2 Drain hose length approximately 59 inches (150cm). 3 Power supply cord length approximately 60 inches (152.5cm). straight installation back or with depth. back or with depth. installation Requirements Installed washer dimensions (128.53cm)* to clear open door 31.50" (80cm)* -to front of closed door water...
Installation Instructions
Page 7
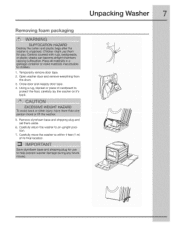
Temporarily remove door tape. 2. Close door and reapply door tape. 4. Remove styrofoam base and shipping plug and set them aside. 6. Using a rug, blanket or piece of its final location. Carefully return the washer to protect the floor, carefully lay the washer on it's back. ! 5. Carefully move the washer to within 4 feet (1 m) of cardboard to an upright position. 7. Open washer door and remove everything from the drum. 3. Removing foam packaging Unpackin Washer 1.
Temporarily remove door tape. 2. Close door and reapply door tape. 4. Remove styrofoam base and shipping plug and set them aside. 6. Using a rug, blanket or piece of its final location. Carefully return the washer to protect the floor, carefully lay the washer on it's back. ! 5. Carefully move the washer to within 4 feet (1 m) of cardboard to an upright position. 7. Open washer door and remove everything from the drum. 3. Removing foam packaging Unpackin Washer 1.
Installation Instructions
Page 8
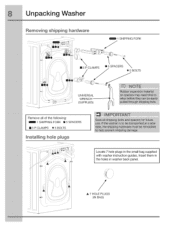
Unpacking Washer Removing shipping hardware 1 SHIPPING FORK [] 5 P CLAMPS sX ® 5 SPACER • BOLTS UNWERSAI WRENCH " ®_ (SUPPLIED) _/_ Remove all of the following: 1 SHIPPING FORK ® 5 SPACERS []5PCLAMPS 05BOLTS Installing hole pmugs Locate 7 hole plugs in washer back panel. / A 7 HOLE PLUGS (IN BAG) Insert them in the holes in the small bag supplied with washer instruction guides.
Unpacking Washer Removing shipping hardware 1 SHIPPING FORK [] 5 P CLAMPS sX ® 5 SPACER • BOLTS UNWERSAI WRENCH " ®_ (SUPPLIED) _/_ Remove all of the following: 1 SHIPPING FORK ® 5 SPACERS []5PCLAMPS 05BOLTS Installing hole pmugs Locate 7 hole plugs in washer back panel. / A 7 HOLE PLUGS (IN BAG) Insert them in the holes in the small bag supplied with washer instruction guides.
Installation Instructions
Page 9
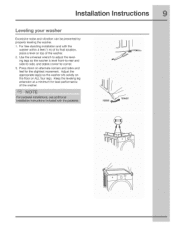
Installation instructions Leveling your washer Excessive noise and vibration can be prevented by properly leveling the washer. 1. For free standing installation and with the washer within 4 feet (1 m) of its final location, place a level on top of the washer. Use the universal wrench to adjust the leveling legs so the washer is level front-to-rear and side-to-side, and stable corner-to-corner. 3. Press down on ALL four legs. Adjust...
Installation instructions Leveling your washer Excessive noise and vibration can be prevented by properly leveling the washer. 1. For free standing installation and with the washer within 4 feet (1 m) of its final location, place a level on top of the washer. Use the universal wrench to adjust the leveling legs so the washer is level front-to-rear and side-to-side, and stable corner-to-corner. 3. Press down on ALL four legs. Adjust...
Installation Instructions
Page 10
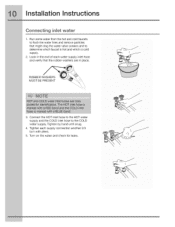
installation instructions Connecting inlet water 1. Look in the end of each supply connection another 2/3 turn with pliers. 5. Connect the HOT inlet hose to the HOT water supply and the COLD inlet hose to determine which faucet is hot and which is cold supply. 2. Tighten each water supply inlet hose and verify that might clog the water valve screens and to the COLD water supply. Turn on the water and check for leaks. Run some water from the hot and cold faucets to...
installation instructions Connecting inlet water 1. Look in the end of each supply connection another 2/3 turn with pliers. 5. Connect the HOT inlet hose to the HOT water supply and the COLD inlet hose to determine which faucet is hot and which is cold supply. 2. Tighten each water supply inlet hose and verify that might clog the water valve screens and to the COLD water supply. Turn on the water and check for leaks. Run some water from the hot and cold faucets to...
Installation Instructions
Page 11
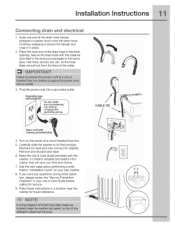
Place the hook end of the drain hose in washer drum) onto the drain hose. Snap one end of the water. 3. Continue wrapping it around the hanger and snap it in the enclosure package) to the standpipe, inlet hose, laundry tub, etc. Secure the drain hose with the cable tie (provided in place. . Plug the power cord into a grounded outlet. ¸wall CABLE T[ E II Installation Instructions Connecting drain and electrical 1. so the hose does not pull out from the force of the drain hose hanger (shipped in the drain opening.
Place the hook end of the drain hose in washer drum) onto the drain hose. Snap one end of the water. 3. Continue wrapping it around the hanger and snap it in the enclosure package) to the standpipe, inlet hose, laundry tub, etc. Secure the drain hose with the cable tie (provided in place. . Plug the power cord into a grounded outlet. ¸wall CABLE T[ E II Installation Instructions Connecting drain and electrical 1. so the hose does not pull out from the force of the drain hose hanger (shipped in the drain opening.
Installation Instructions
Page 12
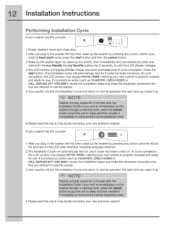
... LCD display changes. 4.The LCD window will exit the Installation Cycle and return to normal operation the next time you attempt to use the washer. 5.Your washer will automatically test for use . At cycle completion, the LCD window may display INSTAL PASS!, meaning your new washer is properly installed and ready for use . liooo i ioo° 1. Empty washer's drum and close door. 2.After you plug in the washer the first time: wake up the washer by...
... LCD display changes. 4.The LCD window will exit the Installation Cycle and return to normal operation the next time you attempt to use the washer. 5.Your washer will automatically test for use . At cycle completion, the LCD window may display INSTAL PASS!, meaning your new washer is properly installed and ready for use . liooo i ioo° 1. Empty washer's drum and close door. 2.After you plug in the washer the first time: wake up the washer by...
Installation Instructions
Page 13
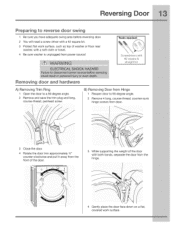
... cloth or towel. 4 Be sure washer is unplugged from the hinge. / / ! / t 4 Gently place the door face down on a flat, covered work surface. B) Removing Door from Hinge 1 Reopen door to a 90 degree angle. 2 Remove and save the trim plug and long, course-thread, panhead screw. Tools needed: % Screwdrivers with #2 square & straight bit Removing door and hardware A) Removing Trim Ring 1 Open the door to 90 degree angle. 2 Remove 4 long, course...
... cloth or towel. 4 Be sure washer is unplugged from the hinge. / / ! / t 4 Gently place the door face down on a flat, covered work surface. B) Removing Door from Hinge 1 Reopen door to a 90 degree angle. 2 Remove and save the trim plug and long, course-thread, panhead screw. Tools needed: % Screwdrivers with #2 square & straight bit Removing door and hardware A) Removing Trim Ring 1 Open the door to 90 degree angle. 2 Remove 4 long, course...
Installation Instructions
Page 14
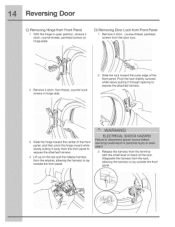
D) Removing Door Lock from Front Panel 1 Remove 2 short, course-thread, panhead screws from the door lock. 2 Remove 3 short, fine-thread, counter-sunk screws in open position, remove 2 short, course-thread, panhead screws on hinge plate. Pivot the lock slightly outward while slowly pulling it through opening to expose the attached harness. 3 Slide the hinge toward the outer edge of the lock. Slide the lock toward the...
D) Removing Door Lock from Front Panel 1 Remove 2 short, course-thread, panhead screws from the door lock. 2 Remove 3 short, fine-thread, counter-sunk screws in open position, remove 2 short, course-thread, panhead screws on hinge plate. Pivot the lock slightly outward while slowly pulling it through opening to expose the attached harness. 3 Slide the hinge toward the outer edge of the lock. Slide the lock toward the...
Installation Instructions
Page 15
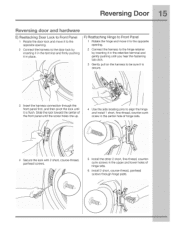
... hinge side. 6 Install 2 short, course-thread, panhead screws through the front panel first, and then pivot the lock until it is flush. Reversing Door Reversing door and hardware E) Reattaching Door Lock to Front Panel 1 Rotate the door lock and move it to the opposite opening . 2 Connect the harness to the door lock by inserting it in... it to the opposite opening . 2 Connect the harness to the hinge retainer by inserting it in the terminal and firmly pushing it in the upper and lower holes of the front panel until the screw holes line up. 4 Use the side locating pins to be sure it...
... hinge side. 6 Install 2 short, course-thread, panhead screws through the front panel first, and then pivot the lock until it is flush. Reversing Door Reversing door and hardware E) Reattaching Door Lock to Front Panel 1 Rotate the door lock and move it to the opposite opening . 2 Connect the harness to the door lock by inserting it in... it to the opposite opening . 2 Connect the harness to the hinge retainer by inserting it in the terminal and firmly pushing it in the upper and lower holes of the front panel until the screw holes line up. 4 Use the side locating pins to be sure it...
Installation Instructions
Page 16
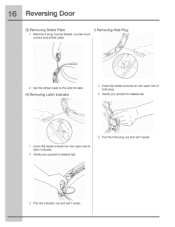
H) Removing Latch Indicator 1 Insert flat blade screwdriver into open slot of hole plug. 2 Gently pry upward to release tab. 1 Insert flat blade screwdriver into open slot of latch indicator. 2 Gently pry upward to the side for later. counter-sunk I) Removing Hole Plug iI_I_I i iii_ii_ 2 Set the striker plate to release tab. 3 Pull the hole plug out and set it aside. 3 Pull the indicator out and set it aside. Reversing Door G) Removing Striker Plate 1 Remove 2 long, course-thread, screws and striker plate.
H) Removing Latch Indicator 1 Insert flat blade screwdriver into open slot of hole plug. 2 Gently pry upward to release tab. 1 Insert flat blade screwdriver into open slot of latch indicator. 2 Gently pry upward to the side for later. counter-sunk I) Removing Hole Plug iI_I_I i iii_ii_ 2 Set the striker plate to release tab. 3 Pull the hole plug out and set it aside. 3 Pull the indicator out and set it aside. Reversing Door G) Removing Striker Plate 1 Remove 2 long, course-thread, screws and striker plate.
Installation Instructions
Page 17
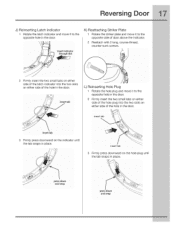
insert tab 3 Firmly press downward on the hole plug until the tab snaps _n place. L pressdown and snap insert indicator _slot 7 K) Reattaching Striker Plate 1 Rotate the striker plate and move it to the opposite side of door above the indicator. 2 Reattach with 2 long, course-thread, counter-sunk screws. 2 Firmly insert the...and move it to the opposite hole in the door. 2 Firmly insert the two small tabs on either side of the hole plug into the two slots on either side of the hole in the door. L) Reinserting Hole Plug 1 Rotate the hole plug and move it to the opposite hole in the...
insert tab 3 Firmly press downward on the hole plug until the tab snaps _n place. L pressdown and snap insert indicator _slot 7 K) Reattaching Striker Plate 1 Rotate the striker plate and move it to the opposite side of door above the indicator. 2 Reattach with 2 long, course-thread, counter-sunk screws. 2 Firmly insert the...and move it to the opposite hole in the door. 2 Firmly insert the two small tabs on either side of the hole plug into the two slots on either side of the hole in the door. L) Reinserting Hole Plug 1 Rotate the hole plug and move it to the opposite hole in the...
Installation Instructions
Page 18
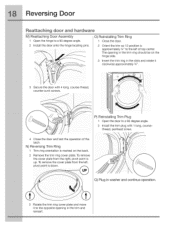
... side. 3 Insert the trim ring in washer and continue operation. 3 Rotate the trim ring cover plate and move it clockwise approximately 3A". \ \ 3 Secure the door with 1 long, coursethread, panhead screw. 4 Close the door and test the operation of top center. N) Reversing Trim Ring 1 Trim ring orientation is approximately 3/4"to a 90 degree angle. 2 Install the door onto the hinge locating pins.
... side. 3 Insert the trim ring in washer and continue operation. 3 Rotate the trim ring cover plate and move it clockwise approximately 3A". \ \ 3 Secure the door with 1 long, coursethread, panhead screw. 4 Close the door and test the operation of top center. N) Reversing Trim Ring 1 Trim ring orientation is approximately 3/4"to a 90 degree angle. 2 Install the door onto the hinge locating pins.
Installation Instructions
Page 19
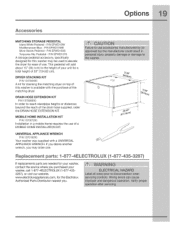
... ease of the 0 matching dryer. DRAIN HOSE EXTENSION KIT P/N 137098000 in a mobile home requires the use . If you desire another wrench, you . (1-877-435-3287} This pedestal will add about 15" (38.1cm) to the height of your washer, call 1-877-4ELECTROLUX (1-877-4353287), or visit our website, www.electroluxappliances.com, for the Electrolux Authorized Parts Distributor nearest you may...
... ease of the 0 matching dryer. DRAIN HOSE EXTENSION KIT P/N 137098000 in a mobile home requires the use . If you desire another wrench, you . (1-877-435-3287} This pedestal will add about 15" (38.1cm) to the height of your washer, call 1-877-4ELECTROLUX (1-877-4353287), or visit our website, www.electroluxappliances.com, for the Electrolux Authorized Parts Distributor nearest you may...


