
Installation Instructions
Page 2
... U.S. To ensure our ability to continue serving you for quick reference Purchase date Electrolux model number Electrolux serial number For toll-free telephone support in home appliances. and Canada: 1-877...Installation requirements 4-9 Electrical system requirements 4 Grounding requirements 4 Water supply requirements 4 Drain system requirements 4 Clearance requirements 5 installed dimensions 6 Unpacking washer 7-8 Removing foam packaging 7 Removing shipping hardware 8 Installing hole plugs 8 Installation instructions 9-12 Leveling your purchase as the beginning of a...
... U.S. To ensure our ability to continue serving you for quick reference Purchase date Electrolux model number Electrolux serial number For toll-free telephone support in home appliances. and Canada: 1-877...Installation requirements 4-9 Electrical system requirements 4 Grounding requirements 4 Water supply requirements 4 Drain system requirements 4 Clearance requirements 5 installed dimensions 6 Unpacking washer 7-8 Removing foam packaging 7 Removing shipping hardware 8 Installing hole plugs 8 Installation instructions 9-12 Leveling your purchase as the beginning of a...

Installation Instructions
Page 3
Save these instructions for installation: OR OR OR Universal wrench supplied wkh washer Adjustable wrench 3/8" or 10 mm box wrench Ratchet and socket set AND Adjustable plbrs AND Carpenter's level Clear the room, building or area of all ...
Save these instructions for installation: OR OR OR Universal wrench supplied wkh washer Adjustable wrench 3/8" or 10 mm box wrench Ratchet and socket set AND Adjustable plbrs AND Carpenter's level Clear the room, building or area of all ...
Installation Instructions
Page 4
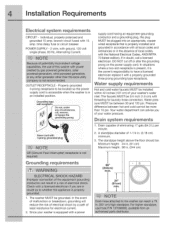
...not, under "_ any circumstances, | cut off or alter the grounding prong on the power supply cord. The faucets MUST be more than 10 psi. The washer MUST be : Minimum height: 24 in. (61 cm) Maximum height: 96 in. (244 cm) Grounding requirements 1. Properly grounded 3-prong receptacle to have ... with supply cord having an equipment-grounding conductor and a grounding plug, the plug MUST be located so the power supply cord is accessible when the washer is present, it with a power 96 _ (244cm) [lrlax. (61 C/r I) mln" m Pressure difference between 30 and 120 psi. In the event of...
...not, under "_ any circumstances, | cut off or alter the grounding prong on the power supply cord. The faucets MUST be more than 10 psi. The washer MUST be : Minimum height: 24 in. (61 cm) Maximum height: 96 in. (244 cm) Grounding requirements 1. Properly grounded 3-prong receptacle to have ... with supply cord having an equipment-grounding conductor and a grounding plug, the plug MUST be located so the power supply cord is accessible when the washer is present, it with a power 96 _ (244cm) [lrlax. (61 C/r I) mln" m Pressure difference between 30 and 120 psi. In the event of...
Installation Instructions
Page 5
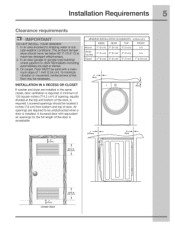
... with equivalent air openings for the full length of door. Inches (cm) SIDES REAR TOP FRONT Alcove 0" (0 cm) 0" (0 cm)* 0" (0 cm) n/a Under- Counter 0" (0 cm) 0" (0 cm)* 0" (0 cm) n/a Closet 0" (0 cm) 0" (0 cm)* 0" (0 cm) 1" (2.54 cm) iNSTALLATiON iN A RECESS OR CLOSET If washer and dryer are required to be located 3 inches (7.6 cm) from bottom and top of...
... with equivalent air openings for the full length of door. Inches (cm) SIDES REAR TOP FRONT Alcove 0" (0 cm) 0" (0 cm)* 0" (0 cm) n/a Under- Counter 0" (0 cm) 0" (0 cm)* 0" (0 cm) n/a Closet 0" (0 cm) 0" (0 cm)* 0" (0 cm) 1" (2.54 cm) iNSTALLATiON iN A RECESS OR CLOSET If washer and dryer are required to be located 3 inches (7.6 cm) from bottom and top of...
Installation Instructions
Page 6
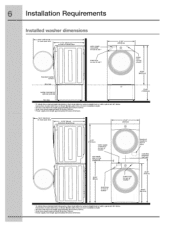
... ° elbow. back or with depth. a quick-turn 90 ° elbow. 50.6" (128.5cm) _ to clear open door (80.01cm) to front of closed door 27.00 (68.5cm) power cord on rear of unit 3 38.00" !(96.52cm) 53.00" (134.62cm) ! 75.75" (192.5cm) water...Drain hose length approximately 59 inches (150cm). 3 Power supply cord length approximately 60 inches (152.5cm). installation Requirements Installed washer dimensions (128.53cm)* to clear open door 31.50" (80cm)* -to front of closed door water supply connection on rear of unit 1 drain hose on rear of unit 2 (68.58cm) ...
... ° elbow. back or with depth. a quick-turn 90 ° elbow. 50.6" (128.5cm) _ to clear open door (80.01cm) to front of closed door 27.00 (68.5cm) power cord on rear of unit 3 38.00" !(96.52cm) 53.00" (134.62cm) ! 75.75" (192.5cm) water...Drain hose length approximately 59 inches (150cm). 3 Power supply cord length approximately 60 inches (152.5cm). installation Requirements Installed washer dimensions (128.53cm)* to clear open door 31.50" (80cm)* -to front of closed door water supply connection on rear of unit 1 drain hose on rear of unit 2 (68.58cm) ...
Installation Instructions
Page 7
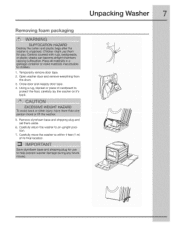
Using a rug, blanket or piece of its final location. Temporarily remove door tape. 2. Carefully return the washer to protect the floor, carefully lay the washer on it's back. ! 5. Carefully move the washer to within 4 feet (1 m) of cardboard to an upright position. 7. Close door and reapply door tape. 4. Remove styrofoam base and shipping plug and set them aside. 6. Removing foam packaging Unpackin Washer 1. Open washer door and remove everything from the drum. 3.
Using a rug, blanket or piece of its final location. Temporarily remove door tape. 2. Carefully return the washer to protect the floor, carefully lay the washer on it's back. ! 5. Carefully move the washer to within 4 feet (1 m) of cardboard to an upright position. 7. Close door and reapply door tape. 4. Remove styrofoam base and shipping plug and set them aside. 6. Removing foam packaging Unpackin Washer 1. Open washer door and remove everything from the drum. 3.
Installation Instructions
Page 8
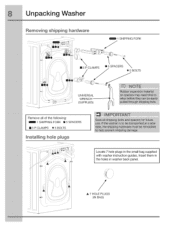
Insert them in the holes in the small bag supplied with washer instruction guides. Unpacking Washer Removing shipping hardware 1 SHIPPING FORK [] 5 P CLAMPS sX ® 5 SPACER • BOLTS UNWERSAI WRENCH " ®_ (SUPPLIED) _/_ Remove all of the following: 1 SHIPPING FORK ® 5 SPACERS []5PCLAMPS 05BOLTS Installing hole pmugs Locate 7 hole plugs in washer back panel. / A 7 HOLE PLUGS (IN BAG)
Insert them in the holes in the small bag supplied with washer instruction guides. Unpacking Washer Removing shipping hardware 1 SHIPPING FORK [] 5 P CLAMPS sX ® 5 SPACER • BOLTS UNWERSAI WRENCH " ®_ (SUPPLIED) _/_ Remove all of the following: 1 SHIPPING FORK ® 5 SPACERS []5PCLAMPS 05BOLTS Installing hole pmugs Locate 7 hole plugs in washer back panel. / A 7 HOLE PLUGS (IN BAG)
Installation Instructions
Page 9
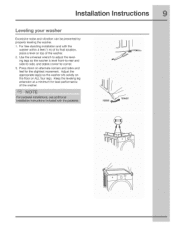
Use the universal wrench to adjust the leveling legs so the washer is level front-to-rear and side-to-side, and stable corner-to-corner. 3. Press down on ALL four legs. Adjust the appropriate leg(s) so the washer sits solidly on the floor on alternate corners and sides and feel for best ...performance of the washer. 2. Keep the leveling leg extension at a minimum for ...
Use the universal wrench to adjust the leveling legs so the washer is level front-to-rear and side-to-side, and stable corner-to-corner. 3. Press down on ALL four legs. Adjust the appropriate leg(s) so the washer sits solidly on the floor on alternate corners and sides and feel for best ...performance of the washer. 2. Keep the leveling leg extension at a minimum for ...
Installation Instructions
Page 10
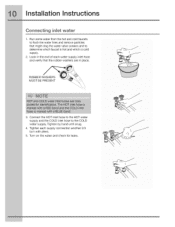
... some water from the hot and cold faucets to flush the water lines and remove particles that the rubber washers are in the end of each supply connection another 2/3 turn with pliers. 5. RUBBER WASHERS MUST BE PRESENT 3. Tighten each water supply inlet hose and verify that might clog the water valve screens...
... some water from the hot and cold faucets to flush the water lines and remove particles that the rubber washers are in the end of each supply connection another 2/3 turn with pliers. 5. RUBBER WASHERS MUST BE PRESENT 3. Tighten each water supply inlet hose and verify that might clog the water valve screens...
Installation Instructions
Page 11
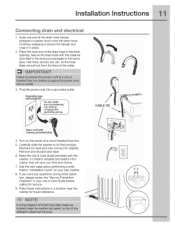
Continue wrapping it around the hanger and snap it in washer drum) onto the drain hose. Snap one end of the drain hose hanger (shipped in place. . Secure the drain hose with the cable tie (provided in the drain opening. Plug the power cord into a grounded outlet. ¸wall CABLE T[ E II Place the hook end of the water. 3. so the hose does not pull out from the force of the drain hose in the enclosure package) to the standpipe, inlet hose, laundry tub, etc. Installation Instructions Connecting drain and electrical 1.
Continue wrapping it around the hanger and snap it in washer drum) onto the drain hose. Snap one end of the drain hose hanger (shipped in place. . Secure the drain hose with the cable tie (provided in the drain opening. Plug the power cord into a grounded outlet. ¸wall CABLE T[ E II Place the hook end of the water. 3. so the hose does not pull out from the force of the drain hose in the enclosure package) to the standpipe, inlet hose, laundry tub, etc. Installation Instructions Connecting drain and electrical 1.
Installation Instructions
Page 12
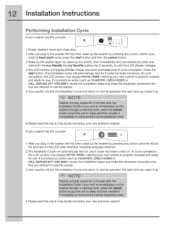
... then the cancel button. 3.Wake up . 6.Please read the Use & Care Guide and enjoy your washer has this console: { f L_ _@ =,=_=,=o Oo 1 .After you wake it up the washer again by pressing any button, then immediately and simultaneously press and hold both the eco friendly and my..., CHECH HOSES or CALL 5ERUICE 8-?-? H3S 328-?, review the installation steps and make the necessary corrections before you attempt to use the washer. 3.Your washer will automatically test for use. The Installation Cycle will automatically test for 5 seconds, or until the LCD display changes. 4.The LCD ...
... then the cancel button. 3.Wake up . 6.Please read the Use & Care Guide and enjoy your washer has this console: { f L_ _@ =,=_=,=o Oo 1 .After you wake it up the washer again by pressing any button, then immediately and simultaneously press and hold both the eco friendly and my..., CHECH HOSES or CALL 5ERUICE 8-?-? H3S 328-?, review the installation steps and make the necessary corrections before you attempt to use the washer. 3.Your washer will automatically test for use. The Installation Cycle will automatically test for 5 seconds, or until the LCD display changes. 4.The LCD ...
Installation Instructions
Page 13
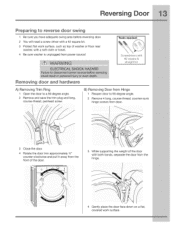
... from the hinge. / / ! / t 4 Gently place the door face down on a flat, covered work surface, such as top of washer or floor near washer, with a soft cloth or towel. 4 Be sure washer is unplugged from the front of the door. 3 While supporting the weight of the door with #2 square & straight bit Removing door and hardware...
... from the hinge. / / ! / t 4 Gently place the door face down on a flat, covered work surface, such as top of washer or floor near washer, with a soft cloth or towel. 4 Be sure washer is unplugged from the front of the door. 3 While supporting the weight of the door with #2 square & straight bit Removing door and hardware...
Installation Instructions
Page 18
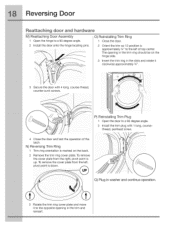
... from the right, pivot point is marked on the hinge side. 3 Insert the trim ring in the trim and reinsert. counter-sun k screws. Q) Plug in washer and continue operation. 3 Rotate the trim ring cover plate and move it clockwise approximately 3A". \ \ 3 Secure the door with 1 long, coursethread, panhead screw. 4 Close the...
... from the right, pivot point is marked on the hinge side. 3 Insert the trim ring in the trim and reinsert. counter-sun k screws. Q) Plug in washer and continue operation. 3 Rotate the trim ring cover plate and move it clockwise approximately 3A". \ \ 3 Secure the door with 1 long, coursethread, panhead screw. 4 Close the...
Installation Instructions
Page 19
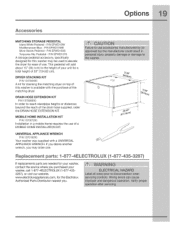
...drain hose supplied, order the DRAIN HOSE EXTENSION KIT. Repmacement paAs: 1-877-4ELECTROLUX If replacements parts are needed for your washer, contact the source where you . (1-877-435-3287} Options MATCHING STORAGE PEDESTAL Island White Pedestal - MOBILE HOME INSTALLATION...P/N EPWD15iW Mediterranean Blue - P/N EPWD15TS A storage pedestal accessory, specifically designed for the Electrolux Authorized Parts Distributor nearest you purchased your unit for ease of use of this washer may order one. P/N EPWD15MB Silver Sands Pedestal- This pedestal will add about 15" ...
...drain hose supplied, order the DRAIN HOSE EXTENSION KIT. Repmacement paAs: 1-877-4ELECTROLUX If replacements parts are needed for your washer, contact the source where you . (1-877-435-3287} Options MATCHING STORAGE PEDESTAL Island White Pedestal - MOBILE HOME INSTALLATION...P/N EPWD15iW Mediterranean Blue - P/N EPWD15TS A storage pedestal accessory, specifically designed for the Electrolux Authorized Parts Distributor nearest you purchased your unit for ease of use of this washer may order one. P/N EPWD15MB Silver Sands Pedestal- This pedestal will add about 15" ...


