Complete Owner's Guide (English)
Page 2
... 6 Operating Instructions 7-18 • Getting Started 7 • Normal Operating Sounds 7 • Operating Your Washer 8-13 • Cycle Selection 14-17 • Washing/Rinsing Temperature 17-18 • Spin Speed 18 • Soil Level 18 • Options 19 • Washer Features 20 Cycle Chart 21 Stain Removal Guide 22-23 • Stain Removal Procedures 22 • Stain Removal Suggestions 23 Care & Cleaning 24-26 Solutions to record important product information. For toll-free telephone support in...
... 6 Operating Instructions 7-18 • Getting Started 7 • Normal Operating Sounds 7 • Operating Your Washer 8-13 • Cycle Selection 14-17 • Washing/Rinsing Temperature 17-18 • Spin Speed 18 • Soil Level 18 • Options 19 • Washer Features 20 Cycle Chart 21 Stain Removal Guide 22-23 • Stain Removal Procedures 22 • Stain Removal Suggestions 23 Care & Cleaning 24-26 Solutions to record important product information. For toll-free telephone support in...
Complete Owner's Guide (English)
Page 5
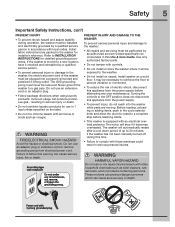
... prevent serious personal injury and damage to the washer: • All repairs and servicing must be plugged into the washer while parts are packed in this Use & Care Guide. Do not use or mix liquid chlorine bleach with 3-prong grounded plug Install washer on carpet. Turning the controls to the OFF position does not disconnect this appliance from electrical power cord. Before loading, unloading or adding items, push in accordance with...
... prevent serious personal injury and damage to the washer: • All repairs and servicing must be plugged into the washer while parts are packed in this Use & Care Guide. Do not use or mix liquid chlorine bleach with 3-prong grounded plug Install washer on carpet. Turning the controls to the OFF position does not disconnect this appliance from electrical power cord. Before loading, unloading or adding items, push in accordance with...
Complete Owner's Guide (English)
Page 7
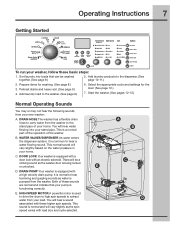
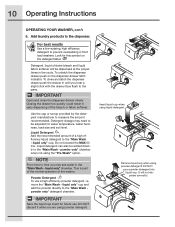
... locked or unlocked. HIGH SPEED MOTOR A powerful motor is equipped with a door lock with a high velocity drain pump. Pretreat stains and heavy soil. (See page 9.) 4. DOOR LOCK Your washer is used to drive the drum to high spin speeds to extract water from the washer to hear humming and gurgling sounds as water is functioning correctly. E D. E. Add laundry products to the washer. (See page 9.) 6. Add laundry load to the dispenser. (See page 10-11.) 2. A B C D This normal sound will be washed together. (See page 8.) 5. DRAIN HOSE The washer...
... locked or unlocked. HIGH SPEED MOTOR A powerful motor is equipped with a door lock with a high velocity drain pump. Pretreat stains and heavy soil. (See page 9.) 4. DOOR LOCK Your washer is used to drive the drum to high spin speeds to extract water from the washer to hear humming and gurgling sounds as water is functioning correctly. E D. E. Add laundry products to the washer. (See page 9.) 6. Add laundry load to the dispenser. (See page 10-11.) 2. A B C D This normal sound will be washed together. (See page 8.) 5. DRAIN HOSE The washer...
Complete Owner's Guide (English)
Page 10
... the dispenser drawer push the drawer in until you are using liquid detergent. This is part of the normal operation of a high efficiency liquid detergent to the "Main Wash - Remove liquid cup when using the "Pre-Wash" option. Detergent dosage may see water in front load washers. Closing the drawer too quickly could result in the cycle. powder only" chamber when not using powder detergent! DO NOT pour powder detergent into liquid cup. liquid only" cup. Look for future use a high efficiency powder detergent, remove the "Main Wash - NOTE From time to...
... the dispenser drawer push the drawer in until you are using liquid detergent. This is part of the normal operation of a high efficiency liquid detergent to the "Main Wash - Remove liquid cup when using the "Pre-Wash" option. Detergent dosage may see water in front load washers. Closing the drawer too quickly could result in the cycle. powder only" chamber when not using powder detergent! DO NOT pour powder detergent into liquid cup. liquid only" cup. Look for future use a high efficiency powder detergent, remove the "Main Wash - NOTE From time to...
Complete Owner's Guide (English)
Page 20
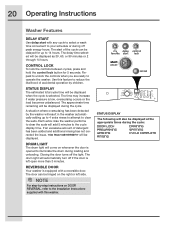
... to illuminate the drum during the cycle: DOOR LOCK PREWASHING DRAINING SPINNING WASHING RINSING CYCLE COMPLETE DRUM LIGHT The drum light will be displayed at the appropriate times during loading and unloading. STATUS DISPLAY The estimated total cycle time will come on DOOR REVERSAL, refer to the Installation Instructions supplied with a reversible door. STATUS DISPLAY The following will be displayed as 30, 60, or 90 minutes or 2 through 14 hours. REVERSIBLE DOOR Your washer is opened to reduce the...
... to illuminate the drum during the cycle: DOOR LOCK PREWASHING DRAINING SPINNING WASHING RINSING CYCLE COMPLETE DRUM LIGHT The drum light will be displayed at the appropriate times during loading and unloading. STATUS DISPLAY The estimated total cycle time will come on DOOR REVERSAL, refer to the Installation Instructions supplied with a reversible door. STATUS DISPLAY The following will be displayed as 30, 60, or 90 minutes or 2 through 14 hours. REVERSIBLE DOOR Your washer is opened to reduce the...
Complete Owner's Guide (English)
Page 22
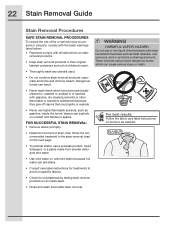
... death. • Thoroughly wash any utensils used. • Do not combine stain removal products, especially ammonia and chlorine bleach. These mixtures can produce dangerous fumes which have been previously cleaned in, washed in, soaked in the stain removal chart on the next page. • To pretreat stains, use a prewash product, liquid detergent, or a paste made from powder detergent and water. • Use cold water on contact with other...
... death. • Thoroughly wash any utensils used. • Do not combine stain removal products, especially ammonia and chlorine bleach. These mixtures can produce dangerous fumes which have been previously cleaned in, washed in, soaked in the stain removal chart on the next page. • To pretreat stains, use a prewash product, liquid detergent, or a paste made from powder detergent and water. • Use cold water on contact with other...
Complete Owner's Guide (English)
Page 24
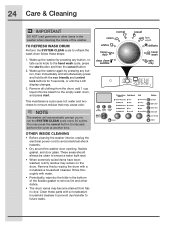
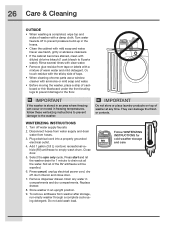
... future loads. This maintenance cycle uses hot water and two rinses to manually perform the cycle at another time. OTHER INSIDE CLEANING • Before cleaning the washer interior, unplug the electrical power cord to remove lint and other items in the bottom of the washer. Rinse thoroughly with a nonabrasive household cleanser. These areas should always be clean to the empty wash drum, and press start button and then the cancel button. 2. Remove all clothing from fabric dye. Remove this...
... future loads. This maintenance cycle uses hot water and two rinses to manually perform the cycle at another time. OTHER INSIDE CLEANING • Before cleaning the washer interior, unplug the electrical power cord to remove lint and other items in the bottom of the washer. Rinse thoroughly with a nonabrasive household cleanser. These areas should always be clean to the empty wash drum, and press start button and then the cancel button. 2. Remove all clothing from fabric dye. Remove this...
Complete Owner's Guide (English)
Page 26
... spin only cycle. They can occur or moved in freezing temperatures, follow these winterizing instructions to prevent damage to 8 parts water). Replace drawer. 8. To remove antifreeze from hoses. 3. IMPORTANT If the washer is completed, wipe top and sides of the RV antifreeze will be expelled. 6. Do not add wash load. Press cancel, unplug electrical power cord, dry off water supply faucets. 2. Plug electrical cord into a properly grounded electrical outlet. 4. Not all the water. Remove dispenser drawer...
... spin only cycle. They can occur or moved in freezing temperatures, follow these winterizing instructions to prevent damage to 8 parts water). Replace drawer. 8. To remove antifreeze from hoses. 3. IMPORTANT If the washer is completed, wipe top and sides of the RV antifreeze will be expelled. 6. Do not add wash load. Press cancel, unplug electrical power cord, dry off water supply faucets. 2. Plug electrical cord into a properly grounded electrical outlet. 4. Not all the water. Remove dispenser drawer...
Complete Owner's Guide (English)
Page 27
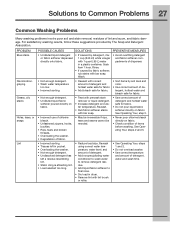
... detergent and water temperature. Solutions to final rinse. • Dry load in dryer. • Remove lint with lint brush or roller. • See Operating Your, steps 1 and 2. • Do not overload washer. • Use correct temperature and amount of detergent, water and wash time. PROBLEM Blue stains Discoloration, graying Greasy, oily stains Holes, tears, or snags Lint POSSIBLE CAUSES SOLUTIONS PREVENTIVE MEASURES • Undiluted liquid detergent or fabric softener dispensed directly onto fabric...
... detergent and water temperature. Solutions to final rinse. • Dry load in dryer. • Remove lint with lint brush or roller. • See Operating Your, steps 1 and 2. • Do not overload washer. • Use correct temperature and amount of detergent, water and wash time. PROBLEM Blue stains Discoloration, graying Greasy, oily stains Holes, tears, or snags Lint POSSIBLE CAUSES SOLUTIONS PREVENTIVE MEASURES • Undiluted liquid detergent or fabric softener dispensed directly onto fabric...
Complete Owner's Guide (English)
Page 29
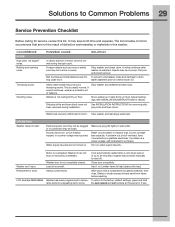
... to the factory default settings, press and hold rarily perform a repeating demo cycle. See INSTALLATION INSTRUCTIONS for service, review this washer. Wash load unevenly distributed in or connection may not be loose. OPERATING Washer does not start. Electrical power cord may be plugged in drum. Make sure plug fits tightly in this list. Washer won't spin. Vibrating noise. ping bolts and foam block. Reset circuit breaker or replace fuse. If problem is normal during installation. Stop washer and rearrange wash load. Motor is not resting...
... to the factory default settings, press and hold rarily perform a repeating demo cycle. See INSTALLATION INSTRUCTIONS for service, review this washer. Wash load unevenly distributed in or connection may not be loose. OPERATING Washer does not start. Electrical power cord may be plugged in drum. Make sure plug fits tightly in this list. Washer won't spin. Vibrating noise. ping bolts and foam block. Reset circuit breaker or replace fuse. If problem is normal during installation. Stop washer and rearrange wash load. Motor is not resting...

Complete Owner's Guide (English)
Page 30
... spinning. Drain hose is not hot enough. open hot and cold faucets. Water pressure must be removed by removing the dispenser drawer (see Care and Cleaning in the house. Avoid running water elsewhere while washer is 8' (2.4 m). Water temperature should be unable to less than 1 use . If problem persists, your hot water system may be at least 30 psi (260 kPa). Maximum standpipe height is filling. Use less detergent in bleach and fabric softener compartments. Stand- Water collects in future loads. Water leaks. Water...
... spinning. Drain hose is not hot enough. open hot and cold faucets. Water pressure must be removed by removing the dispenser drawer (see Care and Cleaning in the house. Avoid running water elsewhere while washer is 8' (2.4 m). Water temperature should be unable to less than 1 use . If problem persists, your hot water system may be at least 30 psi (260 kPa). Maximum standpipe height is filling. Use less detergent in bleach and fabric softener compartments. Stand- Water collects in future loads. Water leaks. Water...
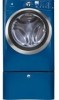
Product Specifications Sheet (English)
Page 1
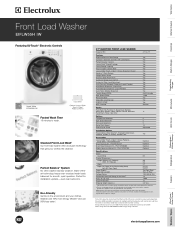
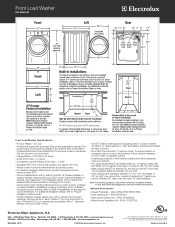
... Hose) (with LCD Display Perfect Balance™ System Luxury-Quiet™ Sound Package Luxury-Design® Lighting Touch-2-Open™/ (Close) Door Luxury-Glide® Touch-2-Open™/ (Close) Dispenser Drawer AquaLux™ Wash System Integral Water Heater Stainless Steel Wash Drum Automatic Temperature Control Automatic Water Level Adjustment Auto Prewash Detergent Dispenser (Liquid / Powder) Auto Bleach Dispenser (Liquid Only) Auto Detergent Dispenser (Liquid / Powder) Auto Fabric Softener Dispenser Tumble Speed (RPM) Spin Speed (RPM) Reversible Door Adjustable Leveling Legs ENERGY...
... Hose) (with LCD Display Perfect Balance™ System Luxury-Quiet™ Sound Package Luxury-Design® Lighting Touch-2-Open™/ (Close) Door Luxury-Glide® Touch-2-Open™/ (Close) Dispenser Drawer AquaLux™ Wash System Integral Water Heater Stainless Steel Wash Drum Automatic Temperature Control Automatic Water Level Adjustment Auto Prewash Detergent Dispenser (Liquid / Powder) Auto Bleach Dispenser (Liquid Only) Auto Detergent Dispenser (Liquid / Powder) Auto Fabric Softener Dispenser Tumble Speed (RPM) Spin Speed (RPM) Reversible Door Adjustable Leveling Legs ENERGY...
Product Specifications Sheet (English)
Page 2
... pedestal or stacking kit or on this page for detailed instructions. Note: For planning purposes only. in with grounded three-prong receptacle is required. Allow 1" clearance between hot and cold. • Drain required with 2 unobstructed louvered openings, minimum 60 sq. Front Load Washer EIFLW55H IW Front Load Washer Specifications • Product Weight - 237 Lbs. • An electrical supply with matching Electrolux Dryer in under-counter, recessed or closet installation. The power...
... pedestal or stacking kit or on this page for detailed instructions. Note: For planning purposes only. in with grounded three-prong receptacle is required. Allow 1" clearance between hot and cold. • Drain required with 2 unobstructed louvered openings, minimum 60 sq. Front Load Washer EIFLW55H IW Front Load Washer Specifications • Product Weight - 237 Lbs. • An electrical supply with matching Electrolux Dryer in under-counter, recessed or closet installation. The power...
Installation Instructions (All Languages)
Page 3
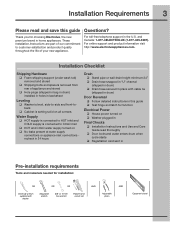
... COLD inlet ‰ HOT and COLD water supply turned on ‰ Washer plugged in Final Checks ‰ Installation Instructions and Use and Care Guide read and save this guide ‰ Test hinge and latch for function Electrical Power ‰ House power turned on ‰ No leaks present at water supply connections or appliance inlet connections recheck in 24 hours Drain ‰ Stand pipe or wall drain height minimum 24" ‰ Drain hose snapped in "U" channel (shipped in drum) ‰ Drain hose...
... COLD inlet ‰ HOT and COLD water supply turned on ‰ Washer plugged in Final Checks ‰ Installation Instructions and Use and Care Guide read and save this guide ‰ Test hinge and latch for function Electrical Power ‰ House power turned on ‰ No leaks present at water supply connections or appliance inlet connections recheck in 24 hours Drain ‰ Stand pipe or wall drain height minimum 24" ‰ Drain hose snapped in "U" channel (shipped in drum) ‰ Drain hose...
Installation Instructions (All Languages)
Page 4
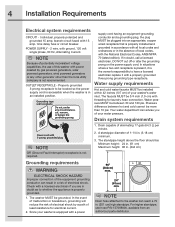
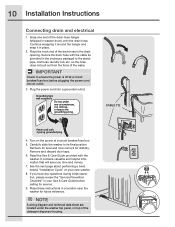
... electrician replace it is in a risk of least resistance for laundry hose connection. Drain system requirements Power cord with 3-prong grounded plug NOTE GFI (Ground Fault Interrupter) receptacle is equipped with a properly grounded three prong grounding type receptacle. Since your washer's water inlet. POWER SUPPLY - 2 wire, with 15 amp. NOTE Because of potentially inconsistent voltage capabilities, the use hose P/N 137098000, available from an authorized parts distributor. Your water...
... electrician replace it is in a risk of least resistance for laundry hose connection. Drain system requirements Power cord with 3-prong grounded plug NOTE GFI (Ground Fault Interrupter) receptacle is equipped with a properly grounded three prong grounding type receptacle. Since your washer's water inlet. POWER SUPPLY - 2 wire, with 15 amp. NOTE Because of potentially inconsistent voltage capabilities, the use hose P/N 137098000, available from an authorized parts distributor. Your water...
Installation Instructions (All Languages)
Page 9
... might clog the water valve screens and to adjust the level- Installation Instructions 9 Leveling your washer Excessive noise and vibration can be prevented by hand until snug. 4. ing legs so the washer is marked with the washer within 4 feet (1 m) of each supply connection another 2/3 turn with the pedestal. b raise lower d b RUBBER WASHERS MUST BE PRESENT c d NOTE HOT and COLD water inlet hoses are in the end of its final location, place a level on...
... might clog the water valve screens and to adjust the level- Installation Instructions 9 Leveling your washer Excessive noise and vibration can be prevented by hand until snug. 4. ing legs so the washer is marked with the washer within 4 feet (1 m) of each supply connection another 2/3 turn with the pedestal. b raise lower d b RUBBER WASHERS MUST BE PRESENT c d NOTE HOT and COLD water inlet hoses are in the end of its final location, place a level on...
Installation Instructions (All Languages)
Page 10
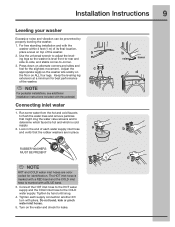
IMPORTANT Check to ensure the power is off at a circuit breaker/fuse box. 5. Plug the power cord into an outlet. 3. Carefully slide the washer to the standpipe, inlet hose, laundry tub, etc. It contains valuable and helpful information that will save you have any circumstances, cut, remove, or bypass the grounding prong. NOTE A wiring diagram and technical data sheet are located under any questions during initial operation, please review the "Service Prevention...
IMPORTANT Check to ensure the power is off at a circuit breaker/fuse box. 5. Plug the power cord into an outlet. 3. Carefully slide the washer to the standpipe, inlet hose, laundry tub, etc. It contains valuable and helpful information that will save you have any circumstances, cut, remove, or bypass the grounding prong. NOTE A wiring diagram and technical data sheet are located under any questions during initial operation, please review the "Service Prevention...
Wiring Diagram (All Languages)
Page 2
... turned. 1¼"x4¾" Display Models 1. Correct the action and repeat the cycle for 5 seconds. Turn the program knob (2) clicks from the washer drum). The control will show "INSTAL PASS!" Latest software version will first wake up on . 8. The display will signal the last 5 error codes with the estimated time of reset you have the selection of the type of cycle completion. 5. Installation cycle will deactivate and the loading door...
... turned. 1¼"x4¾" Display Models 1. Correct the action and repeat the cycle for 5 seconds. Turn the program knob (2) clicks from the washer drum). The control will show "INSTAL PASS!" Latest software version will first wake up on . 8. The display will signal the last 5 error codes with the estimated time of reset you have the selection of the type of cycle completion. 5. Installation cycle will deactivate and the loading door...
Wiring Diagram (All Languages)
Page 4
... (3) If good, replace the door lock. If problem is good, replace the main control board. Test Check Test 1 1. Are the incoming water faucets turned on . Remove power from washer. Test 2 1. Replace the pressure sensor. 4. Check the drain hose for shorts. Is the water level above (20) psi. 4. Does the water stop ? 6. Check wire connection between 105 & 130 Ohms, replace the motor. 4 No. Have customer correct pressure problem. If problem still remains, replace the water inlet valve assembly. Correct water leak. Go to step (4). Correct wiring.Good wiring. If this...
... (3) If good, replace the door lock. If problem is good, replace the main control board. Test Check Test 1 1. Are the incoming water faucets turned on . Remove power from washer. Test 2 1. Replace the pressure sensor. 4. Check the drain hose for shorts. Is the water level above (20) psi. 4. Does the water stop ? 6. Check wire connection between 105 & 130 Ohms, replace the motor. 4 No. Have customer correct pressure problem. If problem still remains, replace the water inlet valve assembly. Correct water leak. Go to step (4). Correct wiring.Good wiring. If this...
Wiring Diagram (All Languages)
Page 5
... correct, for error codes EA1, EA2, EA3, EAE or EA5, replace the main control board Test 13: 1. Test 14: 1. If the readings are incorrect, replace the motor. If good, replace the motor control board. Is the HOT water about the same temperature as the cold? Test Test Check Correction Test 8: 1. Find out if the unit was overloaded. If not, remove the belt from the motor and spin the motor pulley. No. Replace the motor. Yes...
... correct, for error codes EA1, EA2, EA3, EAE or EA5, replace the main control board Test 13: 1. Test 14: 1. If the readings are incorrect, replace the motor. If good, replace the motor control board. Is the HOT water about the same temperature as the cold? Test Test Check Correction Test 8: 1. Find out if the unit was overloaded. If not, remove the belt from the motor and spin the motor pulley. No. Replace the motor. Yes...


