Complete Owner's Guide (English)
Page 2
...part of your new appliance. To ensure our ability to continue serving you for quick reference Purchase date Electrolux model number Electrolux serial number NOTE Registering your product with Electrolux... 7-18 • Getting Started 7 • Normal Operating Sounds 7 • Operating Your Washer 8-13 • Cycle Selection 14-17 • Washing/Rinsing Temperature 17-18 • Spin Speed... Common Problems 27-30 • Common Washing Problems 27-28 • Service Prevention Checklist 29-30 Warranty Information 31 Notes 32 ©2008 Electrolux Major Aplliances All ...
...part of your new appliance. To ensure our ability to continue serving you for quick reference Purchase date Electrolux model number Electrolux serial number NOTE Registering your product with Electrolux... 7-18 • Getting Started 7 • Normal Operating Sounds 7 • Operating Your Washer 8-13 • Cycle Selection 14-17 • Washing/Rinsing Temperature 17-18 • Spin Speed... Common Problems 27-30 • Common Washing Problems 27-28 • Service Prevention Checklist 29-30 Warranty Information 31 Notes 32 ©2008 Electrolux Major Aplliances All ...
Complete Owner's Guide (English)
Page 4
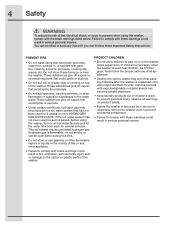
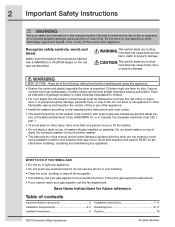
...substances give off vapors or chemical reactions that could result in fire, explosion, serious bodily injury and/ or damage to the rubber or plastic parts of the washer. HYDROGEN GAS IS EXPLOSIVE. If the hot water system has not been used for 2 weeks or more. 4 Safety WARNING To reduce the... Failure to comply with these warnings could ignite or explode. • Do not put oily or greasy rags or clothing on or in the washer. These substances give off vapors that could result in serious personal injuries. Hydrogen gas is unpacked. PROTECT CHILDREN • Do not allow children ...
...substances give off vapors or chemical reactions that could result in fire, explosion, serious bodily injury and/ or damage to the rubber or plastic parts of the washer. HYDROGEN GAS IS EXPLOSIVE. If the hot water system has not been used for 2 weeks or more. 4 Safety WARNING To reduce the... Failure to comply with these warnings could ignite or explode. • Do not put oily or greasy rags or clothing on or in the washer. These substances give off vapors that could result in serious personal injuries. Hydrogen gas is unpacked. PROTECT CHILDREN • Do not allow children ...
Complete Owner's Guide (English)
Page 5
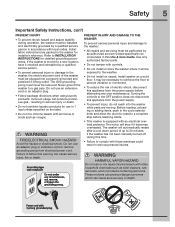
... controls. • Do not install or store the washer where it becomes overheated. Turning the controls to the washer: • All repairs and servicing must be performed by an authorized servicer unless specifically recommended in 1 load unless specified on a solid floor. WARNING HARMFUL VAPOR ... prevent shock hazard and assure stability during this time. • Failure to the washer, the electrical power cord of the washer must be plugged into the washer while parts are packed in the washer for use an extension cord or an adaptor plug. • Follow package directions when...
... controls. • Do not install or store the washer where it becomes overheated. Turning the controls to the washer: • All repairs and servicing must be performed by an authorized servicer unless specifically recommended in 1 load unless specified on a solid floor. WARNING HARMFUL VAPOR ... prevent shock hazard and assure stability during this time. • Failure to the washer, the electrical power cord of the washer must be plugged into the washer while parts are packed in the washer for use an extension cord or an adaptor plug. • Follow package directions when...
Complete Owner's Guide (English)
Page 7
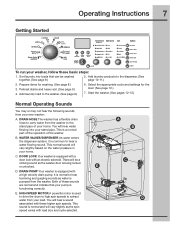
...will be washed together. (See page 8.) 5. This normal sound will hear a sound associated with load size and cycle selected. C. You will vary slightly based on the water pressure in your home. Start the washer. (See pages 12-13.) Normal Operating Sounds You may or may not hear the following sounds...from your washer, follow these higher spin speeds. It is used to drive the drum to high spin speeds to carry water from your stand pipe. This sound is normal and will vary slightly as water is a normal part of the operation of your home. Prepare items for the load. (...
...will be washed together. (See page 8.) 5. This normal sound will hear a sound associated with load size and cycle selected. C. You will vary slightly based on the water pressure in your home. Start the washer. (See pages 12-13.) Normal Operating Sounds You may or may not hear the following sounds...from your washer, follow these higher spin speeds. It is used to drive the drum to high spin speeds to carry water from your stand pipe. This sound is normal and will vary slightly as water is a normal part of the operation of your home. Prepare items for the load. (...
Complete Owner's Guide (English)
Page 10
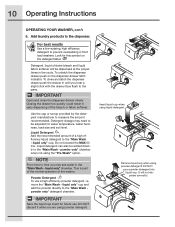
... not using liquid detergent. liquid only" cup and add the powder directly to prevent oversudsing in front load washers. Insert liquid cup when using the "Pre-Wash" option. 10 Operating Instructions OPERATING YOUR WASHER, con't 5. Look for this symbol on the dispenser drawer latch indicator. IMPORTANT Open and close...From time to time you hear a slight click with the drawer face flush to be added directly to the "Main Wash - This is part of the normal operation of a high efficiency liquid detergent to the "Main Wash - liquid only" cup. To unlatch the dispenser drawer push ...
... not using liquid detergent. liquid only" cup and add the powder directly to prevent oversudsing in front load washers. Insert liquid cup when using the "Pre-Wash" option. 10 Operating Instructions OPERATING YOUR WASHER, con't 5. Look for this symbol on the dispenser drawer latch indicator. IMPORTANT Open and close...From time to time you hear a slight click with the drawer face flush to be added directly to the "Main Wash - This is part of the normal operation of a high efficiency liquid detergent to the "Main Wash - liquid only" cup. To unlatch the dispenser drawer push ...
Complete Owner's Guide (English)
Page 11
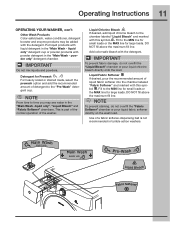
...the "Main Wash - NOTE To prevent staining, do not overfill the "Liquid Bleach" chamber or pour liquid chlorine bleach directly onto the load. NOTE From time to the chamber labeled "Liquid Bleach" and marked with the detergent. Liquid Chlorine Bleach If desired, add liquid chlorine bleach... amount of a fabric softener-dispensing ball is part of the normal operation of detergent to the "Pre-Wash" detergent cup. Use of liquid fabric softener into the chamber labeled "Fabric Softener" and marked with liquid detergent in tumble action washers. IMPORTANT Do not mix liquids and powders. ...
...the "Main Wash - NOTE To prevent staining, do not overfill the "Liquid Bleach" chamber or pour liquid chlorine bleach directly onto the load. NOTE From time to the chamber labeled "Liquid Bleach" and marked with the detergent. Liquid Chlorine Bleach If desired, add liquid chlorine bleach... amount of a fabric softener-dispensing ball is part of the normal operation of detergent to the "Pre-Wash" detergent cup. Use of liquid fabric softener into the chamber labeled "Fabric Softener" and marked with liquid detergent in tumble action washers. IMPORTANT Do not mix liquids and powders. ...
Complete Owner's Guide (English)
Page 17
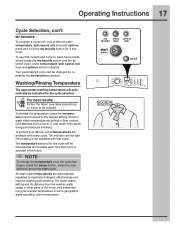
...temperature selected for the cycle will be remembered and recalled each time that cycle is not available with that customized cycle to wash future loads, simply press the my favorite button and the selected cycle, water temperature, spin speed, soil level and options will be washed. For...to the desired setting. All wash water temperatures are available with every cycle. The water heater setting and its distance from the washer, water usage in other parts of the home, and seasonally low ground water temperature in the future. Operating Instructions 17 Cycle Selection, con't MY FAVORITE ...
...temperature selected for the cycle will be remembered and recalled each time that cycle is not available with that customized cycle to wash future loads, simply press the my favorite button and the selected cycle, water temperature, spin speed, soil level and options will be washed. For...to the desired setting. All wash water temperatures are available with every cycle. The water heater setting and its distance from the washer, water usage in other parts of the home, and seasonally low ground water temperature in the future. Operating Instructions 17 Cycle Selection, con't MY FAVORITE ...
Complete Owner's Guide (English)
Page 24
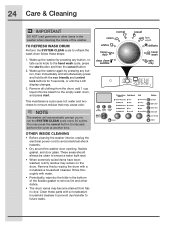
... cycles. These areas should always be clean to avoid electrical shock hazards. • Dry around the washer door opening, flexible gasket, and door glass. 24 Care & Cleaning IMPORTANT DO NOT load garments or other debris. • The drum vanes may become stained from the drum, add 1 ...to remove lint and other items in the washer when cleaning the inside of the washer. TO REFRESH WASH DRUM Perform the SYSTEM CLEAN cycle to refresh the wash drum follow these parts with a nonabrasive household cleanser. Wake up the washer by pressing any button, rotate cycle knob ...
... cycles. These areas should always be clean to avoid electrical shock hazards. • Dry around the washer door opening, flexible gasket, and door glass. 24 Care & Cleaning IMPORTANT DO NOT load garments or other debris. • The drum vanes may become stained from the drum, add 1 ...to remove lint and other items in the washer when cleaning the inside of the washer. TO REFRESH WASH DRUM Perform the SYSTEM CLEAN cycle to refresh the wash drum follow these parts with a nonabrasive household cleanser. Wake up the washer by pressing any button, rotate cycle knob ...

Complete Owner's Guide (English)
Page 25
... inserts with hot tap water to clean the recess. Care & Cleaning 25 Pull out the drawer. • Remove the insert from the upper and lower parts of the recess. • Replace the insert by pulling the drawer out until you hear a slight click. Large amounts of the drawer cavity and press...
... inserts with hot tap water to clean the recess. Care & Cleaning 25 Pull out the drawer. • Remove the insert from the upper and lower parts of the recess. • Replace the insert by pulling the drawer out until you hear a slight click. Large amounts of the drawer cavity and press...
Complete Owner's Guide (English)
Page 26
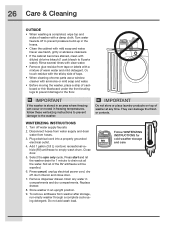
Rinse several times with ammonia or mild soap and water. • Before moving the washer, place a strip of cardboard or thin fiberboard under the front leveling legs to prevent damage to prevent pressure build-up in freezing temperatures, follow these winterizing instructions to prevent damage...If the washer is completed, wipe top and sides of washer with diluted chlorine bleach (1 part bleach to drain out all of washer at any water in an upright position. 9. Close door. 5. To remove antifreeze from tape or labels with mild soap and water. Do not add wash load. Replace ...
Rinse several times with ammonia or mild soap and water. • Before moving the washer, place a strip of cardboard or thin fiberboard under the front leveling legs to prevent damage to prevent pressure build-up in freezing temperatures, follow these winterizing instructions to prevent damage...If the washer is completed, wipe top and sides of washer with diluted chlorine bleach (1 part bleach to drain out all of washer at any water in an upright position. 9. Close door. 5. To remove antifreeze from tape or labels with mild soap and water. Do not add wash load. Replace ...

Complete Owner's Guide (English)
Page 30
.... Water may be at least 23.6" (60 cm). Washer is too tall. Load is not adequate in area. Water supply is too small. Install rubber washer. water hose to allow proper spinning. Water collects in future loads. Water is part of the normal operation of the washer. Water pressure must be enough hot water available for...
.... Water may be at least 23.6" (60 cm). Washer is too tall. Load is not adequate in area. Water supply is too small. Install rubber washer. water hose to allow proper spinning. Water collects in future loads. Water is part of the normal operation of the washer. Water pressure must be enough hot water available for...
Complete Owner's Guide (English)
Page 31
... During the 2nd year from the factory. 9. Products used other cosmetic parts. 10. or external causes such as described or illustrated are not a part of parts other than authorized service companies; ELECTROLUX SHALL NOT BE LIABLE FOR CONSEQUENTIAL OR INCIDENTAL DAMAGES SUCH AS PROPERTY DAMAGE...Service calls to obtain and keep all receipts. Damages caused by: services performed by Electrolux Canada Corp. Obligations for this warranty must be performed by an additional one year, parts only, limited warranty. Service calls which do not involve malfunction or defects in ...
... During the 2nd year from the factory. 9. Products used other cosmetic parts. 10. or external causes such as described or illustrated are not a part of parts other than authorized service companies; ELECTROLUX SHALL NOT BE LIABLE FOR CONSEQUENTIAL OR INCIDENTAL DAMAGES SUCH AS PROPERTY DAMAGE...Service calls to obtain and keep all receipts. Damages caused by: services performed by Electrolux Canada Corp. Obligations for this warranty must be performed by an additional one year, parts only, limited warranty. Service calls which do not involve malfunction or defects in ...
Installation Instructions (All Languages)
Page 2
...contents Important Safety Instructions 2 Installation Requirements 3-5 Installed Dimensions 6 Installation Instructions 7-11 Reversing Door 12-17 Options 18 ©2010 Electrolux Major Appliances All rights reserved. Follow the gas supplier's instructions. • If you to situations that may cause bodily injury or...codes. • The electrical service to the washer must conform with local codes and ordinances and the latest edition of the National Electrical Code, ANSI/NFPA 70, or in Canada, the Canadian electrical code C22.1 part 1. • To avoid back or other appliance...
...contents Important Safety Instructions 2 Installation Requirements 3-5 Installed Dimensions 6 Installation Instructions 7-11 Reversing Door 12-17 Options 18 ©2010 Electrolux Major Appliances All rights reserved. Follow the gas supplier's instructions. • If you to situations that may cause bodily injury or...codes. • The electrical service to the washer must conform with local codes and ordinances and the latest edition of the National Electrical Code, ANSI/NFPA 70, or in Canada, the Canadian electrical code C22.1 part 1. • To avoid back or other appliance...
Installation Instructions (All Languages)
Page 3
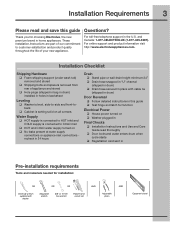
... Carpenter's level For toll-free telephone support in home appliances. These Installation Instructions are part of our commitment to customer satisfaction and product quality throughout the life of appliance and...shipped in bag in drum) installed in holes in backsheet Leveling ‰ Washer is level, side-to-side and front-toback ‰ Cabinet is setting solid on all corners Water Supply &#...turned on ‰ Washer plugged in Final Checks ‰ Installation Instructions and Use and Care Guide read and save this guide ‰ Test hinge and latch for choosing Electrolux, the new premium...
... Carpenter's level For toll-free telephone support in home appliances. These Installation Instructions are part of our commitment to customer satisfaction and product quality throughout the life of appliance and...shipped in bag in drum) installed in holes in backsheet Leveling ‰ Washer is level, side-to-side and front-toback ‰ Cabinet is setting solid on all corners Water Supply &#...turned on ‰ Washer plugged in Final Checks ‰ Installation Instructions and Use and Care Guide read and save this guide ‰ Test hinge and latch for choosing Electrolux, the new premium...
Installation Instructions (All Languages)
Page 4
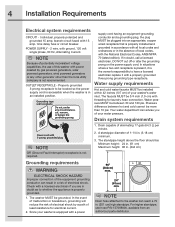
...inch (1.9 cm) with power created by a path of potentially inconsistent voltage capabilities, the use hose P/N 137098000, available from an authorized parts distributor. Individual, properly polarized and grounded 15 amp. NOTE Because of least resistance for laundry hose connection. If in . (3.18 cm...call a licensed electrician. The standpipe height above the floor should be located so the power supply cord is accessible when the washer is equipped with a power 96" (244cm) max. 24" (61cm) min. 4 Installation Requirements Electrical system requirements CIRCUIT - ...
...inch (1.9 cm) with power created by a path of potentially inconsistent voltage capabilities, the use hose P/N 137098000, available from an authorized parts distributor. Individual, properly polarized and grounded 15 amp. NOTE Because of least resistance for laundry hose connection. If in . (3.18 cm...call a licensed electrician. The standpipe height above the floor should be located so the power supply cord is accessible when the washer is equipped with a power 96" (244cm) max. 24" (61cm) min. 4 Installation Requirements Electrical system requirements CIRCUIT - ...
Installation Instructions (All Languages)
Page 18
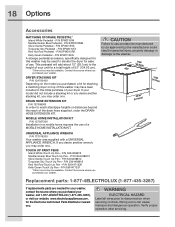
...by (or approved by) the manufacturer could result in the initial purchase of your washer, call 1-877-4ELECTROLUX (1-877-435-3287), or visit our website, www.electroluxappliances.com, for the Electrolux Authorized Parts Distributor nearest you. P/N 5304468814 Turquoise Sky Touch Up Pen - P/N 5304468815 Red ... This pedestal will add about 15" (38.1cm) to the washer. 27.00" (68.58cm) (3185.1.000cm" ) (672.61.64c4m" ) Replacement parts: 1-877-4ELECTROLUX (1-877-435-3287) If replacements parts are needed for your washer, contact the source where you purchased your unit for stacking a matching...
...by (or approved by) the manufacturer could result in the initial purchase of your washer, call 1-877-4ELECTROLUX (1-877-435-3287), or visit our website, www.electroluxappliances.com, for the Electrolux Authorized Parts Distributor nearest you. P/N 5304468814 Turquoise Sky Touch Up Pen - P/N 5304468815 Red ... This pedestal will add about 15" (38.1cm) to the washer. 27.00" (68.58cm) (3185.1.000cm" ) (672.61.64c4m" ) Replacement parts: 1-877-4ELECTROLUX (1-877-435-3287) If replacements parts are needed for your washer, contact the source where you purchased your unit for stacking a matching...
Wiring Diagram (All Languages)
Page 2
...(8) clicks from the start position. This is a free position. Exiting Diagnostic Mode To return the washer to normal operation: a) Unplug the power cord, wait 5-8 seconds, then reconnect the power cord OR.../Pause" button, then the "Cancel" button. 4. The display will turn on setting up , the part(s) of cycle completion. 5. At cycle completion, the display will activate and cold water should enter through this..., wiring issues & water flow issues. The door lock solenoid will deactivate and the loading door can run it now if you choose. Turn the program knob (9) clicks from...
...(8) clicks from the start position. This is a free position. Exiting Diagnostic Mode To return the washer to normal operation: a) Unplug the power cord, wait 5-8 seconds, then reconnect the power cord OR.../Pause" button, then the "Cancel" button. 4. The display will turn on setting up , the part(s) of cycle completion. 5. At cycle completion, the display will activate and cold water should enter through this..., wiring issues & water flow issues. The door lock solenoid will deactivate and the loading door can run it now if you choose. Turn the program knob (9) clicks from...


