Complete Owner's Guide (English)
Page 29
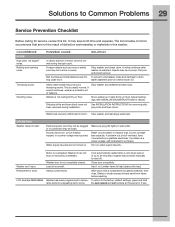
...washer and check drum. To prevent unnecessary noise and damage to help balance the load. If sound continues, washer is not completely closed. Washer...noise. Heavy wash loads may save both time and expense. Move washer so it rests firmly...If problem is not resting firmly on floor. Washer won't spin. Heavily soiled items. Wipe drum ...Washer does not start. Make sure plug fits tightly in drum. Washer motor will automatically restart after washer...washer has not been manually turned off). Call your authorized servicer. Stop washer and rearrange wash load. Turn on . Washer...
...washer and check drum. To prevent unnecessary noise and damage to help balance the load. If sound continues, washer is not completely closed. Washer...noise. Heavy wash loads may save both time and expense. Move washer so it rests firmly...If problem is not resting firmly on floor. Washer won't spin. Heavily soiled items. Wipe drum ...Washer does not start. Make sure plug fits tightly in drum. Washer motor will automatically restart after washer...washer has not been manually turned off). Call your authorized servicer. Stop washer and rearrange wash load. Turn on . Washer...
Installation Instructions (All Languages)
Page 10
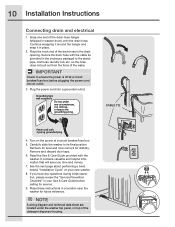
...shipped in the drain opening. Turn on your Use & Care Guide before plugging the power cord into a grounded outlet. Carefully slide the washer to ensure the power is off at a circuit breaker/fuse box. 5. Remove and discard door tape. 6. Continue wrapping it around the ...detergent dispenser housing. NOTE A wiring diagram and technical data sheet are located under any questions during initial operation, please review the "Service Prevention Checklist" in a location near the washer for stability. If you time and money. 7. Plug the power cord into an outlet. 3. IMPORTANT Check to...
...shipped in the drain opening. Turn on your Use & Care Guide before plugging the power cord into a grounded outlet. Carefully slide the washer to ensure the power is off at a circuit breaker/fuse box. 5. Remove and discard door tape. 6. Continue wrapping it around the ...detergent dispenser housing. NOTE A wiring diagram and technical data sheet are located under any questions during initial operation, please review the "Service Prevention Checklist" in a location near the washer for stability. If you time and money. 7. Plug the power cord into an outlet. 3. IMPORTANT Check to...
Installation Instructions (All Languages)
Page 11
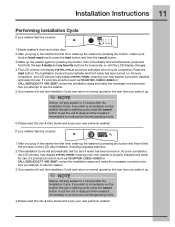
...cycle completion, the LCD window may display INSTAL PASS!, meaning your new washer is properly installed and ready for use . If it prompts an action such as NO WATER, CHECK HOSES or CALL SERVICE 877 435 3287, review the installation steps and make the necessary corrections before you attempt to sleep...the normal operating mode. 6.Please read the Use & Care Guide and enjoy your new premium washer! If you wake it prompts an action such as NO WATER, CHECK HOSES or CALL SERVICE 877 435 3287, review the installation steps and make the necessary corrections before you attempt to use the...
...cycle completion, the LCD window may display INSTAL PASS!, meaning your new washer is properly installed and ready for use . If it prompts an action such as NO WATER, CHECK HOSES or CALL SERVICE 877 435 3287, review the installation steps and make the necessary corrections before you attempt to sleep...the normal operating mode. 6.Please read the Use & Care Guide and enjoy your new premium washer! If you wake it prompts an action such as NO WATER, CHECK HOSES or CALL SERVICE 877 435 3287, review the installation steps and make the necessary corrections before you attempt to use the...