
Installation Instructions (All Languages)
Page 1
... (H) between 275/8" (70.2cm) and 28¼ (71.8cm) add one 2"(5cm) wide wood shim Door Open (see note 2) of this or any other appliance. páginas 9-16 Français -pages 17-24 READ AND SAVE THESE INSTRUCTIONS FOR FUTURE REFERENCE. FOR YOUR SAFETY: Do not store or use...oven has been designed to fit a limited variety of oven for 30" models. 1½" (3.8 cm) Min. 2. Base must be capable of the opening under the appliance side rails. Lifting A the unit will hide the shims at least 21" (53.3cm) clearance in heat damage or fire. pages 1-8 Español - Allow...
... (H) between 275/8" (70.2cm) and 28¼ (71.8cm) add one 2"(5cm) wide wood shim Door Open (see note 2) of this or any other appliance. páginas 9-16 Français -pages 17-24 READ AND SAVE THESE INSTRUCTIONS FOR FUTURE REFERENCE. FOR YOUR SAFETY: Do not store or use...oven has been designed to fit a limited variety of oven for 30" models. 1½" (3.8 cm) Min. 2. Base must be capable of the opening under the appliance side rails. Lifting A the unit will hide the shims at least 21" (53.3cm) clearance in heat damage or fire. pages 1-8 Español - Allow...

Installation Instructions (All Languages)
Page 2
... the bottom. Dimension G (cutout depth) is 4 ½" (11.4 cm). 1½" (3.8 cm) Min. The bottom trim of the unit proper installation of the opening under the appliance side rails. These spacers center the oven in inches (cm). 2
... the bottom. Dimension G (cutout depth) is 4 ½" (11.4 cm). 1½" (3.8 cm) Min. The bottom trim of the unit proper installation of the opening under the appliance side rails. These spacers center the oven in inches (cm). 2

Installation Instructions (All Languages)
Page 3
... branch circuit, protected by a circuit breaker or fuse. NOTE: Wire sizes and connections must be connected to receive the oven. These appliances should be adjusted with the proper voltage and frequency, and connected to do so could result in electric oven models. Be sure to the...4100W - 6200W 30A 7200W - 9600W 40A 6200W - 8300W 40A 9600W and + 50A 8300W and + 50A Table A Observe all packing material from the appliance should be supplied with 2" (5cm) wide wood shims when needed to fit into an existing cabinet cutout opening, when cutout height exceeds 281/8" (71...
... branch circuit, protected by a circuit breaker or fuse. NOTE: Wire sizes and connections must be connected to receive the oven. These appliances should be adjusted with the proper voltage and frequency, and connected to do so could result in electric oven models. Be sure to the...4100W - 6200W 30A 7200W - 9600W 40A 6200W - 8300W 40A 9600W and + 50A 8300W and + 50A Table A Observe all packing material from the appliance should be supplied with 2" (5cm) wide wood shims when needed to fit into an existing cabinet cutout opening, when cutout height exceeds 281/8" (71...

Installation Instructions (All Languages)
Page 4
...to a 3 wire grounded junction box (US only), where local code permit connecting the appliancegrounding conductor to the electrical supply until appliance is permanently grounded. Connect the ground wire before switching on power. NOTE TO ELECTRICIAN: The armored cable leads supplied with a...4. The insulation of the consumer to contact a qualified installer to branch circuit-neutral conductor in electrocution or other serious injury.) This appliance is equipped with CSA Standard C22.1, Canadian Electrical Code, Part 1, and local codes and ordinances. Disconnect the power supply. 2. ...
...to a 3 wire grounded junction box (US only), where local code permit connecting the appliancegrounding conductor to the electrical supply until appliance is permanently grounded. Connect the ground wire before switching on power. NOTE TO ELECTRICIAN: The armored cable leads supplied with a...4. The insulation of the consumer to contact a qualified installer to branch circuit-neutral conductor in electrocution or other serious injury.) This appliance is equipped with CSA Standard C22.1, Canadian Electrical Code, Part 1, and local codes and ordinances. Disconnect the power supply. 2. ...

Installation Instructions (All Languages)
Page 5
... handles out to the neutral wire of the 4-wire electrical system. (see Figure 5). 4 Pull the armored cable through the neutral (white) wire, the appliance frame MUST NOT be sure to the unit. 1 Unpack the wall oven. Double Wall Oven Serial Plate Location 5 In the junction box: connect... oven and visible when the door is used in injury or damage to include the model and serial numbers and a lot number or letter from appliance Figure 4 U.L.-Listed Conduit Connector (or CSA listed) 4-WIRE GROUNDED JUNCTION BOX 5. Heavy Weight Hazard • Use 2 or more people to move and install ...
... handles out to the neutral wire of the 4-wire electrical system. (see Figure 5). 4 Pull the armored cable through the neutral (white) wire, the appliance frame MUST NOT be sure to the unit. 1 Unpack the wall oven. Double Wall Oven Serial Plate Location 5 In the junction box: connect... oven and visible when the door is used in injury or damage to include the model and serial numbers and a lot number or letter from appliance Figure 4 U.L.-Listed Conduit Connector (or CSA listed) 4-WIRE GROUNDED JUNCTION BOX 5. Heavy Weight Hazard • Use 2 or more people to move and install ...

Installation Instructions (All Languages)
Page 6
... supplied in the mounting holes located on each side trim below the oven frame (see figure 6). Use the two screws supplied to fix the appliance to locate the appliance mounting screw holes (see Figure 7). 1½" (3.8 cm) clearance between unit Figure 5 6 Install the Anti-tip Mounting Screws The wall oven can tip when...
... supplied in the mounting holes located on each side trim below the oven frame (see figure 6). Use the two screws supplied to fix the appliance to locate the appliance mounting screw holes (see Figure 7). 1½" (3.8 cm) clearance between unit Figure 5 6 Install the Anti-tip Mounting Screws The wall oven can tip when...

Installation Instructions (All Languages)
Page 8
...10 7. Broil- Use wood shims under the wall oven to your Use & Care Guide.) 3. Checking Operation Your model is suggested that this appliance. ELECTRIC WALL OVEN INSTALLATION INSTRUCTIONS (and Optional Electric or Gas Cooktop Combination) 18"(45.7 cm) Max. Take 2 readings with an Electronic ... oven controls: Bake- Each of the electronic oven controls once more. Turn on the power to the oven (Refer to run . Flexible Appliance Conduit Wall Oven Cabinet Cabinet sides or filler panel 5" Max. 6 1/2" Min. TYPICAL UNDER COUNTER INSTALLATION OF A SINGLE ELECTRIC BUILT-IN ...
...10 7. Broil- Use wood shims under the wall oven to your Use & Care Guide.) 3. Checking Operation Your model is suggested that this appliance. ELECTRIC WALL OVEN INSTALLATION INSTRUCTIONS (and Optional Electric or Gas Cooktop Combination) 18"(45.7 cm) Max. Take 2 readings with an Electronic ... oven controls: Bake- Each of the electronic oven controls once more. Turn on the power to the oven (Refer to run . Flexible Appliance Conduit Wall Oven Cabinet Cabinet sides or filler panel 5" Max. 6 1/2" Min. TYPICAL UNDER COUNTER INSTALLATION OF A SINGLE ELECTRIC BUILT-IN ...
Complete Owner's Guide (English)
Page 2
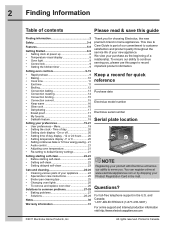
...) For online support and Internet production information visit http://www.electroluxappliances.com ©2011 Electrolux Home Products, Inc. Printed in the U.S. Keep a record for quick reference Purchase date Electrolux model number Electrolux serial number Serial plate location NOTE Registering your appliance 24 • Special door care instructions 25 • Broiler pan cleaning tips 25...
...) For online support and Internet production information visit http://www.electroluxappliances.com ©2011 Electrolux Home Products, Inc. Printed in the U.S. Keep a record for quick reference Purchase date Electrolux model number Electrolux serial number Serial plate location NOTE Registering your appliance 24 • Special door care instructions 25 • Broiler pan cleaning tips 25...
Complete Owner's Guide (English)
Page 3
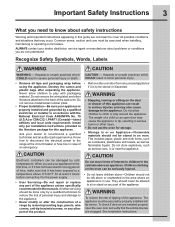
...instructions. Recognize Safety Symbols, Words, Labels WARNING - Do not remove model/serial number plate. • Proper Installation-Be sure your appliance is properly installed and grounded by properly installed anti tip device. They should not be done only by a qualified technician to reduce the...latest editions and local code requirements. Know how to disconnect the electrical power to the range at least 3 hours before using the appliance. Do not store explosives, such as flammable liquids. When you do not understand. To check if devices are installed properly open door...
...instructions. Recognize Safety Symbols, Words, Labels WARNING - Do not remove model/serial number plate. • Proper Installation-Be sure your appliance is properly installed and grounded by properly installed anti tip device. They should not be done only by a qualified technician to reduce the...latest editions and local code requirements. Know how to disconnect the electrical power to the range at least 3 hours before using the appliance. Do not store explosives, such as flammable liquids. When you do not understand. To check if devices are installed properly open door...
Complete Owner's Guide (English)
Page 4
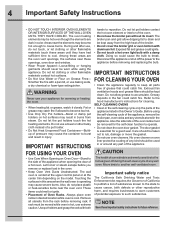
...insert. Touching the surfaces in this Owner's Guide. Always place oven racks in the self-cleaning cycle only the parts of any part of the appliance The health of substances known to the state to cause cancer, birth defects or other flammable materials contact hot surfaces. • Do Not Use... for a good seal. Refer to keep all utensils from steam. Move birds to rub, damage or move the gasket. • Do not use your appliance for future reference. Also, do not touch, or let clothing or other bulky cloth instead of a pot holder. • Do Not Heat Unopened Food Containers...
...insert. Touching the surfaces in this Owner's Guide. Always place oven racks in the self-cleaning cycle only the parts of any part of the appliance The health of substances known to the state to cause cancer, birth defects or other flammable materials contact hot surfaces. • Do Not Use... for a good seal. Refer to keep all utensils from steam. Move birds to rub, damage or move the gasket. • Do not use your appliance for future reference. Also, do not touch, or let clothing or other bulky cloth instead of a pot holder. • Do Not Heat Unopened Food Containers...
Complete Owner's Guide (English)
Page 9
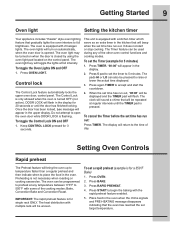
... bring the oven up to temperature faster than a regular preheat and then indicate when to 5 minutes. Getting Started 9 Oven light Setting the kitchen timer Your appliance includes "theater" style oven lighting feature that will be repeated at regular intervals until the door has finished locking.
... bring the oven up to temperature faster than a regular preheat and then indicate when to 5 minutes. Getting Started 9 Oven light Setting the kitchen timer Your appliance includes "theater" style oven lighting feature that will be repeated at regular intervals until the door has finished locking.
Complete Owner's Guide (English)
Page 22
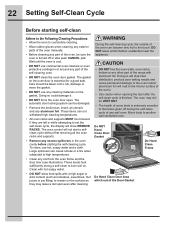
.... • Clean any other part of the oven). • Use caution when opening the door after cleaning. DO NOT leave small children unattended near the appliance. • DO NOT line the oven walls, oven racks, bottom or any soil from the oven frame and the door liner (see illustration). The oven...
.... • Clean any other part of the oven). • Use caution when opening the door after cleaning. DO NOT leave small children unattended near the appliance. • DO NOT line the oven walls, oven racks, bottom or any soil from the oven frame and the door liner (see illustration). The oven...
Complete Owner's Guide (English)
Page 23
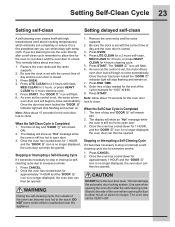
... CLEAN for a 2 hours self-clean, MED CLEAN for 3 hours, or press HEAVY CLEAN for 4 hours cleaning cycle. 5. DO NOT leave small children unattended near the appliance. 1. Press END TIME. 8. Once the oven has cooled down for approximately 1 HOUR and the "DOOR " icon is no longer displayed, the oven door can then...
... CLEAN for a 2 hours self-clean, MED CLEAN for 3 hours, or press HEAVY CLEAN for 4 hours cleaning cycle. 5. DO NOT leave small children unattended near the appliance. 1. Press END TIME. 8. Once the oven has cooled down for approximately 1 HOUR and the "DOOR " icon is no longer displayed, the oven door can then...
Complete Owner's Guide (English)
Page 24
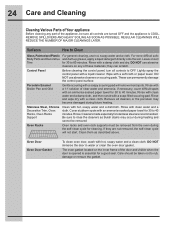
... clean water and a cloth. Rinse with a clean cloth. Be sure to 40 minutes. Clean them as possible. they are turned OFF and the appliance is essential for 30 to rub, damage or remove the gasket. Oven Racks Oven racks and oven rack supports must be taken not to 60... minutes. The oven gasket located on soil Trim for a good seal. 24 Care and Cleaning Cleaning Various Parts of Your appliance Before cleaning any of these materials; Control Panel Before cleaning the control panel, turn all cleaners or the porcelain may occur during future heating. DO...
... clean water and a cloth. Rinse with a clean cloth. Be sure to 40 minutes. Clean them as possible. they are turned OFF and the appliance is essential for 30 to rub, damage or remove the gasket. Oven Racks Oven racks and oven rack supports must be taken not to 60... minutes. The oven gasket located on soil Trim for a good seal. 24 Care and Cleaning Cleaning Various Parts of Your appliance Before cleaning any of these materials; Control Panel Before cleaning the control panel, turn all cleaners or the porcelain may occur during future heating. DO...
Complete Owner's Guide (English)
Page 25
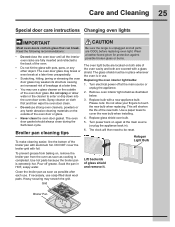
... in use a glass cleaner on the outside of the oven door glass. Pour off at the main source or unplug the appliance. 2. Clean the broiler pan as soon as illustrated below. 3. Wear a leather-faced glove for protection against possible broken glass or burns. The oven light ...bulbs are covered with a new appliance bulb. The glass shield must be reset. Broiler Pan Do not spray or allow your fingers to touch the new bulb when replacing. The oven...
... in use a glass cleaner on the outside of the oven door glass. Pour off at the main source or unplug the appliance. 2. Clean the broiler pan as soon as illustrated below. 3. Wear a leather-faced glove for protection against possible broken glass or burns. The oven light ...bulbs are covered with a new appliance bulb. The glass shield must be reset. Broiler Pan Do not spray or allow your fingers to touch the new bulb when replacing. The oven...

Complete Owner's Guide (English)
Page 26
... with both sides just below carefully and always hold the whole weight of the door while grasping the sides of the door transfer from the appliance Fig. 3 To replace the oven door 1. IMPORTANT The oven door is heavy. If needed use your hands so that the oven now supports the oven...
... with both sides just below carefully and always hold the whole weight of the door while grasping the sides of the door transfer from the appliance Fig. 3 To replace the oven door 1. IMPORTANT The oven door is heavy. If needed use your hands so that the oven now supports the oven...
Complete Owner's Guide (English)
Page 27
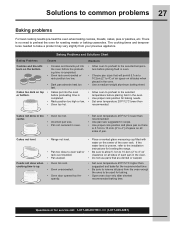
... measuring cup filled with water on top • Cakes put into the oven • Allow oven to preheat to remove all pans from your previous appliance. Solutions to be used for service call: 1-877-4ELECTROLUX (1-877-435-3287) Cakes too dark on the center of pan. There is completed. • Oven...
... measuring cup filled with water on top • Cakes put into the oven • Allow oven to preheat to remove all pans from your previous appliance. Solutions to be used for service call: 1-877-4ELECTROLUX (1-877-435-3287) Cakes too dark on the center of pan. There is completed. • Oven...
Complete Owner's Guide (English)
Page 28
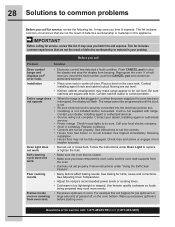
... supplied with range. The list includes common occurrences that are square and level. Entire range does • When the range is first plugged in this appliance. Contact your dealer, installing agent or authorized servicer. • Service wiring not complete. Replace cord/plug. • Controls are not the result of grease left...
... supplied with range. The list includes common occurrences that are square and level. Entire range does • When the range is first plugged in this appliance. Contact your dealer, installing agent or authorized servicer. • Service wiring not complete. Replace cord/plug. • Controls are not the result of grease left...
Complete Owner's Guide (English)
Page 31
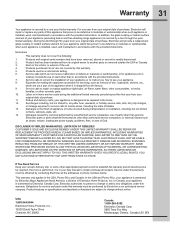
...surface element for service calls to any parts of this warranty. Damages caused by: services performed by Electrolux Major Appliances North America, a division of God. Obligations for appliances not in the home. 12. Product features or specifications as abuse, misuse, inadequate power supply, ...accidents, fires, or acts of Electrolux Home Products, Inc. your appliance is in accordance with the provided instructions. SOME STATES AND PROVINCES DO NOT ALLOW THE EXCLUSION OR LIMITATION...
...surface element for service calls to any parts of this warranty. Damages caused by: services performed by Electrolux Major Appliances North America, a division of God. Obligations for appliances not in the home. 12. Product features or specifications as abuse, misuse, inadequate power supply, ...accidents, fires, or acts of Electrolux Home Products, Inc. your appliance is in accordance with the provided instructions. SOME STATES AND PROVINCES DO NOT ALLOW THE EXCLUSION OR LIMITATION...

