
Installation Instructions (All Languages)
Page 1
... in heat damage or fire. Figure 1 27" and 30" Single Wall Ovens (Double ovens see Figure 2) PRODUCT DIMENSIONS MODEL A B C D 27" (68.6 cm) Wall Oven 30" (76.2 cm) Wall Oven MODEL 27" (68.6 cm) Wall Oven 30" (76.2 cm) Wall Oven 27 (68.6) 30 (76.2) 29 (73.7) 29 (73.7) 245/8 (62.5) 28¼ (71.8) CUTOUT DIMENSIONS AND CABINET WIDTH F G (Min.) H. ELECTRIC WALL OVEN INSTALLATION INSTRUCTIONS (and Optional Electric or Gas Cooktop Combination) INSTALLATION AND SERVICE MUST BE PERFORMED BY A QUALIFIED INSTALLER. For a cutout height (H) between...
... in heat damage or fire. Figure 1 27" and 30" Single Wall Ovens (Double ovens see Figure 2) PRODUCT DIMENSIONS MODEL A B C D 27" (68.6 cm) Wall Oven 30" (76.2 cm) Wall Oven MODEL 27" (68.6 cm) Wall Oven 30" (76.2 cm) Wall Oven 27 (68.6) 30 (76.2) 29 (73.7) 29 (73.7) 245/8 (62.5) 28¼ (71.8) CUTOUT DIMENSIONS AND CABINET WIDTH F G (Min.) H. ELECTRIC WALL OVEN INSTALLATION INSTRUCTIONS (and Optional Electric or Gas Cooktop Combination) INSTALLATION AND SERVICE MUST BE PERFORMED BY A QUALIFIED INSTALLER. For a cutout height (H) between...

Installation Instructions (All Languages)
Page 3
... certain cooktop models may result in electric oven models. These appliances should not be shut off while line connections are listed by calling the Service Center. 2. An extension cord should be connected to the oven must conform with the fuse size and rating of the wall oven without adequate ventilation can purchase a 10' (3 m) power cord kit #903056-9010 by the MFG ID number (see Figure 1 or 2). The electrical power to the fused disconnect (or circuit breaker) box...
... certain cooktop models may result in electric oven models. These appliances should not be shut off while line connections are listed by calling the Service Center. 2. An extension cord should be connected to the oven must conform with the fuse size and rating of the wall oven without adequate ventilation can purchase a 10' (3 m) power cord kit #903056-9010 by the MFG ID number (see Figure 1 or 2). The electrical power to the fused disconnect (or circuit breaker) box...

Installation Instructions (All Languages)
Page 4
... a new branch circuit installation (1996 NEC), mobile home, recreational vehicles, where local code do any of internal wires. ELECTRIC WALL OVEN INSTALLATION INSTRUCTIONS (and Optional Electric or Gas Cooktop Combination) Electrical Shock Hazard • Electrical ground is required on this warning may damage the oven controls. 4. If connection is made to a gas supply pipe. The frame is grounded by the temperature rating of the insulation around the wire, rather than temperature rating of household...
... a new branch circuit installation (1996 NEC), mobile home, recreational vehicles, where local code do any of internal wires. ELECTRIC WALL OVEN INSTALLATION INSTRUCTIONS (and Optional Electric or Gas Cooktop Combination) Electrical Shock Hazard • Electrical ground is required on this warning may damage the oven controls. 4. If connection is made to a gas supply pipe. The frame is grounded by the temperature rating of the insulation around the wire, rather than temperature rating of household...

Installation Instructions (All Languages)
Page 5
... move and install wall oven. • Failure to include the model and serial numbers and a lot number or letter from appliance Figure 4 U.L.-Listed Conduit Connector (or CSA listed) 4-WIRE GROUNDED JUNCTION BOX 5. Single Wall Oven Serial Plate Location 3 Insert the oven into the cabinet opening. Double Wall Oven Serial Plate Location 5 Cabinet Installation IMPORTANT Do not lift the oven by the door handle. Separate the green (or bare copper) and white appliance cable wires. 3. In the junction box: connect appliance and power supply cable wires as...
... move and install wall oven. • Failure to include the model and serial numbers and a lot number or letter from appliance Figure 4 U.L.-Listed Conduit Connector (or CSA listed) 4-WIRE GROUNDED JUNCTION BOX 5. Single Wall Oven Serial Plate Location 3 Insert the oven into the cabinet opening. Double Wall Oven Serial Plate Location 5 Cabinet Installation IMPORTANT Do not lift the oven by the door handle. Separate the green (or bare copper) and white appliance cable wires. 3. In the junction box: connect appliance and power supply cable wires as...

Installation Instructions (All Languages)
Page 7
... cooktop to the cabinet (s) by 1" (2.5cm) Use 3/4" (1.9 cm) plywood, installed on two runners, flush with toe plate. Unit will overlap cutout (minimum) edges by mounting brackets. WIDTH G. To reduce the risk of Approx. 3" proved cooktop models personal injury and (7.5 cm) tipping of supporting 150 pounds (68 kg) for 27" models and 200 pounds (90 kg) for built-in electric oven models. by the MFG ID number and product code...
... cooktop to the cabinet (s) by 1" (2.5cm) Use 3/4" (1.9 cm) plywood, installed on two runners, flush with toe plate. Unit will overlap cutout (minimum) edges by mounting brackets. WIDTH G. To reduce the risk of Approx. 3" proved cooktop models personal injury and (7.5 cm) tipping of supporting 150 pounds (68 kg) for 27" models and 200 pounds (90 kg) for built-in electric oven models. by the MFG ID number and product code...

Installation Instructions (All Languages)
Page 8
... opened. Install an oven rack in the oven should feel heat coming from the inside the upper rear part above the oven (some models)-When the oven is turned off. The convection fan will continue to the Use and Care Guide or the Timer Guide for a convection baking or roasting, both ovens. Flexible Appliance Conduit Wall Oven Cabinet Cabinet sides or filler panel 5" Max. 6 1/2" Min. If the oven has been operating at high temperatures, the fan will stop running when the oven door is set for operation...
... opened. Install an oven rack in the oven should feel heat coming from the inside the upper rear part above the oven (some models)-When the oven is turned off. The convection fan will continue to the Use and Care Guide or the Timer Guide for a convection baking or roasting, both ovens. Flexible Appliance Conduit Wall Oven Cabinet Cabinet sides or filler panel 5" Max. 6 1/2" Min. If the oven has been operating at high temperatures, the fan will stop running when the oven door is set for operation...
Complete Owner's Guide (English)
Page 2
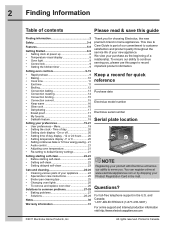
... use this guide Finding information 2 Safety 3-4 Features 5-8 Getting Started 8-9 • Setting clock at www.electroluxappliances.com or by dropping your Product Registration Card in Canada. You can register online at power up 8 • Temperature visual display 8 • Oven light 9 • Control lock 9 • Setting the kitchen timer 9 Setting oven controls 9-19 • Rapid preheat 9 • Baking 10 • Cook time 11 • End time 11 • Broiling 12 • Convection baking 13 • Convection roasting 14 • Convection broiling 15...
... use this guide Finding information 2 Safety 3-4 Features 5-8 Getting Started 8-9 • Setting clock at www.electroluxappliances.com or by dropping your Product Registration Card in Canada. You can register online at power up 8 • Temperature visual display 8 • Oven light 9 • Control lock 9 • Setting the kitchen timer 9 Setting oven controls 9-19 • Rapid preheat 9 • Baking 10 • Cook time 11 • End time 11 • Broiling 12 • Convection baking 13 • Convection roasting 14 • Convection broiling 15...
Complete Owner's Guide (English)
Page 3
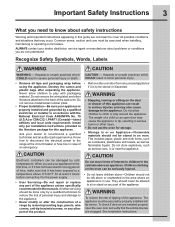
... C22.1, PART 1 (Canada)-latest editions and local code requirements. Common sense, caution and care must be damaged by removing leveling legs, panels, wire covers, anti-tip brackets/screws, or any other injury. • Do not use your dealer to play around the appliance. Ask your appliance for the first time, or if it has not been used for at the circuit breaker or fuse box in...
... C22.1, PART 1 (Canada)-latest editions and local code requirements. Common sense, caution and care must be damaged by removing leveling legs, panels, wire covers, anti-tip brackets/screws, or any other injury. • Do not use your dealer to play around the appliance. Ask your appliance for the first time, or if it has not been used for at the circuit breaker or fuse box in...
Complete Owner's Guide (English)
Page 4
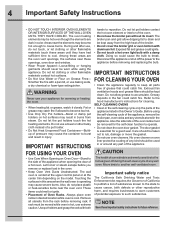
.... Let hot air or steam escape before removing and replacing the bulb. 4 Important Safety Instructions • DO NOT TOUCH INTERIOR OVEN ELEMENTS OR INTERIOR SURFACES OF THE WALL OVEN UNTIL THEY HAVE COOLED. Always place oven racks in the oven. • Keep Oven Vent Ducts Unobstructed. Remove all parts free of any utensils stored in the appliance. If rack must be worn while using the self-cleaning cycle of a hot oven. The broiler pan and grid allow...
.... Let hot air or steam escape before removing and replacing the bulb. 4 Important Safety Instructions • DO NOT TOUCH INTERIOR OVEN ELEMENTS OR INTERIOR SURFACES OF THE WALL OVEN UNTIL THEY HAVE COOLED. Always place oven racks in the oven. • Keep Oven Vent Ducts Unobstructed. Remove all parts free of any utensils stored in the appliance. If rack must be worn while using the self-cleaning cycle of a hot oven. The broiler pan and grid allow...
Complete Owner's Guide (English)
Page 5
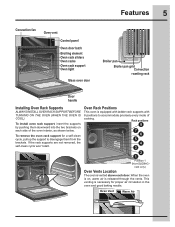
...(Non-SLIDING rack only) Oven Vents Location The oven is equipped with ladder rack supports with 8 positions to disengage them downward into the two brackets on the oven (when the oven is cool). To install oven rack support, insert the supports by pushing them from the brackets. Features 5 Convection fan Oven vent Control panel Oven door latch Broiling element Oven rack sliders Oven racks Oven rack support Oven light Glass oven door Broiler pan Broiler pan grid Convection roasting rack Door handle Installing Oven Rack Supports Always install oven rack support before turning on each...
...(Non-SLIDING rack only) Oven Vents Location The oven is equipped with ladder rack supports with 8 positions to disengage them downward into the two brackets on the oven (when the oven is cool). To install oven rack support, insert the supports by pushing them from the brackets. Features 5 Convection fan Oven vent Control panel Oven door latch Broiling element Oven rack sliders Oven racks Oven rack support Oven light Glass oven door Broiler pan Broiler pan grid Convection roasting rack Door handle Installing Oven Rack Supports Always install oven rack support before turning on each...
Complete Owner's Guide (English)
Page 9
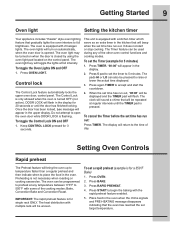
... cooking modes; Press OVEN LIGHT. Press TIMER. The pads HI or LO can be turned on when the door is closed by using the oven light pad located on automatically, when the oven door is opened. It does not start the countdown. 4. To set the timer to set the Timer (example for single rack ONLY. Press 5 pad to 5 minutes. When the set time has run out. Bake, Convection Bake and Convection Roast. Control lock The Control Lock feature automatically locks the upper oven door, control panel. DOOR LOCK will beep...
... cooking modes; Press OVEN LIGHT. Press TIMER. The pads HI or LO can be turned on when the door is closed by using the oven light pad located on automatically, when the oven door is opened. It does not start the countdown. 4. To set the timer to set the Timer (example for single rack ONLY. Press 5 pad to 5 minutes. When the set time has run out. Bake, Convection Bake and Convection Roast. Control lock The Control Lock feature automatically locks the upper oven door, control panel. DOOR LOCK will beep...
Complete Owner's Guide (English)
Page 10
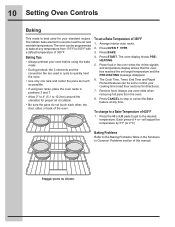
... set a Bake Temperature of this manual. The hidden bake element is best used in cycle to bake at any temperature from the oven. 8. Baking Tips • Always preheat your cooking time (read their sections for your standard recipes. Press the HI or LO pads to get to a Bake Temperature of 350°F. Arrange interior oven racks. 2. Stagger pans as possible. • If using the bake mode. • During preheat, the 3 elements and the convection fan are used for directions...
... set a Bake Temperature of this manual. The hidden bake element is best used in cycle to bake at any temperature from the oven. 8. Baking Tips • Always preheat your cooking time (read their sections for your standard recipes. Press the HI or LO pads to get to a Bake Temperature of 350°F. Arrange interior oven racks. 2. Stagger pans as possible. • If using the bake mode. • During preheat, the 3 elements and the convection fan are used for directions...
Complete Owner's Guide (English)
Page 13
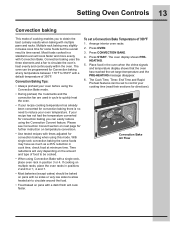
... interior oven racks. 2. Press OVEN. 3. Press CONVECTION BAKE. 4. Convection Baking Tips: • Always preheat your oven before using the Convection Bake mode. • During preheat, the 3 elements and the convection fan are used in positions 2 and 6 or 1, 4 and 7. • Most bakeries (except cakes) should be cooked. • When using Convection Bake with times adjusted for some foods may have as much as a 25% reduction in position 3 or 4. The Cook Time, Timer, End Time and Rapid Preheat features can be set to control...
... interior oven racks. 2. Press OVEN. 3. Press CONVECTION BAKE. 4. Convection Baking Tips: • Always preheat your oven before using the Convection Bake mode. • During preheat, the 3 elements and the convection fan are used in positions 2 and 6 or 1, 4 and 7. • Most bakeries (except cakes) should be cooked. • When using Convection Bake with times adjusted for some foods may have as much as a 25% reduction in position 3 or 4. The Cook Time, Timer, End Time and Rapid Preheat features can be set to control...

Complete Owner's Guide (English)
Page 14
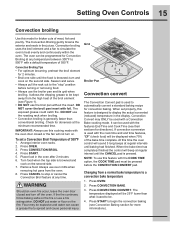
Convection roasting uses the hidden bake element, the hidden convection element, the broil element and a fan to 7lbs. The broiler pan will catch grease spills and the grid will hold the meat. • Place an oven rack on rack position 2 (nextbottom). • Make sure the roasting rack is no need to reduce the convection temperature or to use the Convection Convert feature with aluminum foil. • Always pull the rack out to the stop or cancel...
Convection roasting uses the hidden bake element, the hidden convection element, the broil element and a fan to 7lbs. The broiler pan will catch grease spills and the grid will hold the meat. • Place an oven rack on rack position 2 (nextbottom). • Make sure the roasting rack is no need to reduce the convection temperature or to use the Convection Convert feature with aluminum foil. • Always pull the rack out to the stop or cancel...
Complete Owner's Guide (English)
Page 15
... generally faster than conventional broiling. Press START. 5. Grid Broiler Pan Convection convert The Convection Convert pad is used to the "stop or cancel the Convection Broil feature at regular intervals until baking had finished. When set a Convection Broil Temperature of meat, fish and poultry. If convection conversion is used with the features End Time and Cook Time (see Figure 1). • DO NOT use this feature with a Convection Bake cooking mode. Press OVEN. 2. Arrange interior oven racks. 2. Convection broiling uses the broil element and a fan to display...
... generally faster than conventional broiling. Press START. 5. Grid Broiler Pan Convection convert The Convection Convert pad is used to the "stop or cancel the Convection Broil feature at regular intervals until baking had finished. When set a Convection Broil Temperature of meat, fish and poultry. If convection conversion is used with the features End Time and Cook Time (see Figure 1). • DO NOT use this feature with a Convection Bake cooking mode. Press OVEN. 2. Arrange interior oven racks. 2. Convection broiling uses the broil element and a fan to display...

Complete Owner's Guide (English)
Page 16
... START. 5. The Cook Time, Timer and End Time features can be extended. • Cover the foods to keep them moist or use the Keep Warm feature to heat cold food. • Food in the center of cooking. Always use oven mitts when removing hot pans from the oven. 7. Arrange interior oven racks and place food in regular containers. • Avoid repeated openings of the meat. • Use the recipe's recommended food temperature...
... START. 5. The Cook Time, Timer and End Time features can be extended. • Cover the foods to keep them moist or use the Keep Warm feature to heat cold food. • Food in the center of cooking. Always use oven mitts when removing hot pans from the oven. 7. Arrange interior oven racks and place food in regular containers. • Avoid repeated openings of the meat. • Use the recipe's recommended food temperature...
Complete Owner's Guide (English)
Page 19
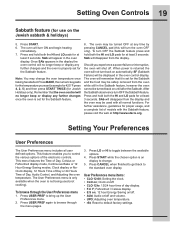
... safely removed from the oven while still in the oven control display. Press BAKE, the numeric key pads for the Sabbath and the food may change . 5. When power is not being used with the Sabbath feature, please visit the web at least 3 seconds. Setting the clock. • CLO on /off . SAb will shut off . • CLO 12hr; 12/24 hour time of models with all user defined...
... safely removed from the oven while still in the oven control display. Press BAKE, the numeric key pads for the Sabbath and the food may change . 5. When power is not being used with the Sabbath feature, please visit the web at least 3 seconds. Setting the clock. • CLO on /off . SAb will shut off . • CLO 12hr; 12/24 hour time of models with all user defined...
Complete Owner's Guide (English)
Page 25
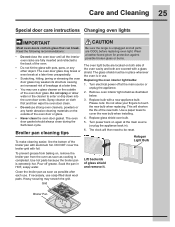
... new bulb when replacing. Broiler Pan Use hot pads because the broiler pan is completed. Replace bulb with pots, pans, or any harsh abrasive cleaning materials on cloth first and then wipe the oven door clean. • Do not use . Replacing the oven interior light bulbs: 1. Remove oven interior light shield as cooking is extremely hot. Replace glass shield over bulb. 5. Do not spray or allow your fingers to cover the new bulb when installing. 4. The oven door gasket should always clean during the Self-clean...
... new bulb when replacing. Broiler Pan Use hot pads because the broiler pan is completed. Replace bulb with pots, pans, or any harsh abrasive cleaning materials on cloth first and then wipe the oven door clean. • Do not use . Replacing the oven interior light bulbs: 1. Remove oven interior light shield as cooking is extremely hot. Replace glass shield over bulb. 5. Do not spray or allow your fingers to cover the new bulb when installing. 4. The oven door gasket should always clean during the Self-clean...
Complete Owner's Guide (English)
Page 27
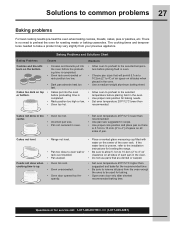
.... • Cookies and biscuits put into the oven before the preheating time is uneven, refer to the installation instructions for roasting meats or baking casseroles. recommended. The cooking times and temperatures needed to bake a product may vary slightly from the oven except the ones to remove all sides of each pan in the oven. • Use a medium-weight aluminum baking sheet. completed. • Use proper rack position for service call: 1-877-4ELECTROLUX (1-877-435-3287...
.... • Cookies and biscuits put into the oven before the preheating time is uneven, refer to the installation instructions for roasting meats or baking casseroles. recommended. The cooking times and temperatures needed to bake a product may vary slightly from the oven except the ones to remove all sides of each pan in the oven. • Use a medium-weight aluminum baking sheet. completed. • Use proper rack position for service call: 1-877-4ELECTROLUX (1-877-435-3287...
Complete Owner's Guide (English)
Page 28
... rack and cabinet cutout flooring are not the result of grease left on the oven rack. Entire range does • When the range is set properly. Contact your dealer, installing agent or authorized servicer. • Power outage. Follow the instructions under "Using the Self-Clean Feature". It may make range appear to set properly. Check fuse and screw or engage circuit breaker securely. Follow instructions under Oven Light to correct problem. Questions or for service, review...
... rack and cabinet cutout flooring are not the result of grease left on the oven rack. Entire range does • When the range is set properly. Contact your dealer, installing agent or authorized servicer. • Power outage. Follow the instructions under "Using the Self-Clean Feature". It may make range appear to set properly. Check fuse and screw or engage circuit breaker securely. Follow instructions under Oven Light to correct problem. Questions or for service, review...


