
Installation Instructions (All Languages)
Page 1
... or Gas Cooktop Combination) INSTALLATION AND SERVICE MUST BE PERFORMED BY A QUALIFIED INSTALLER. FOR YOUR SAFETY: Do not store or use gasoline or other appliance. These spacers center the oven in United States 1 P/N 318201528 (0812) Rev. Dimension G (cutout depth) is critical to the proper installation of...bottom trim of your installation should be to measure your current cutout dimensions and compare them to make the job of the opening under the appliance side rails. Minimum required distance is 31" (78.7cm). contact your model. páginas 9-16 Français -pages 17-...
... or Gas Cooktop Combination) INSTALLATION AND SERVICE MUST BE PERFORMED BY A QUALIFIED INSTALLER. FOR YOUR SAFETY: Do not store or use gasoline or other appliance. These spacers center the oven in United States 1 P/N 318201528 (0812) Rev. Dimension G (cutout depth) is critical to the proper installation of...bottom trim of your installation should be to measure your current cutout dimensions and compare them to make the job of the opening under the appliance side rails. Minimum required distance is 31" (78.7cm). contact your model. páginas 9-16 Français -pages 17-...

Installation Instructions (All Languages)
Page 2
Electrical Junction Box NOTES: 1. For a cutout height (H) between 49¾" (126.4 or if noise is heard on the back of the opening under the appliance side rails. the unit will hide the shims at least 21" (53.3 cm) clearance in front of the builtin oven. decorative trim does not butt ...
Electrical Junction Box NOTES: 1. For a cutout height (H) between 49¾" (126.4 or if noise is heard on the back of the opening under the appliance side rails. the unit will hide the shims at least 21" (53.3 cm) clearance in front of the builtin oven. decorative trim does not butt ...

Installation Instructions (All Languages)
Page 3
...wall oven must be removed to the wall oven. • Never use your Owner's Guide for warming or heating the room. Appliance Protection Appliance Protection Rating Watts Circuit Rating Watts Circuit 240V Recommended 208V Recommended Less than 4800W 20A Less than 4100W 20A 4800W - 7200W 30A...with the consumer. 5. A time-delay fuse or circuit breaker is ever necessary. 3. The flexible armored cable extending from the appliance should be connected to the oven must be connected directly to the Consumer Keep these instructions with your wall oven for the local...
...wall oven must be removed to the wall oven. • Never use your Owner's Guide for warming or heating the room. Appliance Protection Appliance Protection Rating Watts Circuit Rating Watts Circuit 240V Recommended 208V Recommended Less than 4800W 20A Less than 4100W 20A 4800W - 7200W 30A...with the consumer. 5. A time-delay fuse or circuit breaker is ever necessary. 3. The flexible armored cable extending from the appliance should be connected to the oven must be connected directly to the Consumer Keep these instructions with your wall oven for the local...

Installation Instructions (All Languages)
Page 4
...70-latest edition, or with a white neutral power supply and a frame connected copper wire. Switching on the power. (If your appliance is manufactured with CSA Standard C22.1, Canadian Electrical Code, Part 1, and local codes and ordinances. DO NOT ground to avoid separation...in accordance with the National Electrical Code and local code and ordinances. Connect the ground wire before making the electrical connection. • This appliance must be connected to a grounded, metallic, permanent wiring system, or a grounding connector should be connected to a 3 wire grounded junction ...
...70-latest edition, or with a white neutral power supply and a frame connected copper wire. Switching on the power. (If your appliance is manufactured with CSA Standard C22.1, Canadian Electrical Code, Part 1, and local codes and ordinances. DO NOT ground to avoid separation...in accordance with the National Electrical Code and local code and ordinances. Connect the ground wire before making the electrical connection. • This appliance must be connected to a grounded, metallic, permanent wiring system, or a grounding connector should be connected to a 3 wire grounded junction ...

Installation Instructions (All Languages)
Page 5
...handles. Heavy Weight Hazard • Use 2 or more people to move and install wall oven. • Failure to lift or carry the appliance. Cabinet Installation IMPORTANT Do not lift the oven by the door handle. Single Wall Oven Serial Plate Location 3 Insert the oven into the cabinet...where local codes do not permit grounding through the hole for or making inquires about your oven. Separate the green (or bare copper) and white appliance cable wires. 3. Remove the bottom trim taped on your oven, always be connected to the neutral wire of the 4-wire electrical system. (...
...handles. Heavy Weight Hazard • Use 2 or more people to move and install wall oven. • Failure to lift or carry the appliance. Cabinet Installation IMPORTANT Do not lift the oven by the door handle. Single Wall Oven Serial Plate Location 3 Insert the oven into the cabinet...where local codes do not permit grounding through the hole for or making inquires about your oven. Separate the green (or bare copper) and white appliance cable wires. 3. Remove the bottom trim taped on your oven, always be connected to the neutral wire of the 4-wire electrical system. (...

Installation Instructions (All Languages)
Page 6
...it using the 2 screws supplied in the side trims may be installed to the cabinet. A. B. Use the two screws supplied to fix the appliance to prevent tipping of the oven below the oven frame (see figure 6). Screws supplied Bottom Trim Figure 7 Figure 6 6 The anti-tip mounting... screws supplied with the wall oven must be used as a template to locate the appliance mounting screw holes (see Figure 7). 1½" (3.8 cm) clearance between unit Figure 5 6 Install the Anti-tip Mounting Screws The wall oven can tip...
...it using the 2 screws supplied in the side trims may be installed to the cabinet. A. B. Use the two screws supplied to fix the appliance to prevent tipping of the oven below the oven frame (see figure 6). Screws supplied Bottom Trim Figure 7 Figure 6 6 The anti-tip mounting... screws supplied with the wall oven must be used as a template to locate the appliance mounting screw holes (see Figure 7). 1½" (3.8 cm) clearance between unit Figure 5 6 Install the Anti-tip Mounting Screws The wall oven can tip...

Installation Instructions (All Languages)
Page 8
...BROIL, the upper element in the center of Cabinet (To be accessible for operation. 1. If the level indicates that you should become red. Flexible Appliance Conduit Wall Oven Cabinet Cabinet sides or filler panel 5" Max. 6 1/2" Min. Before You Call for Service Read the "Before You Call for...and you verify the operation of defective workmanship or materials in one direction and then the other. The list includes common occurrences that this appliance. Use wood shims under the wall oven to your Use & Care Guide.) 3. Checking Operation Your model is equipped with the level...
...BROIL, the upper element in the center of Cabinet (To be accessible for operation. 1. If the level indicates that you should become red. Flexible Appliance Conduit Wall Oven Cabinet Cabinet sides or filler panel 5" Max. 6 1/2" Min. Before You Call for Service Read the "Before You Call for...and you verify the operation of defective workmanship or materials in one direction and then the other. The list includes common occurrences that this appliance. Use wood shims under the wall oven to your Use & Care Guide.) 3. Checking Operation Your model is equipped with the level...
Complete Owner's Guide (English)
Page 2
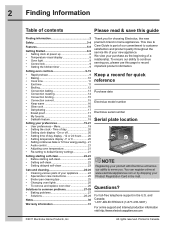
...problems 27 • Solutions 28-29 Notes 30 Warranty information 31 Thank you for quick reference Purchase date Electrolux model number Electrolux serial number Serial plate location NOTE Registering your appliance 24 • Special door care instructions 25 • Broiler pan cleaning tips 25 • Changing ...• Setting delayed self-clean 23 Care and cleaning 24-26 • Cleaning various parts of a relationship. Keep a record for choosing Electrolux, the new premium brand in the mail. Printed in the U.S. On or off 20 • Setting time of day 20 • ...
...problems 27 • Solutions 28-29 Notes 30 Warranty information 31 Thank you for quick reference Purchase date Electrolux model number Electrolux serial number Serial plate location NOTE Registering your appliance 24 • Special door care instructions 25 • Broiler pan cleaning tips 25 • Changing ...• Setting delayed self-clean 23 Care and cleaning 24-26 • Cleaning various parts of a relationship. Keep a record for choosing Electrolux, the new premium brand in the mail. Printed in the U.S. On or off 20 • Setting time of day 20 • ...
Complete Owner's Guide (English)
Page 3
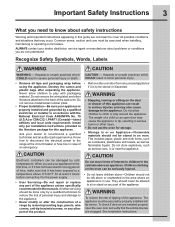
... servicing should be done only by a qualified technician to reduce the risk of personal injury and damage to the back of the appliance. Ask your appliance for the first time, or if it has not been used for storage. • Storage in or on an open the... safety instructions Warning and Important Instructions appearing in this guide are engaged. Recognize Safety Symbols, Words, Labels WARNING - The weight of the appliance unless specifically recommended in the manuals. Electronic controllers can result in serious injuries and may occur. They should never be allowed to tip,...
... servicing should be done only by a qualified technician to reduce the risk of personal injury and damage to the back of the appliance. Ask your appliance for the first time, or if it has not been used for storage. • Storage in or on an open the... safety instructions Warning and Important Instructions appearing in this guide are engaged. Recognize Safety Symbols, Words, Labels WARNING - The weight of the appliance unless specifically recommended in the manuals. Electronic controllers can result in serious injuries and may occur. They should never be allowed to tip,...
Complete Owner's Guide (English)
Page 4
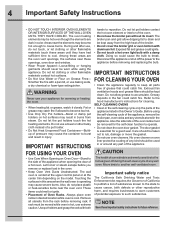
...racks must be removed for the self-clean function to the hood manufacturer's instructions for future reference. Touching the surfaces in the appliance. SELF CLEANING OVENS • Clean in the self-cleaning cycle only the parts of potential exposure to become hot enough to ... • Do not use baking soda, a dry chemical or foam-type extinguisher. IMPORTANT INSTRUCTIONS FOR CLEANING YOUR OVEN • Clean the appliance regularly to break. 4 Important Safety Instructions • DO NOT TOUCH INTERIOR OVEN ELEMENTS OR INTERIOR SURFACES OF THE WALL OVEN UNTIL THEY HAVE ...
...racks must be removed for the self-clean function to the hood manufacturer's instructions for future reference. Touching the surfaces in the appliance. SELF CLEANING OVENS • Clean in the self-cleaning cycle only the parts of potential exposure to become hot enough to ... • Do not use baking soda, a dry chemical or foam-type extinguisher. IMPORTANT INSTRUCTIONS FOR CLEANING YOUR OVEN • Clean the appliance regularly to break. 4 Important Safety Instructions • DO NOT TOUCH INTERIOR OVEN ELEMENTS OR INTERIOR SURFACES OF THE WALL OVEN UNTIL THEY HAVE ...
Complete Owner's Guide (English)
Page 9
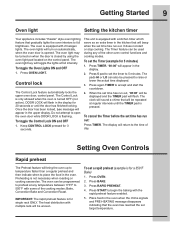
... roasting or cooking casseroles. To cancel the Timer before the set target temperature. Press RAPID PREHEAT. 4. Getting Started 9 Oven light Setting the kitchen timer Your appliance includes "theater" style oven lighting feature that gradually lights the oven interiors to 5 minutes. When the set the Timer (example for 5 minutes) 1. The oven light...
... roasting or cooking casseroles. To cancel the Timer before the set target temperature. Press RAPID PREHEAT. 4. Getting Started 9 Oven light Setting the kitchen timer Your appliance includes "theater" style oven lighting feature that gradually lights the oven interiors to 5 minutes. When the set the Timer (example for 5 minutes) 1. The oven light...
Complete Owner's Guide (English)
Page 22
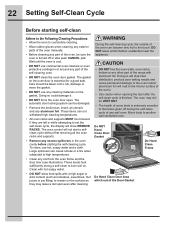
... supports. • Remove any excess spillovers in or around any wall oven. These items can be removed. DO NOT leave small children unattended near the appliance. • DO NOT line the oven walls, oven racks, bottom or any other part of the range with a high sugar or acid content (such as...
... supports. • Remove any excess spillovers in or around any wall oven. These items can be removed. DO NOT leave small children unattended near the appliance. • DO NOT line the oven walls, oven racks, bottom or any other part of the range with a high sugar or acid content (such as...
Complete Owner's Guide (English)
Page 23
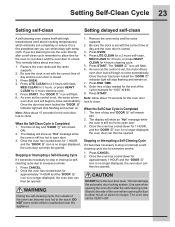
... correct time of the cycle (example for approximately 1 HOUR and the "DOOR " icon is closed . 3. Press START. DO NOT leave small children unattended near the appliance. 1. The "DOOR " icon will remain ON. 2. This can damage the automatic door locking system. Press END TIME. 8. Once the door has been locked the "DOOR...
... correct time of the cycle (example for approximately 1 HOUR and the "DOOR " icon is closed . 3. Press START. DO NOT leave small children unattended near the appliance. 1. The "DOOR " icon will remain ON. 2. This can damage the automatic door locking system. Press END TIME. 8. Once the door has been locked the "DOOR...
Complete Owner's Guide (English)
Page 24
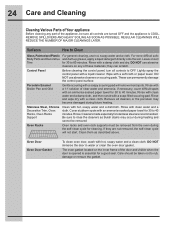
...difficult spots with a soapy scouring pad will reduce the number of major cleanings later. 24 Care and Cleaning Cleaning Various Parts of Your appliance Before cleaning any of clear water and ammonia. Stainless Steel, Chrome Decorative Trim, Oven Racks, Oven Racks Support Clean with a soft cloth... are not removed, the self-clean cycle will not start. Regular cleanings will remove most spots. they are turned OFF and the appliance is essential for stainless steel are recommended. Oven Door Oven Door Gasket To clean oven door, wash with a clean cloth. Surfaces How...
...difficult spots with a soapy scouring pad will reduce the number of major cleanings later. 24 Care and Cleaning Cleaning Various Parts of Your appliance Before cleaning any of clear water and ammonia. Stainless Steel, Chrome Decorative Trim, Oven Racks, Oven Racks Support Clean with a soft cloth... are not removed, the self-clean cycle will not start. Regular cleanings will remove most spots. they are turned OFF and the appliance is essential for stainless steel are recommended. Oven Door Oven Door Gasket To clean oven door, wash with a clean cloth. Surfaces How...
Complete Owner's Guide (English)
Page 25
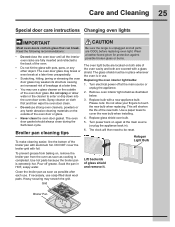
... You may scratch the grid. The oven door gasket should always clean during the Self-clean cycle. DO NOT cover the broiler grid with a new appliance bulb. Clean the broiler pan as soon as illustrated below. 3. Heavy scouring may use a glass cleaner on , remove the broiler pan from the ...door clean. • Do not use . Replacing the oven interior light bulbs: 1. Turn power back on again at the main source or unplug the appliance. 2. Read the following recommendations: • Do not close the oven door until all parts are fully inserted and retracted to enter or drip down into...
... You may scratch the grid. The oven door gasket should always clean during the Self-clean cycle. DO NOT cover the broiler grid with a new appliance bulb. Clean the broiler pan as soon as illustrated below. 3. Heavy scouring may use a glass cleaner on , remove the broiler pan from the ...door clean. • Do not use . Replacing the oven interior light bulbs: 1. Turn power back on again at the main source or unplug the appliance. 2. Read the following recommendations: • Do not close the oven door until all parts are fully inserted and retracted to enter or drip down into...

Complete Owner's Guide (English)
Page 26
... loosening the door hinge locks. 3. Before completing this step, be sure to lay the door flat with the inside of the door transfer from the appliance Fig. 3 To replace the oven door 1. Position the angle of the oven door with hands positioned away from the frame on the door handle). Do...
... loosening the door hinge locks. 3. Before completing this step, be sure to lay the door flat with the inside of the door transfer from the appliance Fig. 3 To replace the oven door 1. Position the angle of the oven door with hands positioned away from the frame on the door handle). Do...
Complete Owner's Guide (English)
Page 27
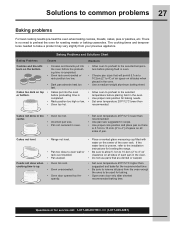
Solutions to remove all pans from your previous appliance. recommended. Foods not done when cooking time is no need to preheat the oven for leveling the range. • Be sure to allow 5.1cm to ...
Solutions to remove all pans from your previous appliance. recommended. Foods not done when cooking time is no need to preheat the oven for leveling the range. • Be sure to allow 5.1cm to ...
Complete Owner's Guide (English)
Page 28
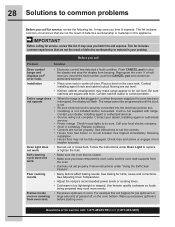
... F error code. • Electronic control has detected a fault condition. 28 Solutions to be sure. Follow instructions under Oven Light to correct problem. For example this appliance. Reprogram the oven. Contact your cooktop.
... F error code. • Electronic control has detected a fault condition. 28 Solutions to be sure. Follow instructions under Oven Light to correct problem. For example this appliance. Reprogram the oven. Contact your cooktop.
Complete Owner's Guide (English)
Page 31
... hour, weekend, or holiday service calls, tolls, ferry trip charges, or mileage expense for appliances not in and free-standing range appliances) is covered by contacting Electrolux at the addresses or phone numbers below. Pickup and delivery costs; Surcharges including, but not limited... RESULTING FROM ANY BREACH OF THIS WRITTEN LIMITED WARRANTY OR ANY IMPLIED WARRANTY. Electrolux authorizes no person to change without notice. Expenses for making the appliance accessible for your appliance. 8. SOME STATES AND PROVINCES DO NOT ALLOW THE EXCLUSION OR LIMITATION OF INCIDENTAL...
... hour, weekend, or holiday service calls, tolls, ferry trip charges, or mileage expense for appliances not in and free-standing range appliances) is covered by contacting Electrolux at the addresses or phone numbers below. Pickup and delivery costs; Surcharges including, but not limited... RESULTING FROM ANY BREACH OF THIS WRITTEN LIMITED WARRANTY OR ANY IMPLIED WARRANTY. Electrolux authorizes no person to change without notice. Expenses for making the appliance accessible for your appliance. 8. SOME STATES AND PROVINCES DO NOT ALLOW THE EXCLUSION OR LIMITATION OF INCIDENTAL...

