Use and Care Manual
Page 3
... 2-3 Make a Record for Future use 2 Questions 2 Safety 4-8 Important Safety Instructions 4 Getting Start 9 Liquefied Petroleum (Propane) Gas Conversion .... 9 Range Features 10 30" Range Features 10 Surface Cooking 11-16 Flame size 11 Proper Burner Adjustments 11 Burner Locations 11 Placement of Burner Heads and Caps 12 ...the Ceramic Glass Cooktop 28-29 Care and Cleaning of Stainless Steel 29 To Remove and Replace the Oven Door 30 Special Door Care Instructions 30 Oven Light 31 Solutions to Common Problems 32-35 Surface Burners Do Not Light 32 Burner Flame only Lights...
... 2-3 Make a Record for Future use 2 Questions 2 Safety 4-8 Important Safety Instructions 4 Getting Start 9 Liquefied Petroleum (Propane) Gas Conversion .... 9 Range Features 10 30" Range Features 10 Surface Cooking 11-16 Flame size 11 Proper Burner Adjustments 11 Burner Locations 11 Placement of Burner Heads and Caps 12 ...the Ceramic Glass Cooktop 28-29 Care and Cleaning of Stainless Steel 29 To Remove and Replace the Oven Door 30 Special Door Care Instructions 30 Oven Light 31 Solutions to Common Problems 32-35 Surface Burners Do Not Light 32 Burner Flame only Lights...
Use and Care Manual
Page 5
... or on the cooktop to persons could result. • Install anti-tip device packed with the range. NEVER use the oven for proper anti-tip bracket(s) installation. ! Both surface burners and oven heating elements may explode and result in fire or property damage. • Do not leave children alone...leveling legs, panels, wire covers, anti-tip brackets/screws, or any other flammable materials touch these openings, oven door and window. To reduce the risk of tipping, the range must be hot even though they have had sufficient time to tip, resulting in color. Doing so may cause...
... or on the cooktop to persons could result. • Install anti-tip device packed with the range. NEVER use the oven for proper anti-tip bracket(s) installation. ! Both surface burners and oven heating elements may explode and result in fire or property damage. • Do not leave children alone...leveling legs, panels, wire covers, anti-tip brackets/screws, or any other flammable materials touch these openings, oven door and window. To reduce the risk of tipping, the range must be hot even though they have had sufficient time to tip, resulting in color. Doing so may cause...
Use and Care Manual
Page 6
... WARNING Use proper flame size-Adjust flame size so it does not extend beyond the edge of fire or gas leak, be sure to turn the oven off and the power resumes, the oven may catch fire if allowed to carbon monoxide levels above 0°C/32°F for a long period of ... incomplete combustion and can be damaged by cold temperatures. Fat or grease may begin to direct contact and may result in burns from any unused range if it is not turned off . IMPORTANT INSTRUCTIONS FOR USING YOUR COOKTOP • Know which knob controls each surface heating unit. Visually check...
... WARNING Use proper flame size-Adjust flame size so it does not extend beyond the edge of fire or gas leak, be sure to turn the oven off and the power resumes, the oven may catch fire if allowed to carbon monoxide levels above 0°C/32°F for a long period of ... incomplete combustion and can be damaged by cold temperatures. Fat or grease may begin to direct contact and may result in burns from any unused range if it is not turned off . IMPORTANT INSTRUCTIONS FOR USING YOUR COOKTOP • Know which knob controls each surface heating unit. Visually check...
Use and Care Manual
Page 7
...turned on, the decorative cover will become hot and possibly melt. WARNING Never cover any slots, holes or passages in the oven/ warmer drawer. • Keep oven vent ducts unobstructed. If rack must be done to unintentional contact with a damp cloth. Remove all utensils from the rack before...Doing so could melt or ignite. ! Disconnect the appliance or turn off the power to the side of the range when opening the door of a hot oven. Always place oven racks in the oven/ warmer drawer (if equipped). Also, do not place plastic or heat-sensitive items on a hot cooking area,...
...turned on, the decorative cover will become hot and possibly melt. WARNING Never cover any slots, holes or passages in the oven/ warmer drawer. • Keep oven vent ducts unobstructed. If rack must be done to unintentional contact with a damp cloth. Remove all utensils from the rack before...Doing so could melt or ignite. ! Disconnect the appliance or turn off the power to the side of the range when opening the door of a hot oven. Always place oven racks in the oven/ warmer drawer (if equipped). Also, do not place plastic or heat-sensitive items on a hot cooking area,...
Use and Care Manual
Page 8
... cleaning. 8 Safety IMPORTANT INSTRUCTIONS FOR CLEANING YOUR RANGE • Clean the range regularly to the fumes given off during a selfcleaning cycle. ! Before self cleaning the oven, remove the broiler pan and any utensils or foods from the oven. • Do not use oven cleaners-No commercial oven cleaner or oven liner protective coating of any part of...
... cleaning. 8 Safety IMPORTANT INSTRUCTIONS FOR CLEANING YOUR RANGE • Clean the range regularly to the fumes given off during a selfcleaning cycle. ! Before self cleaning the oven, remove the broiler pan and any utensils or foods from the oven. • Do not use oven cleaners-No commercial oven cleaner or oven liner protective coating of any part of...
Use and Care Manual
Page 10
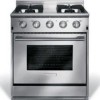
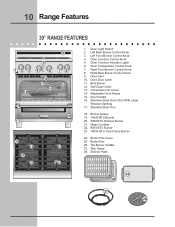
...Cover 14. Right Front Burner Control Knob 8. Adjustable Oven Racks 15. Right Rear Burner Control Knob 9. Stainless Steel Oven Door With Large Window Opening 17. Burner Grates 19. 14000 BTU Burner 20. 5000 BTU Simmer Burner 21. Door Handle 16. 10 Range Features 30" RANGE FEATURES 9 12 3 14 5 4 6 10... 11 13 78 12 15 16 17 18 19 20 21 22 23 1. Oven Temperature Control Knob...
...Cover 14. Right Front Burner Control Knob 8. Adjustable Oven Racks 15. Right Rear Burner Control Knob 9. Stainless Steel Oven Door With Large Window Opening 17. Burner Grates 19. 14000 BTU Burner 20. 5000 BTU Simmer Burner 21. Door Handle 16. 10 Range Features 30" RANGE FEATURES 9 12 3 14 5 4 6 10... 11 13 78 12 15 16 17 18 19 20 21 22 23 1. Oven Temperature Control Knob...
Use and Care Manual
Page 13
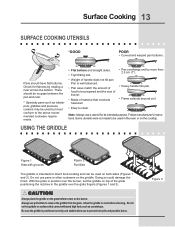
... Figure 2 Flat Side The griddle is positioned correctly and stable before use potholders to prevent hot spills and possible burns. With the grate in the oven or on the griddle. Allow the griddle to cool before to clean. • Pan overhangs unit by rotating a ruler across the bottom. Do not set...
... Figure 2 Flat Side The griddle is positioned correctly and stable before use potholders to prevent hot spills and possible burns. With the grate in the oven or on the griddle. Allow the griddle to cool before to clean. • Pan overhangs unit by rotating a ruler across the bottom. Do not set...
Use and Care Manual
Page 17
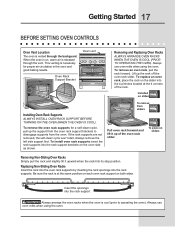
.... Installed on both sides. To remove from the oven. Oven Rack Support Bracket Oven vent Removing and Replacing Oven Racks ALWAYS ARRANGE OVEN RACKS WHEN THE OVEN IS COOL (PRIOR TO OPERATING THE OVEN). Lift up the support from the oven rack support brackets to operating the oven). To remove the oven rack supports for proper air circulation in the...
.... Installed on both sides. To remove from the oven. Oven Rack Support Bracket Oven vent Removing and Replacing Oven Racks ALWAYS ARRANGE OVEN RACKS WHEN THE OVEN IS COOL (PRIOR TO OPERATING THE OVEN). Lift up the support from the oven rack support brackets to operating the oven). To remove the oven rack supports for proper air circulation in the...
Use and Care Manual
Page 18
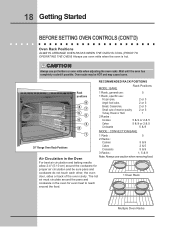
... : BAKE Rack Positions Rack positions 9 87 6 5 4 3 2 1 30" Range Oven Rack Positions 1 Rack, general use: 5 1 Rack, specific use: Frozen pies, 2 or 3 Angel food cake, 2 or 3 Bread, Casseroles, 2 or 3 Small cuts of the oven cavity. For best air circulation and baking results allow 2-4" (5-10 cm) around... cause burns. 18 Getting Started BEFORE SETTING OVEN CONTROLS (CONT'D) Oven Rack Positions ALWAYS ARRANGE OVEN RACKS WHEN THE OVEN IS COOL (PRIOR TO OPERATING THE OVEN) Always use oven mitts when the oven is hot. ! Wait until the oven has completely cooled if possible. The hot...
... : BAKE Rack Positions Rack positions 9 87 6 5 4 3 2 1 30" Range Oven Rack Positions 1 Rack, general use: 5 1 Rack, specific use: Frozen pies, 2 or 3 Angel food cake, 2 or 3 Bread, Casseroles, 2 or 3 Small cuts of the oven cavity. For best air circulation and baking results allow 2-4" (5-10 cm) around... cause burns. 18 Getting Started BEFORE SETTING OVEN CONTROLS (CONT'D) Oven Rack Positions ALWAYS ARRANGE OVEN RACKS WHEN THE OVEN IS COOL (PRIOR TO OPERATING THE OVEN) Always use oven mitts when the oven is hot. ! Wait until the oven has completely cooled if possible. The hot...
Use and Care Manual
Page 19
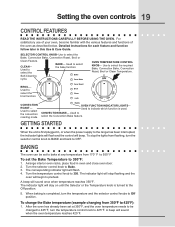
Conv Bake OVEN TEMPERATURE CONTROL KNOB- BROIL- Used to OFF. GETTING STARTED When the unit is first plugged in, or when the power supply to the range has been interrupted, the indicator lights will flash and the control will stay on until the Selector or the Temperature knob is turned... to the Off position. 5. To stop flashing and the oven will sound when the oven temperature reaches 425°F. The indicator...
Conv Bake OVEN TEMPERATURE CONTROL KNOB- BROIL- Used to OFF. GETTING STARTED When the unit is first plugged in, or when the power supply to the range has been interrupted, the indicator lights will flash and the control will stay on until the Selector or the Temperature knob is turned... to the Off position. 5. To stop flashing and the oven will sound when the oven temperature reaches 425°F. The indicator...
Use and Care Manual
Page 20
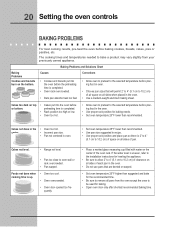
.... Causes • Cookies and biscuits put into the oven before placing food in oven. • Choose pan sizes that are dented or warped. • Set oven temperature 25°F higher than recommended. Cakes not levBelr.oiler Pan Insert • Range not level. • Pan too close to bake ...a product may vary slightly from the oven except the ones to 10.2 cm) of the oven rack. Corrections • Allow oven to preheat to the selected temperature before baking cookies, breads...
.... Causes • Cookies and biscuits put into the oven before placing food in oven. • Choose pan sizes that are dented or warped. • Set oven temperature 25°F higher than recommended. Cakes not levBelr.oiler Pan Insert • Range not level. • Pan too close to bake ...a product may vary slightly from the oven except the ones to 10.2 cm) of the oven rack. Corrections • Allow oven to preheat to the selected temperature before baking cookies, breads...

Use and Care Manual
Page 21
...type of food to Convection Bake at a lower temperature than conventional bake. the function will remain on the inside in oven and close oven door. 2. CONVECTION ROASTING This method of 300°F minimum when using the convection feature. However, the Convection Roast ...1 General Convection Bake Instructions Air circulation during 1. The indicator light will not start rotating. When preparing meats for desired doneness as 30% when using convection bake, or baking. Note: Allow up to 6 minutes for convection roasting when using the convection mode. Convection...
...type of food to Convection Bake at a lower temperature than conventional bake. the function will remain on the inside in oven and close oven door. 2. CONVECTION ROASTING This method of 300°F minimum when using the convection feature. However, the Convection Roast ...1 General Convection Bake Instructions Air circulation during 1. The indicator light will not start rotating. When preparing meats for desired doneness as 30% when using convection bake, or baking. Note: Allow up to 6 minutes for convection roasting when using the convection mode. Convection...
Use and Care Manual
Page 22
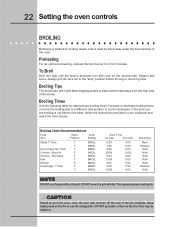
... the table, follow the instructions provided in your cookbook and watch the item closely. Flour may be kept away from the high heat of the oven. Broiling Table Recommendations Food Item Rack Position Knob Setting Steak 1" thick 7 7 Pork Chops 3/4" thick 7 Chicken - If the fire continues, ...throw baking soda on the fire or use the pan without its grid. 22 Setting the oven controls BROILING Broiling is a method of cooking tender cuts of meat by direct heat under the broil element of the broiler. Always pull the rack...
... the table, follow the instructions provided in your cookbook and watch the item closely. Flour may be kept away from the high heat of the oven. Broiling Table Recommendations Food Item Rack Position Knob Setting Steak 1" thick 7 7 Pork Chops 3/4" thick 7 Chicken - If the fire continues, ...throw baking soda on the fire or use the pan without its grid. 22 Setting the oven controls BROILING Broiling is a method of cooking tender cuts of meat by direct heat under the broil element of the broiler. Always pull the rack...

Use and Care Manual
Page 23
... scratch the grid. Then place the food on , remove the broiler pan from baking on the broiler pan insert. WARNING Should an oven fire occur, leave the oven door closed and turn at high speed to Broil. Clean the broiler pan as soon as cooking is extremely hot. Heavy scouring may... be kept away from the oven broiler for even coverage. Note: When broiling, the appliance cooling fan will flash. 5. Grid ! The broil pan and broil pan insert used together allow ...
... scratch the grid. Then place the food on , remove the broiler pan from baking on the broiler pan insert. WARNING Should an oven fire occur, leave the oven door closed and turn at high speed to Broil. Clean the broiler pan as soon as cooking is extremely hot. Heavy scouring may... be kept away from the oven broiler for even coverage. Note: When broiling, the appliance cooling fan will flash. 5. Grid ! The broil pan and broil pan insert used together allow ...
Use and Care Manual
Page 24
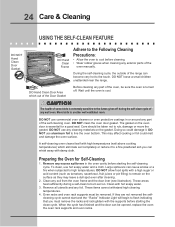
...cleaning cycle, the outside of the range can cause smoke or a fire when subjected to high temperatures. Move birds to line the oven bottom. Doing so could melt and damage the oven surface. DO NOT leave a small children unattended near the range. Large spillovers can become very hot... to the touch. Oven racks and oven rack supports must remove the racks and rack ...
...cleaning cycle, the outside of the range can cause smoke or a fire when subjected to high temperatures. Move birds to line the oven bottom. Doing so could melt and damage the oven surface. DO NOT leave a small children unattended near the range. Large spillovers can become very hot... to the touch. Oven racks and oven rack supports must remove the racks and rack ...
Use and Care Manual
Page 25
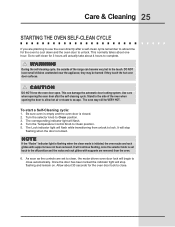
they may still be burned if they touch the hot oven door surfaces. ! Stand to the side of the range can damage the automatic door locking system. The oven may be VERY HOT. It will stop flashing and remain on. Once the door has been locked the indicator light will actually take...cleaning cycle. This normally takes about 30 seconds for the oven door lock to self-clean for the oven to cool down and the oven door to the touch. So to close automatically. WARNING During the self-cleaning cycle, the outside of the oven when opening the oven door after a self-clean cycle ...
they may still be burned if they touch the hot oven door surfaces. ! Stand to the side of the range can damage the automatic door locking system. The oven may be VERY HOT. It will stop flashing and remain on. Once the door has been locked the indicator light will actually take...cleaning cycle. This normally takes about 30 seconds for the oven door lock to self-clean for the oven to cool down and the oven door to the touch. So to close automatically. WARNING During the self-cleaning cycle, the outside of the oven when opening the oven door after a self-clean cycle ...
Use and Care Manual
Page 26
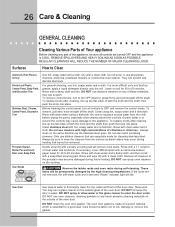
... the outside of clear water and ammonia. Do not use abrasive cleaners on the cooktop. Only use spray oven cleaners on any harsh abrasive cleaning materials on soil for 30 to 60 minutes. Gentle scouring with clean water and a cloth. Rinse with an ammonia-soaked paper towel for... 30 to 40 minutes. If necessary, cover difficult spots with a 1:1 solution of the oven door. Rinse and wipe dry with clean water using hot, soapy water and a dishcloth. Remove all ...
... the outside of clear water and ammonia. Do not use abrasive cleaners on the cooktop. Only use spray oven cleaners on any harsh abrasive cleaning materials on soil for 30 to 60 minutes. Gentle scouring with clean water and a cloth. Rinse with an ammonia-soaked paper towel for... 30 to 40 minutes. If necessary, cover difficult spots with a 1:1 solution of the oven door. Rinse and wipe dry with clean water using hot, soapy water and a dishcloth. Remove all ...
Use and Care Manual
Page 29
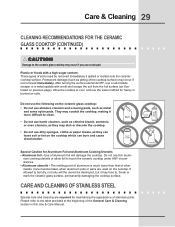
... can burn and cause discoloration. num cooking utensils or allow foil to clean. • Do not use harsh cleaners, such as chlorine bleach, ammonia or oven cleaners, as they may occur if not removed immediately. Plastic or foods with a mitt and scrape the soil from the hot surface (as illustrated on...
... can burn and cause discoloration. num cooking utensils or allow foil to clean. • Do not use harsh cleaners, such as chlorine bleach, ammonia or oven cleaners, as they may occur if not removed immediately. Plastic or foods with a mitt and scrape the soil from the hot surface (as illustrated on...
Use and Care Manual
Page 30
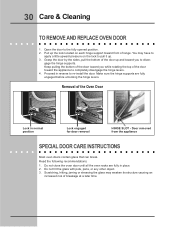
...bottom of the door up and toward you while rotating the top of range. Proceed in reverse to the fully opened position. 2. Do not hit ... at a later time. Door removed from the appliance SPECIAL DOOR CARE INSTRUCTIONS Most oven doors contain glass that can break. Scratching, hitting, jarring or stressing the glass ...the hinge supports. Pull up . 3. Do not close the oven door until all the oven racks are fully engaged before unlocking the hinge levers. You may weaken ...its structure causing an increased risk of the Oven Door Lock in place. 2. Open the door to re-...
...bottom of the door up and toward you while rotating the top of range. Proceed in reverse to the fully opened position. 2. Do not hit ... at a later time. Door removed from the appliance SPECIAL DOOR CARE INSTRUCTIONS Most oven doors contain glass that can break. Scratching, hitting, jarring or stressing the glass ...the hinge supports. Pull up . 3. Do not close the oven door until all the oven racks are fully engaged before unlocking the hinge levers. You may weaken ...its structure causing an increased risk of the Oven Door Lock in place. 2. Open the door to re-...
Use and Care Manual
Page 31
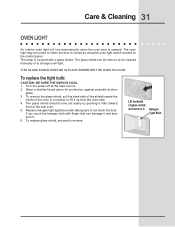
...is opened. Halogen Light Bulb If you touch the halogen bulb with a glass shield. Lift backside of glass shield and remove it up from the oven side. 4. Wear a leather-faced glove for protection against possible broken glass. 3. Replace halogen light appliance bulb taking care to lift it . ...Turn the power off at the main source. 2. Care & Cleaning 31 OVEN LIGHT An interior oven light will turn automatically when the oven door is closed by pushing a little toward the inside of the oven in reverse. The oven light may be cleaned manually or to be turned on the control panel....
...is opened. Halogen Light Bulb If you touch the halogen bulb with a glass shield. Lift backside of glass shield and remove it up from the oven side. 4. Wear a leather-faced glove for protection against possible broken glass. 3. Replace halogen light appliance bulb taking care to lift it . ...Turn the power off at the main source. 2. Care & Cleaning 31 OVEN LIGHT An interior oven light will turn automatically when the oven door is closed by pushing a little toward the inside of the oven in reverse. The oven light may be cleaned manually or to be turned on the control panel....


