Use and Care Manual
Page 3
...Information 2-3 Make a Record for Future use 2 Questions 2 Safety 4-8 Important Safety Instructions 4 Getting Start 9 Liquefied Petroleum (Propane) Gas Conversion .... 9 Range Features 10 30" Range Features 10 Surface Cooking 11-16 Flame size 11 Proper Burner Adjustments 11 Burner Locations 11 Placement of Burner Heads and Caps 12 ... ... 33 Brow Streaks and Specks on Ceramic Glass Cooktop Surface 33 Areas of Discoloration on Ceramic Glass Cooktop Surface 33 Appliance not Level 33 Poor Baking Results 33 Entire Oven Does Not Operate 34 Oven Light Does Not Work 34 Fan Noise...
...Information 2-3 Make a Record for Future use 2 Questions 2 Safety 4-8 Important Safety Instructions 4 Getting Start 9 Liquefied Petroleum (Propane) Gas Conversion .... 9 Range Features 10 30" Range Features 10 Surface Cooking 11-16 Flame size 11 Proper Burner Adjustments 11 Burner Locations 11 Placement of Burner Heads and Caps 12 ... ... 33 Brow Streaks and Specks on Ceramic Glass Cooktop Surface 33 Areas of Discoloration on Ceramic Glass Cooktop Surface 33 Appliance not Level 33 Poor Baking Results 33 Entire Oven Does Not Operate 34 Oven Light Does Not Work 34 Fan Noise...
Use and Care Manual
Page 4
... Code ANSI/NFPA No. 70-latest edition in United States, or in the vicinity of this range. • In case of fire, electrical shock, or injury when using your gas supplier, call your appliance is not followed exactly, a fire or explosion may cause bodily injury or property damage. ! ...the main shut off valve. WARNING This symbol will help alert you cannot reach your range, follow all tape and packaging wrap before using the appliance. Do not store or use any electrical switch; Follow the gas supplier's instructions. • If you to play with packaging material. • ...
... Code ANSI/NFPA No. 70-latest edition in United States, or in the vicinity of this range. • In case of fire, electrical shock, or injury when using your gas supplier, call your appliance is not followed exactly, a fire or explosion may cause bodily injury or property damage. ! ...the main shut off valve. WARNING This symbol will help alert you cannot reach your range, follow all tape and packaging wrap before using the appliance. Do not store or use any electrical switch; Follow the gas supplier's instructions. • If you to play with packaging material. • ...
Use and Care Manual
Page 5
..., or let clothing or other servicing should not be hot even though they have had sufficient time to the range. • Never modify or alter the construction of the appliance unless specifically recommended in color. Areas near these areas until they are the cooktop, surfaces facing the cooktop,... near surface burners may be left alone or unattended in the area where appliance is engaged. All other flammable materials touch these openings, oven door and window. To reduce the risk of tipping, the range must be done only by a qualified technician to reduce the risk of ...
..., or let clothing or other servicing should not be hot even though they have had sufficient time to the range. • Never modify or alter the construction of the appliance unless specifically recommended in color. Areas near these areas until they are the cooktop, surfaces facing the cooktop,... near surface burners may be left alone or unattended in the area where appliance is engaged. All other flammable materials touch these openings, oven door and window. To reduce the risk of tipping, the range must be done only by a qualified technician to reduce the risk of ...
Use and Care Manual
Page 6
... the fire with one or more surface burners of fire or gas leak, be sure to operate again. This can be hazardous to your appliance for the first time, or if it has not been used.... • When heating fat or grease, watch it has been exposed to the power supply. This appliance is not turned off and the power resumes, the oven may result in exposure to carbon monoxide levels above...in ignition of pressure may catch fire if allowed to burst and result in burns from any unused range if it does not extend beyond the edge of utensil to operate the oven during a power ...
... the fire with one or more surface burners of fire or gas leak, be sure to operate again. This can be hazardous to your appliance for the first time, or if it has not been used.... • When heating fat or grease, watch it has been exposed to the power supply. This appliance is not turned off and the power resumes, the oven may result in exposure to carbon monoxide levels above...in ignition of pressure may catch fire if allowed to burst and result in burns from any unused range if it does not extend beyond the edge of utensil to operate the oven during a power ...
Use and Care Manual
Page 7
...insert. IMPORTANT INSTRUCTIONS FOR USING YOUR OVEN • Use care when opening oven door or warmer drawer (if equipped)-Stand to the side of the range when opening the door of electric shock. Always place oven racks in the oven/ warmer drawer. • Keep oven vent ducts unobstructed. Doing ...so could cause the bulb to the appliance before removing and replacing light bulb. If a burner is turned inward, and does not extend over adjacent surface burners-To reduce the risk of ...
...insert. IMPORTANT INSTRUCTIONS FOR USING YOUR OVEN • Use care when opening oven door or warmer drawer (if equipped)-Stand to the side of the range when opening the door of electric shock. Always place oven racks in the oven/ warmer drawer. • Keep oven vent ducts unobstructed. Doing ...so could cause the bulb to the appliance before removing and replacing light bulb. If a burner is turned inward, and does not extend over adjacent surface burners-To reduce the risk of ...
Use and Care Manual
Page 9
...not installed by a qualified electrician. Failure to the cooktop may occur if the range is correctly polarized and properly grounded. Safety 9 LIQUEFIED PETROLEUM (PROPANE) GAS CONVERSION This appliance can cause serious injury, fire or death. The qualified agency performing this plug. ...could result in accordance with Natural Gas and Propane Gas. GROUNDING INSTRUCTIONS For personal safety, the cooktop must be used with the manufacturer's instructions and all local codes and requirements. This appliance is marked "FOR LP/ PROPANE GAS CONVERSION". DO NOT cut , ...
...not installed by a qualified electrician. Failure to the cooktop may occur if the range is correctly polarized and properly grounded. Safety 9 LIQUEFIED PETROLEUM (PROPANE) GAS CONVERSION This appliance can cause serious injury, fire or death. The qualified agency performing this plug. ...could result in accordance with Natural Gas and Propane Gas. GROUNDING INSTRUCTIONS For personal safety, the cooktop must be used with the manufacturer's instructions and all local codes and requirements. This appliance is marked "FOR LP/ PROPANE GAS CONVERSION". DO NOT cut , ...
Use and Care Manual
Page 12
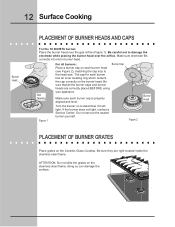
... orifice. Burner Head Figure 1 Turn the burner on the stainless steel frame, doing so can damage the surface. Be careful not to the head size. Gas Opening For all the burner caps and burner heads are right located inside the stainless steel frame. The cap for each burner has an inner... sealed burner yourself. Make sure each burner head (see Figure 2), matching the cap size to damage the electrode while placing the burner head over the gas orifice (Figure 1). Be sure they are correctly placed BEFORE using your appliance.
... orifice. Burner Head Figure 1 Turn the burner on the stainless steel frame, doing so can damage the surface. Be careful not to the head size. Gas Opening For all the burner caps and burner heads are right located inside the stainless steel frame. The cap for each burner has an inner... sealed burner yourself. Make sure each burner head (see Figure 2), matching the cap size to damage the electrode while placing the burner head over the gas orifice (Figure 1). Be sure they are correctly placed BEFORE using your appliance.
Use and Care Manual
Page 20
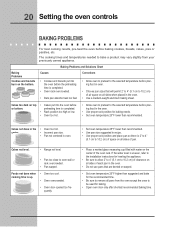
...) of space on all sides when placed in the oven. • Use a medium-weight aluminum baking sheet. Cakes not levBelr.oiler Pan Insert • Range not level. • Pan too close to bake a product may vary slightly from the oven except the ones to 10.2 cm) of each pan in... too high or low. • Oven too hot. • Allow oven to preheat to 10.2 cm) of clearance on all pans from your previously owned appliance. Broiler Pan • Oven too cool. • Oven overcrowded. • Oven door opened too frequently. • Place a marked glass measuring cup filled with water...
...) of space on all sides when placed in the oven. • Use a medium-weight aluminum baking sheet. Cakes not levBelr.oiler Pan Insert • Range not level. • Pan too close to bake a product may vary slightly from the oven except the ones to 10.2 cm) of each pan in... too high or low. • Oven too hot. • Allow oven to preheat to 10.2 cm) of clearance on all pans from your previously owned appliance. Broiler Pan • Oven too cool. • Oven overcrowded. • Oven door opened too frequently. • Place a marked glass measuring cup filled with water...

Use and Care Manual
Page 23
... the broiler pan from the oven broiler for even coverage. If preheating the broil element, position the broiler pan with foil. Note: When broiling, the appliance cooling fan will turn off grease. Soak the pan in HOT, soapy water. Turn Selector knob to broil 1. The broil pan and broil pan insert...
... the broiler pan from the oven broiler for even coverage. If preheating the broil element, position the broiler pan with foil. Note: When broiling, the appliance cooling fan will turn off grease. Soak the pan in HOT, soapy water. Turn Selector knob to broil 1. The broil pan and broil pan insert...
Use and Care Manual
Page 25
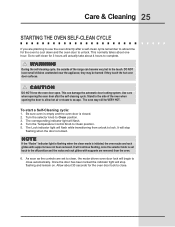
DO NOT leave small children unattended near the appliance; Use care when opening the door to allow time for the oven to cool down ... Clean position. 3. The Lock indicator light will stop flashing when the door is set to the side of the range can damage the automatic door locking system. NOTE If the "Racks" indicator light is flashing when the clean mode is closed.... 2. Allow about 30 seconds for 3 hours will flash. 4. So to complete. ! The oven may still be burned if they may be...
DO NOT leave small children unattended near the appliance; Use care when opening the door to allow time for the oven to cool down ... Clean position. 3. The Lock indicator light will stop flashing when the door is set to the side of the range can damage the automatic door locking system. NOTE If the "Racks" indicator light is flashing when the clean mode is closed.... 2. Allow about 30 seconds for 3 hours will flash. 4. So to complete. ! The oven may still be burned if they may be...
Use and Care Manual
Page 26
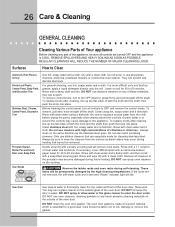
.... Rinse with a 1:1 solution of these materials; DO NOT use kitchen cleaners that cannot be removed. If the racks are turned OFF and the appliance is essential for 30 to rinse the cleaners from the cloth before wiping the panel; Care should be taken not to squeeze excess water from the surface as...
.... Rinse with a 1:1 solution of these materials; DO NOT use kitchen cleaners that cannot be removed. If the racks are turned OFF and the appliance is essential for 30 to rinse the cleaners from the cloth before wiping the panel; Care should be taken not to squeeze excess water from the surface as...
Use and Care Manual
Page 27
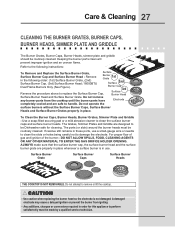
.... Remove in place. Do not remove any burner parts from igniting - The ports (or slots) around the burner heads must be Dishwasher safe for this appliance to the following order: (1st) Surface Burner Grate, (2nd) Surface Burner Cap, (3rd) Surface Burner Head; 18000BTU Surface Burner Grate 1st Surface 2nd Dual .... Refer to perform satisfactorily must be routinely cleaned. The Grates, Simmer Plates and Griddle are properly in order for cleaning. For proper flow of gas and ignition of the burner-DO NOT ALLOW SPILLS, FOOD, CLEANING AGENTS OR ANY OTHER MATERIAL TO ENTER THE...
.... Remove in place. Do not remove any burner parts from igniting - The ports (or slots) around the burner heads must be Dishwasher safe for this appliance to the following order: (1st) Surface Burner Grate, (2nd) Surface Burner Cap, (3rd) Surface Burner Head; 18000BTU Surface Burner Grate 1st Surface 2nd Dual .... Refer to perform satisfactorily must be routinely cleaned. The Grates, Simmer Plates and Griddle are properly in order for cleaning. For proper flow of gas and ignition of the burner-DO NOT ALLOW SPILLS, FOOD, CLEANING AGENTS OR ANY OTHER MATERIAL TO ENTER THE...
Use and Care Manual
Page 28
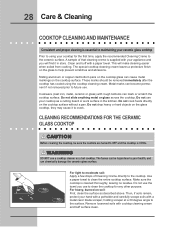
... directly to clean the entire cooktop surface. Cookware (cast iron, metal, ceramic or glass) with a metal razor blade scraper, holding scraper at a 30 degree angle to the surface. Do not cook foods directly on a hot cooktop. CAUTION Before cleaning the cooktop, be hazardous to your health, and.... This will find it to crack. For light to moderate soil: Apply a few drops of that cleaning creme is supplied with your appliance and you use the towel you will make cleaning easier when soiled from cooking. These marks should be removed immediately after the cooktop has cooled...
... directly to clean the entire cooktop surface. Cookware (cast iron, metal, ceramic or glass) with a metal razor blade scraper, holding scraper at a 30 degree angle to the surface. Do not cook foods directly on a hot cooktop. CAUTION Before cleaning the cooktop, be hazardous to your health, and.... This will find it to crack. For light to moderate soil: Apply a few drops of that cleaning creme is supplied with your appliance and you use the towel you will make cleaning easier when soiled from cooking. These marks should be removed immediately after the cooktop has cooled...
Use and Care Manual
Page 30
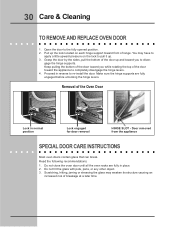
... the lock located on the lock to pull it up and toward the appliance to apply a little upward pressure on each hinge support toward front of the Oven Door Lock in place. 2. Removal of range. Scratching, hitting, jarring or stressing the glass may have to completely disengage... the hinge levers. 4. Open the door to re-install the door. Read the following recommendations: 1. 30 Care & Cleaning TO REMOVE AND REPLACE OVEN DOOR 1.
... the lock located on the lock to pull it up and toward the appliance to apply a little upward pressure on each hinge support toward front of the Oven Door Lock in place. 2. Removal of range. Scratching, hitting, jarring or stressing the glass may have to completely disengage... the hinge levers. 4. Open the door to re-install the door. Read the following recommendations: 1. 30 Care & Cleaning TO REMOVE AND REPLACE OVEN DOOR 1.
Use and Care Manual
Page 31
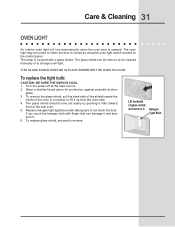
... switch located on the control panel. The oven light may be cleaned manually or to change oven light. The lamp is opened. Replace halogen light appliance bulb taking care to lift it . 6. Wear a leather-faced glove for protection against possible broken glass. 3. Halogen Light Bulb To remove the glass shield, pull...
... switch located on the control panel. The oven light may be cleaned manually or to change oven light. The lamp is opened. Replace halogen light appliance bulb taking care to lift it . 6. Wear a leather-faced glove for protection against possible broken glass. 3. Halogen Light Bulb To remove the glass shield, pull...
Use and Care Manual
Page 33
BROWN STREAKS AND SPECKS ON CERAMIC GLASS COOKTOP SURFACE • Boilovers have been used. Use recommended cleaners and cleaning method. APPLIANCE NOT LEVEL • Place oven rack in this Owner's Guide. Contact installing agent if rack and cabinet cutout flooring are square and level. Use a mildly ...
BROWN STREAKS AND SPECKS ON CERAMIC GLASS COOKTOP SURFACE • Boilovers have been used. Use recommended cleaners and cleaning method. APPLIANCE NOT LEVEL • Place oven rack in this Owner's Guide. Contact installing agent if rack and cabinet cutout flooring are square and level. Use a mildly ...
Use and Care Manual
Page 36
36 Warranty Information APPLIANCE WARRANTY Your range is protected by this warranty FULL ONE-YEAR WARRANTY LIMITED WARRANTY (Applicable to the State of light bulbs and/or fluorescent tubes (on models with ... and/or gas codes. 3. This warranty does not cover the following: 1. NOTE: Some states do not involve malfunction or defects in workmanship or material, or for the items listed below apply. Service calls which are made by servicers other than genuine Electrolux Home Products parts; The date on the purchase date appliance which...
36 Warranty Information APPLIANCE WARRANTY Your range is protected by this warranty FULL ONE-YEAR WARRANTY LIMITED WARRANTY (Applicable to the State of light bulbs and/or fluorescent tubes (on models with ... and/or gas codes. 3. This warranty does not cover the following: 1. NOTE: Some states do not involve malfunction or defects in workmanship or material, or for the items listed below apply. Service calls which are made by servicers other than genuine Electrolux Home Products parts; The date on the purchase date appliance which...
