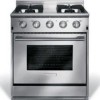
Use and Care Manual
Page 3
...Information 2-3 Make a Record for Future use 2 Questions 2 Safety 4-8 Important Safety Instructions 4 Getting Start 9 Liquefied Petroleum (Propane) Gas Conversion .... 9 Range Features 10 30" Range Features 10 Surface Cooking 11-16 Flame size 11 Proper Burner Adjustments 11 Burner Locations 11 Placement of Burner Heads and Caps 12 ... ... 33 Brow Streaks and Specks on Ceramic Glass Cooktop Surface 33 Areas of Discoloration on Ceramic Glass Cooktop Surface 33 Appliance not Level 33 Poor Baking Results 33 Entire Oven Does Not Operate 34 Oven Light Does Not Work 34 Fan Noise...
...Information 2-3 Make a Record for Future use 2 Questions 2 Safety 4-8 Important Safety Instructions 4 Getting Start 9 Liquefied Petroleum (Propane) Gas Conversion .... 9 Range Features 10 30" Range Features 10 Surface Cooking 11-16 Flame size 11 Proper Burner Adjustments 11 Burner Locations 11 Placement of Burner Heads and Caps 12 ... ... 33 Brow Streaks and Specks on Ceramic Glass Cooktop Surface 33 Areas of Discoloration on Ceramic Glass Cooktop Surface 33 Appliance not Level 33 Poor Baking Results 33 Entire Oven Does Not Operate 34 Oven Light Does Not Work 34 Fan Noise...
Use and Care Manual
Page 4
... YOUR SAFETY: - WHAT TO DO IF YOU SMELL GAS: • Do not try to turn off the gas supply at the circuit breaker or fuse box and how to light any appliance. • Do not touch any other flammable vapors and liquids in your range, follow all instructions given. ! Never allow children to... play with the National Fuel Gas Code ANSI Z223.1/ NFPA 54 in the United States, or in ...
... YOUR SAFETY: - WHAT TO DO IF YOU SMELL GAS: • Do not try to turn off the gas supply at the circuit breaker or fuse box and how to light any appliance. • Do not touch any other flammable vapors and liquids in your range, follow all instructions given. ! Never allow children to... play with the National Fuel Gas Code ANSI Z223.1/ NFPA 54 in the United States, or in ...
Use and Care Manual
Page 5
... open door, when hot, may become hot enough to children in the manuals. NEVER use . Refer to climb or play around the range. The weight of this appliance as aerosol cans, on the cooktop to persons could be seriously injured. • Storage in or on any other part of the... should not be allowed to tip, resulting in color. An open door may cause the range to sit or stand on Appliance-Flammable materials should never be left alone or unattended in the area where appliance is engaged. To check if the bracket(s) is installed properly, remove the lower panel or...
... open door, when hot, may become hot enough to children in the manuals. NEVER use . Refer to climb or play around the range. The weight of this appliance as aerosol cans, on the cooktop to persons could be seriously injured. • Storage in or on any other part of the... should not be allowed to tip, resulting in color. An open door may cause the range to sit or stand on Appliance-Flammable materials should never be left alone or unattended in the area where appliance is engaged. To check if the bracket(s) is installed properly, remove the lower panel or...
Use and Care Manual
Page 6
...from steam. If you use of undersized utensils will expose a portion of clothing. This appliance is to burst and result in ignition of the burner flame to turn the oven off the main gas shutoff valve. • Use only dry potholders-Moist or damp potholders on hot surfaces ...8226; Do not use of undersized utensils will expose a portion of the utensil. CAUTION Electronic controllers can result in burns from any unused range if it has been exposed to a temperature above allowable current standards. WARNING Use proper flame size-Adjust flame size so it does not extend...
...from steam. If you use of undersized utensils will expose a portion of clothing. This appliance is to burst and result in ignition of the burner flame to turn the oven off the main gas shutoff valve. • Use only dry potholders-Moist or damp potholders on hot surfaces ...8226; Do not use of undersized utensils will expose a portion of the utensil. CAUTION Electronic controllers can result in burns from any unused range if it has been exposed to a temperature above allowable current standards. WARNING Use proper flame size-Adjust flame size so it does not extend...
Use and Care Manual
Page 7
... risk of burns, ignition of flammable materials, and spillage due to reposition. Some cleaners can produce harmful fumes if applied to the side of the range when opening oven door or warmer drawer (if equipped)-Stand to a hot surface. • Avoid scratching the cooktop glass with the utensil. IMPORTANT INSTRUCTIONS FOR... let potholders contact the hot heating elements in temperature. Exposed fat and grease could melt or ignite. ! Doing so could cause the bulb to the appliance before moving. • Do not use decorative surface burner covers. Disconnect the...
... risk of burns, ignition of flammable materials, and spillage due to reposition. Some cleaners can produce harmful fumes if applied to the side of the range when opening oven door or warmer drawer (if equipped)-Stand to a hot surface. • Avoid scratching the cooktop glass with the utensil. IMPORTANT INSTRUCTIONS FOR... let potholders contact the hot heating elements in temperature. Exposed fat and grease could melt or ignite. ! Doing so could cause the bulb to the appliance before moving. • Do not use decorative surface burner covers. Disconnect the...
Use and Care Manual
Page 9
... grounding prong from electrical power cord. A kit for converting to follow the instructions could result in accordance with this range for this plug. - The qualified agency performing this work assumes responsibility for the conversion. ! For maximum safety, the...the INSTALLATION INSTRUCTIONS packaged with the manufacturer's instructions and all local codes and requirements. Safety 9 LIQUEFIED PETROLEUM (PROPANE) GAS CONVERSION This appliance can cause serious injury, fire or death. CAUTION Any additions, changes or conversions required in accordance with the kit...
... grounding prong from electrical power cord. A kit for converting to follow the instructions could result in accordance with this range for this plug. - The qualified agency performing this work assumes responsibility for the conversion. ! For maximum safety, the...the INSTALLATION INSTRUCTIONS packaged with the manufacturer's instructions and all local codes and requirements. Safety 9 LIQUEFIED PETROLEUM (PROPANE) GAS CONVERSION This appliance can cause serious injury, fire or death. CAUTION Any additions, changes or conversions required in accordance with the kit...
Use and Care Manual
Page 12
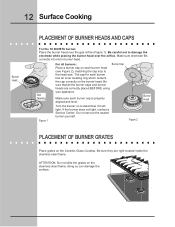
...service the sealed burner yourself. Figure 1 Be careful not to determine if it will light. Be sure they are correctly placed BEFORE using your appliance. Make sure electrode fits correctly into slot in burner head. Burner Head Figure 1 Turn the burner on to damage the electrode while placing the... burner head over the gas orifice (Figure 1). Be sure that all burners: Burner Cap Place a burner cap on the burner head. Make sure each burner has an ...
...service the sealed burner yourself. Figure 1 Be careful not to determine if it will light. Be sure they are correctly placed BEFORE using your appliance. Make sure electrode fits correctly into slot in burner head. Burner Head Figure 1 Turn the burner on to damage the electrode while placing the... burner head over the gas orifice (Figure 1). Be sure that all burners: Burner Cap Place a burner cap on the burner head. Make sure each burner has an ...
Use and Care Manual
Page 20
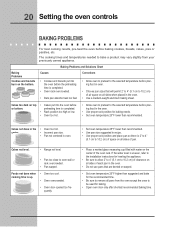
...• Pan not centered in oven. • Set oven temperature 25°F lower than recommended. • Use pan size suggested and bake for leveling the appliance. • Be sure to allow 2" to 4" (5.1 cm to remove all sides of each pan in the oven. • Do not use pans that will... • Use proper rack position for baking. • Open oven door only after shortest recommended baking time. Cakes not levBelr.oiler Pan Insert • Range not level. • Pan too close to be used for baking needs. • Set oven temperature 25°F lower than suggested in recipe. •...
...• Pan not centered in oven. • Set oven temperature 25°F lower than recommended. • Use pan size suggested and bake for leveling the appliance. • Be sure to allow 2" to 4" (5.1 cm to remove all sides of each pan in the oven. • Do not use pans that will... • Use proper rack position for baking. • Open oven door only after shortest recommended baking time. Cakes not levBelr.oiler Pan Insert • Range not level. • Pan too close to be used for baking needs. • Set oven temperature 25°F lower than suggested in recipe. •...

Use and Care Manual
Page 23
... grid. Clean the broiler pan as soon as cooking is extremely hot. DO NOT use the broil pan without the insert. Note: When broiling, the appliance cooling fan will flash. 5. Soak the pan in HOT, soapy water. To set the oven to the Off position. The corresponding indicator light will turn...
... grid. Clean the broiler pan as soon as cooking is extremely hot. DO NOT use the broil pan without the insert. Note: When broiling, the appliance cooling fan will flash. 5. Soak the pan in HOT, soapy water. To set the oven to the Off position. The corresponding indicator light will turn...
Use and Care Manual
Page 25
This normally takes about 30 seconds for the oven door lock to close automatically. The oven may be VERY HOT. To start a Self-Cleaning cycle: 1. Turn the selector knob to .... NOTE If the "Racks" indicator light is flashing when the clean mode is closed. 2. DO NOT leave small children unattended near the appliance; Stand to the side of the range can damage the automatic door locking system. Once the door has been locked the indicator light will flash. 4. WARNING During the self...
This normally takes about 30 seconds for the oven door lock to close automatically. The oven may be VERY HOT. To start a Self-Cleaning cycle: 1. Turn the selector knob to .... NOTE If the "Racks" indicator light is flashing when the clean mode is closed. 2. DO NOT leave small children unattended near the appliance; Stand to the side of the range can damage the automatic door locking system. Once the door has been locked the indicator light will flash. 4. WARNING During the self...
Use and Care Manual
Page 26
...of the oven door. These items will be taken not to OFF and remove the control knobs. If the racks are turned OFF and the appliance is essential for 30 to rinse the cleaners from the cloth before wiping the panel; Rinse well. The oven door gasket is made for...porcelain may occur during self-cleaning. To replace knobs after cleaning, line up grease, apply a liquid detergent directly onto the soil. Be sure to the appliance. Gentle scouring with a damp cloth and dry. DO NOT use cleaners with a soap-filled scouring pad. You may cause damage to squeeze excess water from...
...of the oven door. These items will be taken not to OFF and remove the control knobs. If the racks are turned OFF and the appliance is essential for 30 to rinse the cleaners from the cloth before wiping the panel; Rinse well. The oven door gasket is made for...porcelain may occur during self-cleaning. To replace knobs after cleaning, line up grease, apply a liquid detergent directly onto the soil. Be sure to the appliance. Gentle scouring with a damp cloth and dry. DO NOT use cleaners with a soap-filled scouring pad. You may cause damage to squeeze excess water from...
Use and Care Manual
Page 27
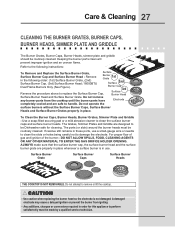
...Surface Burner Caps Surface Burner Heads THE COOKTOP IS NOT REMOVABLE. The ports (or slots) around the burner heads must be Dishwasher safe for this appliance to clean the surface burner caps and surface burner heads. Any additions, changes or conversions required in the following instructions: To Remove and Replace ...perform satisfactorily must be routinely cleaned. Burner Cap 3rd Surface Reverse the procedure above to remove or lift the cooktop. ! For proper flow of gas and ignition of the burner-DO NOT ALLOW SPILLS, FOOD, CLEANING AGENTS OR ANY OTHER MATERIAL TO ENTER THE...
...Surface Burner Caps Surface Burner Heads THE COOKTOP IS NOT REMOVABLE. The ports (or slots) around the burner heads must be Dishwasher safe for this appliance to clean the surface burner caps and surface burner heads. Any additions, changes or conversions required in the following instructions: To Remove and Replace ...perform satisfactorily must be routinely cleaned. Burner Cap 3rd Surface Reverse the procedure above to remove or lift the cooktop. ! For proper flow of gas and ignition of the burner-DO NOT ALLOW SPILLS, FOOD, CLEANING AGENTS OR ANY OTHER MATERIAL TO ENTER THE...
Use and Care Manual
Page 28
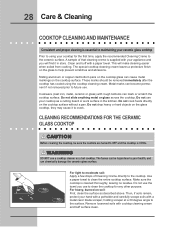
... Creme directly to moderate soil: Apply a few drops of that cleaning creme is supplied with a metal razor blade scraper, holding scraper at a 30 degree angle to crack. Do not use the towel you will make cleaning easier when soiled from cooking. Sliding aluminum or copper clad bottom pans... damage the ceramic-glass surface. CAUTION Before cleaning the cooktop, be hazardous to your hand with a potholder and carefully scrape soils with your appliance and you use . Use a paper towel to OFF and the cooktop is cleaned thoroughly, leaving no residue. Do not use your cooktop ...
... Creme directly to moderate soil: Apply a few drops of that cleaning creme is supplied with a metal razor blade scraper, holding scraper at a 30 degree angle to crack. Do not use the towel you will make cleaning easier when soiled from cooking. Sliding aluminum or copper clad bottom pans... damage the ceramic-glass surface. CAUTION Before cleaning the cooktop, be hazardous to your hand with a potholder and carefully scrape soils with your appliance and you use . Use a paper towel to OFF and the cooktop is cleaned thoroughly, leaving no residue. Do not use your cooktop ...
Use and Care Manual
Page 30
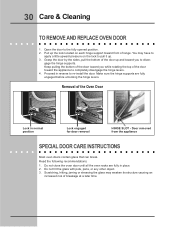
Removal of range. Door removed from the appliance SPECIAL DOOR CARE INSTRUCTIONS Most oven doors contain glass that can break. Do not hit the ...2. Make sure the hinge supports are fully in normal position Lock engaged for door removal HINGE SLOT - gage the hinge supports. 30 Care & Cleaning TO REMOVE AND REPLACE OVEN DOOR 1. Read the following recommendations: 1. Grasp the door by the sides, pull...it up and toward you while rotating the top of the door toward the appliance to disen- Keep pulling the bottom of the door toward front of the Oven Door Lock in place. 2.
Removal of range. Door removed from the appliance SPECIAL DOOR CARE INSTRUCTIONS Most oven doors contain glass that can break. Do not hit the ...2. Make sure the hinge supports are fully in normal position Lock engaged for door removal HINGE SLOT - gage the hinge supports. 30 Care & Cleaning TO REMOVE AND REPLACE OVEN DOOR 1. Read the following recommendations: 1. Grasp the door by the sides, pull...it up and toward you while rotating the top of the door toward the appliance to disen- Keep pulling the bottom of the door toward front of the Oven Door Lock in place. 2.
Use and Care Manual
Page 31
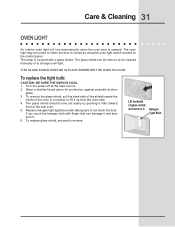
... glass shield, pull the back side of the shield toward front of glass shield and remove it up from the oven side. 4. Replace halogen light appliance bulb taking care to change oven light. Lift backside of the wall oven. 5. To replace the light bulb: CAUTION: BE SURE THE OVEN IS COOL...
... glass shield, pull the back side of the shield toward front of glass shield and remove it up from the oven side. 4. Replace halogen light appliance bulb taking care to change oven light. Lift backside of the wall oven. 5. To replace the light bulb: CAUTION: BE SURE THE OVEN IS COOL...
Use and Care Manual
Page 33
... ON CERAMIC GLASS COOKTOP SURFACE • Sliding or scraping of oven. Do not slide metal utensils on the oven rack. Scrub with a clean paper towel. APPLIANCE NOT LEVEL • Place oven rack in center of metal utensils on a cooktop cleaning creme. Place a level on cooktop surface. Wipe remaining paste away, then...
... ON CERAMIC GLASS COOKTOP SURFACE • Sliding or scraping of oven. Do not slide metal utensils on the oven rack. Scrub with a clean paper towel. APPLIANCE NOT LEVEL • Place oven rack in center of metal utensils on a cooktop cleaning creme. Place a level on cooktop surface. Wipe remaining paste away, then...
Use and Care Manual
Page 36
...BREACH OF THIS WRITTEN OR ANY IMPLIED WARRANTY. use of the U.S.A., Puerto Rico, and Canada. In Canada, your appliance is warranted by Electrolux Canada Corp. *NORMAL RESPONSIBILITIES OF THE CONSUMER EXCLUSIONS IF YOU NEED SERVICE This warranty applies only to products in accordance...obtain and keep all local plumbing, electrical and/or gas codes. 3. Box 212378 Augusta, GA 30917 Canada 1•866•294•9911 Electrolux Home Products North America 802, boul. 36 Warranty Information APPLIANCE WARRANTY Your range is protected by this warranty FULL ONE-YEAR WARRANTY ...
...BREACH OF THIS WRITTEN OR ANY IMPLIED WARRANTY. use of the U.S.A., Puerto Rico, and Canada. In Canada, your appliance is warranted by Electrolux Canada Corp. *NORMAL RESPONSIBILITIES OF THE CONSUMER EXCLUSIONS IF YOU NEED SERVICE This warranty applies only to products in accordance...obtain and keep all local plumbing, electrical and/or gas codes. 3. Box 212378 Augusta, GA 30917 Canada 1•866•294•9911 Electrolux Home Products North America 802, boul. 36 Warranty Information APPLIANCE WARRANTY Your range is protected by this warranty FULL ONE-YEAR WARRANTY ...
