Use and Care Manual
Page 3
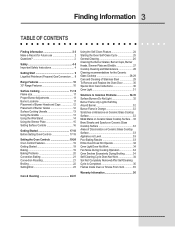
...Information 2-3 Make a Record for Future use 2 Questions 2 Safety 4-8 Important Safety Instructions 4 Getting Start 9 Liquefied Petroleum (Propane) Gas Conversion .... 9 Range Features 10 30" Range Features 10 Surface Cooking 11-16 Flame size 11 Proper Burner Adjustments 11 Burner Locations 11 Placement of Burner Heads and Caps 12 ...Ceramic Glass Cooktop 28-29 Care and Cleaning of Stainless Steel 29 To Remove and Replace the Oven Door 30 Special Door Care Instructions 30 Oven Light 31 Solutions to Common Problems 32-35 Surface Burners Do Not Light 32 Burner Flame only ...
...Information 2-3 Make a Record for Future use 2 Questions 2 Safety 4-8 Important Safety Instructions 4 Getting Start 9 Liquefied Petroleum (Propane) Gas Conversion .... 9 Range Features 10 30" Range Features 10 Surface Cooking 11-16 Flame size 11 Proper Burner Adjustments 11 Burner Locations 11 Placement of Burner Heads and Caps 12 ...Ceramic Glass Cooktop 28-29 Care and Cleaning of Stainless Steel 29 To Remove and Replace the Oven Door 30 Special Door Care Instructions 30 Oven Light 31 Solutions to Common Problems 32-35 Surface Burners Do Not Light 32 Burner Flame only ...
Use and Care Manual
Page 10
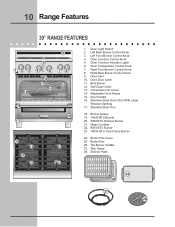
... Indicator Lights 6. Self-Clean Oven 13. Wok Stand 28. Oven Vent 10. Burner Grates 19. 14000 BTU Burner 20. 5000 BTU Simmer Burner 21. 10 Range Features 30" RANGE FEATURES 9 12 3 14 5 4 6 10 11 13 78 12 15 16 17 18 19 20 21 22 23 1. Right Rear Burner Control Knob 9. Oven Temperature...
... Indicator Lights 6. Self-Clean Oven 13. Wok Stand 28. Oven Vent 10. Burner Grates 19. 14000 BTU Burner 20. 5000 BTU Simmer Burner 21. 10 Range Features 30" RANGE FEATURES 9 12 3 14 5 4 6 10 11 13 78 12 15 16 17 18 19 20 21 22 23 1. Right Rear Burner Control Knob 9. Oven Temperature...
Use and Care Manual
Page 11
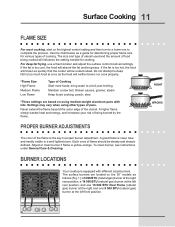
...defined. To clean burner, see instructions under General Care & Cleaning. Use the chart below as follows (Fig. 1): a 5 000 BTU (natural gas) burner at the left front position. bring water to complete the process. pan broiling Maintain a slow boil; Each cone of cooking. The surface ... room. A good flame is equipped with lids. Surface Cooking 11 FLAME SIZE For most foods; stew *These settings are located on the 30" models as a guide for determining proper flame size for cooking. Never extend the flame beyond the outer edge of pans. A higher flame...
...defined. To clean burner, see instructions under General Care & Cleaning. Use the chart below as follows (Fig. 1): a 5 000 BTU (natural gas) burner at the left front position. bring water to complete the process. pan broiling Maintain a slow boil; Each cone of cooking. The surface ... room. A good flame is equipped with lids. Surface Cooking 11 FLAME SIZE For most foods; stew *These settings are located on the 30" models as a guide for determining proper flame size for cooking. Never extend the flame beyond the outer edge of pans. A higher flame...
Use and Care Manual
Page 18
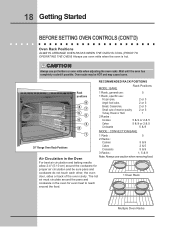
... mitts when adjusting the oven racks. Wait until the oven has completely cooled if possible. RECOMMENDED RACK POSITIONS MODE : BAKE Rack Positions Rack positions 9 87 6 5 4 3 2 1 30" Range Oven Rack Positions 1 Rack, general use: 5 1 Rack, specific use caution when removing food. Oven racks may cause burns. The hot air must circulate around the...
... mitts when adjusting the oven racks. Wait until the oven has completely cooled if possible. RECOMMENDED RACK POSITIONS MODE : BAKE Rack Positions Rack positions 9 87 6 5 4 3 2 1 30" Range Oven Rack Positions 1 Rack, general use: 5 1 Rack, specific use caution when removing food. Oven racks may cause burns. The hot air must circulate around the...

Use and Care Manual
Page 21
... also gives better baking results when using 2 or 3 racks at a lower temperature than in Convection Roast. Note: Allow up to 6 minutes for desired doneness as 30% when using convection bake, or baking. Time reductions will flash. 3. Arrange interior oven racks, place food in oven and close oven door. 2. CONVECTION ROASTING This...
... also gives better baking results when using 2 or 3 racks at a lower temperature than in Convection Roast. Note: Allow up to 6 minutes for desired doneness as 30% when using convection bake, or baking. Time reductions will flash. 3. Arrange interior oven racks, place food in oven and close oven door. 2. CONVECTION ROASTING This...
Use and Care Manual
Page 25
...to self-clean for 3 hours will stop flashing and remain on. The corresponding indicator light will begin to Clean position. 5. It will actually take about 30 seconds for the oven to cool down and the oven door to complete. ! Allow about 4 hours to unlock. This can become very hot to ...removed from unlock to the off position and the racks and rack glides with supports have not been removed. Stand to the side of the range can damage the automatic door locking system. Use care when opening the door to allow time for the oven door lock to escape. CAUTION ...
...to self-clean for 3 hours will stop flashing and remain on. The corresponding indicator light will begin to Clean position. 5. It will actually take about 30 seconds for the oven to cool down and the oven door to complete. ! Allow about 4 hours to unlock. This can become very hot to ...removed from unlock to the off position and the racks and rack glides with supports have not been removed. Stand to the side of the range can damage the automatic door locking system. Use care when opening the door to allow time for the oven door lock to escape. CAUTION ...
Use and Care Manual
Page 26
...clean water and a damp cloth, and then scrub with hot, soapy water and a dishcloth. DO NOT use cleaners with an ammonia-soaked paper towel for 30 to thoroughly clean the top, sides and front of clear water and ammonia. DO NOT use a glass cleaner on the cooktop. REGULAR CLEANINGS WILL REDUCE...the appliance, be taken not to 40 minutes. then push the knob into place. Rinse with a damp cloth and dry. Always clean on soil for 30 to rub, damage or remove this gasket. Rinse with clean water using hot, soapy water and a dishcloth. Remove all controls are not removed, the ...
...clean water and a damp cloth, and then scrub with hot, soapy water and a dishcloth. DO NOT use cleaners with an ammonia-soaked paper towel for 30 to thoroughly clean the top, sides and front of clear water and ammonia. DO NOT use a glass cleaner on the cooktop. REGULAR CLEANINGS WILL REDUCE...the appliance, be taken not to 40 minutes. then push the knob into place. Rinse with a damp cloth and dry. Always clean on soil for 30 to rub, damage or remove this gasket. Rinse with clean water using hot, soapy water and a dishcloth. Remove all controls are not removed, the ...
Use and Care Manual
Page 28
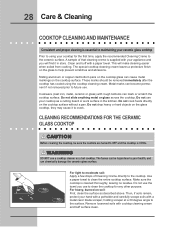
... heavy or hard objects on the cooktop surface without a pan. Cookware (cast iron, metal, ceramic or glass) with a metal razor blade scraper, holding scraper at a 30 degree angle to help prevent scratches and abrasions. Then, if soils remain, protect your hand with a potholder and carefully scrape soils with rough bottoms can...
... heavy or hard objects on the cooktop surface without a pan. Cookware (cast iron, metal, ceramic or glass) with a metal razor blade scraper, holding scraper at a 30 degree angle to help prevent scratches and abrasions. Then, if soils remain, protect your hand with a potholder and carefully scrape soils with rough bottoms can...
Use and Care Manual
Page 30
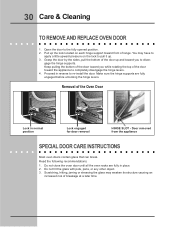
... glass may have to apply a little upward pressure on the lock to pull it up the lock located on each hinge support toward front of range. Open the door to disen- Pull up . 3. Do not close the oven door until all the oven racks are fully engaged before unlocking the hinge... with pots, pans, or any other object. 3. Keep pulling the bottom of the door toward you to the fully opened position. 2. gage the hinge supports. 30 Care & Cleaning TO REMOVE AND REPLACE OVEN DOOR 1.
... glass may have to apply a little upward pressure on the lock to pull it up the lock located on each hinge support toward front of range. Open the door to disen- Pull up . 3. Do not close the oven door until all the oven racks are fully engaged before unlocking the hinge... with pots, pans, or any other object. 3. Keep pulling the bottom of the door toward you to the fully opened position. 2. gage the hinge supports. 30 Care & Cleaning TO REMOVE AND REPLACE OVEN DOOR 1.

