Quick Install Guide
Page 6
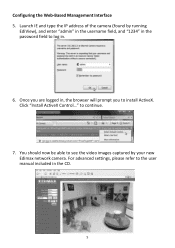
Click "Install ActiveX Control..." Once you are logged in the CD. 5 to install ActiveX. You should now be able to see the video images captured by running EdiView), and enter "admin" in the username field, and "1234" in the password field to log in. 6. Configuring the Web-Based Management Interface 5. Launch IE and type the IP address of the camera (found by your new Edimax network camera. For advanced settings, please refer to the user manual included in , the browser will prompt you to continue. 7.
Click "Install ActiveX Control..." Once you are logged in the CD. 5 to install ActiveX. You should now be able to see the video images captured by running EdiView), and enter "admin" in the username field, and "1234" in the password field to log in. 6. Configuring the Web-Based Management Interface 5. Launch IE and type the IP address of the camera (found by your new Edimax network camera. For advanced settings, please refer to the user manual included in , the browser will prompt you to continue. 7.
Quick Install Guide
Page 7
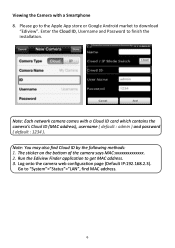
... Ediview Finder application to download "Ediview". The sticker on the bottom of the camera says MAC:xxxxxxxxxxxxxx. 2. Log onto the camera web configuration page (Default IP:192.168.2.3). Go to finish the installation. Viewing the Camera with a Cloud ID card which contains the camera's Cloud ID (MAC address), username ( default : admin...
... Ediview Finder application to download "Ediview". The sticker on the bottom of the camera says MAC:xxxxxxxxxxxxxx. 2. Log onto the camera web configuration page (Default IP:192.168.2.3). Go to finish the installation. Viewing the Camera with a Cloud ID card which contains the camera's Cloud ID (MAC address), username ( default : admin...
Manual
Page 3
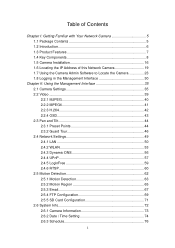
Table of Contents Chapter I: Getting Familiar with Your Network Camera 5 1.1 Package Contents 5 1.2 Introduction 6 1.3 Product Features 7 1.4 Key Components 8 1.5 Camera Installation 16 1.6 Locating the IP Address of this Network Camera 19 1.7 Using the Camera Admin Software to Locate the Camera 23 1.8 Logging in the Management Interface 30 Chapter II: Using ...
Table of Contents Chapter I: Getting Familiar with Your Network Camera 5 1.1 Package Contents 5 1.2 Introduction 6 1.3 Product Features 7 1.4 Key Components 8 1.5 Camera Installation 16 1.6 Locating the IP Address of this Network Camera 19 1.7 Using the Camera Admin Software to Locate the Camera 23 1.8 Logging in the Management Interface 30 Chapter II: Using ...
Manual
Page 8
... buying a new camera! Supports up to the camera also. Video control functions, like video conference or environment monitor. Wired and wireless network (IC-7100W only, 802.11b / 802.11g / 802.11n) support Wireless data encryption (WEP / WPA) Supports DHCP and PPPoE protocol, you can also ...assign a fixed IP address to 16 video cameras and view images captured by every camera at the same time. Upgradeable firmware - Audio function, suitable for applications like...
... buying a new camera! Supports up to the camera also. Video control functions, like video conference or environment monitor. Wired and wireless network (IC-7100W only, 802.11b / 802.11g / 802.11n) support Wireless data encryption (WEP / WPA) Supports DHCP and PPPoE protocol, you can also ...assign a fixed IP address to 16 video cameras and view images captured by every camera at the same time. Upgradeable firmware - Audio function, suitable for applications like...
Manual
Page 20
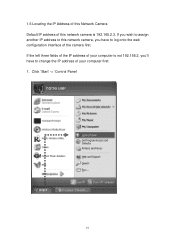
If you wish to assign another IP address to this network camera, you ‟ll have to change the IP address of your computer first: 1. 1.6 Locating the IP Address of this Network Camera Default IP address of the camera first. Click „Start‟ -> „Control Panel‟ 19 If the left three fields of the IP address of your computer is not 192.168.2, you have to log onto the web configuration interface of this network camera is 192.168.2.3.
If you wish to assign another IP address to this network camera, you ‟ll have to change the IP address of your computer first: 1. 1.6 Locating the IP Address of this Network Camera Default IP address of the camera first. Click „Start‟ -> „Control Panel‟ 19 If the left three fields of the IP address of your computer is not 192.168.2, you have to log onto the web configuration interface of this network camera is 192.168.2.3.
Manual
Page 23
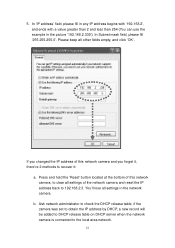
... all other fields empty, and click „OK‟. Please keep all settings of this network camera and you changed the IP address of the network camera and reset the IP address back to recover it: a. b. In Subnet mask field, please fill „255.255.255.0‟. If you forget it, there...‟re 2 methods to 192.168.2.3. In „IP address‟ field, please fill in any IP address begins with „192.168.2‟, and ends with a value greater than 2 and less than 254 (You can use the example...
... all other fields empty, and click „OK‟. Please keep all settings of this network camera and you changed the IP address of the network camera and reset the IP address back to recover it: a. b. In Subnet mask field, please fill „255.255.255.0‟. If you forget it, there...‟re 2 methods to 192.168.2.3. In „IP address‟ field, please fill in any IP address begins with „192.168.2‟, and ends with a value greater than 2 and less than 254 (You can use the example...
Manual
Page 25
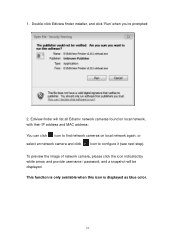
... click the icon indicated by white arrow, and provide username / password, and a snapshot will list all Ediamx network cameras found on local network, with their IP address and MAC address: You can click icon to find network cameras on local network again, or select an network camera and click Icon to...
... click the icon indicated by white arrow, and provide username / password, and a snapshot will list all Ediamx network cameras found on local network, with their IP address and MAC address: You can click icon to find network cameras on local network again, or select an network camera and click Icon to...
Manual
Page 30
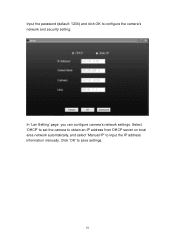
Input the password (default: 1234) and click OK to save settings. 29 Click „OK‟ to configure the camera‟s network and security setting: In „Lan Setting‟ page, you can configure camera‟s network settings. Select „DHCP‟ to set the camera to obtain an IP address from DHCP server on local area network automatically, and select „Manual IP‟ to input the IP address information manually.
Input the password (default: 1234) and click OK to save settings. 29 Click „OK‟ to configure the camera‟s network and security setting: In „Lan Setting‟ page, you can configure camera‟s network settings. Select „DHCP‟ to set the camera to obtain an IP address from DHCP server on local area network automatically, and select „Manual IP‟ to input the IP address information manually.
Manual
Page 31
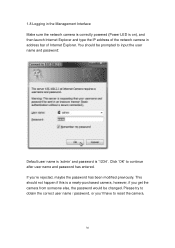
.... 1.8 Logging in the Management Interface Make sure the network camera is correctly powered (Power LED is on), and then launch Internet Explorer and type the IP address of the network camera in address bar of Internet Explorer.
.... 1.8 Logging in the Management Interface Make sure the network camera is correctly powered (Power LED is on), and then launch Internet Explorer and type the IP address of the network camera in address bar of Internet Explorer.
Manual
Page 50
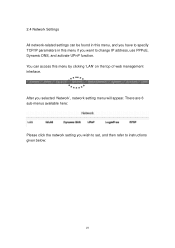
2.4 Network Settings All network-related settings can access this menu if you want to change IP address, use PPPoE, Dynamic DNS, and activate UPnP function. After you wish to set, and then refer to specify TCP/IP parameters in this menu by clicking „LAN‟ on the top of web management interface. You can be found in this menu, and you have to instructions given below: 49 There are 6 sub-menus available here: Please click the network setting you selected „Network‟, network setting menu will appear.
2.4 Network Settings All network-related settings can access this menu if you want to change IP address, use PPPoE, Dynamic DNS, and activate UPnP function. After you wish to set, and then refer to specify TCP/IP parameters in this menu by clicking „LAN‟ on the top of web management interface. You can be found in this menu, and you have to instructions given below: 49 There are 6 sub-menus available here: Please click the network setting you selected „Network‟, network setting menu will appear.
Manual
Page 51
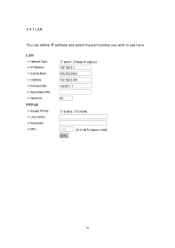
2.4.1 LAN You can define IP address and select the port number you wish to use here. 50
2.4.1 LAN You can define IP address and select the port number you wish to use here. 50
Manual
Page 52
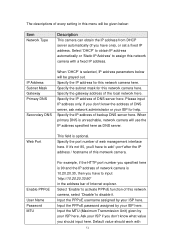
...10.20.20.30:90' in this menu will be grayed out. Input the MTU (Maximum Transmission Unit) given by your ISP here. Specify the IP address for this network camera here. Specify the subnet mask for this network camera here. Enable PPPoE User Name Password MTU For example, if the... of every setting in the address bar of Internet explorer. Specify the port number of the local network here. Default value should input here. IP Address Subnet Mask Gateway Primary DNS Secondary DNS When „DHCP‟ is unreachable, network camera will be given below will use the...
...10.20.20.30:90' in this menu will be grayed out. Input the MTU (Maximum Transmission Unit) given by your ISP here. Specify the IP address for this network camera here. Specify the subnet mask for this network camera here. Enable PPPoE User Name Password MTU For example, if the... of every setting in the address bar of Internet explorer. Specify the port number of the local network here. Default value should input here. IP Address Subnet Mask Gateway Primary DNS Secondary DNS When „DHCP‟ is unreachable, network camera will be given below will use the...
Manual
Page 57
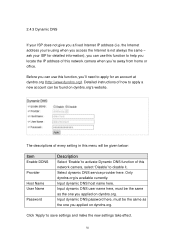
... you applied on dyndns.org‟s website. Detailed instructions of how to apply a new account can use this function to help you locate the IP address of this network camera when you‟re away from home or office. Input dynamic DNS host name here. Input dynamic DNS password here...;re using when you access the Internet is available currently. Select dynamic DNS service provider here. ask your ISP does not give you a fixed Internet IP address (i.e. Only dyndns.org is not always the same - Input dynamic DNS user name here, must be given below: Item Enable DDNS Provider Host...
... you applied on dyndns.org‟s website. Detailed instructions of how to apply a new account can use this function to help you locate the IP address of this network camera when you‟re away from home or office. Input dynamic DNS host name here. Input dynamic DNS password here...;re using when you access the Internet is available currently. Select dynamic DNS service provider here. ask your ISP does not give you a fixed Internet IP address (i.e. Only dyndns.org is not always the same - Input dynamic DNS user name here, must be given below: Item Enable DDNS Provider Host...

Manual
Page 58
... function is useful and you don‟t have to discover this network camera automatically (only those in this menu will be able to remember the IP address of this network camera. After UPnP function is activated, a popup message will appear: 57 Simply open „Network neighbor‟ and it . 2.4.4 UPnP When...
... function is useful and you don‟t have to discover this network camera automatically (only those in this menu will be able to remember the IP address of this network camera. After UPnP function is activated, a popup message will appear: 57 Simply open „Network neighbor‟ and it . 2.4.4 UPnP When...
Manual
Page 60
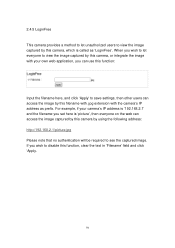
... you set here is „picture‟, then everyone to view the image captured by this camera, or integrate the image with your camera‟s IP address is called as prefix. When you wish to let everyone on the web can access the image by this filename with .jpg extension with... the camera‟s IP address as „LoginFree‟. 2.4.5 LoginFree This camera provides a method to let unauthorized users to view the image captured by this camera, which is „...
... you set here is „picture‟, then everyone to view the image captured by this camera, or integrate the image with your camera‟s IP address is called as prefix. When you wish to let everyone on the web can access the image by this filename with .jpg extension with... the camera‟s IP address as „LoginFree‟. 2.4.5 LoginFree This camera provides a method to let unauthorized users to view the image captured by this camera, which is „...

Manual
Page 65
... Configuration‟ menu first, so this function. Select „Enable‟ to configure FTP server parameters in specified folder, select „Anonymous‟; Input the IP address or host name of the user name required by destination network folder. If username and password are 1, 2, 3, 4, and 5 (seconds). Maximum file size is 100...
... Configuration‟ menu first, so this function. Select „Enable‟ to configure FTP server parameters in specified folder, select „Anonymous‟; Input the IP address or host name of the user name required by destination network folder. If username and password are 1, 2, 3, 4, and 5 (seconds). Maximum file size is 100...
Manual
Page 68
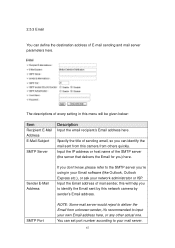
...: Some mail server would reject to deliver the Email from others quickly. You can set port number according to your mail server. 67 Input the IP address or host name of the SMTP server (the server that delivers the Email for you can identify the mail sent from this will be...
...: Some mail server would reject to deliver the Email from others quickly. You can set port number according to your mail server. 67 Input the IP address or host name of the SMTP server (the server that delivers the Email for you can identify the mail sent from this will be...
Manual
Page 70
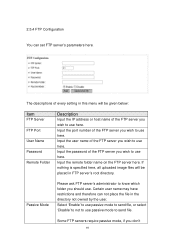
.... The descriptions of every setting in this menu will be given below: Item FTP Server FTP Port User Name Password Remote Folder Description Input the IP address or host name of the FTP server you wish to know which folder you don‟t 69 Input the remote folder name on the...
.... The descriptions of every setting in this menu will be given below: Item FTP Server FTP Port User Name Password Remote Folder Description Input the IP address or host name of the FTP server you wish to know which folder you don‟t 69 Input the remote folder name on the...

Manual
Page 75
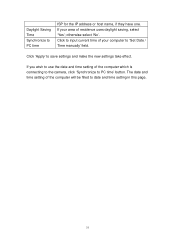
... = 2007/ 08 / 24, and PM 9:24:30 = 21:24:30 Time Zone NTP Server If you wish to set the time automatically. Please input the IP address or host name of resident from NTP Server automatically. The descriptions of every setting in this camera manually. You can set the date and...
... = 2007/ 08 / 24, and PM 9:24:30 = 21:24:30 Time Zone NTP Server If you wish to set the time automatically. Please input the IP address or host name of resident from NTP Server automatically. The descriptions of every setting in this camera manually. You can set the date and...
Manual
Page 76
... this page. 75 If your computer to input current time of your area of the computer will be filled to PC time ISP for the IP address or host name, if they have one.
... this page. 75 If your computer to input current time of your area of the computer will be filled to PC time ISP for the IP address or host name, if they have one.