Quick Install Guide
Page 6
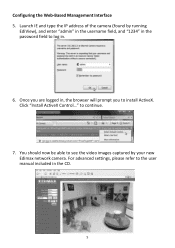
Click "Install ActiveX Control..." You should now be able to the user manual included in the CD. 5 For advanced settings, please refer to see the video images captured by running EdiView), and enter "admin" in the username field, and "1234" in the password field to log in , the browser will prompt you to continue. 7. Once you are logged in . 6. Configuring the Web-Based Management Interface 5. to install ActiveX. Launch IE and type the IP address of the camera (found by your new Edimax network camera.
Click "Install ActiveX Control..." You should now be able to the user manual included in the CD. 5 For advanced settings, please refer to see the video images captured by running EdiView), and enter "admin" in the username field, and "1234" in the password field to log in , the browser will prompt you to continue. 7. Once you are logged in . 6. Configuring the Web-Based Management Interface 5. to install ActiveX. Launch IE and type the IP address of the camera (found by your new Edimax network camera.
Quick Install Guide
Page 9
... This equipment is connected. 4. Federal Communication Commission Interference Statement This equipment has been tested and found to comply with the specific antenna tested in the application for certification. Consult the dealer or an experienced radio technician for Use None 8 Operation is intended for Use The ETSI version of the equipment. The R&TTE Directive repeals and replaces in Austria, Belgium...
... This equipment is connected. 4. Federal Communication Commission Interference Statement This equipment has been tested and found to comply with the specific antenna tested in the application for certification. Consult the dealer or an experienced radio technician for Use None 8 Operation is intended for Use The ETSI version of the equipment. The R&TTE Directive repeals and replaces in Austria, Belgium...
Manual
Page 3
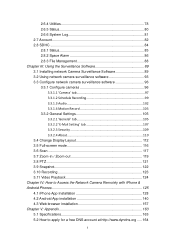
... Locate the Camera 23 1.8 Logging in the Management Interface 30 Chapter II: Using the Management Interface 35 2.1 Camera Settings 35 2.2 Video 39 2.2.1 MJPEG 40 2.2.2 MPEG4 41 2.2.3 H.264 42 2.2.4 OSD 43 2.3 Pan and Tilt 44 2.3.1 Preset Points 44 2.3.2 Guard Tour 46 2.4 Network Settings 49 2.4.1 LAN 50 2.4.2 WLAN 53 2.4.3 Dynamic DNS 56 2.4.4 UPnP 57 2.4.5 LoginFree 59 2.4.6 RTSP 60 2.5 Motion Detection 62 2.5.1 Motion Detection 63 2.5.2 Motion Region 65 2.5.3 Email 67 2.5.4 FTP Configuration...
... Locate the Camera 23 1.8 Logging in the Management Interface 30 Chapter II: Using the Management Interface 35 2.1 Camera Settings 35 2.2 Video 39 2.2.1 MJPEG 40 2.2.2 MPEG4 41 2.2.3 H.264 42 2.2.4 OSD 43 2.3 Pan and Tilt 44 2.3.1 Preset Points 44 2.3.2 Guard Tour 46 2.4 Network Settings 49 2.4.1 LAN 50 2.4.2 WLAN 53 2.4.3 Dynamic DNS 56 2.4.4 UPnP 57 2.4.5 LoginFree 59 2.4.6 RTSP 60 2.5 Motion Detection 62 2.5.1 Motion Detection 63 2.5.2 Motion Region 65 2.5.3 Email 67 2.5.4 FTP Configuration...
Manual
Page 4
... Recording 99 3.3.1.3 Audio 102 3.3.1.4 Motion Record 103 3.3.2 General Settings 105 3.3.2.1 'General' tab 105 3.3.2.2 'E-Mail Setting' tab 107 3.3.2.3 Security 109 3.3.2.4 About 110 3.4 Change Display Layout 112 3.5 Full-screen mode 116 3.6 Scan 117 3.7 Zoom-in / Zoom-out 119 3.8 PTZ 121 3.9 Snapshot 122 3.10 Recording 123 3.11 Video Playback 124 Chapter IV: How to Access the Network Camera Remotely with iPhone & Android Phones 125 4.1 iPhone App Installation 128 4.2 Android App installation 140 4.3 Web browser installation 157 Chapter V: Appendix 163 5.1 Specifications...
... Recording 99 3.3.1.3 Audio 102 3.3.1.4 Motion Record 103 3.3.2 General Settings 105 3.3.2.1 'General' tab 105 3.3.2.2 'E-Mail Setting' tab 107 3.3.2.3 Security 109 3.3.2.4 About 110 3.4 Change Display Layout 112 3.5 Full-screen mode 116 3.6 Scan 117 3.7 Zoom-in / Zoom-out 119 3.8 PTZ 121 3.9 Snapshot 122 3.10 Recording 123 3.11 Video Playback 124 Chapter IV: How to Access the Network Camera Remotely with iPhone & Android Phones 125 4.1 iPhone App Installation 128 4.2 Android App installation 140 4.3 Web browser installation 157 Chapter V: Appendix 163 5.1 Specifications...
Manual
Page 7
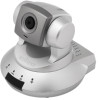
..., simply select H.264, MPEG4 or M-JPEG depending on your network settings. You can view the Network camera's video from anywhere on your local computers or via the Internet. 1.2 Introduction Thank you for all kinds of video surveillance purposes, like home/office safety, kid/pet monitoring, and remote video acquire etc. With built-in next section! 6 Edimax IC-7100 series is an ideal product for purchasing this...
..., simply select H.264, MPEG4 or M-JPEG depending on your network settings. You can view the Network camera's video from anywhere on your local computers or via the Internet. 1.2 Introduction Thank you for all kinds of video surveillance purposes, like home/office safety, kid/pet monitoring, and remote video acquire etc. With built-in next section! 6 Edimax IC-7100 series is an ideal product for purchasing this...
Manual
Page 8
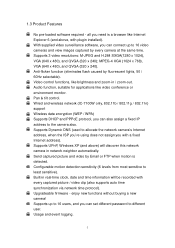
... new camera! Supports UPnP, Windows XP (and above , with every captured picture / video clip (also supports auto time synchronization via network time protocol). Upgradeable firmware - all you can connect up to least sensitive). Video control functions, like video conference or environment monitor. 1.3 Product Features No pre-loaded software required - With supplied video surveillance software, you need is detected. Send captured picture and video by Email or FTP when motion is a browser like Internet Explorer 6 (and above ) will discover this network camera in real-time...
... new camera! Supports UPnP, Windows XP (and above , with every captured picture / video clip (also supports auto time synchronization via network time protocol). Upgradeable firmware - all you can connect up to least sensitive). Video control functions, like video conference or environment monitor. 1.3 Product Features No pre-loaded software required - With supplied video surveillance software, you need is detected. Send captured picture and video by Email or FTP when motion is a browser like Internet Explorer 6 (and above ) will discover this network camera in real-time...
Manual
Page 9
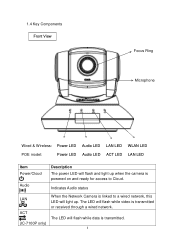
Indicates Audio status LAN ACT (IC-7100P only) When the Network Camera is transmitted or received through a wired network. The LED will flash while video is linked to Cloud. The LED will flash while data is powered on and ready for access to a wired network, this LED will light up when the camera is transmitted. 8 1.4 Key Components Front View Focus Ring Microphone Wired & Wireless: Power LED Audio LED LAN LED WLAN LED POE model: Power LED Audio LED ACT LED LAN LED Item Power/Cloud Audio Description The power LED will flash and light up .
Indicates Audio status LAN ACT (IC-7100P only) When the Network Camera is transmitted or received through a wired network. The LED will flash while video is linked to Cloud. The LED will flash while data is powered on and ready for access to a wired network, this LED will light up when the camera is transmitted. 8 1.4 Key Components Front View Focus Ring Microphone Wired & Wireless: Power LED Audio LED LAN LED WLAN LED POE model: Power LED Audio LED ACT LED LAN LED Item Power/Cloud Audio Description The power LED will flash and light up .
Manual
Page 23
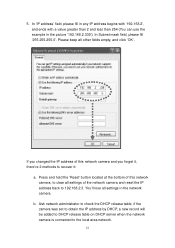
... the IP address by DHCP, a new record will be added to DHCP release table on DHCP server when the network camera is connected to recover it , there‟re 2 methods to the local area network. 22 If you changed the IP address of the network camera and reset the IP address back to 192.168.2.3. You‟ll lose all settings in the picture „...
... the IP address by DHCP, a new record will be added to DHCP release table on DHCP server when the network camera is connected to recover it , there‟re 2 methods to the local area network. 22 If you changed the IP address of the network camera and reset the IP address back to 192.168.2.3. You‟ll lose all settings in the picture „...
Manual
Page 31
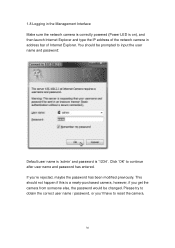
... password: Default user name is „admin‟ and password is on), and then launch Internet Explorer and type the IP address of the network camera in address bar of Internet Explorer. This should be changed. Please try to obtain the correct user name / password, or you‟ll have to continue after user name and password has entered. 1.8 Logging in the Management Interface Make sure the network camera is correctly powered (Power LED...
... password: Default user name is „admin‟ and password is on), and then launch Internet Explorer and type the IP address of the network camera in address bar of Internet Explorer. This should be changed. Please try to obtain the correct user name / password, or you‟ll have to continue after user name and password has entered. 1.8 Logging in the Management Interface Make sure the network camera is correctly powered (Power LED...
Manual
Page 47
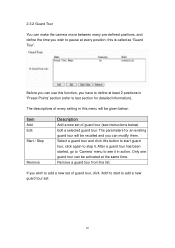
...;Camera‟ menu to stop it in „Preset Points‟ section (refer to pause at the same time. If you can use this menu will be given below ) Edit a selected guard tour. this button to start to add a new guard tour set of guard tour, click „Add‟ to start guard tour, click again to see instructions below...
...;Camera‟ menu to stop it in „Preset Points‟ section (refer to pause at the same time. If you can use this menu will be given below ) Edit a selected guard tour. this button to start to add a new guard tour set of guard tour, click „Add‟ to start guard tour, click again to see instructions below...
Manual
Page 50
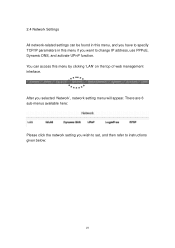
There are 6 sub-menus available here: Please click the network setting you selected „Network‟, network setting menu will appear. 2.4 Network Settings All network-related settings can access this menu if you want to change IP address, use PPPoE, Dynamic DNS, and activate UPnP function. After you wish to set, and then refer to specify TCP/IP parameters in this menu by clicking „LAN‟ on the top of web management interface. You can be found in this menu, and you have to instructions given below: 49
There are 6 sub-menus available here: Please click the network setting you selected „Network‟, network setting menu will appear. 2.4 Network Settings All network-related settings can access this menu if you want to change IP address, use PPPoE, Dynamic DNS, and activate UPnP function. After you wish to set, and then refer to specify TCP/IP parameters in this menu by clicking „LAN‟ on the top of web management interface. You can be found in this menu, and you have to instructions given below: 49
Manual
Page 52
... address of network camera is unreachable, network camera will be given below will use the IP address specified here as DNS server. Enable PPPoE User Name Password MTU For example, if the HTTP port number you don‟t know what value you have to assign this network camera here. Default value should input here. Please input IP address only. Web Port This field is selected, IP address parameters below : Item Network Type Description This camera...
... address of network camera is unreachable, network camera will be given below will use the IP address specified here as DNS server. Enable PPPoE User Name Password MTU For example, if the HTTP port number you don‟t know what value you have to assign this network camera here. Default value should input here. Please input IP address only. Web Port This field is selected, IP address parameters below : Item Network Type Description This camera...
Manual
Page 70
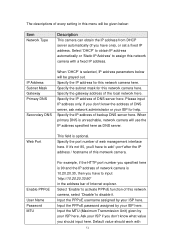
.... Input the user name of the FTP server you wish to send file. Input the port number of the FTP server you don‟t 69 The descriptions of the FTP server you wish to use passive mode to use here. If nothing is specified here, all uploaded image files will be given below: Item FTP Server FTP Port User Name Password Remote Folder Description Input the IP address or host name of every setting in this...
.... Input the user name of the FTP server you wish to send file. Input the port number of the FTP server you don‟t 69 The descriptions of the FTP server you wish to use passive mode to use here. If nothing is specified here, all uploaded image files will be given below: Item FTP Server FTP Port User Name Password Remote Folder Description Input the IP address or host name of every setting in this...

Manual
Page 79
... the camera. PLEASE NOTE THAT THE IP ADDRESS OF THE CAMERA WILL RESET TO DEFAULT VALUE: 192.168.2.3 Clear all settings in this button to reset all settings, reboot the network camera, and switch LED lights on your computer, click „Upgrade Firmware‟ button to start upgrade. After you selected a proper firmware file from our website, you to upgrade firmware, clear all 78 2.6.4 Utilities This menu allows you can upload the firmware file to the network camera...
... the camera. PLEASE NOTE THAT THE IP ADDRESS OF THE CAMERA WILL RESET TO DEFAULT VALUE: 192.168.2.3 Clear all settings in this button to reset all settings, reboot the network camera, and switch LED lights on your computer, click „Upgrade Firmware‟ button to start upgrade. After you selected a proper firmware file from our website, you to upgrade firmware, clear all 78 2.6.4 Utilities This menu allows you can upload the firmware file to the network camera...
Manual
Page 83
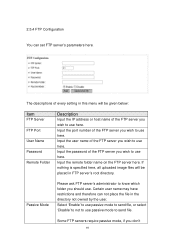
... system settings, you can give them user-level user name and password, so they can only view the image and can not change any system setting. Input the password of this user: Operator (able to enter camera & video menu) or Guest (view images only, but don‟t want to allow other people to view the live image captured by this camera, but Guest account still needs to input User name/Password 82...
... system settings, you can give them user-level user name and password, so they can only view the image and can not change any system setting. Input the password of this user: Operator (able to enter camera & video menu) or Guest (view images only, but don‟t want to allow other people to view the live image captured by this camera, but Guest account still needs to input User name/Password 82...
Manual
Page 95
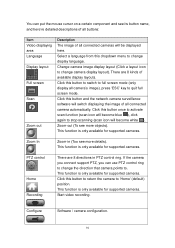
... icon will switch displaying the image of available display layouts. This function is only available for supported cameras. There are 8 directions in (Too see more details). Click this button and the network camera surveillance software will become white ). PTZ control Home Recording There are 8 kinds of all connected camera automatically. This function is only available for supported cameras. Configure Software / camera configuration. 94 Zoom In Zoom-in PTZ control ring. This function is only...
... icon will switch displaying the image of available display layouts. This function is only available for supported cameras. There are 8 directions in (Too see more details). Click this button and the network camera surveillance software will become white ). PTZ control Home Recording There are 8 kinds of all connected camera automatically. This function is only available for supported cameras. Configure Software / camera configuration. 94 Zoom In Zoom-in PTZ control ring. This function is only...
Manual
Page 99
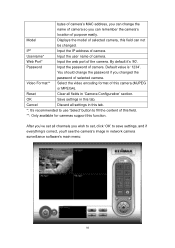
...‟ button to save settings, and if everything‟s correct, you‟ll see the camera‟s image in this function. bytes of camera‟s MAC address, you can change the password if you can remember the camera‟s location of purpose easily. IP* Input the IP address of the camera. OK Save settings in network camera surveillance software‟s main menu: 98 Web Port* Input the web port of camera. Password Input the password of camera. Default value...
...‟ button to save settings, and if everything‟s correct, you‟ll see the camera‟s image in this function. bytes of camera‟s MAC address, you can change the password if you can remember the camera‟s location of purpose easily. IP* Input the IP address of the camera. OK Save settings in network camera surveillance software‟s main menu: 98 Web Port* Input the web port of camera. Password Input the password of camera. Default value...
Manual
Page 145
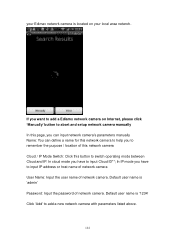
...;Add‟ to remember the purpose / location of network camera. Default user name is located on Internet, please click 'Manually' button to abort and setup network camera manually In this page, you to add a new network camera with parameters listed above. 144 If you want to add a Ediamx network camera on your Edimax network camera is „admin‟ Password: Input the password of this network camera Cloud / IP Mode Switch: Click this network camera to help you can input network camera‟s parameters manually...
...;Add‟ to remember the purpose / location of network camera. Default user name is located on Internet, please click 'Manually' button to abort and setup network camera manually In this page, you to add a new network camera with parameters listed above. 144 If you want to add a Ediamx network camera on your Edimax network camera is „admin‟ Password: Input the password of this network camera Cloud / IP Mode Switch: Click this network camera to help you can input network camera‟s parameters manually...
Manual
Page 164
...-45 port to connect to 10/100Mbps Ethernet Wireless: IEEE 802.11b/g/n (*Wireless Model Only) LED Indicator: Power/Audio/LAN/WLAN for wired and wireless model Power/Audio/ACT/LAN for POE model HTTP/Utility Includes easy-to-find and surveillance utility Provides Web based Management View multiple cameras simultaneously on PC surveillance software up to 16 cameras at a time Supports 16 additional user accounts for viewing camera Auto sending Snap Shot or video by E-mail or FTP Support DDNS and UPnP functions Supports Windows 2000/XP/Vista/Win7 Firmware Upgradeable EMI...
...-45 port to connect to 10/100Mbps Ethernet Wireless: IEEE 802.11b/g/n (*Wireless Model Only) LED Indicator: Power/Audio/LAN/WLAN for wired and wireless model Power/Audio/ACT/LAN for POE model HTTP/Utility Includes easy-to-find and surveillance utility Provides Web based Management View multiple cameras simultaneously on PC surveillance software up to 16 cameras at a time Supports 16 additional user accounts for viewing camera Auto sending Snap Shot or video by E-mail or FTP Support DDNS and UPnP functions Supports Windows 2000/XP/Vista/Win7 Firmware Upgradeable EMI...

Manual
Page 168
... therefore saves your valuable time. You‟ll need a pen or pin to be able to network camera Possible Solution a. Press and hold reset button for help, please check the troubleshooting list here, this may help , if above solutions do not work. Image refreshes very slow f. Contact dealer of the network camera, you to reset it ‟s not 30. Please make sure the port that network camera uses (Video and HTTP port...
... therefore saves your valuable time. You‟ll need a pen or pin to be able to network camera Possible Solution a. Press and hold reset button for help, please check the troubleshooting list here, this may help , if above solutions do not work. Image refreshes very slow f. Contact dealer of the network camera, you to reset it ‟s not 30. Please make sure the port that network camera uses (Video and HTTP port...


