Datasheet
Page 1
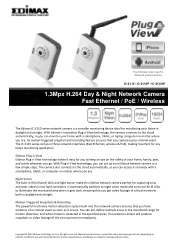
...‐define multiple areas in the specified areas, this network camera ensures that you capture every criminal event. The IC‐3110 series comes in low light conditions. Copyright © 2012 Edimax Technology Co. Night Vision The built‐in IR ...EdiView viewer app for iPhone & Android phones IC-3110 / IC-3110P / IC-3110W 1.3Mpx H.264 Day & Night Network Camera Fast Ethernet / PoE / Wireless The Edimax IC‐3110 series network camera is detected in the monitored range for motion detection; The camera also connects to change without notice. Maximum ...
...‐define multiple areas in the specified areas, this network camera ensures that you capture every criminal event. The IC‐3110 series comes in low light conditions. Copyright © 2012 Edimax Technology Co. Night Vision The built‐in IR ...EdiView viewer app for iPhone & Android phones IC-3110 / IC-3110P / IC-3110W 1.3Mpx H.264 Day & Night Network Camera Fast Ethernet / PoE / Wireless The Edimax IC‐3110 series network camera is detected in the monitored range for motion detection; The camera also connects to change without notice. Maximum ...
Quick Install Guide
Page 3
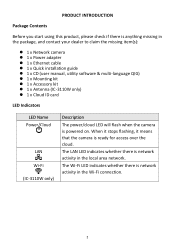
... package, and contact your dealer to claim the missing item(s): 1 x Network camera 1 x Power adapter 1 x Ethernet cable 1 x Quick installation guide 1 x CD (user manual, utility software & multi-language QIG) 1 x Mounting kit 1 x Accessory kit 1 x Antenna (IC-3110W only) 1 x Cloud ID card LED Indicators LED Name Power/Cloud...
... package, and contact your dealer to claim the missing item(s): 1 x Network camera 1 x Power adapter 1 x Ethernet cable 1 x Quick installation guide 1 x CD (user manual, utility software & multi-language QIG) 1 x Mounting kit 1 x Accessory kit 1 x Antenna (IC-3110W only) 1 x Cloud ID card LED Indicators LED Name Power/Cloud...
Quick Install Guide
Page 4
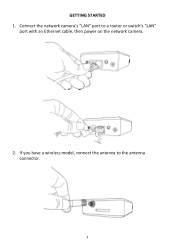
If you have a wireless model, connect the antenna to a router or switch's "LAN" port with an Ethernet cable, then power on the network camera. 2. Connect the network camera's "LAN" port to the antenna connector. 3 GETTING STARTED 1.
If you have a wireless model, connect the antenna to a router or switch's "LAN" port with an Ethernet cable, then power on the network camera. 2. Connect the network camera's "LAN" port to the antenna connector. 3 GETTING STARTED 1.
Quick Install Guide
Page 6
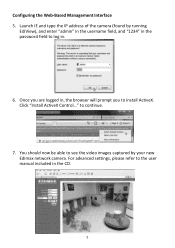
to log in. 6. For advanced settings, please refer to install ActiveX. Once you to the user manual included in , the browser will prompt you are logged in the CD. 5 Click "Install ActiveX Control..." You should now be able to see the video images captured by running EdiView), and enter "admin" in the username field, and "1234" in the password field to continue. 7. Configuring the Web-Based Management Interface 5. Launch IE and type the IP address of the camera (found by your new Edimax network camera.
to log in. 6. For advanced settings, please refer to install ActiveX. Once you to the user manual included in , the browser will prompt you are logged in the CD. 5 Click "Install ActiveX Control..." You should now be able to see the video images captured by running EdiView), and enter "admin" in the username field, and "1234" in the password field to continue. 7. Configuring the Web-Based Management Interface 5. Launch IE and type the IP address of the camera (found by your new Edimax network camera.

Quick Install Guide
Page 7
Please go to the Apple App store or Google Android market to finish the installation. Note: Each network camera comes with a Smartphone 8. The sticker on the bottom of the camera says MAC:xxxxxxxxxxxxxx. 2. Note: You may also find MAC address. 6 Go to get MAC address. 3. Enter ...the Cloud ID, Username and Password to download "Ediview". Log onto the camera web configuration page (Default IP:192.168.2.3). Run the Ediview Finder application to "System">"Status">"LAN", find Cloud ID by the following methods: ...
Please go to the Apple App store or Google Android market to finish the installation. Note: Each network camera comes with a Smartphone 8. The sticker on the bottom of the camera says MAC:xxxxxxxxxxxxxx. 2. Note: You may also find MAC address. 6 Go to get MAC address. 3. Enter ...the Cloud ID, Username and Password to download "Ediview". Log onto the camera web configuration page (Default IP:192.168.2.3). Run the Ediview Finder application to "System">"Status">"LAN", find Cloud ID by the following methods: ...
Quick Install Guide
Page 11
Equipment: Model No.: Report No.: 1.3Mpx Wireless H.264 Day & Night Network Camera IC-3110W L110722L037, EA9D1828-05, EH9D1828-05, ER9D1828-05AC, ER9D1828-05AI The following European standards for essential requirements have been followed: European Standard: 2006/... under our sole responsibility, that the equipment described below complies with the requirements of Signature: March 01, 2012 Signature: Printed Name: Title: Albert Chang Director Edimax Technology Co., Ltd. 10 No. 3, Wu Chuan 3rd Road, Wu-Ku Industrial Park, New Taipei City, Taiwan Date of the European R&TTE directive ...
Equipment: Model No.: Report No.: 1.3Mpx Wireless H.264 Day & Night Network Camera IC-3110W L110722L037, EA9D1828-05, EH9D1828-05, ER9D1828-05AC, ER9D1828-05AI The following European standards for essential requirements have been followed: European Standard: 2006/... under our sole responsibility, that the equipment described below complies with the requirements of Signature: March 01, 2012 Signature: Printed Name: Title: Albert Chang Director Edimax Technology Co., Ltd. 10 No. 3, Wu Chuan 3rd Road, Wu-Ku Industrial Park, New Taipei City, Taiwan Date of the European R&TTE directive ...
Quick Install Guide
Page 12
...the European EMC directive (2004/108/EC). Equipment: Model No.: Report No.: 1.3Mpx H.264 Day & Night Network Camera 1.3Mpx PoE H.264 Day & Night Network Camera IC-3110 IC-3110P EC9D1823-09 The following European standards for essential requirements have been followed: European Standard EN 55022:2010 Class B...-4-4:2004/A1:2010 IEC 61000-4-5:2005, IEC 61000-4-6:2008 IEC 61000-4-8:2009, IEC 61000-4-11:2004) Edimax Technology Co., Ltd. Declaration of Conformity We, Edimax Technology Co., Ltd., declare under our sole responsibility, that the equipment described below complies with the ...
...the European EMC directive (2004/108/EC). Equipment: Model No.: Report No.: 1.3Mpx H.264 Day & Night Network Camera 1.3Mpx PoE H.264 Day & Night Network Camera IC-3110 IC-3110P EC9D1823-09 The following European standards for essential requirements have been followed: European Standard EN 55022:2010 Class B...-4-4:2004/A1:2010 IEC 61000-4-5:2005, IEC 61000-4-6:2008 IEC 61000-4-8:2009, IEC 61000-4-11:2004) Edimax Technology Co., Ltd. Declaration of Conformity We, Edimax Technology Co., Ltd., declare under our sole responsibility, that the equipment described below complies with the ...
Manual
Page 3
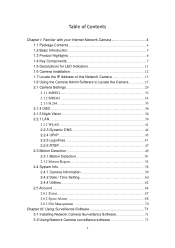
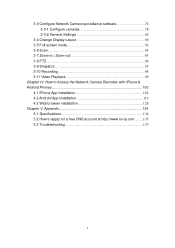
... Contents 4 1.2 Basic Introduction 5 1.3 Product Highlights 6 1.4 Key Components 7 1.5 Descriptions for LED Indicators 11 1.6 Camera Installation 12 1.7 Locate the IP Address of this Network Camera 13 1.8 Using the Camera Admin Software to Locate the Camera 17 2.1 Camera Settings 29 2.1.1 MJPEG 33 2.1.2 MPEG4 34 2.1.3 H.264 35 2.1.4 OSD...36 2.1.5 Night Vision 36 2.2.1 LAN...39 2.2.2 WLAN 41 2.2.3 Dynamic DNS 44 2.2.4 UPnP...
... Contents 4 1.2 Basic Introduction 5 1.3 Product Highlights 6 1.4 Key Components 7 1.5 Descriptions for LED Indicators 11 1.6 Camera Installation 12 1.7 Locate the IP Address of this Network Camera 13 1.8 Using the Camera Admin Software to Locate the Camera 17 2.1 Camera Settings 29 2.1.1 MJPEG 33 2.1.2 MPEG4 34 2.1.3 H.264 35 2.1.4 OSD...36 2.1.5 Night Vision 36 2.2.1 LAN...39 2.2.2 WLAN 41 2.2.3 Dynamic DNS 44 2.2.4 UPnP...
Manual
Page 4
... 93 3-6 Scan...94 3-7 Zoom-in / Zoom-out 95 3-8 PTZ ...96 3-9 Snapshot...97 3-10 Recording 98 3-11 Video Playback 99 Chapter IV: How to Access the Network Camera Remotely with iPhone & Android Phones 100 4.1 iPhone App Installation 102 4.2 Android App installation 113 4.3 Web browser installation 128 Chapter V: Appendix 134 5.1 Specifications 134 5.2 How to...
... 93 3-6 Scan...94 3-7 Zoom-in / Zoom-out 95 3-8 PTZ ...96 3-9 Snapshot...97 3-10 Recording 98 3-11 Video Playback 99 Chapter IV: How to Access the Network Camera Remotely with iPhone & Android Phones 100 4.1 iPhone App Installation 102 4.2 Android App installation 113 4.3 Web browser installation 128 Chapter V: Appendix 134 5.1 Specifications 134 5.2 How to...
Manual
Page 5
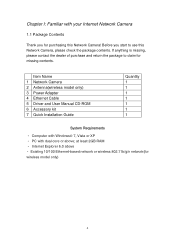
If anything is missing, please contact the dealer of purchase and return the package to use this Network Camera! at least 2GB RAM • Internet Explorer 6.0 above ; Item Name 1 Network Camera 2 Antenna(wireless model only) 3 Power Adapter 4 Ethernet Cable 5 Driver and User Manual CD-ROM 6 ... Computer with Windows® 7, Vista or XP • PC with your Internet Network Camera 1.1 Package Contents Thank you start to claim for missing contents. Before you for purchasing this Network Camera, please check the package contents. Chapter I: Familiar with dual core or above •...
If anything is missing, please contact the dealer of purchase and return the package to use this Network Camera! at least 2GB RAM • Internet Explorer 6.0 above ; Item Name 1 Network Camera 2 Antenna(wireless model only) 3 Power Adapter 4 Ethernet Cable 5 Driver and User Manual CD-ROM 6 ... Computer with Windows® 7, Vista or XP • PC with your Internet Network Camera 1.1 Package Contents Thank you start to claim for missing contents. Before you for purchasing this Network Camera, please check the package contents. Chapter I: Familiar with dual core or above •...
Manual
Page 6
...-LEDs and will illuminate automatically when the environment is too dark, and the image captured by this camera will not be clear. You can view the Network camera's video from anywhere on your network settings. Besides, Edimax IC-3110 series features high quality and high frame rate video streaming through advanced video compression. In order to stream...
...-LEDs and will illuminate automatically when the environment is too dark, and the image captured by this camera will not be clear. You can view the Network camera's video from anywhere on your network settings. Besides, Edimax IC-3110 series features high quality and high frame rate video streaming through advanced video compression. In order to stream...
Manual
Page 7
... protocol, you can connect up to allocate the Network Camera's Internet address, when the ISP you're using does not assign you with every captured picture / video clip (also supports auto time synchronization via network time protocol). Configurable motion detection sensitivity (6 levels from...function (eliminates flash caused by Email or FTP when motion is a browser like Internet Explorer 6 (and above ) will discover this Network Camera in real-time clock, date and time information will be recorded with a fixed Internet address). all major web browser, including Microsoft Internet...
... protocol, you can connect up to allocate the Network Camera's Internet address, when the ISP you're using does not assign you with every captured picture / video clip (also supports auto time synchronization via network time protocol). Configurable motion detection sensitivity (6 levels from...function (eliminates flash caused by Email or FTP when motion is a browser like Internet Explorer 6 (and above ) will discover this Network Camera in real-time clock, date and time information will be recorded with a fixed Internet address). all major web browser, including Microsoft Internet...
Manual
Page 11
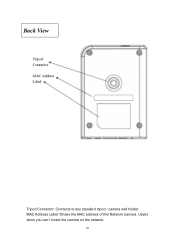
Useful when you can't locate the camera on the network. 10 MAC Address Label: Shows the MAC address of this Network Camera. Back View Tripod Connector: Connects to any standard tripod / camera wall holder.
Useful when you can't locate the camera on the network. 10 MAC Address Label: Shows the MAC address of this Network Camera. Back View Tripod Connector: Connects to any standard tripod / camera wall holder.
Manual
Page 13
... follow the following instructions to set your computer, and following the instructions given in next section to set the Network Camera. 12 Plug the power adapter to wall socket, and connect the power connector to monitor. NOTE: You can skip this step ...of the Network Camera. 4. Connect two antennas to secure the camera. 6. Connect the Ethernet cable to your local area network, and connect the other end to the LAN jack of the camera) to the antenna bases, which is located at the bottom of this Network Camera. Place the camera at the bottom of this Network Camera. 5. ...
... follow the following instructions to set your computer, and following the instructions given in next section to set the Network Camera. 12 Plug the power adapter to wall socket, and connect the power connector to monitor. NOTE: You can skip this step ...of the Network Camera. 4. Connect two antennas to secure the camera. 6. Connect the Ethernet cable to your local area network, and connect the other end to the LAN jack of the camera) to the antenna bases, which is located at the bottom of this Network Camera. Place the camera at the bottom of this Network Camera. 5. ...
Manual
Page 14
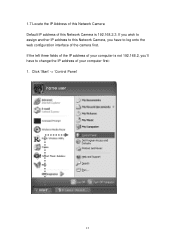
If you wish to assign another IP address to this Network Camera is not 192.168.2, you have to change the IP address of the camera first. If the left three fields of the IP address of your computer first: 1. Click 'Start' -> 'Control Panel' 13 1.7 Locate the IP Address of this Network Camera Default IP address of this Network Camera, you 'll have to log onto the web configuration interface of your computer is 192.168.2.3.
If you wish to assign another IP address to this Network Camera is not 192.168.2, you have to change the IP address of the camera first. If the left three fields of the IP address of your computer first: 1. Click 'Start' -> 'Control Panel' 13 1.7 Locate the IP Address of this Network Camera Default IP address of this Network Camera, you 'll have to log onto the web configuration interface of your computer is 192.168.2.3.
Manual
Page 17
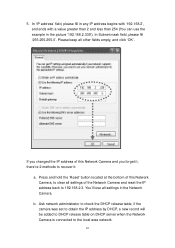
... it: a. Press and hold the 'Reset' button located at the bottom of this Network Camera and you changed the IP address of this Network Camera, to clear all settings of the Network Camera and reset the IP address back to the local area network. 16 b. You'll lose all other fields empty, and click 'OK'. In 'IP... in any IP address begins with '192.168.2', and ends with a value greater than 2 and less than 254 (You can use the example in the Network Camera. Please keep all settings in the picture '192.168.2.339'). In Subnet mask field, please fill '255.255.255.0'. Ask...
... it: a. Press and hold the 'Reset' button located at the bottom of this Network Camera and you changed the IP address of this Network Camera, to clear all settings of the Network Camera and reset the IP address back to the local area network. 16 b. You'll lose all other fields empty, and click 'OK'. In 'IP... in any IP address begins with '192.168.2', and ends with a value greater than 2 and less than 254 (You can use the example in the Network Camera. Please keep all settings in the picture '192.168.2.339'). In Subnet mask field, please fill '255.255.255.0'. Ask...
Manual
Page 19
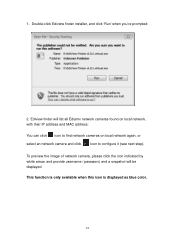
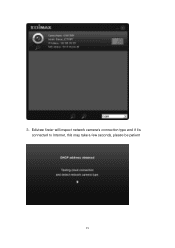
1. Double-click Ediview finder installer, and click 'Run' when you're prompted: 2. This function is only available when this icon is displayed as blue color. 18 To preview the image of network camera, please click the icon indicated by white arrow, and provide username / password, and a snapshot will list all Ediamx network cameras found on local network, with their IP address and MAC address: You can click icon to find network cameras on local network again, or select an network camera and click Icon to configure it (see next step). Ediview finder will be displayed.
1. Double-click Ediview finder installer, and click 'Run' when you're prompted: 2. This function is only available when this icon is displayed as blue color. 18 To preview the image of network camera, please click the icon indicated by white arrow, and provide username / password, and a snapshot will list all Ediamx network cameras found on local network, with their IP address and MAC address: You can click icon to find network cameras on local network again, or select an network camera and click Icon to configure it (see next step). Ediview finder will be displayed.
Manual
Page 20
3. Ediview finder will inspect network camera's connection type and if it's connected to Internet, this may take a few seconds, please be patient 19
3. Ediview finder will inspect network camera's connection type and if it's connected to Internet, this may take a few seconds, please be patient 19
Manual
Page 21
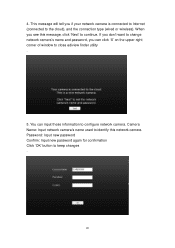
... connected to Internet (connected to close ediview finder utility . 5. If you don't want to change network camera's name and password, you see this message, click 'Next' to identify this network camera. You can click 'X' on the upper-right corner of window to the cloud), and the connection type (wired or wireless). Password: Input new...
... connected to Internet (connected to close ediview finder utility . 5. If you don't want to change network camera's name and password, you see this message, click 'Next' to identify this network camera. You can click 'X' on the upper-right corner of window to the cloud), and the connection type (wired or wireless). Password: Input new...
Manual
Page 22
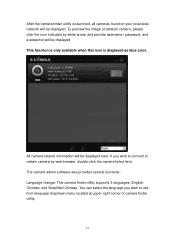
... you wish to connect to use from language dropdown menu located at upper-right corner of network camera, please click the icon indicated by web browser, double-click the camera listed here. If you wish to certain camera by white arrow, and provide username / password, and a snapshot will be displayed This function is only...
... you wish to connect to use from language dropdown menu located at upper-right corner of network camera, please click the icon indicated by web browser, double-click the camera listed here. If you wish to certain camera by white arrow, and provide username / password, and a snapshot will be displayed This function is only...

