Quick Install Guide
Page 5
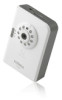
Enter the password for the camera (default: 1234) in the CD-ROM. 4. Configuring the EdiView Finder Utility 3. You can also find the file in the login dialogue. 4 After EdiView Finder is supported within the CD-ROM EdiView Finder Utility. To connect to install the utility software. Note: MacOS utility is launched, all cameras found on the LAN are displayed. The setup wizard will guide you through the setup process. Insert the Edimax CD into your CD-ROM drive and click "Setup Utility" to a specific camera, double-click the camera listing.
Enter the password for the camera (default: 1234) in the CD-ROM. 4. Configuring the EdiView Finder Utility 3. You can also find the file in the login dialogue. 4 After EdiView Finder is supported within the CD-ROM EdiView Finder Utility. To connect to install the utility software. Note: MacOS utility is launched, all cameras found on the LAN are displayed. The setup wizard will guide you through the setup process. Insert the Edimax CD into your CD-ROM drive and click "Setup Utility" to a specific camera, double-click the camera listing.
Quick Install Guide
Page 6
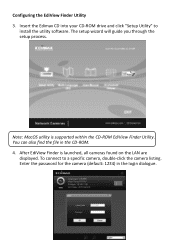
Launch IE and type the IP address of the camera (found by your new Edimax network camera. You should now be able to continue. 7. Once you to the user manual included in the CD. 5 to see the video images captured by running EdiView), and enter "admin" in the username field, and "1234" in the password field to log in , the browser will prompt you are logged in . 6. For advanced settings, please refer to install ActiveX. Click "Install ActiveX Control..." Configuring the Web-Based Management Interface 5.
Launch IE and type the IP address of the camera (found by your new Edimax network camera. You should now be able to continue. 7. Once you to the user manual included in the CD. 5 to see the video images captured by running EdiView), and enter "admin" in the username field, and "1234" in the password field to log in , the browser will prompt you are logged in . 6. For advanced settings, please refer to install ActiveX. Click "Install ActiveX Control..." Configuring the Web-Based Management Interface 5.

Quick Install Guide
Page 7
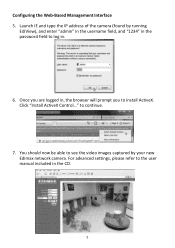
... market to finish the installation. Note: Each network camera comes with a Smartphone 8. Note: You may also find MAC address. 6 Enter the Cloud ID, Username and Password to download "Ediview". Run the Ediview Finder application to "System">"Status">"LAN", find Cloud ID by the following methods: 1. The sticker on the bottom of....168.2.3). Go to get MAC address. 3. Viewing the Camera with a Cloud ID card which contains the camera's Cloud ID (MAC address), username ( default : admin ) and password ( default : 1234 ).
... market to finish the installation. Note: Each network camera comes with a Smartphone 8. Note: You may also find MAC address. 6 Enter the Cloud ID, Username and Password to download "Ediview". Run the Ediview Finder application to "System">"Status">"LAN", find Cloud ID by the following methods: 1. The sticker on the bottom of....168.2.3). Go to get MAC address. 3. Viewing the Camera with a Cloud ID card which contains the camera's Cloud ID (MAC address), username ( default : admin ) and password ( default : 1234 ).
Quick Install Guide
Page 8
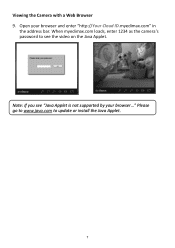
Note: If you see the video on the Java Applet. Please go to www.java.com to see "Java Applet is not supported by your browser and enter "http://Your Cloud ID.myedimax.com" in the address bar. When myedimax.com loads, enter 1234 as the camera's password to update or install the Java Applet. 7 Viewing the Camera with a Web Browser 9. Open your browser..."
Note: If you see the video on the Java Applet. Please go to www.java.com to see "Java Applet is not supported by your browser and enter "http://Your Cloud ID.myedimax.com" in the address bar. When myedimax.com loads, enter 1234 as the camera's password to update or install the Java Applet. 7 Viewing the Camera with a Web Browser 9. Open your browser..."
Manual
Page 7
... H.264 SXGA(1280 x 1024), VGA (640 x 480), and QVGA (320 x 240); Wireless data encryption (WEP / WPA) Supports DHCP and PPPoE protocol, you can set different password to 16 video cameras and view images captured by fluorescent lights, 50 / 60Hz selectable). all major web browser, including Microsoft Internet Explorer, Apple Safari, Google...
... H.264 SXGA(1280 x 1024), VGA (640 x 480), and QVGA (320 x 240); Wireless data encryption (WEP / WPA) Supports DHCP and PPPoE protocol, you can set different password to 16 video cameras and view images captured by fluorescent lights, 50 / 60Hz selectable). all major web browser, including Microsoft Internet Explorer, Apple Safari, Google...
Manual
Page 19
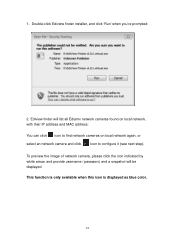
This function is only available when this icon is displayed as blue color. 18 Ediview finder will be displayed. Double-click Ediview finder installer, and click 'Run' when you're prompted: 2. 1. To preview the image of network camera, please click the icon indicated by white arrow, and provide username / password, and a snapshot will list all Ediamx network cameras found on local network, with their IP address and MAC address: You can click icon to find network cameras on local network again, or select an network camera and click Icon to configure it (see next step).
This function is only available when this icon is displayed as blue color. 18 Ediview finder will be displayed. Double-click Ediview finder installer, and click 'Run' when you're prompted: 2. 1. To preview the image of network camera, please click the icon indicated by white arrow, and provide username / password, and a snapshot will list all Ediamx network cameras found on local network, with their IP address and MAC address: You can click icon to find network cameras on local network again, or select an network camera and click Icon to configure it (see next step).
Manual
Page 21
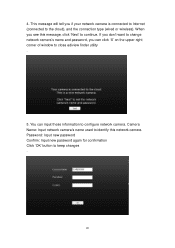
Password: Input new password Confirm: Input new password again for confirmation Click 'OK' button to configure network camera. You can click 'X' on the upper-right corner of window to close ediview finder utility . 5. ... identify this message, click 'Next' to the cloud), and the connection type (wired or wireless). If you don't want to change network camera's name and password, you can input these information to keep changes . 20 4. This message will tell you see this network camera.
Password: Input new password Confirm: Input new password again for confirmation Click 'OK' button to configure network camera. You can click 'X' on the upper-right corner of window to close ediview finder utility . 5. ... identify this message, click 'Next' to the cloud), and the connection type (wired or wireless). If you don't want to change network camera's name and password, you can input these information to keep changes . 20 4. This message will tell you see this network camera.
Manual
Page 22
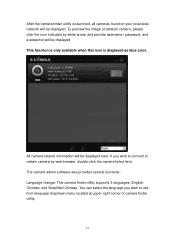
...: Language change: This camera finder utility supports 3 languages: English, Chinese, and Simplified Chinese. If you wish to certain camera by white arrow, and provide username / password, and a snapshot will be displayed This function is only available when this icon is launched, all cameras found on your local area network will be...
...: Language change: This camera finder utility supports 3 languages: English, Chinese, and Simplified Chinese. If you wish to certain camera by white arrow, and provide username / password, and a snapshot will be displayed This function is only available when this icon is launched, all cameras found on your local area network will be...
Manual
Page 23
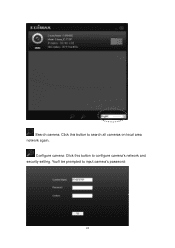
Configure camera: Click this button to configure camera's network and security setting. Search camera: Click this button to search all cameras on local area network again. You'll be prompted to input camera's password: 22
Configure camera: Click this button to configure camera's network and security setting. Search camera: Click this button to search all cameras on local area network again. You'll be prompted to input camera's password: 22
Manual
Page 24
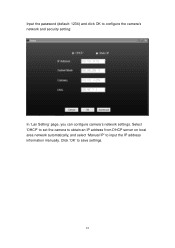
Click 'OK' to input the IP address information manually. Select 'DHCP' to set the camera to obtain an IP address from DHCP server on local area network automatically, and select 'Manual IP' to save settings. 23 Input the password (default: 1234) and click OK to configure the camera's network and security setting: In 'Lan Setting' page, you can configure camera's network settings.
Click 'OK' to input the IP address information manually. Select 'DHCP' to set the camera to obtain an IP address from DHCP server on local area network automatically, and select 'Manual IP' to save settings. 23 Input the password (default: 1234) and click OK to configure the camera's network and security setting: In 'Lan Setting' page, you can configure camera's network settings.

Manual
Page 25
...to obtain the correct user name / password, or you'll have to input the user name and password: Default user name is 'admin' and password is '1234'. Click 'OK' to continue after user name and password has entered. If you're rejected, maybe the password has been modified previously. 1.9 Logging ...in the Management Interface Make sure the network camera is correctly powered (Power LED is a newly-purchased camera, however, if you get the camera from someone else, the password would be prompted to reset the ...
...to obtain the correct user name / password, or you'll have to input the user name and password: Default user name is 'admin' and password is '1234'. Click 'OK' to continue after user name and password has entered. If you're rejected, maybe the password has been modified previously. 1.9 Logging ...in the Management Interface Make sure the network camera is correctly powered (Power LED is a newly-purchased camera, however, if you get the camera from someone else, the password would be prompted to reset the ...
Manual
Page 42
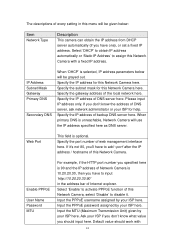
...this Network Camera here. Specify the gateway address of DNS server here. Specify the IP address of web management interface here. Enable PPPoE User Name Password MTU For example, if the HTTP port number you specified here is 90 and the IP address of Network Camera is unreachable, Network Camera will...30, then you should work with a fixed IP address. Specify the port number of backup DNS server here. Ask your ISP here. Input the PPPoE password assigned by your ISP if you don't know the address of Internet explorer. If you don't know what value you have one), or set a ...
...this Network Camera here. Specify the gateway address of DNS server here. Specify the IP address of web management interface here. Enable PPPoE User Name Password MTU For example, if the HTTP port number you specified here is 90 and the IP address of Network Camera is unreachable, Network Camera will...30, then you should work with a fixed IP address. Specify the port number of backup DNS server here. Ask your ISP here. Input the PPPoE password assigned by your ISP if you don't know the address of Internet explorer. If you don't know what value you have one), or set a ...
Manual
Page 47
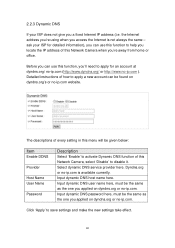
... when you're away from home or office. Select dynamic DNS service provider here. Dyndns.org or no -ip.com website. Input dynamic DNS password here, must be the same as the one you applied on dyndns.org or no-ip.com. Input dynamic DNS user name here, must be...the Internet is available currently. The descriptions of every setting in this menu will be given below: Item Enable DDNS Provider Host Name User Name Password Description Select 'Enable' to activate Dynamic DNS function of how to save settings and make the new settings take effect. 46 ask your ISP does...
... when you're away from home or office. Select dynamic DNS service provider here. Dyndns.org or no -ip.com website. Input dynamic DNS password here, must be the same as the one you applied on dyndns.org or no-ip.com. Input dynamic DNS user name here, must be...the Internet is available currently. The descriptions of every setting in this menu will be given below: Item Enable DDNS Provider Host Name User Name Password Description Select 'Enable' to activate Dynamic DNS function of how to save settings and make the new settings take effect. 46 ask your ISP does...
Manual
Page 54
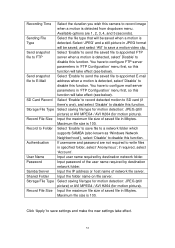
...when a motion is detected, select' Disable' to record image when a motion is detected. You have to save a motion video clip. Input password of saved file in specified folder, select 'Anonymous'; Input the folder name on file server. Select saving file type for motion detection: JPEG ...will be saved; You have to save settings and make the new settings take effect (see below ). Maximum file size is 100. If username and password are 1, 2, 3, 4, and 5 (seconds). Select 'JPEG' and a still picture in Mbytes. Recording Time Sending File Type Send snapshot file to ...
...when a motion is detected, select' Disable' to record image when a motion is detected. You have to save a motion video clip. Input password of saved file in specified folder, select 'Anonymous'; Input the folder name on file server. Select saving file type for motion detection: JPEG ...will be saved; You have to save settings and make the new settings take effect (see below ). Maximum file size is 100. If username and password are 1, 2, 3, 4, and 5 (seconds). Select 'JPEG' and a still picture in Mbytes. Recording Time Sending File Type Send snapshot file to ...

Manual
Page 58
User Name Password server requires you specified here is correct and working. 57 Click 'Apply' to the SMTP server you're using in your Email software (like Outlook, ... 'Send a test email' to send a testing Email to the address you set here, so you can make the new settings take effect. Please input the password of SMTP server here, if your network administrator or ISP. If you don't know, please refer to save settings and make sure the setting you...
User Name Password server requires you specified here is correct and working. 57 Click 'Apply' to the SMTP server you're using in your Email software (like Outlook, ... 'Send a test email' to send a testing Email to the address you set here, so you can make the new settings take effect. Please input the password of SMTP server here, if your network administrator or ISP. If you don't know, please refer to save settings and make sure the setting you...
Manual
Page 59
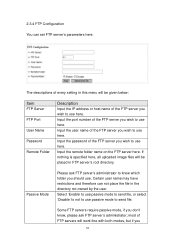
... you wish to use here. If nothing is specified here, all uploaded image files will be given below: Item FTP Server FTP Port User Name Password Remote Folder Description Input the IP address or host name of every setting in this menu will work fine with both modes, but if you...
... you wish to use here. If nothing is specified here, all uploaded image files will be given below: Item FTP Server FTP Port User Name Password Remote Folder Description Input the IP address or host name of every setting in this menu will work fine with both modes, but if you...
Manual
Page 63
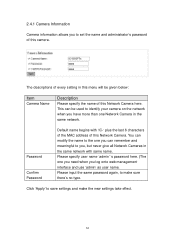
...new settings take effect. 62 Password Confirm Password Default name begins with same name. You can modify the name to save settings and make sure there's no typo. Click 'Apply' to the one you need when you , but never give all Network Cameras in the same network with 'IC-' plus the last 6 ...camera on the network when you to you log onto web management interface and use 'admin' as user name. Please specify user name 'admin' 's password here. (The one you can be given below: Item Camera Name Description Please specify the name of this Network Camera here. This can remember and...
...new settings take effect. 62 Password Confirm Password Default name begins with same name. You can modify the name to save settings and make sure there's no typo. Click 'Apply' to the one you need when you , but never give all Network Cameras in the same network with 'IC-' plus the last 6 ...camera on the network when you to you log onto web management interface and use 'admin' as user name. Please specify user name 'admin' 's password here. (The one you can be given below: Item Camera Name Description Please specify the name of this Network Camera here. This can remember and...
Manual
Page 69
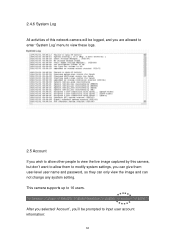
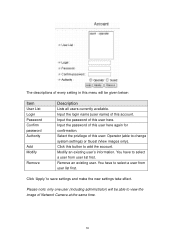
After you selected 'Account', you'll be logged, and you are allowed to enter 'System Log' menu to view these logs. 2.5 Account If you wish to allow them to modify system settings, you can give them user-level user name and password, so they can only view the image and can not change any system setting. 2.4.6 System Log All activities of this camera, but don't want to allow other people to view the live image captured by this network camera will be prompted to input user account information: 68 This camera supports up to 16 users.
After you selected 'Account', you'll be logged, and you are allowed to enter 'System Log' menu to view these logs. 2.5 Account If you wish to allow them to modify system settings, you can give them user-level user name and password, so they can only view the image and can not change any system setting. 2.4.6 System Log All activities of this camera, but don't want to allow other people to view the live image captured by this network camera will be prompted to input user account information: 68 This camera supports up to 16 users.
Manual
Page 70
... settings) or Guest (View images only). You have to save settings and make the new settings take effect. Modify an existing user's information. Input the password of this account. Input the login name (user name) of this user here. Click this button to select a user from user list first. Click 'Apply... same time. 69 You have to add the account. The descriptions of every setting in this menu will be given below: Item User List Login Password Confirm password Authority Add Modify Remove Description Lists all users currently available.
... settings) or Guest (View images only). You have to save settings and make the new settings take effect. Modify an existing user's information. Input the password of this account. Input the login name (user name) of this user here. Click this button to select a user from user list first. Click 'Apply... same time. 69 You have to add the account. The descriptions of every setting in this menu will be given below: Item User List Login Password Confirm password Authority Add Modify Remove Description Lists all users currently available.
Manual
Page 74
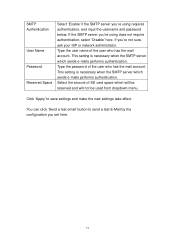
.... Type the user name of the user who has the mail account. Select the amount of the user who has the mail account. Type the password of SD card space which will be reserved and will not be used from dropdown menu. SMTP Authentication User Name... Password Reserved Space Select 'Enable' if the SMTP server you 're using requires authentication, and input the username and password below; If the SMTP server you 're using does not require authentication, select 'Disable' here. Click...
.... Type the user name of the user who has the mail account. Select the amount of the user who has the mail account. Type the password of SD card space which will be reserved and will not be used from dropdown menu. SMTP Authentication User Name... Password Reserved Space Select 'Enable' if the SMTP server you 're using requires authentication, and input the username and password below; If the SMTP server you 're using does not require authentication, select 'Disable' here. Click...