Quick Install Guide
Page 9
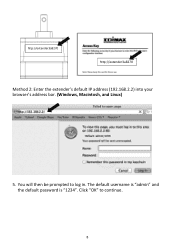
http://extender3a8270 http://extender3a8270 Method 2: Enter the extender's default IP address (192.168.2.2) into your browser's address bar. (Windows, Macintosh, and Linux) 5. Click "OK" to log in. The default username is "admin" and the default password is "1234". You will then be prompted to continue. 8
http://extender3a8270 http://extender3a8270 Method 2: Enter the extender's default IP address (192.168.2.2) into your browser's address bar. (Windows, Macintosh, and Linux) 5. Click "OK" to log in. The default username is "admin" and the default password is "1234". You will then be prompted to continue. 8
Manual
Page 3
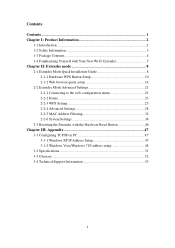
... 21 2-2-2 Home 23 2-2-3 WPS Setting 25 2-2-4 Advanced Settings 28 2-2-5 MAC Address Filtering 32 2-2-6 System Settings 38 2-3 Resetting the Extender with the Hardware Reset Button 46 Chapter III: Appendix 47 3-1 Configuring TCP/IP on PC 47 3-1-1 Windows XP IP Address Setup 47 3-1-2 Windows Vista/Windows 7 IP address setup 48 3-2 Specifications 51 3-3 Glossary ...52 3-4 Technical Support Information 55 1
... 21 2-2-2 Home 23 2-2-3 WPS Setting 25 2-2-4 Advanced Settings 28 2-2-5 MAC Address Filtering 32 2-2-6 System Settings 38 2-3 Resetting the Extender with the Hardware Reset Button 46 Chapter III: Appendix 47 3-1 Configuring TCP/IP on PC 47 3-1-1 Windows XP IP Address Setup 47 3-1-2 Windows Vista/Windows 7 IP address setup 48 3-2 Specifications 51 3-3 Glossary ...52 3-4 Technical Support Information 55 1
Manual
Page 16
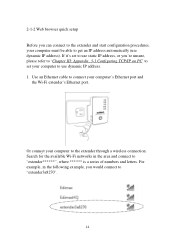
...Use an Ethernet cable to connect your computer to the extender through a wireless connection. If it's set your computer to use dynamic IP address). For example, in the area and connect to "extender******", where ****** is a series of numbers and letters. Or connect your ...2-1-2 Web browser quick setup Before you can connect to the extender and start configuration procedures, your computer must be able to get an IP address automatically (use dynamic IP address. 1. Search for the available Wi-Fi networks in the following example, you 're unsure, please refer to 'Chapter III: Appendix,...
...Use an Ethernet cable to connect your computer to the extender through a wireless connection. If it's set your computer to use dynamic IP address). For example, in the area and connect to "extender******", where ****** is a series of numbers and letters. Or connect your ...2-1-2 Web browser quick setup Before you can connect to the extender and start configuration procedures, your computer must be able to get an IP address automatically (use dynamic IP address. 1. Search for the available Wi-Fi networks in the following example, you 're unsure, please refer to 'Chapter III: Appendix,...
Manual
Page 18
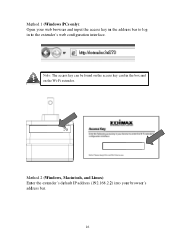
Note: The access key can be found on the access key card in to the extender's web configuration interface. http://extender3a8270 http://extender3a8270 Method 2 (Windows, Macintosh, and Linux): Enter the extender's default IP address (192.168.2.2) into your web browser and input the access key in the address bar to log in the box and on the Wi-Fi extender. Method 1 (Windows PCs only): Open your browser's address bar. 16
Note: The access key can be found on the access key card in to the extender's web configuration interface. http://extender3a8270 http://extender3a8270 Method 2 (Windows, Macintosh, and Linux): Enter the extender's default IP address (192.168.2.2) into your web browser and input the access key in the address bar to log in the box and on the Wi-Fi extender. Method 1 (Windows PCs only): Open your browser's address bar. 16

Manual
Page 22
If you want to log in to the web UI of the extender, please refer to '2-2 Extender Mode Advanced Settings' for more information. 20 Note: After the wireless connection between the extender and the wireless broadband router is established, the extender becomes a DHCP client and will receive its IP address from the broadband router automatically.
If you want to log in to the web UI of the extender, please refer to '2-2 Extender Mode Advanced Settings' for more information. 20 Note: After the wireless connection between the extender and the wireless broadband router is established, the extender becomes a DHCP client and will receive its IP address from the broadband router automatically.
Manual
Page 23
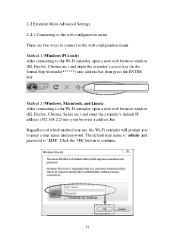
... connect to the Wi-Fi extender, open a new web browser window (IE, Firefox, Chrome, Safari etc.) and enter the extender's default IP address (192.168.2.2) into your browser's address bar. Method 1 (Windows PCs only) After connecting to the Wi-Fi extender, open a new web browser window (IE, Firefox, Chrome ...etc.) and input the extender's access key (in the format http://extender******) into address bar, then press the ENTER key: http://extender3a8270 Method 2 (Windows, Macintosh, and Linux): After connecting to the web configuration menu.
... connect to the Wi-Fi extender, open a new web browser window (IE, Firefox, Chrome, Safari etc.) and enter the extender's default IP address (192.168.2.2) into your browser's address bar. Method 1 (Windows PCs only) After connecting to the Wi-Fi extender, open a new web browser window (IE, Firefox, Chrome ...etc.) and input the extender's access key (in the format http://extender******) into address bar, then press the ENTER key: http://extender3a8270 Method 2 (Windows, Macintosh, and Linux): After connecting to the web configuration menu.

Manual
Page 40
2-2-6 System Settings You can change the settings of several system-level parameters on the left. 38 To access the 'System Settings' menu, click 'System Settings' on this page, including the administrator password, and IP address.
2-2-6 System Settings You can change the settings of several system-level parameters on the left. 38 To access the 'System Settings' menu, click 'System Settings' on this page, including the administrator password, and IP address.
Manual
Page 43
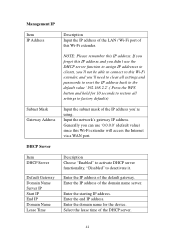
...need to clear all settings and passwords to reset the IP address back to deactivate it. Input the network's gateway IP address. Enter the IP address of the domain name server. Enter the starting IP address. Enter the end IP address. Enter the IP address of the default gateway. Enter the domain name for 10...will access the Internet via a WAN port. Select the lease time of this IP address and you 're using. If you forget this Wi-Fi extender. Management IP Item IP Address Description Input the IP address of the LAN / Wi-Fi port of the DHCP server. 41 Generally you...
...need to clear all settings and passwords to reset the IP address back to deactivate it. Input the network's gateway IP address. Enter the IP address of the domain name server. Enter the starting IP address. Enter the end IP address. Enter the IP address of the default gateway. Enter the domain name for 10...will access the Internet via a WAN port. Select the lease time of this IP address and you 're using. If you forget this Wi-Fi extender. Management IP Item IP Address Description Input the IP address of the LAN / Wi-Fi port of the DHCP server. 41 Generally you...

Manual
Page 49
Click the 'Start' button (it should be located at lower-left corner of your computer), then click control panel. Double-click the Network and Internet Connections icon, click Network Connections, then double-click Local Area Connection, the Local Area Connection Status window will appear, and then click 'Properties' 2. Select 'Obtain an IP address automatically' and 'Obtain DNS server address automatically', then click 'OK'. 47 Chapter III: Appendix 3-1 Configuring TCP/IP on PC 3-1-1 Windows XP IP Address Setup: 1.
Click the 'Start' button (it should be located at lower-left corner of your computer), then click control panel. Double-click the Network and Internet Connections icon, click Network Connections, then double-click Local Area Connection, the Local Area Connection Status window will appear, and then click 'Properties' 2. Select 'Obtain an IP address automatically' and 'Obtain DNS server address automatically', then click 'OK'. 47 Chapter III: Appendix 3-1 Configuring TCP/IP on PC 3-1-1 Windows XP IP Address Setup: 1.

Manual
Page 50
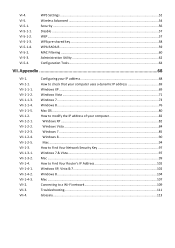
Right-click Local Area Network, then select 'Properties'. The Local Area Connection Properties window will appear, select 'Internet Protocol Version 4 (TCP / IPv4)', and then click 'Properties' 48 3-1-2 Windows Vista/Windows 7 IP address setup: 1. Click the 'Start' button (it should be located at the lower-left corner of your computer), then click control panel. Click View Network Status and Tasks, and then click Manage Network Connections.
Right-click Local Area Network, then select 'Properties'. The Local Area Connection Properties window will appear, select 'Internet Protocol Version 4 (TCP / IPv4)', and then click 'Properties' 48 3-1-2 Windows Vista/Windows 7 IP address setup: 1. Click the 'Start' button (it should be located at the lower-left corner of your computer), then click control panel. Click View Network Status and Tasks, and then click Manage Network Connections.

Manual
Page 51
Select 'Obtain an IP address automatically' and 'Obtain DNS server address automatically', then click 'OK'. 49 2.
Select 'Obtain an IP address automatically' and 'Obtain DNS server address automatically', then click 'OK'. 49 2.
Manual
Page 3
... Utility 62 Configuration Tools...64 VII. Appendix 68 VII-1. VII-1-3-1. VI-5. VII-1-1-1. VII-1-2. VII-1-3-2. Configuring your IP address 68 How to check that your computer uses a dynamic IP address 69 Windows XP ...69 Windows Vista ...71 Windows 7 ...73 Windows 8 ...76 Mac OS...80 How to...85 Windows 8 ...90 Mac ...94 How to Find Your Network Security Key 97 Windows 7 & Vista...97 Mac ...99 How to Find Your Router's IP Address 102 Windows XP, Vista & 7 102 Windows 8 ...104 Mac ...107 Connecting to a Wi-Fi network 109 Troubleshooting ...111 Glossary...113 VI-5-1. VI-5-1-1....
... Utility 62 Configuration Tools...64 VII. Appendix 68 VII-1. VII-1-3-1. VI-5. VII-1-1-1. VII-1-2. VII-1-3-2. Configuring your IP address 68 How to check that your computer uses a dynamic IP address 69 Windows XP ...69 Windows Vista ...71 Windows 7 ...73 Windows 8 ...76 Mac OS...80 How to...85 Windows 8 ...90 Mac ...94 How to Find Your Network Security Key 97 Windows 7 & Vista...97 Mac ...99 How to Find Your Router's IP Address 102 Windows XP, Vista & 7 102 Windows 8 ...104 Mac ...107 Connecting to a Wi-Fi network 109 Troubleshooting ...111 Glossary...113 VI-5-1. VI-5-1-1....
Manual
Page 10
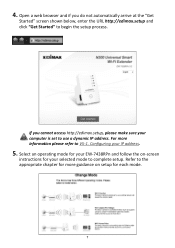
... and if you cannot access http://edimax.setup, please make sure your computer is set to begin the setup process. Configuring your selected mode to complete setup. Select an operating mode for your EW-7438RPn and follow the on setup for more... information please refer to the appropriate chapter for each mode. 7 For more guidance on -screen instructions for your IP address. 5. If you do not automatically arrive at the "Get Started" screen shown below, enter the URL http://edimax.setup and click "Get Started" to use a dynamic IP address...
... and if you cannot access http://edimax.setup, please make sure your computer is set to begin the setup process. Configuring your selected mode to complete setup. Select an operating mode for your EW-7438RPn and follow the on setup for more... information please refer to the appropriate chapter for each mode. 7 For more guidance on -screen instructions for your IP address. 5. If you do not automatically arrive at the "Get Started" screen shown below, enter the URL http://edimax.setup and click "Get Started" to use a dynamic IP address...
Manual
Page 12
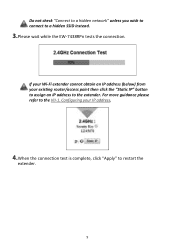
For more guidance please refer to the extender. If your Wi-Fi extender cannot obtain an IP address (below) from your IP address. 4.When the connection test is complete, click "Apply" to a hidden SSID instead. 3.Please wait while the EW-7438RPn tests the connection. Configuring your existing router/access point then click the "Static IP" button to assign an IP address to the VII-1. Do not check "Connect to a hidden network" unless you wish to connect to restart the extender. 9
For more guidance please refer to the extender. If your Wi-Fi extender cannot obtain an IP address (below) from your IP address. 4.When the connection test is complete, click "Apply" to a hidden SSID instead. 3.Please wait while the EW-7438RPn tests the connection. Configuring your existing router/access point then click the "Static IP" button to assign an IP address to the VII-1. Do not check "Connect to a hidden network" unless you wish to connect to restart the extender. 9
Manual
Page 16
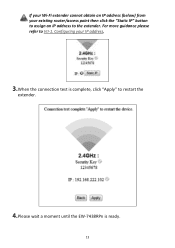
Configuring your existing router/access point then click the "Static IP" button to assign an IP address to the extender. If your Wi-Fi extender cannot obtain an IP address (below) from your IP address. 3.When the connection test is complete, click "Apply" to restart the extender. 4.Please wait a moment until the EW-7438RPn is ready. 13 For more guidance please refer to VII-1.
Configuring your existing router/access point then click the "Static IP" button to assign an IP address to the extender. If your Wi-Fi extender cannot obtain an IP address (below) from your IP address. 3.When the connection test is complete, click "Apply" to restart the extender. 4.Please wait a moment until the EW-7438RPn is ready. 13 For more guidance please refer to VII-1.
Manual
Page 18
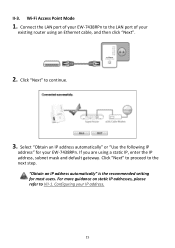
... using an Ethernet cable, and then click "Next". 2. "Obtain an IP address automatically" is the recommended setting for your existing router using a static IP, enter the IP address, subnet mask and default gateway. Connect the LAN port of your EW-7438RPn. For more guidance on static IP addresses, please refer to the next step. Wi-Fi Access Point Mode...
... using an Ethernet cable, and then click "Next". 2. "Obtain an IP address automatically" is the recommended setting for your existing router using a static IP, enter the IP address, subnet mask and default gateway. Connect the LAN port of your EW-7438RPn. For more guidance on static IP addresses, please refer to the next step. Wi-Fi Access Point Mode...
Manual
Page 25
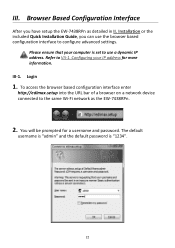
... configuration interface enter http://edimax.setup into the URL bar of a browser on a network device connected to VII-1. Browser Based Configuration Interface After you can use the browser based configuration interface to use a dynamic IP address. Please ensure that your IP address for a username and... password. III-1. Refer to the same Wi-Fi network as detailed in II. Login 1. Installation or the included Quick Installation Guide, you have setup the EW-7438RPn as the EW-7438RPn. 2. III. The ...
... configuration interface enter http://edimax.setup into the URL bar of a browser on a network device connected to VII-1. Browser Based Configuration Interface After you can use the browser based configuration interface to use a dynamic IP address. Please ensure that your IP address for a username and... password. III-1. Refer to the same Wi-Fi network as detailed in II. Login 1. Installation or the included Quick Installation Guide, you have setup the EW-7438RPn as the EW-7438RPn. 2. III. The ...
Manual
Page 30
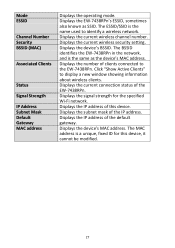
... device. Displays the current wireless security setting. Displays the number of the default gateway. Displays the subnet mask of the EW-7438RPn. Displays the current connection status of the IP address. The BSSID identifies the EW-7438RPn in the network, and is the name used to display a new window showing information about wireless clients. Mode ESSID...
... device. Displays the current wireless security setting. Displays the number of the default gateway. Displays the subnet mask of the EW-7438RPn. Displays the current connection status of the IP address. The BSSID identifies the EW-7438RPn in the network, and is the name used to display a new window showing information about wireless clients. Mode ESSID...
Manual
Page 35
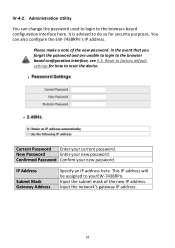
... password. Input the network's gateway IP address. 32 Please make a note of the new IP address. IP Address Subnet Mask Gateway Address Specify an IP address here. In the event that you forget the password and are unable to login to yourEW-7438RPn. This IP address will be assigned to the browser ...configuration interface, see II-5. Input the subnet mask of the new password. IV-4-2. Administration Utility You can also configure the EW-7438RPn's IP address. It is advised to do so for how to the browser-based configuration interface here. You can change the password ...
... password. Input the network's gateway IP address. 32 Please make a note of the new IP address. IP Address Subnet Mask Gateway Address Specify an IP address here. In the event that you forget the password and are unable to login to yourEW-7438RPn. This IP address will be assigned to the browser ...configuration interface, see II-5. Input the subnet mask of the new password. IV-4-2. Administration Utility You can also configure the EW-7438RPn's IP address. It is advised to do so for how to the browser-based configuration interface here. You can change the password ...
Manual
Page 41
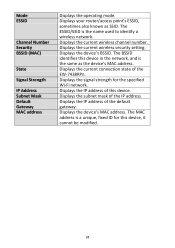
.... 38 Displays the signal strength for this device in the network, and is the same as SSID. Displays the IP address of the IP address. The MAC address is the name used to identify a wireless network. Displays the device's BSSID. Displays the subnet mask of the ...'s MAC address. Displays the current wireless security setting. The ESSID/SSID is a unique, fixed ID for the specified Wi-Fi network. Displays the current wireless channel number. Displays the current connection state of this device. Displays the device's MAC address. Displays the IP address of the EW-7438RPn.
.... 38 Displays the signal strength for this device in the network, and is the same as SSID. Displays the IP address of the IP address. The MAC address is the name used to identify a wireless network. Displays the device's BSSID. Displays the subnet mask of the ...'s MAC address. Displays the current wireless security setting. The ESSID/SSID is a unique, fixed ID for the specified Wi-Fi network. Displays the current wireless channel number. Displays the current connection state of this device. Displays the device's MAC address. Displays the IP address of the EW-7438RPn.