
User Manual
Page 2
... I -3. Safety Information...3 II. III-3-2. III-4-1. III-4-2. Login ...11 Save Settings...13 Main Menu ...14 Home...14 iQ Setup ...17 WPS Settings ...17 Advanced Settings ...19 WLAN Security ...20 Scheduling Setting ...21 Guest Network...24 Administration Utility 26 Configuration ...IV-5. Configuring your IP address 37 How to Factory Default Settings 10 III. Installation 4 II-1. III-3. Login ...32 IV-2. WPS Setup...9 II-3. Admin ...36 V. System Requirements...1 I -4. Main Menu ...34 IV-3. Appendix 37 V-1. V-1-1-2. Good Night Mode ...35 IV...
... I -3. Safety Information...3 II. III-3-2. III-4-1. III-4-2. Login ...11 Save Settings...13 Main Menu ...14 Home...14 iQ Setup ...17 WPS Settings ...17 Advanced Settings ...19 WLAN Security ...20 Scheduling Setting ...21 Guest Network...24 Administration Utility 26 Configuration ...IV-5. Configuring your IP address 37 How to Factory Default Settings 10 III. Installation 4 II-1. III-3. Login ...32 IV-2. WPS Setup...9 II-3. Admin ...36 V. System Requirements...1 I -4. Main Menu ...34 IV-3. Appendix 37 V-1. V-1-1-2. Good Night Mode ...35 IV...
User Manual
Page 7
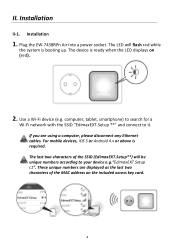
... "EdimaxEXT.Setup **" and connect to your device e.g."EdimaxEXT.Setup c1". If you are displayed as the last two characters of the SSID (EdimaxEXT.Setup**) will flash red while the system is required. Use a Wi-Fi device (e.g. For mobile devices, iOS 5 or Android 4.x or above is booting up. Installation II-1. Plug the EW-7438RPn Air into a power...
... "EdimaxEXT.Setup **" and connect to your device e.g."EdimaxEXT.Setup c1". If you are displayed as the last two characters of the SSID (EdimaxEXT.Setup**) will flash red while the system is required. Use a Wi-Fi device (e.g. For mobile devices, iOS 5 or Android 4.x or above is booting up. Installation II-1. Plug the EW-7438RPn Air into a power...
User Manual
Page 8
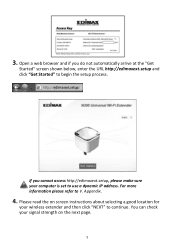
3. Open a web browser and if you cannot access http://edimaxext.setup, please make sure your wireless extender and then click "NEXT" to use a dynamic IP address. You can check your signal strength on screen instructions about selecting a good location for your computer is set to continue. If you do not automatically arrive at the "Get Started" screen shown below, enter the URL http://edimaxext.setup and click "Get Started" to V. Please read the on the next page. 5 Appendix. 4. For more information please refer to begin the setup process.
3. Open a web browser and if you cannot access http://edimaxext.setup, please make sure your wireless extender and then click "NEXT" to use a dynamic IP address. You can check your signal strength on screen instructions about selecting a good location for your computer is set to continue. If you do not automatically arrive at the "Get Started" screen shown below, enter the URL http://edimaxext.setup and click "Get Started" to V. Please read the on the next page. 5 Appendix. 4. For more information please refer to begin the setup process.
User Manual
Page 10
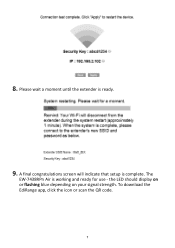
the LED should display on or flashing blue depending on your signal strength. The EW-7438RPn Air is complete. To download the EdiRange app, click the icon or scan the QR code. 7 8. A final congratulations screen will indicate that setup is working and ready for use - Please wait a moment until the extender is ready. 9.
the LED should display on or flashing blue depending on your signal strength. The EW-7438RPn Air is complete. To download the EdiRange app, click the icon or scan the QR code. 7 8. A final congratulations screen will indicate that setup is working and ready for use - Please wait a moment until the extender is ready. 9.

User Manual
Page 12
Please check the instructions for your wireless router/access point for how long you can use this method to setup your wireless extender. 1. The extender's LED should flash green to indicate a successful connection. 9 Press the WPS button on the wireless extender for 30 seconds to ...indicate that WPS is in progress. 3. The extender's LED should display on (green) for two seconds. WPS Setup If your wireless router/access point to hold the WPS button on your wireless router/access point supports WPS (Wi-Fi Protected...
Please check the instructions for your wireless router/access point for how long you can use this method to setup your wireless extender. 1. The extender's LED should flash green to indicate a successful connection. 9 Press the WPS button on the wireless extender for 30 seconds to ...indicate that WPS is in progress. 3. The extender's LED should display on (green) for two seconds. WPS Setup If your wireless router/access point to hold the WPS button on your wireless router/access point supports WPS (Wi-Fi Protected...
User Manual
Page 13
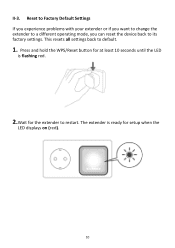
This resets all settings back to its factory settings. II-3. Press and hold the WPS/Reset button for at least 10 seconds until the LED is ready for the extender to restart. The extender is flashing red. 2.Wait for setup when the LED displays on (red). 10 Reset to Factory Default Settings If you experience problems with your extender or if you want to change the extender to a different operating mode, you can reset the device back to default. 1.
This resets all settings back to its factory settings. II-3. Press and hold the WPS/Reset button for at least 10 seconds until the LED is ready for the extender to restart. The extender is flashing red. 2.Wait for setup when the LED displays on (red). 10 Reset to Factory Default Settings If you experience problems with your extender or if you want to change the extender to a different operating mode, you can reset the device back to default. 1.
User Manual
Page 14
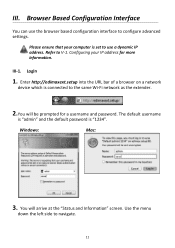
Configuring your computer is "1234". Enter http://edimaxext.setup into the URL bar of a browser on a network device which is connected to navigate. 11 You will be prompted for more information. III. Login 1. Use ...
Configuring your computer is "1234". Enter http://edimaxext.setup into the URL bar of a browser on a network device which is connected to navigate. 11 You will be prompted for more information. III. Login 1. Use ...
User Manual
Page 20
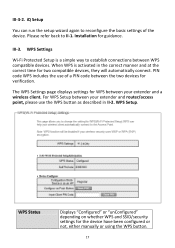
...settings for guidance. Please refer back to reconfigure the basic settings of a PIN code between WPS compatible devices. WPS Settings Wi-Fi Protected Setup is activated in II-2. III-3-2. PIN code WPS includes the use the WPS button as described in the correct manner and at the ... time for WPS between your extender and router/access point, please use of the device. For WPS Setup between your extender and a wireless client. WPS Setup. iQ Setup You can run the setup wizard again to II-1. Installation for the device have been configured or not, either manually or using...
...settings for guidance. Please refer back to reconfigure the basic settings of a PIN code between WPS compatible devices. WPS Settings Wi-Fi Protected Setup is activated in II-2. III-3-2. PIN code WPS includes the use the WPS button as described in the correct manner and at the ... time for WPS between your extender and router/access point, please use of the device. For WPS Setup between your extender and a wireless client. WPS Setup. iQ Setup You can run the setup wizard again to II-1. Installation for the device have been configured or not, either manually or using...
User Manual
Page 23
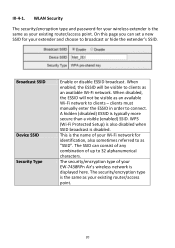
WLAN Security The security/encryption type and password for your extender and choose to connect. WPS (Wi-Fi Protected Setup) is also disabled when SSID broadcast is typically more secure than a visible (enabled) SSID. The SSID can set a new SSID for your... Wi-Fi network for identification, also sometimes referred to 32 alphanumerical characters. This is displayed here. The security/encryption type is the same as your EW-7438RPn Air's wireless network is the name of your existing router/access point. 20 III-4-1. When enabled, the ESSID will not be visible to clients - ...
WLAN Security The security/encryption type and password for your extender and choose to connect. WPS (Wi-Fi Protected Setup) is also disabled when SSID broadcast is typically more secure than a visible (enabled) SSID. The SSID can set a new SSID for your... Wi-Fi network for identification, also sometimes referred to 32 alphanumerical characters. This is displayed here. The security/encryption type is the same as your EW-7438RPn Air's wireless network is the name of your existing router/access point. 20 III-4-1. When enabled, the ESSID will not be visible to clients - ...
User Manual
Page 35
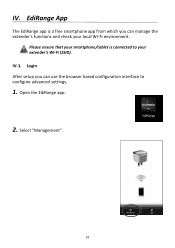
IV-1. Login After setup you can use the browser based configuration interface to your local Wi-Fi environment. Select "Management". 32 EdiRange App The EdiRange app is connected to configure advanced settings. 1. Open the EdiRange app. 2. IV. Please ensure that your smartphone/tablet is a free smartphone app from which you can manage the extender's functions and check your extender's Wi-Fi (SSID).
IV-1. Login After setup you can use the browser based configuration interface to your local Wi-Fi environment. Select "Management". 32 EdiRange App The EdiRange app is connected to configure advanced settings. 1. Open the EdiRange app. 2. IV. Please ensure that your smartphone/tablet is a free smartphone app from which you can manage the extender's functions and check your extender's Wi-Fi (SSID).
User Manual
Page 40
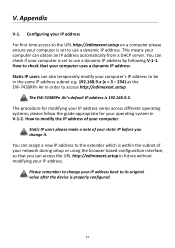
... in the same IP address subnet e.g. 192.168.9.x (x = 3 - 254) as the EW-7438RPn Air in order to change it. Please remember to access http://edimaxext.setup. The EW-7438RPn Air's default IP address is properly configured. 37 please follow the guide appropriate for modifying your computer is... set to the extender which is set to the URL http://edimaxext.setup on a computer please ensure your...
... in the same IP address subnet e.g. 192.168.9.x (x = 3 - 254) as the EW-7438RPn Air in order to change it. Please remember to access http://edimaxext.setup. The EW-7438RPn Air's default IP address is properly configured. 37 please follow the guide appropriate for modifying your computer is... set to the extender which is set to the URL http://edimaxext.setup on a computer please ensure your...
User Manual
Page 54
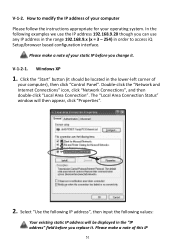
... you change it . Double-click the "Network and Internet Connections" icon, click "Network Connections", and then double-click "Local Area Connection". How to access iQ Setup/browser based configuration interface. Windows XP 1. In the following values: Your existing static IP address will then appear, click "Properties". 2. Please make a note of your...
... you change it . Double-click the "Network and Internet Connections" icon, click "Network Connections", and then double-click "Local Area Connection". How to access iQ Setup/browser based configuration interface. Windows XP 1. In the following values: Your existing static IP address will then appear, click "Properties". 2. Please make a note of your...
User Manual
Page 81
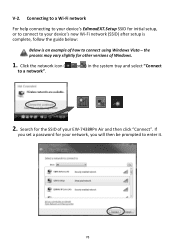
... For help connecting to your device's EdimaxEXT.Setup SSID for the SSID of your device's new Wi-Fi network (SSID) after setup is complete, follow the guide below: Below is an example of Windows. 1. Search for initial setup, or to connect to connect using Windows Vista... - Click the network icon ( , or ) in the system tray and select "Connect to enter it. 78 the process may vary slightly for your network, you will then be prompted to a network". 2. V-2. If you set a password for other versions of how to your EW-7438RPn Air...
... For help connecting to your device's EdimaxEXT.Setup SSID for the SSID of your device's new Wi-Fi network (SSID) after setup is complete, follow the guide below: Below is an example of Windows. 1. Search for initial setup, or to connect to connect using Windows Vista... - Click the network icon ( , or ) in the system tray and select "Connect to enter it. 78 the process may vary slightly for your network, you will then be prompted to a network". 2. V-2. If you set a password for other versions of how to your EW-7438RPn Air...
User Manual
Page 86
Edimax Technology Co., Ltd. makes no representations or warranties, either expressed or implied, with respect to make changes from those shown in the contents hereof without notice. The product you have purchased and the setup screen may be reproduced, transmitted, transcribed, stored in a ..., the buyer (and not this QIG. The software and specifications are trademarks and/or registered trademarks of all rights reserved. Edimax Technology Co., Ltd. all necessary servicing, repair, and any particular purpose. No part of this publication may appear slightly different...
Edimax Technology Co., Ltd. makes no representations or warranties, either expressed or implied, with respect to make changes from those shown in the contents hereof without notice. The product you have purchased and the setup screen may be reproduced, transmitted, transcribed, stored in a ..., the buyer (and not this QIG. The software and specifications are trademarks and/or registered trademarks of all rights reserved. Edimax Technology Co., Ltd. all necessary servicing, repair, and any particular purpose. No part of this publication may appear slightly different...
