
Datasheet
Page 2
... of ESSID to group the different wireless networks. • Support WEP, WPA, WPA2 securities and RADIUS server authorization function. • Supports WPS (Wi-Fi Protected Setup) function. • Provides MAC access control. • Supports hidden SSID function. • Supports Web-based configuration. • Firmware upgradeable via Web browser. • Complies with...
... of ESSID to group the different wireless networks. • Support WEP, WPA, WPA2 securities and RADIUS server authorization function. • Supports WPS (Wi-Fi Protected Setup) function. • Provides MAC access control. • Supports hidden SSID function. • Supports Web-based configuration. • Firmware upgradeable via Web browser. • Complies with...

Quick Install Guide
Page 2
... if there's anything missing in the package, and contact your dealer of purchase to claim any missing items. Wireless access point x 1 CD (EZmax Setup Wizard, Multi-language Quick Installation Guide and User Manual) x 1 Power adapter x 1 3dBi antenna x 2 Accessory kit x 1 Quick installation guide x 1 Top Panel LED...
... if there's anything missing in the package, and contact your dealer of purchase to claim any missing items. Wireless access point x 1 CD (EZmax Setup Wizard, Multi-language Quick Installation Guide and User Manual) x 1 Power adapter x 1 3dBi antenna x 2 Accessory kit x 1 Quick installation guide x 1 Top Panel LED...

Quick Install Guide
Page 4
Remove any Ethernet cable that may be connected, so that your Macintosh computer operate as shown below. Then, you will see all of your network connections. In System Preferences, click on "System Preferences". 2. Select "Wi-Fi" from the left sidebar displays "Not Connected", as usual, and click on "Network". 3. Have your Macintosh's Wi-Fi is switched off. Here you need to ensure that the "Ethernet" status in the left sidebar. 4 Quick Setup 1.
Remove any Ethernet cable that may be connected, so that your Macintosh computer operate as shown below. Then, you will see all of your network connections. In System Preferences, click on "System Preferences". 2. Select "Wi-Fi" from the left sidebar displays "Not Connected", as usual, and click on "Network". 3. Have your Macintosh's Wi-Fi is switched off. Here you need to ensure that the "Ethernet" status in the left sidebar. 4 Quick Setup 1.

Manual
Page 5
... point to your Network 5 2-2 Connecting to wireless access point by web browser 6 2-2-1 Windows 95/98/Me IP address setup 6 2-2-2 Windows 2000 IP address setup 8 2-2-3 Windows XP IP address setup 10 2-2-4 Windows Vista IP address setup 12 2-2-5 Connecting to Web Management Interface 15 2-3 View System Status and Information 16 2-4 Select an Operating Mode for Wireless...
... point to your Network 5 2-2 Connecting to wireless access point by web browser 6 2-2-1 Windows 95/98/Me IP address setup 6 2-2-2 Windows 2000 IP address setup 8 2-2-3 Windows XP IP address setup 10 2-2-4 Windows Vista IP address setup 12 2-2-5 Connecting to Web Management Interface 15 2-3 View System Status and Information 16 2-4 Select an Operating Mode for Wireless...
Manual
Page 7
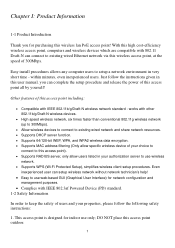
... allow specific wireless device of your choice to connect to use wireless network. • Supports WPS (Wi-Fi Protected Setup), simplifies wireless client setup procedures. Just follow the following safety instructions: 1. Other features of this access point including: • Compatible with 802... users. Chapter I: Product Information 1-1 Product Introduction Thank you can complete the setup procedure and release the power of this access point all by yourself! Even inexperienced user can setup wireless network without network technician's help! • Easy to existing wired Ethernet...
... allow specific wireless device of your choice to connect to use wireless network. • Supports WPS (Wi-Fi Protected Setup), simplifies wireless client setup procedures. Just follow the following safety instructions: 1. Other features of this access point including: • Compatible with 802... users. Chapter I: Product Information 1-1 Product Introduction Thank you can complete the setup procedure and release the power of this access point all by yourself! Even inexperienced user can setup wireless network without network technician's help! • Easy to existing wired Ethernet...
Manual
Page 11
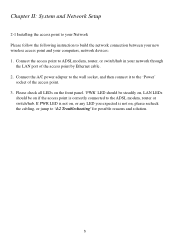
... devices: 1. If PWR LED is not on , please recheck the cabling, or jump to '4-2 Troubleshooting' for possible reasons and solution. 5 Chapter II: System and Network Setup 2-1 Installing the access point to your Network Please follow the following instruction to build the network connection between your new wireless access point and your...
... devices: 1. If PWR LED is not on , please recheck the cabling, or jump to '4-2 Troubleshooting' for possible reasons and solution. 5 Chapter II: System and Network Setup 2-1 Installing the access point to your Network Please follow the following instruction to build the network connection between your new wireless access point and your...

Manual
Page 12
... you 're unsure, please follow the following instructions to configure your computer to use dynamic IP address: If the operating system of your computer is setup the access point with proper network parameters, so it can connect to the access point and start configuration procedures, your computer must be located at... able to get an IP address automatically (use dynamic IP address). please go to section 2-2-3 please go to section 2-2-4 2-2-1 Windows 95/98/Me IP address setup 1. Windows 95/98/Me Windows 2000 Windows XP Windows Vista -
... you 're unsure, please follow the following instructions to configure your computer to use dynamic IP address: If the operating system of your computer is setup the access point with proper network parameters, so it can connect to the access point and start configuration procedures, your computer must be located at... able to get an IP address automatically (use dynamic IP address). please go to section 2-2-3 please go to section 2-2-4 2-2-1 Windows 95/98/Me IP address setup 1. Windows 95/98/Me Windows 2000 Windows XP Windows Vista -

Manual
Page 14
Double-click Network and Dial-up Connections icon, double click Local Area Connection, and Local Area Connection Properties window will appear. Select 'Internet Protocol (TCP/IP)', then click 'Properties' 8 2-2-2 Windows 2000 IP address setup 1. Click 'Start' button (it should be located at lower-left corner of your computer), then click control panel.
Double-click Network and Dial-up Connections icon, double click Local Area Connection, and Local Area Connection Properties window will appear. Select 'Internet Protocol (TCP/IP)', then click 'Properties' 8 2-2-2 Windows 2000 IP address setup 1. Click 'Start' button (it should be located at lower-left corner of your computer), then click control panel.

Manual
Page 16
Click 'Start' button (it should be located at lower-left corner of your computer), then click control panel. 2-2-3 Windows XP IP address setup 1. Double-click Network and Internet Connections icon, click Network Connections, and then double-click Local Area Connection, Local Area Connection Status window will appear, and then click 'Properties' 10
Click 'Start' button (it should be located at lower-left corner of your computer), then click control panel. 2-2-3 Windows XP IP address setup 1. Double-click Network and Internet Connections icon, click Network Connections, and then double-click Local Area Connection, Local Area Connection Status window will appear, and then click 'Properties' 10

Manual
Page 18
Click 'Start' button (it should be located at lower-left corner of your computer), then click control panel. Click View Network Status and Tasks, then click Manage Network Connections..Right-click Local Area Netwrok, then select 'Properties'. Local Area Connection Properties window will appear, select 'Internet Protocol Version 4 (TCP / IPv4), and then click 'Properties' 12 2-2-4 Windows Vista IP address setup 1.
Click 'Start' button (it should be located at lower-left corner of your computer), then click control panel. Click View Network Status and Tasks, then click Manage Network Connections..Right-click Local Area Netwrok, then select 'Properties'. Local Area Connection Properties window will appear, select 'Internet Protocol Version 4 (TCP / IPv4), and then click 'Properties' 12 2-2-4 Windows Vista IP address setup 1.

Manual
Page 26
2-4-1 AP Mode This is the most common mode. If you want to allow or deny the wireless client of every setup item: Band Please select the wireless band you select 'AP', the following options will be set. Please input the ESSID (the name used to configure ...
2-4-1 AP Mode This is the most common mode. If you want to allow or deny the wireless client of every setup item: Band Please select the wireless band you select 'AP', the following options will be set. Please input the ESSID (the name used to configure ...

Manual
Page 28
... who know the ESSID of your wireless access point (set the option to enable the different additional ESSID. You can hide the ESSID of every setup item: No. With different SSIDs, you can get 22
... who know the ESSID of your wireless access point (set the option to enable the different additional ESSID. You can hide the ESSID of every setup item: No. With different SSIDs, you can get 22

Manual
Page 29
... or deny the wireless client of a certain band. WMM VLAN ID (0:Untagged) connected. By selecting different band setting, you can improve the performance of every setup item: Band Please select the wireless band you can connect the access point to Ethernet device such us TV and Game player to enable the...
... or deny the wireless client of a certain band. WMM VLAN ID (0:Untagged) connected. By selecting different band setting, you can improve the performance of every setup item: Band Please select the wireless band you can connect the access point to Ethernet device such us TV and Game player to enable the...

Manual
Page 31
Display the SSID name of the access point. Display the BSSID (MAC Address) of the access point. 2-4-2-1 Wireless Site Survey The table will list the access points nearby as the access point is set to channel number of the access point. Display to Station mode; If you can select one of the access points to select the access point. Display the encryption setting of every setup item: Select Channel SSID BSSID Encryption Click the radio button to associate. you have selected the access point with security 25 Here are descriptions of the access points.
Display the SSID name of the access point. Display the BSSID (MAC Address) of the access point. 2-4-2-1 Wireless Site Survey The table will list the access points nearby as the access point is set to channel number of the access point. Display to Station mode; If you can select one of the access points to select the access point. Display the encryption setting of every setup item: Select Channel SSID BSSID Encryption Click the radio button to associate. you have selected the access point with security 25 Here are descriptions of the access points.

Manual
Page 33
... able to allow 802.11b, 802.11g, and 802.11 Draft-N clients to connect to this access point, select 2.4GHz (B+G+N). Here are descriptions of every setup item: Band Please select the wireless band you want to allow or deny the wireless client of the wireless access point you can click 'Continue...
... able to allow 802.11b, 802.11g, and 802.11 Draft-N clients to connect to this access point, select 2.4GHz (B+G+N). Here are descriptions of every setup item: Band Please select the wireless band you want to allow or deny the wireless client of the wireless access point you can click 'Continue...

Manual
Page 34
... When you wish to use this mode to connect a network to other networks which uses the same mode, and all wired Ethernet clients of every setup item: Band Please select the wireless band you select 'AP Bridge-Point to Multi-Point', the following options will not accept regular wireless clients anymore...
... When you wish to use this mode to connect a network to other networks which uses the same mode, and all wired Ethernet clients of every setup item: Band Please select the wireless band you select 'AP Bridge-Point to Multi-Point', the following options will not accept regular wireless clients anymore...
Manual
Page 36
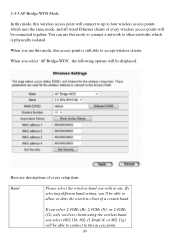
... 'll be able to this access point. 30 When you select 'AP Bridge-WDS', the following options will be displayed: Here are descriptions of every setup item: Band Please select the wireless band you use this access point is physically isolated. You can use this mode, this mode to connect a network...
... 'll be able to this access point. 30 When you select 'AP Bridge-WDS', the following options will be displayed: Here are descriptions of every setup item: Band Please select the wireless band you use this access point is physically isolated. You can use this mode, this mode to connect a network...
Manual
Page 38
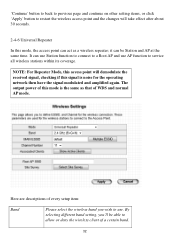
it can be able to allow or deny the wireless client of WDS and normal AP mode. The output power of every setup item: Band Please select the wireless band you 'll be Station and AP at the same time. By selecting different band setting, you wish to ...
it can be able to allow or deny the wireless client of WDS and normal AP mode. The output power of every setup item: Band Please select the wireless band you 'll be Station and AP at the same time. By selecting different band setting, you wish to ...

Manual
Page 41
...the wireless client to start WPS mode. You don't have to select encryption mode and input a long encryption passphrase every time when you need to setup a wireless client, you only have to provide the PIN code of the wireless client you . if you want to use WPS function to set ...encrypted connection between wireless network clients and this ; 2-5 WPS Setting Wi-Fi Protected Setup (WPS) is the simplest way to build connection between this access point and WPS-enabled wireless client by WPS, click 'WPS Setting' on the left...
...the wireless client to start WPS mode. You don't have to select encryption mode and input a long encryption passphrase every time when you need to setup a wireless client, you only have to provide the PIN code of the wireless client you . if you want to use WPS function to set ...encrypted connection between wireless network clients and this ; 2-5 WPS Setting Wi-Fi Protected Setup (WPS) is the simplest way to build connection between this access point and WPS-enabled wireless client by WPS, click 'WPS Setting' on the left...

Manual
Page 42
... be displayed her. (see Section 2-7 for detailed information); SSID: Displays the SSID (ESSID) of this access point. Here are descriptions of every setup item: Enable WPS Wi-Fi Protected Setup Information Check this box to enable or disable WPS function All information related to WPS will be displayed here, they're helpful...
... be displayed her. (see Section 2-7 for detailed information); SSID: Displays the SSID (ESSID) of this access point. Here are descriptions of every setup item: Enable WPS Wi-Fi Protected Setup Information Check this box to enable or disable WPS function All information related to WPS will be displayed here, they're helpful...
