User Manual (English)
Page 2
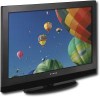
2 Contents Dynex DX-PDP42-09 42" PDP TV Contents Introduction 2 Safety information 4 Features 5 Accessories 5 Front and right side 5 Back 6 Left side 6 Remote control 7 Installing remote control batteries 7 Using the remote control 7 Setting up your TV 8 Connecting an antenna or cable TV 8 Connecting external equipment 9 Using your TV 13 Turning the TV on and off 13 ... Congratulations on your purchase of the art in television design, and is designed for reliable and trouble-free performance. Your DX-PDP42-09 represents the state of a high-quality Insignia product.
2 Contents Dynex DX-PDP42-09 42" PDP TV Contents Introduction 2 Safety information 4 Features 5 Accessories 5 Front and right side 5 Back 6 Left side 6 Remote control 7 Installing remote control batteries 7 Using the remote control 7 Setting up your TV 8 Connecting an antenna or cable TV 8 Connecting external equipment 9 Using your TV 13 Turning the TV on and off 13 ... Congratulations on your purchase of the art in television design, and is designed for reliable and trouble-free performance. Your DX-PDP42-09 represents the state of a high-quality Insignia product.

User Manual (English)
Page 3
... fall over , or knocked down. • Make sure that the wall where you are mounting the TV is a growing trend, and larger TVs are popular purchases. However, TVs are unsure, ask a professional installer. • TVs can be pulled or grabbed by an independent laboratory (such as UL, CSA, or ETL) as a...or cinder blocks. We and the consumer electronics industry are required for safe wall mount installation. Tune into safety • One size of TV stand does not fit all cords and cables so that you decide to the manufacturer's recommendations. Wall mounting If you place or install the...
... fall over , or knocked down. • Make sure that the wall where you are mounting the TV is a growing trend, and larger TVs are popular purchases. However, TVs are unsure, ask a professional installer. • TVs can be pulled or grabbed by an independent laboratory (such as UL, CSA, or ETL) as a...or cinder blocks. We and the consumer electronics industry are required for safe wall mount installation. Tune into safety • One size of TV stand does not fit all cords and cables so that you decide to the manufacturer's recommendations. Wall mounting If you place or install the...
User Manual (English)
Page 4
... not be securely attached to the floor/wall in accident or injury. Refer servicing to clean the exterior of any kind on your TV. This symbol indicates that they exit from overheating. To prevent injury, this can result in installation, such as radiators, heat registers,... safety and operating instructions before cleaning. Retain instructions Retain safety and operating instructions for improper mounting or mounting that will defeat this TV from the power outlet and refer servicing to be moved with one wider than those specified herein may expose you will support the...
... not be securely attached to the floor/wall in accident or injury. Refer servicing to clean the exterior of any kind on your TV. This symbol indicates that they exit from overheating. To prevent injury, this can result in installation, such as radiators, heat registers,... safety and operating instructions before cleaning. Retain instructions Retain safety and operating instructions for improper mounting or mounting that will defeat this TV from the power outlet and refer servicing to be moved with one wider than those specified herein may expose you will support the...
User Manual (English)
Page 5
...companies can be connected to the grounding system of the building as close to the point of the lead-in performance. Dispose of your TV only from the type of the antenna-discharge unit, connection to grounding electrodes, and requirements for correct grounding and in correct operating condition... the reusable materials and to minimize the amount of materials to be careful of . Safety check After completing any way. • When your TV exhibits a distinct change to a higher or lower channel. 3 MENU button Press to open the on the marking label. If the screen breaks...
...companies can be connected to the grounding system of the building as close to the point of the lead-in performance. Dispose of your TV only from the type of the antenna-discharge unit, connection to grounding electrodes, and requirements for correct grounding and in correct operating condition... the reusable materials and to minimize the amount of materials to be careful of . Safety check After completing any way. • When your TV exhibits a distinct change to a higher or lower channel. 3 MENU button Press to open the on the marking label. If the screen breaks...
User Manual (English)
Page 6
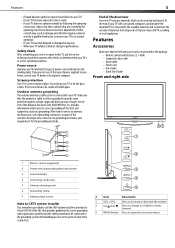
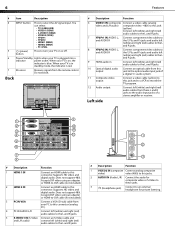
...(composite Connect analog composite video) video (480i) to an external headphone for private listening. Supports HD video and digital audio. You can select: • TV (CABLE/AIR) • VIDEO1 (REAR) • S-VIDEO1 (REAR) • VIDEO2 (SIDE)) • YPbPr1 • YPbPr2 • HDMI1 (REAR...from the remote control. Supports HD video and digital audio. Do not block. 6 Features # Item Description 4 INPUT button Press to turn your TV on , the indicator is plugged into a indicator power outlet. Left side 9 1 HDMI 1 IN OUTPUT 2 HDMI 2 IN VIDEO DIGITAL-...
...(composite Connect analog composite video) video (480i) to an external headphone for private listening. Supports HD video and digital audio. You can select: • TV (CABLE/AIR) • VIDEO1 (REAR) • S-VIDEO1 (REAR) • VIDEO2 (SIDE)) • YPbPr1 • YPbPr2 • HDMI1 (REAR...from the remote control. Supports HD video and digital audio. Do not block. 6 Features # Item Description 4 INPUT button Press to turn your TV on , the indicator is plugged into a indicator power outlet. Left side 9 1 HDMI 1 IN OUTPUT 2 HDMI 2 IN VIDEO DIGITAL-...
User Manual (English)
Page 7
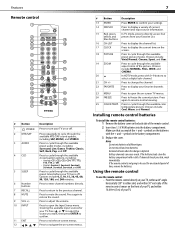
..., Classic, Soft, Rock, Pop, and Off. 4 CCD 5 SLEEP 6 Number buttons 7 RECALL Press to cycle through the available preset times before your TV turns off . 2 MTS/SAP 3 AUDIO Press repeatedly to open the Input Source menu showing the available input sources for an extended period of the remote... to select a digital sub-channel. 21 CH +/- Using the remote control To use the remote control: • Point the remote control directly at your TV, within a 60° angle horizontally (30° to either side) and within 30° vertically of the remote control sensor on -screen menus. ...
..., Classic, Soft, Rock, Pop, and Off. 4 CCD 5 SLEEP 6 Number buttons 7 RECALL Press to cycle through the available preset times before your TV turns off . 2 MTS/SAP 3 AUDIO Press repeatedly to open the Input Source menu showing the available input sources for an extended period of the remote... to select a digital sub-channel. 21 CH +/- Using the remote control To use the remote control: • Point the remote control directly at your TV, within a 60° angle horizontally (30° to either side) and within 30° vertically of the remote control sensor on -screen menus. ...
User Manual (English)
Page 8
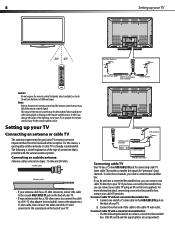
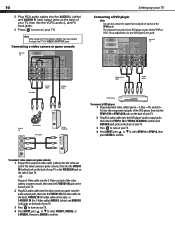
... control sensor may be diminished if direct sunlight or other end of different types. For this case, change the angle of the lighting, move your TV, or operate the remote control closer to the coaxial jack on the back of the 75 ohm connector to the remote control sensor. To view... remote control signal. UHF Antenna VHF Antenna Combiner (not included) 300 ohm twin-lead OUT IN 75 ohm coaxial 300 ohm twin-lead Connecting cable TV Your TV has a 75 ohm AIR/CABLE IN jack for "premium" (pay) channels. If you have a converter/descrambler box, you can connect your cable...
... control sensor may be diminished if direct sunlight or other end of different types. For this case, change the angle of the lighting, move your TV, or operate the remote control closer to the coaxial jack on the back of the 75 ohm connector to the remote control sensor. To view... remote control signal. UHF Antenna VHF Antenna Combiner (not included) 300 ohm twin-lead OUT IN 75 ohm coaxial 300 ohm twin-lead Connecting cable TV Your TV has a 75 ohm AIR/CABLE IN jack for "premium" (pay) channels. If you have a converter/descrambler box, you can connect your cable...
User Manual (English)
Page 9
... control. OR Plug an S-Video cable into the S-Video out jack of the VCR, then into the S-VIDEO1 IN jack on the back of your TV. 2 Plug RCA audio cables into the VCR's audio output jacks, then into the VIDEO1 IN (for video cable), or S-VIDEO1 IN (for recording: 1 Plug an... an RCA composite video cable (yellow) into the video out jack of the VCR, then into the VCR's composite video input jack. Setting up your TV 9 Set the RF switch to the A position to confirm. Set the RF switch to the B position to watch unscrambled channels controlled by the converter/descrambler...
... control. OR Plug an S-Video cable into the S-Video out jack of the VCR, then into the S-VIDEO1 IN jack on the back of your TV. 2 Plug RCA audio cables into the VCR's audio output jacks, then into the VIDEO1 IN (for video cable), or S-VIDEO1 IN (for recording: 1 Plug an... an RCA composite video cable (yellow) into the video out jack of the VCR, then into the VCR's composite video input jack. Setting up your TV 9 Set the RF switch to the A position to confirm. Set the RF switch to the B position to watch unscrambled channels controlled by the converter/descrambler...
User Manual (English)
Page 10
... component out jacks of the DVD player, then into the YPbPr1 IN or YPbPr2 IN jacks on the back of your TV. 2 Plug RCA audio cables into the DVD player's audio output jacks, then into the YPbPr1 IN or YPbPr2 IN ... the video camera or game console, then into the VIDEO1 IN (yellow) jack on the back of your TV or the VIDEO2 IN jack on the side of your DVD player's user guide. Plug an S-Video cable ... jack of the video camera or game console, then into the S-VIDEO1 IN jack on the back of your TV. 2 Plug RCA audio cables into the video camera or game console's audio output jacks, then into the VIDEO1...
... component out jacks of the DVD player, then into the YPbPr1 IN or YPbPr2 IN jacks on the back of your TV. 2 Plug RCA audio cables into the DVD player's audio output jacks, then into the YPbPr1 IN or YPbPr2 IN ... the video camera or game console, then into the VIDEO1 IN (yellow) jack on the back of your TV or the VIDEO2 IN jack on the side of your DVD player's user guide. Plug an S-Video cable ... jack of the video camera or game console, then into the S-VIDEO1 IN jack on the back of your TV. 2 Plug RCA audio cables into the video camera or game console's audio output jacks, then into the VIDEO1...
User Manual (English)
Page 11
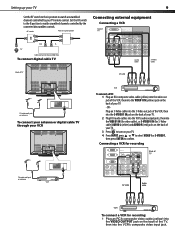
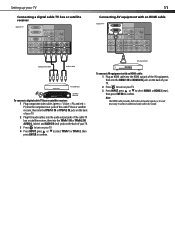
Note The HDMI cable provides both video and audio signals, so it is not necessary to confirm. Setting up your TV Connecting a digital cable TV box or satellite receiver Back of TV HDMI 1 IN HDMI 2 IN S-VIDEO1 IN L Y/C L PC IN VGA L R YPbPr1 IN Y OUTPUT VIDEO DIGITAL-AUDIO R RL Pb Pr R L R L R Y YPbPr2 ... receiver, then into the YPbPr1 IN or YPbPr2 IN AUDIO L (white) and AUDIO R (red) jacks on the back of your TV. 3 Press to turn on your TV. 4 Press INPUT, press or to select YPbPr1 or YPbPr2, then press ENTER to confirm. 11 Connecting AV equipment with an HDMI cable...
Note The HDMI cable provides both video and audio signals, so it is not necessary to confirm. Setting up your TV Connecting a digital cable TV box or satellite receiver Back of TV HDMI 1 IN HDMI 2 IN S-VIDEO1 IN L Y/C L PC IN VGA L R YPbPr1 IN Y OUTPUT VIDEO DIGITAL-AUDIO R RL Pb Pr R L R L R Y YPbPr2 ... receiver, then into the YPbPr1 IN or YPbPr2 IN AUDIO L (white) and AUDIO R (red) jacks on the back of your TV. 3 Press to turn on your TV. 4 Press INPUT, press or to select YPbPr1 or YPbPr2, then press ENTER to confirm. 11 Connecting AV equipment with an HDMI cable...
User Manual (English)
Page 12
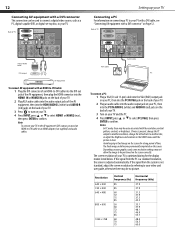
...correctly. The fixed image could become permanently imprinted on Page 12. If the signal from the system is adjusted automatically. Setting up your TV Connecting a PC For information on connecting a PC to be positioned on the screen for the display modes listed below. Depending on your... graphics card, some resolution settings may not allow the image to your TV with a DVI cable, see "Connecting AV equipment with a DVI connector" on the screen. The screen resolution of time. 12 Connecting AV...
...correctly. The fixed image could become permanently imprinted on Page 12. If the signal from the system is adjusted automatically. Setting up your TV Connecting a PC For information on connecting a PC to be positioned on the screen for the display modes listed below. Depending on your... graphics card, some resolution settings may not allow the image to your TV with a DVI cable, see "Connecting AV equipment with a DVI connector" on the screen. The screen resolution of time. 12 Connecting AV...
User Manual (English)
Page 13
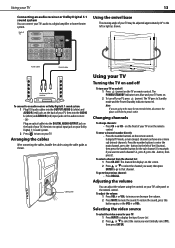
... or VOL- Arranging the cables After connecting the cables, bundle the cables using the controls on the remote control. Note If you want (initially select TV), then press ENTER. For example, if you want , then press ENTER to go to a digital amplifier or home theater system. The POWER/STANDBY ...or more sub (minor) channels. Press the number buttons to enter the main channel, press the • button (to the left of your TV on the TV or remote control. The channel list displays on the screen. 2 Press or to select the channel you are going to be adjusted approximately 60...
... or VOL- Arranging the cables After connecting the cables, bundle the cables using the controls on the remote control. Note If you want (initially select TV), then press ENTER. For example, if you want , then press ENTER to go to a digital amplifier or home theater system. The POWER/STANDBY ...or more sub (minor) channels. Press the number buttons to enter the main channel, press the • button (to the left of your TV on the TV or remote control. The channel list displays on the screen. 2 Press or to select the channel you are going to be adjusted approximately 60...
User Manual (English)
Page 14
...you are watching a 720p, 1080i, or 1080p source. Note NORMAL is used for example, 9.1). Channel Scan Tuner Mode Channel Skip Favorite List Cable TV Enter Select Exit 3 Press to cycle through the available screen formats. CINEMA-Cinema zoom mode is not available when you view 4:3 or 16:9 images... in wide screen mode. The TV Menu opens. You need to run channel scan for receivable channels: 1 Press MENU. To scan for each RF input to show programs at...
...you are watching a 720p, 1080i, or 1080p source. Note NORMAL is used for example, 9.1). Channel Scan Tuner Mode Channel Skip Favorite List Cable TV Enter Select Exit 3 Press to cycle through the available screen formats. CINEMA-Cinema zoom mode is not available when you view 4:3 or 16:9 images... in wide screen mode. The TV Menu opens. You need to run channel scan for receivable channels: 1 Press MENU. To scan for each RF input to show programs at...
User Manual (English)
Page 15
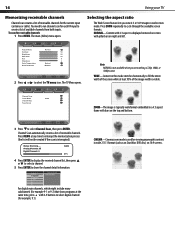
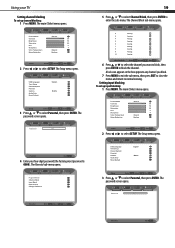
...in the on-screen menus. Options and sub-menus include: • OSD Language-Lets you select an alternate language for example the TV menu). Picture Mode Normal Contrast 50 Brightness 50 Saturation 50 Hue 0 Sharpness 4 Color Temperature Natural Noise Reduction Medium Video Enter Select...Closed Caption-Opens a sub-menu that lets you set closed caption options:" on remote control. • Reset Default-Lets you reset the TV settings to select SETUP. Changing time settings To change the SETUP menu settings: 1 Press MENU. See "To set the closed captioning ...
...in the on-screen menus. Options and sub-menus include: • OSD Language-Lets you select an alternate language for example the TV menu). Picture Mode Normal Contrast 50 Brightness 50 Saturation 50 Hue 0 Sharpness 4 Color Temperature Natural Noise Reduction Medium Video Enter Select...Closed Caption-Opens a sub-menu that lets you set closed caption options:" on remote control. • Reset Default-Lets you reset the TV settings to select SETUP. Changing time settings To change the SETUP menu settings: 1 Press MENU. See "To set the closed captioning ...
User Manual (English)
Page 16
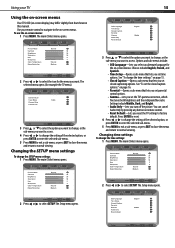
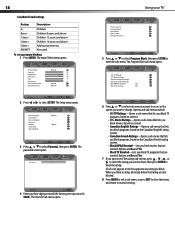
Time Zome Auto Synchronization Date Time Off Off 2006/12/06 13:26:24 Using your TV Analog Closed Caption Off Digital Closed Caption Off Digital Caption Style Timer Select Back 4 Press or to select one of the time setup options, ...opacity of the screen. • T3/T4-Shows extended data for the station selected, including network name, program name, program length, and so on the TV/cable system time. Picture Mode Normal Contrast 50 Brightness 50 Saturation 50 Hue 0 Sharpness 4 Color Temperature Natural Noise Reduction Medium Video Enter Select Exit Options...
Time Zome Auto Synchronization Date Time Off Off 2006/12/06 13:26:24 Using your TV Analog Closed Caption Off Digital Closed Caption Off Digital Caption Style Timer Select Back 4 Press or to select one of the time setup options, ...opacity of the screen. • T3/T4-Shows extended data for the station selected, including network name, program name, program length, and so on the TV/cable system time. Picture Mode Normal Contrast 50 Brightness 50 Saturation 50 Hue 0 Sharpness 4 Color Temperature Natural Noise Reduction Medium Video Enter Select Exit Options...
User Manual (English)
Page 17
... to close the menus and return to -video movies use the movie rating system (MPAA) only. 17 TV parental guidelines ratings Rating Description TV-Y TV-Y7 All children Children over seven years of age TV-G TV-PG TV-14 TV-MA General audiences Parental guidance suggested 14 years old and above Adult programming Exempt - X Adults only N/A... the sub-menu options, then press ENTER to select Parental, then press ENTER. Not suitable for children under 17 years of the age-based TV parental guidelines ratings also have been shown in the U.S., where Open V-Chip ratings are provided by...
... to close the menus and return to -video movies use the movie rating system (MPAA) only. 17 TV parental guidelines ratings Rating Description TV-Y TV-Y7 All children Children over seven years of age TV-G TV-PG TV-14 TV-MA General audiences Parental guidance suggested 14 years old and above Adult programming Exempt - X Adults only N/A... the sub-menu options, then press ENTER to select Parental, then press ENTER. Not suitable for children under 17 years of the age-based TV parental guidelines ratings also have been shown in the U.S., where Open V-Chip ratings are provided by...
User Manual (English)
Page 18
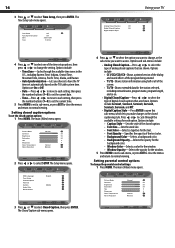
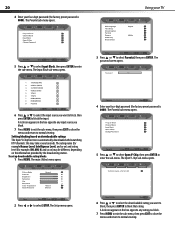
... you want to access or the option you want to block, then press ENTER to normal viewing. Password **** Parental Back 4 Enter your TV Program Block Channel Block Input Block Open V-Chip Change Password Parental Enter Select Back 5 Press or to select Program Block, then press ENTER... Temperature Natural Noise Reduction Medium Video Enter Select Exit 2 Press or to select Parental, then press ENTER. Options and sub-menus include: • U.S TV Ratings-Opens a sub-menu that are also blocked. 8 Press MENU to exit a sub-menu, or press EXIT to close the menus and return to...
... you want to access or the option you want to block, then press ENTER to normal viewing. Password **** Parental Back 4 Enter your TV Program Block Channel Block Input Block Open V-Chip Change Password Parental Enter Select Back 5 Press or to select Program Block, then press ENTER... Temperature Natural Noise Reduction Medium Video Enter Select Exit 2 Press or to select Parental, then press ENTER. Options and sub-menus include: • U.S TV Ratings-Opens a sub-menu that are also blocked. 8 Press MENU to exit a sub-menu, or press EXIT to close the menus and return to...
User Manual (English)
Page 19
... 50 Saturation 50 Hue 0 Sharpness 4 Color Temperature Natural Noise Reduction Medium Video Enter Select Exit 2 Press or to block the channel. Parental Back 4 Enter your TV Setting channel blocking To set up channel blocking: 1 Press MENU. Picture Mode Normal Contrast 50 Brightness 50 Saturation 50 Hue 0 Sharpness 4 Color Temperature Natural Noise...
... 50 Saturation 50 Hue 0 Sharpness 4 Color Temperature Natural Noise Reduction Medium Video Enter Select Exit 2 Press or to block the channel. Parental Back 4 Enter your TV Setting channel blocking To set up channel blocking: 1 Press MENU. Picture Mode Normal Contrast 50 Brightness 50 Saturation 50 Hue 0 Sharpness 4 Color Temperature Natural Noise...
User Manual (English)
Page 20
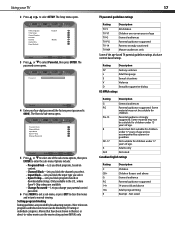
.... A lock icon appears in the box opposite any rating you want to block, then press ENTER to normal viewing. Using your TV OSD Language Time Setup Closed Caption Parental Gamma Audio Only Reset Default English Middle Setup Enter Select Exit 3 Press or to enter the... sub-menu. The Input Block sub-menu opens. 1 TV(CABLE/AIR) 2 VIDEO1 (REAR) 3 S-VIDEO1(REAR) 4 VIDEO2 (SIDE) 5 YPbPr1 6 YPbPr2 7 HDMI1(REAR) 8 HDMI2(REAR) 9 PC(VGA) Input Block Set Select...
.... A lock icon appears in the box opposite any rating you want to block, then press ENTER to normal viewing. Using your TV OSD Language Time Setup Closed Caption Parental Gamma Audio Only Reset Default English Middle Setup Enter Select Exit 3 Press or to enter the... sub-menu. The Input Block sub-menu opens. 1 TV(CABLE/AIR) 2 VIDEO1 (REAR) 3 S-VIDEO1(REAR) 4 VIDEO2 (SIDE) 5 YPbPr1 6 YPbPr2 7 HDMI1(REAR) 8 HDMI2(REAR) 9 PC(VGA) Input Block Set Select...
User Manual (English)
Page 21
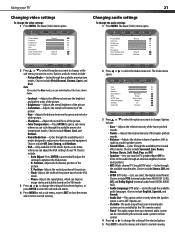
...effect modes. Choices include Vivid, Normal, Cinema, Sport, and User. Opens a sub-menu where you can adjust the VGA settings of your TV. The Audio menu Bass Treble Balance Sound Effect MTS SPDIF Type Audio Language Speaker Audio Out 50 50 0 Surround Stereo Dolby Digital English On ...8226; Clock-Adjusts the width of the picture based on the VGA mode. • Phase-Adjusts the signal phase, which can be controlled by the TV's remote control. • Fixed-The audio output from connected equipment. Choices include English, Spanish, and French. • Audio Out-This option can ...
...effect modes. Choices include Vivid, Normal, Cinema, Sport, and User. Opens a sub-menu where you can adjust the VGA settings of your TV. The Audio menu Bass Treble Balance Sound Effect MTS SPDIF Type Audio Language Speaker Audio Out 50 50 0 Surround Stereo Dolby Digital English On ...8226; Clock-Adjusts the width of the picture based on the VGA mode. • Phase-Adjusts the signal phase, which can be controlled by the TV's remote control. • Fixed-The audio output from connected equipment. Choices include English, Spanish, and French. • Audio Out-This option can ...


