Warranty (English)
Page 1
... Insignia-approved repair person dispatched to your purchase of the product ("Warranty Period"). If service of products and parts are not returned to you. This warranty also does not cover: www.dynexproducts.com 1 The Warranty Period lasts for one (1) year from the date of your home. This warranty does not cover: • Customer instruction • Installation • Set up adjustments •...
... Insignia-approved repair person dispatched to your purchase of the product ("Warranty Period"). If service of products and parts are not returned to you. This warranty also does not cover: www.dynexproducts.com 1 The Warranty Period lasts for one (1) year from the date of your home. This warranty does not cover: • Customer instruction • Installation • Set up adjustments •...
User Manual (English)
Page 2
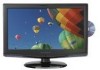
...-LDVD22-10A 22" LCD TV/DVD Combo Contents CHILD SAFETY 1 Important safety instructions 2 Warnings 2 Cautions 2 Installing the stand 3 Removing the stand 3 Removing the stand 4 Installing a wall-mount bracket 4 TV components 4 Front and side panels 4 Back 5 Remote control 5 Using the remote control 6 Installing remote control batteries 6 Aiming the remote control 7 Programming a universal remote control to work with your TV 7 Making connections 7 Connecting the power 7 Connecting an antenna or cable TV 8 Connecting a VCR 8 Connecting a camcorder or game 9 Connecting an HDMI...
...-LDVD22-10A 22" LCD TV/DVD Combo Contents CHILD SAFETY 1 Important safety instructions 2 Warnings 2 Cautions 2 Installing the stand 3 Removing the stand 3 Removing the stand 4 Installing a wall-mount bracket 4 TV components 4 Front and side panels 4 Back 5 Remote control 5 Using the remote control 6 Installing remote control batteries 6 Aiming the remote control 7 Programming a universal remote control to work with your TV 7 Making connections 7 Connecting the power 7 Connecting an antenna or cable TV 8 Connecting a VCR 8 Connecting a camcorder or game 9 Connecting an HDMI...
User Manual (English)
Page 3
...16 Setting parental controls 17 Changing parental control settings 17 Setting or changing the password 17 Setting parental control levels 18 Downloading rating information 19 Using closed captioning 20 Turning closed captioning on or off 20 Adjusting time settings 20 Setting the clock 20 Setting the sleep timer 21 Adjusting menu settings 21 Selecting the menu language and transparency 21 Labeling an input source 22 DVD Playback 22 Basic playback 22 Advanced playback 23 JPEG disc playback 23 Screen saver 23 DVD system setup 23 Playable discs 24 Troubleshooting 25 Video and...
...16 Setting parental controls 17 Changing parental control settings 17 Setting or changing the password 17 Setting parental control levels 18 Downloading rating information 19 Using closed captioning 20 Turning closed captioning on or off 20 Adjusting time settings 20 Setting the clock 20 Setting the sleep timer 21 Adjusting menu settings 21 Selecting the menu language and transparency 21 Labeling an input source 22 DVD Playback 22 Basic playback 22 Advanced playback 23 JPEG disc playback 23 Screen saver 23 DVD system setup 23 Playable discs 24 Troubleshooting 25 Video and...
User Manual (English)
Page 6
... and power line surges. Replacement parts When replacement parts are covered by the manufacturer, or sold with the apparatus. Power source Operate your TV only from the type of other . Adjust only those controls that are required, make absolutely sure that you connect the class I apparatus need to be located in damage and will often require extensive work by a qualified technician to restore your TV to qualified service...
... and power line surges. Replacement parts When replacement parts are covered by the manufacturer, or sold with the apparatus. Power source Operate your TV only from the type of other . Adjust only those controls that are required, make absolutely sure that you connect the class I apparatus need to be located in damage and will often require extensive work by a qualified technician to restore your TV to qualified service...
User Manual (English)
Page 7
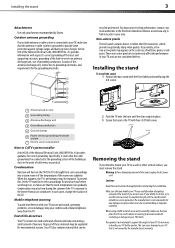
... to support the weight of the antenna-discharge unit, connection to grounding electrodes, and requirements for the grounding electrode. 1 2 3 4 5 7 6 recycled and reused. Installing the stand To install the stand: 1 Position the base stand with four (4) ST4x8 screws. To prevent this job, refer to CATV system installer Article 820 of the National Electrical Code, ANSI/NFPA No. 70, provides information with your TV picture and sound, operating problems, or...
... to support the weight of the antenna-discharge unit, connection to grounding electrodes, and requirements for the grounding electrode. 1 2 3 4 5 7 6 recycled and reused. Installing the stand To install the stand: 1 Position the base stand with four (4) ST4x8 screws. To prevent this job, refer to CATV system installer Article 820 of the National Electrical Code, ANSI/NFPA No. 70, provides information with your TV picture and sound, operating problems, or...
User Manual (English)
Page 8
... power cord is unplugged. 7 Remote sensor Receives signals from your computer to this jack. To attach your TV to open the on page 8. R AUDIO IN L S-VIDEO IN R AUDIO IN L VIDEO IN SERVICE COMPONENT IN Y Pb Pr ANT/CABLE IN TV components Front and side panels MENU INPUT VOL+ VOL- Description Press to a wall-mount bracket: Warning: These servicing instructions are qualified to do not need to make an audio connection. Press to a wall-mount bracket (not provided), you are for use...
... power cord is unplugged. 7 Remote sensor Receives signals from your computer to this jack. To attach your TV to open the on page 8. R AUDIO IN L S-VIDEO IN R AUDIO IN L VIDEO IN SERVICE COMPONENT IN Y Pb Pr ANT/CABLE IN TV components Front and side panels MENU INPUT VOL+ VOL- Description Press to a wall-mount bracket: Warning: These servicing instructions are qualified to do not need to make an audio connection. Press to a wall-mount bracket (not provided), you are for use...

User Manual (English)
Page 9
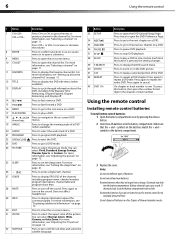
... the parental control password. For more information, see "Adjusting the sound" on your TV in Standby mode. Press to turn on page 13. VOL + INFO CH.LIST FAVORITE ZOOM EXIT TITLE DISPLAY SETUP SUBTITLE REV PREV NEXT MENU STOP PAUSE PLAY/ENTER SLOW ANGLE ZOOM T.SEARCH AUDIO PROGRAM REPEAT A-B 10+ 31 32 33 34 35 36 37 38 39 40 41 42 43 # Button 1 POWER 2 INPUT 3 CCD 4 MTS/SAP 5 Numbers 6 RECALL...
... the parental control password. For more information, see "Adjusting the sound" on your TV in Standby mode. Press to turn on page 13. VOL + INFO CH.LIST FAVORITE ZOOM EXIT TITLE DISPLAY SETUP SUBTITLE REV PREV NEXT MENU STOP PAUSE PLAY/ENTER SLOW ANGLE ZOOM T.SEARCH AUDIO PROGRAM REPEAT A-B 10+ 31 32 33 34 35 36 37 38 39 40 41 42 43 # Button 1 POWER 2 INPUT 3 CCD 4 MTS/SAP 5 Numbers 6 RECALL...
User Manual (English)
Page 10
... DVD mode. Press to go to open the on -screen menu. Press to display information about the DVD, including Time Elapsed, Time Remaining, Chapter Elapsed, Chapter Remaining, and Display off the sound. Press to display EPG OSD of the channel, including program name. Press to change the viewing angle of batteries in the battery compartment. 3 Replace the cover. channel number, program description, channel label and program show time. Press to play a DVD in the channel list...
... DVD mode. Press to go to open the on -screen menu. Press to display information about the DVD, including Time Elapsed, Time Remaining, Chapter Elapsed, Chapter Remaining, and Display off the sound. Press to display EPG OSD of the channel, including program name. Press to change the viewing angle of batteries in the battery compartment. 3 Replace the cover. channel number, program description, channel label and program show time. Press to play a DVD in the channel list...
User Manual (English)
Page 11
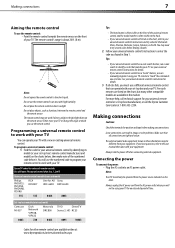
... the remote control to work with a new or existing universal remote control. The remote control may not work if direct sunlight or bright light shines on the chart, but many other remote controls are listed on the remote sensor. Five such remotes are available online at a time. If you will use the numbered code to program your remote control to work with your TV You can operate both your set-top box and your TV. Always turn the power off when connecting external equipment...
... the remote control to work with a new or existing universal remote control. The remote control may not work if direct sunlight or bright light shines on the chart, but many other remote controls are listed on the remote sensor. Five such remotes are available online at a time. If you will use the numbered code to program your remote control to work with your TV You can operate both your set-top box and your TV. Always turn the power off when connecting external equipment...
User Manual (English)
Page 12
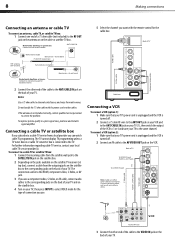
... your TV, then press INPUT to select VIDEO mode for the cable box. S-Video cable S-Video cable Cable box Connecting a VCR To connect a VCR (option 1): 1 Make sure that your TV's power cord is unplugged and the VCR is turned off . 2 Connect an AV cable to the HDMI, component video, S-Video, or AV jack. 3 If you use a component video, S-Video, or AV cable, connect audio cables to the corresponding jacks on the back of your TV and on the staellite box. 4 Turn on your TV (1), then switch the output...
... your TV, then press INPUT to select VIDEO mode for the cable box. S-Video cable S-Video cable Cable box Connecting a VCR To connect a VCR (option 1): 1 Make sure that your TV's power cord is unplugged and the VCR is turned off . 2 Connect an AV cable to the HDMI, component video, S-Video, or AV jack. 3 If you use a component video, S-Video, or AV cable, connect audio cables to the corresponding jacks on the back of your TV and on the staellite box. 4 Turn on your TV (1), then switch the output...
User Manual (English)
Page 14
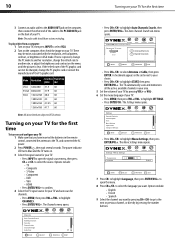
... CH+/CH- To play video from a computer: 1 Turn on your TV, then press INPUT to the TV, and connected the AC power. 2 Press POWER , then wait several seconds. Settings Parental Controls Closed Caption Time Menu Settings Input Labels Computer Settings PICTURE AUDIO CHANNELS SETTINGS CH+ VOL VOL - + CH- Note: The audio cable should have inserted the batteries in your area. 5 Set the volume of your TV by pressing VOL+ or VOL-. 6 Set the menu language of your TV. Mode Resolution Line freq Frame...
... CH+/CH- To play video from a computer: 1 Turn on your TV, then press INPUT to the TV, and connected the AC power. 2 Press POWER , then wait several seconds. Settings Parental Controls Closed Caption Time Menu Settings Input Labels Computer Settings PICTURE AUDIO CHANNELS SETTINGS CH+ VOL VOL - + CH- Note: The audio cable should have inserted the batteries in your area. 5 Set the volume of your TV by pressing VOL+ or VOL-. 6 Set the menu language of your TV. Mode Resolution Line freq Frame...

User Manual (English)
Page 15
... may see different options on your screen. MOVE ENTER SELECT MENU PREVIOUS EXIT EXIT Settings menu Settings Parental Controls Closed Caption Time Menu Settings Input Labels Computer Settings PICTURE AUDIO CHANNELS SETTINGS CH+ VOL VOL - + CH- VOL + CH- to display a list of your saved favorite channels, press CH+ or CH- Understanding the basics 11 Understanding the basics Turning your TV on or off To turn off (standby mode): 1 Plug the power cord into standby mode. Your TV turns on. 3 Press again to select...
... may see different options on your screen. MOVE ENTER SELECT MENU PREVIOUS EXIT EXIT Settings menu Settings Parental Controls Closed Caption Time Menu Settings Input Labels Computer Settings PICTURE AUDIO CHANNELS SETTINGS CH+ VOL VOL - + CH- VOL + CH- to display a list of your saved favorite channels, press CH+ or CH- Understanding the basics 11 Understanding the basics Turning your TV on or off To turn off (standby mode): 1 Plug the power cord into standby mode. Your TV turns on. 3 Press again to select...

User Manual (English)
Page 16
... press PICTURE on the remote control to select the picture mode. • Brightness-Adjusts the brightness. • Contrast-Adjusts the contrast. • Color-Adjusts the color saturation. • Tint-Adjusts the image tint. • Sharpness-Adjusts the sharpness. • Advanced Video-Lets you set menu language and menu transparency. • Input Label-Lets you set closed caption, and program show time Adjusting the picture Adjusting the TV picture To adjust the picture: 1 Press MENU. A digital sub-channel is indicated by the main channel number...
... press PICTURE on the remote control to select the picture mode. • Brightness-Adjusts the brightness. • Contrast-Adjusts the contrast. • Color-Adjusts the color saturation. • Tint-Adjusts the image tint. • Sharpness-Adjusts the sharpness. • Advanced Video-Lets you set menu language and menu transparency. • Input Label-Lets you set closed caption, and program show time Adjusting the picture Adjusting the TV picture To adjust the picture: 1 Press MENU. A digital sub-channel is indicated by the main channel number...

User Manual (English)
Page 18
... press ENTER/CH-. The Add/Skip Channels sub-menu opens. to highlight the channel you press CH+/CH-. Equalizes the overall volume levels for all channels. • Reset Audio Settings-Resets all the active, available channels in stereo. • SAP-Select this option for channels: 1 Press MENU. Changing channel settings Automatically scanning for channels To auto scan for programs broadcast in your TV source Antenna Cable Start 0 Analog Channels 0 Digital Channels CH+ VOL VOL - + CH- The on which...
... press ENTER/CH-. The Add/Skip Channels sub-menu opens. to highlight the channel you press CH+/CH-. Equalizes the overall volume levels for all channels. • Reset Audio Settings-Resets all the active, available channels in stereo. • SAP-Select this option for channels: 1 Press MENU. Changing channel settings Automatically scanning for channels To auto scan for programs broadcast in your TV source Antenna Cable Start 0 Analog Channels 0 Digital Channels CH+ VOL VOL - + CH- The on which...

User Manual (English)
Page 22
... Parental Locks, then press ENTER/VOL+. The default password is 0000. PICTURE Settings Parental Controls Button Lock Block Unrated TV USA Parental Locks Canadian Parental Locks Change Password AUDIO CHANNELS SETTINGS Off Off CH+ VOL VOL - + CH- TV-MA Mature audiences only. Setting parental control levels You can set Canadian controls. The on-screen menu opens. TV-14 Parental guidance strongly suggested . Note: When you want to block, then press ENTER to enter the four-digit password. 18 Setting parental controls 4 Press the number buttons to close the menu...
... Parental Locks, then press ENTER/VOL+. The default password is 0000. PICTURE Settings Parental Controls Button Lock Block Unrated TV USA Parental Locks Canadian Parental Locks Change Password AUDIO CHANNELS SETTINGS Off Off CH+ VOL VOL - + CH- TV-MA Mature audiences only. Setting parental control levels You can set Canadian controls. The on-screen menu opens. TV-14 Parental guidance strongly suggested . Note: When you want to block, then press ENTER to enter the four-digit password. 18 Setting parental controls 4 Press the number buttons to close the menu...

User Manual (English)
Page 24
...; CC2 to turn closed captioning on or off . Select CS1, CS2, CS3, CS4, CS5, CS6, or Off. • Digital CC Settings-To change digital closed captioning Closed captioning helps the hearing impaired with the broadcast program, as well as text on the screen when this option is selected. Adjusting time settings Setting the clock To set up. Picture Mode Brightness Contrast Color Tint Sharpness CH+ VOL VOL - + CH- Settings Parental Controls Closed Caption Time Menu Settings Input Labels Computer Settings PICTURE AUDIO CHANNELS SETTINGS CH+ VOL...
...; CC2 to turn closed captioning on or off . Select CS1, CS2, CS3, CS4, CS5, CS6, or Off. • Digital CC Settings-To change digital closed captioning Closed captioning helps the hearing impaired with the broadcast program, as well as text on the screen when this option is selected. Adjusting time settings Setting the clock To set up. Picture Mode Brightness Contrast Color Tint Sharpness CH+ VOL VOL - + CH- Settings Parental Controls Closed Caption Time Menu Settings Input Labels Computer Settings PICTURE AUDIO CHANNELS SETTINGS CH+ VOL...
User Manual (English)
Page 27
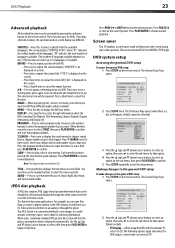
... three times to repeat the entire DVD ("ALL" is ideal for chapter search. The JPEG format is a convenient method to store images in the player, default cannot be activated by software and displayed through the video output interface or on the television screen. Screen saver This TV employs a screen saver mode to display the DVD root menu. General Setup Page --(1/2) Tv Display 4˖3 LB Angle Mark On Osd Lang ENG Caption On Screen...
... three times to repeat the entire DVD ("ALL" is ideal for chapter search. The JPEG format is a convenient method to store images in the player, default cannot be activated by software and displayed through the video output interface or on the television screen. Screen saver This TV employs a screen saver mode to display the DVD root menu. General Setup Page --(1/2) Tv Display 4˖3 LB Angle Mark On Osd Lang ENG Caption On Screen...
User Manual (English)
Page 29
... the antenna or cable TV is connected correctly. For more information, see "Installing remote control batteries" on page 12. • Make sure that the power cord is normal. For more information, see "Adjusting the picture" on an LCD screen is plugged into a power outlet. • Press POWER on page 8. • Adjust the color saturation. Maintenance Cleaning • Before cleaning the screen, unplug your TV from your TV, then turn off your TV. For...
... the antenna or cable TV is connected correctly. For more information, see "Installing remote control batteries" on page 12. • Make sure that the power cord is normal. For more information, see "Adjusting the picture" on an LCD screen is plugged into a power outlet. • Press POWER on page 8. • Adjust the color saturation. Maintenance Cleaning • Before cleaning the screen, unplug your TV from your TV, then turn off your TV. For...
User Manual (English)
Page 30
... no user-serviceable parts inside. Model Picture/sound system Audio output External input ports Power requirements Power consumption Temperature Humidity Dimensions Weight Accessories 22" NTSC, ATSC, Clear QAM ≥ 3W+3W AV input, PC input, S-VIDEO input, PC audio input, YPbPr input, Antenna input, HDMI input, AUDIO in a particular installation. However, there is encouraged to try to change without notice or obligation. Appareil de réception télévision ordinaire, Canada BETS-7 / NTMR-7 Notices Specifications and features are subject to repair your TV/DVD...
... no user-serviceable parts inside. Model Picture/sound system Audio output External input ports Power requirements Power consumption Temperature Humidity Dimensions Weight Accessories 22" NTSC, ATSC, Clear QAM ≥ 3W+3W AV input, PC input, S-VIDEO input, PC audio input, YPbPr input, Antenna input, HDMI input, AUDIO in a particular installation. However, there is encouraged to try to change without notice or obligation. Appareil de réception télévision ordinaire, Canada BETS-7 / NTMR-7 Notices Specifications and features are subject to repair your TV/DVD...
User Manual (English)
Page 31
... notices 27 One-year limited warranty Dynex Products ("Dynex") warrants to you, the original purchaser of this new DX-LDVD22-10A ("Product"), that the Product shall be free of defects in the original manufacture of the material or workmanship for a television with a screen 30 inches or larger, call 1-800-305-2204 www.dynexproducts.com Distributed by Best Buy Purchasing, LLC 7601...
... notices 27 One-year limited warranty Dynex Products ("Dynex") warrants to you, the original purchaser of this new DX-LDVD22-10A ("Product"), that the Product shall be free of defects in the original manufacture of the material or workmanship for a television with a screen 30 inches or larger, call 1-800-305-2204 www.dynexproducts.com Distributed by Best Buy Purchasing, LLC 7601...


