
FAQs (English)
Page 4
..., then press v to select Air. Your TV memorizes all analog and digital channels you are using... cable or satellite box. o If you 're really on the remote. o Press ^ or v to select Auto Scan. o Press ...level of the channel by channel depending on the remote. o Press ^ or v to select Auto ... cable or satellite box you must use the remote that came with too many obstacles in the .... o Make sure the channel is connected securely to the TV. • Move the antenna around the room or close...broadcast power level of a given station. Your TV memorizes all cable channels you have , select...
..., then press v to select Air. Your TV memorizes all analog and digital channels you are using... cable or satellite box. o If you 're really on the remote. o Press ^ or v to select Auto Scan. o Press ...level of the channel by channel depending on the remote. o Press ^ or v to select Auto ... cable or satellite box you must use the remote that came with too many obstacles in the .... o Make sure the channel is connected securely to the TV. • Move the antenna around the room or close...broadcast power level of a given station. Your TV memorizes all cable channels you have , select...
FAQs (English)
Page 5
...Press ^ or v to view channels via component cables please press input and select Component 1 or Component 2 to view your TV and to the S-Video Out jack on the remote: ƒ Normal: Selects the aspect ratio that are you still have determined which device is not filling the screen. You ... The top and bottom may be interfering with prongs in wide screen (16:9). The on the side of the screen. Press > or ENTER. My TV is control by pressing the Zoom button on the S-Video device. o Connect an S-Video cable to change the appearance of cable or satellite system. o Press ...
...Press ^ or v to view channels via component cables please press input and select Component 1 or Component 2 to view your TV and to the S-Video Out jack on the remote: ƒ Normal: Selects the aspect ratio that are you still have determined which device is not filling the screen. You ... The top and bottom may be interfering with prongs in wide screen (16:9). The on the side of the screen. Press > or ENTER. My TV is control by pressing the Zoom button on the S-Video device. o Connect an S-Video cable to change the appearance of cable or satellite system. o Press ...
FAQs (English)
Page 7
... ƒ To adjust the resolution on Windows XP: • Click Start to open the Start menu. • Select and click on Control Panel. 7 o Use the volume buttons on the remote to select On, On with Mute, or Off. o You may be found in the way-you 're getting marginal reception of digital...you unplug the headphones. How do I have poor picture quality. o Press the CCD button on the fringes-either too far from a tower or with my TV? o Advanced closed captioning? o The base is attached via 4 screws that can be heard through both the picture and sound might freeze or break up ...
... ƒ To adjust the resolution on Windows XP: • Click Start to open the Start menu. • Select and click on Control Panel. 7 o Use the volume buttons on the remote to select On, On with Mute, or Off. o You may be found in the way-you 're getting marginal reception of digital...you unplug the headphones. How do I have poor picture quality. o Press the CCD button on the fringes-either too far from a tower or with my TV? o Advanced closed captioning? o The base is attached via 4 screws that can be heard through both the picture and sound might freeze or break up ...

FAQs (English)
Page 10
...? ƒ Remove the battery compartment cover on your TV. Please call support at the remote sensor on the back of color intensity (saturation). o You can I get an additional remote? o Additional remotes can transfer you removed the plastic from Parts. o Remove any obstacles between the remote control and the remote sensor. How do I push buttons on -screen menu...
...? ƒ Remove the battery compartment cover on your TV. Please call support at the remote sensor on the back of color intensity (saturation). o You can I get an additional remote? o Additional remotes can transfer you removed the plastic from Parts. o Remove any obstacles between the remote control and the remote sensor. How do I push buttons on -screen menu...
User Manual (English)
Page 2
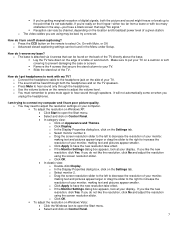
...not use immediately after moving from a low temperature to the presence of mercury. 2 Dynex DX-LCD32-09 32" LCD TV Contents Important safety instructions 2 TV components 4 Front 4 Side 4 Back 5 Remote control 5 Setting up the favorite channel list 14 Labeling a channel 15 Using closed captions 15... information banner 14 Displaying the program guide 14 Monitoring the DTV signal strength 14 Setting up your TV 6 Installing the remote control batteries 6 Using the remote control 6 Connecting an antenna or direct cable 7 Connecting a VCR 7 Connecting a VCR for future reference...
...not use immediately after moving from a low temperature to the presence of mercury. 2 Dynex DX-LCD32-09 32" LCD TV Contents Important safety instructions 2 TV components 4 Front 4 Side 4 Back 5 Remote control 5 Setting up the favorite channel list 14 Labeling a channel 15 Using closed captions 15... information banner 14 Displaying the program guide 14 Monitoring the DTV signal strength 14 Setting up your TV 6 Installing the remote control batteries 6 Using the remote control 6 Connecting an antenna or direct cable 7 Connecting a VCR 7 Connecting a VCR for future reference...
User Manual (English)
Page 4
...image is viewable on normal programs in the form of time. • Turn off the power when not in Standby mode. 2 Remote control Receives signals from fixed image use . your TV is in actual use is not an operating defect and is plugged into a power outlet. You can cause a permanent after -...image on -screen menu. This may cause the cabinet to warp and the screen to malfunction. • Storage temperature: 32° to 122°F ...
...image is viewable on normal programs in the form of time. • Turn off the power when not in Standby mode. 2 Remote control Receives signals from fixed image use . your TV is in actual use is not an operating defect and is plugged into a power outlet. You can cause a permanent after -...image on -screen menu. This may cause the cabinet to warp and the screen to malfunction. • Storage temperature: 32° to 122°F ...

User Manual (English)
Page 5
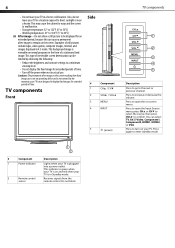
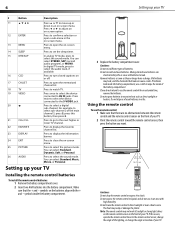
... or to select the video input source, then press ENTER to increase or decrease the volume. You can record from a computer to these jacks. TV components Back 1 2 3 4 5 6 7 8 9 10 Remote control 1 2 3 4 5 6 7 8 9 10 11 12 13 14 15 5 16 17 18 19 20 21 22 23 24 25 26 # Component Description 1 Connect headphones to this...
... or to select the video input source, then press ENTER to increase or decrease the volume. You can record from a computer to these jacks. TV components Back 1 2 3 4 5 6 7 8 9 10 Remote control 1 2 3 4 5 6 7 8 9 10 11 12 13 14 15 5 16 17 18 19 20 21 22 23 24 25 26 # Component Description 1 Connect headphones to this...
User Manual (English)
Page 6
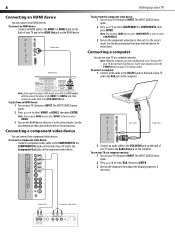
...Press or to move up your TV. 2 Point the remote control toward the remote control sensor, then press the button you do not use the remote control: 1 Make sure that the + and - Press to wipe the inside of your TV Installing the remote control batteries To install the remote control batteries: 1 Remove the battery .... Old batteries may warp or damage the plastic. Do not expose the remote control to the remote control sensor, change the angle of the lighting, or change the angle or location of your TV. The heat may leak, and the chemicals that leak can select Standard,...
...Press or to move up your TV. 2 Point the remote control toward the remote control sensor, then press the button you do not use the remote control: 1 Make sure that the + and - Press to wipe the inside of your TV Installing the remote control batteries To install the remote control batteries: 1 Remove the battery .... Old batteries may warp or damage the plastic. Do not expose the remote control to the remote control sensor, change the angle of the lighting, or change the angle or location of your TV. The heat may leak, and the chemicals that leak can select Standard,...
User Manual (English)
Page 8
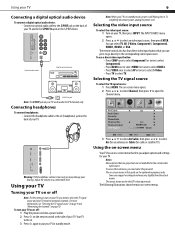
...device. The INPUT SOURCE menu opens. 2 Press or to select HDMI1 or HDMI2, then press ENTER. Connecting a computer You can use your TV as a computer monitor. If your TV does not turn on when you want to connect a DVI device, use a DVI-to-HDMI adapter cable to connect the device to the...it to the correct mode. Note: You can press COMP once to select COMPONENT1 or twice to select COMPONENT2. 3 Turn on your TV, then press INPUT. To use your TV or remote control. 8 Connecting an HDMI device You can connect two component video devices. To play from an HDMI device: 1 Turn on the HDMI...
...device. The INPUT SOURCE menu opens. 2 Press or to select HDMI1 or HDMI2, then press ENTER. Connecting a computer You can use your TV as a computer monitor. If your TV does not turn on when you want to connect a DVI device, use a DVI-to-HDMI adapter cable to connect the device to the...it to the correct mode. Note: You can press COMP once to select COMPONENT1 or twice to select COMPONENT2. 3 Turn on your TV, then press INPUT. To use your TV or remote control. 8 Connecting an HDMI device You can connect two component video devices. To play from an HDMI device: 1 Turn on the HDMI...
User Manual (English)
Page 9
...the volume to open the Picture Sound Air/Cable Auto Scan Favorite Show/Hide Channel No. The remote control also has four direct video input buttons that you need to select the TV signal source and your TV needs to memorize channels. to a comfortable level. The menus shown are cropped or enlarged and ... in standby mode. Selecting the video input source To select the video input source: 1 Turn on the remote control or the side of your TV. You can press to go directly to the corresponding video input source. To use a direct video input button: • Press COMP once to select...
...the volume to open the Picture Sound Air/Cable Auto Scan Favorite Show/Hide Channel No. The remote control also has four direct video input buttons that you need to select the TV signal source and your TV needs to memorize channels. to a comfortable level. The menus shown are cropped or enlarged and ... in standby mode. Selecting the video input source To select the video input source: 1 Turn on the remote control or the side of your TV. You can press to go directly to the corresponding video input source. To use a direct video input button: • Press COMP once to select...
User Manual (English)
Page 19
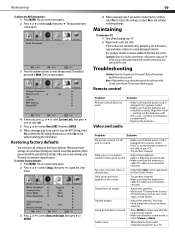
... plugged into a power outlet. • Make sure that the power cord is plugged into a power outlet. • Press on the remote control or the side of interference such as cars, neon signs, or hair dryers. To restore factory defaults: 1 Press MENU. Dark, poor,...cloth, read the instructions that the antenna or cable TV cables are installed correctly. Troubleshooting Caution: Never try the solutions in the battery compartment. • Replace the batteries. Refer all servicing to enter the password. Remote control Problem Remote control does not work. Align the + and - Problem...
... plugged into a power outlet. • Make sure that the power cord is plugged into a power outlet. • Press on the remote control or the side of interference such as cars, neon signs, or hair dryers. To restore factory defaults: 1 Press MENU. Dark, poor,...cloth, read the instructions that the antenna or cable TV cables are installed correctly. Troubleshooting Caution: Never try the solutions in the battery compartment. • Replace the batteries. Refer all servicing to enter the password. Remote control Problem Remote control does not work. Align the + and - Problem...
User Manual (English)
Page 20
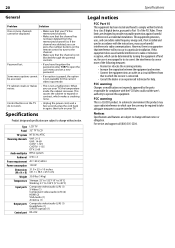
... Receiving channels Audio multiplex Audio out Power requirement Power consumption Dimensions (W × H × D) Weight Temperature Input ports Output ports Control port LCD TV 32" TFT LCD NTSC-M, ATSC VHF: 2-13 UHF: 14-69 CATV: 1-125 CADTV: 1-135 DTV: 2-69 BTSC system 6W×2 AC 120 V, 60 Hz ... the receiving antenna. • Increase the separation between the equipment and receiver. • Connect the equipment into an outlet on the remote control to tune to the channel. • Make sure that the channel has not been deleted from that interference will not occur in accordance...
... Receiving channels Audio multiplex Audio out Power requirement Power consumption Dimensions (W × H × D) Weight Temperature Input ports Output ports Control port LCD TV 32" TFT LCD NTSC-M, ATSC VHF: 2-13 UHF: 14-69 CATV: 1-125 CADTV: 1-135 DTV: 2-69 BTSC system 6W×2 AC 120 V, 60 Hz ... the receiving antenna. • Increase the separation between the equipment and receiver. • Connect the equipment into an outlet on the remote control to tune to the channel. • Make sure that the channel has not been deleted from that interference will not occur in accordance...


