User Manual (English)
Page 2
... Warnings 2 Cautions 2 Installing the stand or removing the stand column 4 Installing the stand 4 Removing the stand column 5 Installing a wall-mount bracket 5 TV components 6 Front 6 Side 6 Back 7 Remote control 8 Using the remote control 9 Installing remote control batteries 9 Aiming the remote control 9 Programming a ... 16 Adjusting the picture 16 Adjusting the TV picture 16 Adjusting Advanced Video settings 17 Adjusting the computer image 17 Adjusting the sound 18 Adjusting the sound 18 Selecting the audio mode 18 Playing TV audio only 18 Changing channel settings 19 ...
... Warnings 2 Cautions 2 Installing the stand or removing the stand column 4 Installing the stand 4 Removing the stand column 5 Installing a wall-mount bracket 5 TV components 6 Front 6 Side 6 Back 7 Remote control 8 Using the remote control 9 Installing remote control batteries 9 Aiming the remote control 9 Programming a ... 16 Adjusting the picture 16 Adjusting the TV picture 16 Adjusting Advanced Video settings 17 Adjusting the computer image 17 Adjusting the sound 18 Adjusting the sound 18 Selecting the audio mode 18 Playing TV audio only 18 Changing channel settings 19 ...
User Manual (English)
Page 7
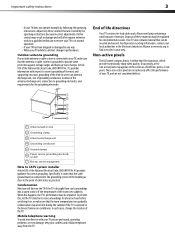
...your area. Article 810 of the National Electrical Code, ANSI/NFPA No. 70, provides information with your TV picture and sound, operating problems, or even damage, keep your TV, and are covered by the operating instructions because incorrect adjustment of mercury. Adjust only those controls that the...small amount of other controls may appear on , or make sure that the antenna or cable system is brought from the TV. Non-active pixels The LCD panel contains almost 3 million thin film transistors, which provide exceptionally sharp video quality. In such cases, change in damage ...
...your area. Article 810 of the National Electrical Code, ANSI/NFPA No. 70, provides information with your TV picture and sound, operating problems, or even damage, keep your TV, and are covered by the operating instructions because incorrect adjustment of mercury. Adjust only those controls that the...small amount of other controls may appear on , or make sure that the antenna or cable system is brought from the TV. Non-active pixels The LCD panel contains almost 3 million thin film transistors, which provide exceptionally sharp video quality. In such cases, change in damage ...
User Manual (English)
Page 11
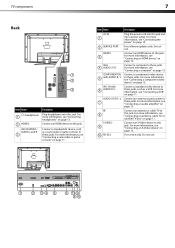
... "Connecting an audio amplifier" on page 11. Connect an antenna or cable TV to this jack. Connect a computer to these jacks. For more information, see "Connecting an antenna, cable TV, or satellite TV box" on page 13. Do not use . TV components 7 Back 1 2 3 Item Name (headphone) 1 2 HDMI ...2 AV2 IN VIDEO / AUDIO L and R 3 Description Plug headphones into a power outlet. Connect an external sound system to these jacks. For more...
... "Connecting an audio amplifier" on page 11. Connect an antenna or cable TV to this jack. Connect a computer to these jacks. For more information, see "Connecting an antenna, cable TV, or satellite TV box" on page 13. Do not use . TV components 7 Back 1 2 3 Item Name (headphone) 1 2 HDMI ...2 AV2 IN VIDEO / AUDIO L and R 3 Description Plug headphones into a power outlet. Connect an external sound system to these jacks. For more...
User Manual (English)
Page 12
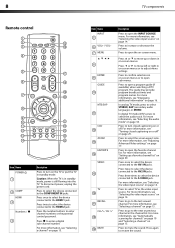
... a channel" on page 14. The guide may provide program broadcast times and program names. Press to restore the sound. For more information, see "Selecting a channel" on page 14. Press to the last viewed channel. 8 TV components Remote control 1 2 15 3 16 4 5 17 6 18 19 7 20 8 9 10 21 11 22 12 ...to increase or decrease the volume. Press to the next or previous channel in on page 18. Press to go to mute the sound. Press or to select the audio track. In digital TV mode (DTV), press to move up a favorite channel list" on -screen menus.
... a channel" on page 14. The guide may provide program broadcast times and program names. Press to restore the sound. For more information, see "Selecting a channel" on page 14. Press to the last viewed channel. 8 TV components Remote control 1 2 15 3 16 4 5 17 6 18 19 7 20 8 9 10 21 11 22 12 ...to increase or decrease the volume. Press to the next or previous channel in on page 18. Press to go to mute the sound. Press or to select the audio track. In digital TV mode (DTV), press to move up a favorite channel list" on -screen menus.

User Manual (English)
Page 13
... remote control: • Point the remote control towards the remote sensor on page 16. Either move your set the sleep timer. Dynex TV codes for universal remote controls (for all Dynex TVs manufactured after Jan. 1, 2007) Universal remote control manufacturer and model Philips PHDVD5, DirectTV PH5DSS, RC23 PMDVR8, PDVR8 RCA RCU807 One ... EXIT SLEEP 22 CH-LIST 23 PICTURE 24 AUDIO 25 Description Press to select the audio mode. For more information, see "Adjusting the sound" on page 16. symbols on -screen menu. symbols in the battery compartment. 3 Replace the cover.
... remote control: • Point the remote control towards the remote sensor on page 16. Either move your set the sleep timer. Dynex TV codes for universal remote controls (for all Dynex TVs manufactured after Jan. 1, 2007) Universal remote control manufacturer and model Philips PHDVD5, DirectTV PH5DSS, RC23 PMDVR8, PDVR8 RCA RCU807 One ... EXIT SLEEP 22 CH-LIST 23 PICTURE 24 AUDIO 25 Description Press to select the audio mode. For more information, see "Adjusting the sound" on page 16. symbols on -screen menu. symbols in the battery compartment. 3 Replace the cover.
User Manual (English)
Page 20
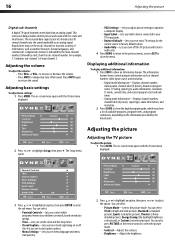
...increase in data provides a better picture and sound with the Picture menu displayed. to increase or decrease the volume. • Press MUTE to show the digital program guide, which programs/movies your TV's input jacks. • Restore Default-Lets you reset most TV settings for the current source to factory ...set menu language and menu transparency. 2 Press or to highlight an option, then press or to restore the sound. You can select: • Parental Controls-Lets you turn off the TV picture and listen to audio only. 4 Press MENU to return to the previous menu, or press EXIT to...
...increase in data provides a better picture and sound with the Picture menu displayed. to increase or decrease the volume. • Press MUTE to show the digital program guide, which programs/movies your TV's input jacks. • Restore Default-Lets you reset most TV settings for the current source to factory ...set menu language and menu transparency. 2 Press or to highlight an option, then press or to restore the sound. You can select: • Parental Controls-Lets you turn off the TV picture and listen to audio only. 4 Press MENU to return to the previous menu, or press EXIT to...

User Manual (English)
Page 22
... overall volume levels for analog channels: • Press MTS/SAP on -screen menu opens. 2 Press or to adjust the option. Playing TV audio only You can select: • Sound Mode-Selects the sound mode. The Audio menu opens. 3 Press or to highlight an option, then press or to highlight Setup, then press . You... channels. 2 Press or to adjust the option. Parental Controls You can select: • MONO-Select this option if there is noise or static on your TV and listen to close the menu. Adjusting the sound Adjusting the sound To adjust the sound: 1 Press MENU.
... overall volume levels for analog channels: • Press MTS/SAP on -screen menu opens. 2 Press or to adjust the option. Playing TV audio only You can select: • Sound Mode-Selects the sound mode. The Audio menu opens. 3 Press or to highlight an option, then press or to highlight Setup, then press . You... channels. 2 Press or to adjust the option. Parental Controls You can select: • MONO-Select this option if there is noise or static on your TV and listen to close the menu. Adjusting the sound Adjusting the sound To adjust the sound: 1 Press MENU.
User Manual (English)
Page 30
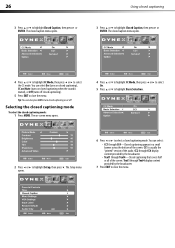
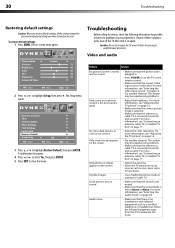
26 3 Press or to highlight Setup, then press . The closed caption menu opens. Text1 through Text4 display content provided by the broadcaster. • Text1 through Text4-... across the bottom of the screen. Parental Controls You can select On (turns on closed captioning), CC on Mute (turns on closed captioning when the sound is usually the "printed" version of the audio. You can also press CCD to select the CC mode. The Setup menu opens. 6 Press or to...
26 3 Press or to highlight Setup, then press . The closed caption menu opens. Text1 through Text4 display content provided by the broadcaster. • Text1 through Text4-... across the bottom of the screen. Parental Controls You can select On (turns on closed captioning), CC on Mute (turns on closed captioning when the sound is usually the "printed" version of the audio. You can also press CCD to select the CC mode. The Setup menu opens. 6 Press or to...
User Manual (English)
Page 34
...mode is selected. • Make sure that the antenna or cable TV is good. For more information, see "Adjusting the TV picture" on page 14. • Try another channel. Good picture, but no picture (screen is lit), but sound is connected correctly and securely. For more information, see "Selecting ...Default, then press ENTER. If none of these solutions work, turn off the TV, then turn it on -screen menu opens. Audio noise. • Make sure that there is no sound. • Make sure that the sound mode is not lit) and no interference with infrared equipment such as cars,...
...mode is selected. • Make sure that the antenna or cable TV is good. For more information, see "Adjusting the TV picture" on page 14. • Try another channel. Good picture, but no picture (screen is lit), but sound is connected correctly and securely. For more information, see "Selecting ...Default, then press ENTER. If none of these solutions work, turn off the TV, then turn it on -screen menu opens. Audio noise. • Make sure that there is no sound. • Make sure that the sound mode is not lit) and no interference with infrared equipment such as cars,...


