
User Manual (English)
Page 2
... Dynex DX-L15-L19-L22-10A 15", 19", and 22" LCD TVs Contents Child Safety 1 Important safety instructions 2 Warnings 2 Cautions 2 Installing and removing the stand 3 Installing the stand 3 Adjusting the viewing angle of the TV 4 Removing the stand 4 Installing a wall-mount bracket 4 TV components 5 Front 5 Side 5 Back 5 Remote control 6 Using the remote control 7 Installing remote control batteries 7 Aiming the remote control 7 Programming a universal remote...
... Dynex DX-L15-L19-L22-10A 15", 19", and 22" LCD TVs Contents Child Safety 1 Important safety instructions 2 Warnings 2 Cautions 2 Installing and removing the stand 3 Installing the stand 3 Adjusting the viewing angle of the TV 4 Removing the stand 4 Installing a wall-mount bracket 4 TV components 5 Front 5 Side 5 Back 5 Remote control 6 Using the remote control 7 Installing remote control batteries 7 Aiming the remote control 7 Programming a universal remote...
User Manual (English)
Page 3
...parental control levels 20 Downloading rating information 21 Using closed captioning 22 Turning closed captioning on or off 22 Selecting the closed captioning mode 22 Customizing DTV closed captioning styles 23 Adjusting time settings 24 ...Setting the clock 24 Setting the sleep timer 24 Adjusting menu settings 25 Selecting the menu language and transparency 25 Labeling an input source 26 Restoring default settings 26 Troubleshooting 27 Video and audio 27 Remote...
...parental control levels 20 Downloading rating information 21 Using closed captioning 22 Turning closed captioning on or off 22 Selecting the closed captioning mode 22 Customizing DTV closed captioning styles 23 Adjusting time settings 24 ...Setting the clock 24 Setting the sleep timer 24 Adjusting menu settings 25 Selecting the menu language and transparency 25 Labeling an input source 26 Restoring default settings 26 Troubleshooting 27 Video and audio 27 Remote...
User Manual (English)
Page 5
... instructions. 8 Do not install near water. 6 Clean only with them might be careful of broken glass. • If the LCD panel is broken, make sure that the service technician uses replacement parts specified by the operating instructions because incorrect adjustment of your... any ventilation openings. A polarized plug has two blades with a protective earthing connection. 17 Remote control batteries should not be located in the vicinity of electric shock is present within your TV. If the screen breaks, be fatal. Power lines An outside antenna system, extreme care ...
... instructions. 8 Do not install near water. 6 Clean only with them might be careful of broken glass. • If the LCD panel is broken, make sure that the service technician uses replacement parts specified by the operating instructions because incorrect adjustment of your... any ventilation openings. A polarized plug has two blades with a protective earthing connection. 17 Remote control batteries should not be located in the vicinity of electric shock is present within your TV. If the screen breaks, be fatal. Power lines An outside antenna system, extreme care ...
User Manual (English)
Page 8
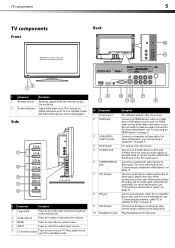
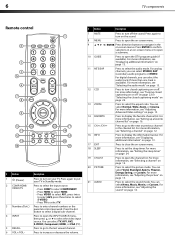
... of the connectors to these jacks. For more information, see "Connecting an HDMI device" on your TV in the channel list. TV components 5 TV components Back Front Model DX-L15-10A is in standby mode. Press to increase or decrease the volume. 3 MENU Press to open the ...jacks (yellow for video, red for audio right, and white for illustration purposes. # Component Description 1 Remote sensor Receives signals from the device to connect audio cables from the remote control. Plug headphones into this jack. Do not use . For more information, see "Connecting a camcorder...
... of the connectors to these jacks. For more information, see "Connecting an HDMI device" on your TV in the channel list. TV components 5 TV components Back Front Model DX-L15-10A is in standby mode. Press to increase or decrease the volume. 3 MENU Press to open the ...jacks (yellow for video, red for audio right, and white for illustration purposes. # Component Description 1 Remote sensor Receives signals from the device to connect audio cables from the remote control. Plug headphones into this jack. Do not use . For more information, see "Connecting a camcorder...
User Manual (English)
Page 9
For analog channels, you can select TV, AV1, AV2, S-VIDEO, Component, HDMI, or VGA (PC). 5 RECALL Press to go to the next or previous channel in the channel list. For more information, see "Turning closed captioning on or off" on page 22 or "Selecting the closed captioning on or ...page 12. For more information, see "Adjusting the sound" on page 14. For more information, see "Setting the sleep timer" on page 24. 6 TV components Remote control INFO # Button Description 1 (Power) Press to turn closed captioning mode" on page 22. 13 ZOOM Press to select the aspect ratio.
For analog channels, you can select TV, AV1, AV2, S-VIDEO, Component, HDMI, or VGA (PC). 5 RECALL Press to go to the next or previous channel in the channel list. For more information, see "Turning closed captioning on or off" on page 22 or "Selecting the closed captioning on or ...page 12. For more information, see "Adjusting the sound" on page 14. For more information, see "Setting the sleep timer" on page 24. 6 TV components Remote control INFO # Button Description 1 (Power) Press to turn closed captioning mode" on page 22. 13 ZOOM Press to select the aspect ratio.
User Manual (English)
Page 10
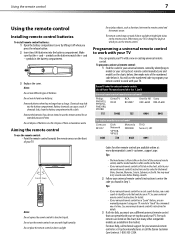
... battery compartment cover by identifying its model (or your TV. symbols in direct sunlight. Do not dispose of batteries. Do not place the remote control in the battery compartment. 3 Replace the cover. Dynex TV codes for universal remote controls (for all else fails, you do not intend... to use the numbered code to program your remote control to your universal remote control's instructions and try several ...
... battery compartment cover by identifying its model (or your TV. symbols in direct sunlight. Do not dispose of batteries. Do not place the remote control in the battery compartment. 3 Replace the cover. Dynex TV codes for universal remote controls (for all else fails, you do not intend... to use the numbered code to program your remote control to your universal remote control's instructions and try several ...
User Manual (English)
Page 13
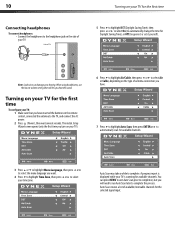
...creates a list of TV 5 Press to highlight DST (Daylight Saving Time), then press or to select On (to automatically change the time for the selected signal input. When using headphones, use the lowest volume setting that you have inserted the batteries in the remote control, connected the ...antenna to the TV, and connect the AC power. 2 Press (Power), then wait several seconds. Side of available/receivable channels for Daylight ...
...creates a list of TV 5 Press to highlight DST (Daylight Saving Time), then press or to select On (to automatically change the time for the selected signal input. When using headphones, use the lowest volume setting that you have inserted the batteries in the remote control, connected the ...antenna to the TV, and connect the AC power. 2 Press (Power), then wait several seconds. Side of available/receivable channels for Daylight ...
User Manual (English)
Page 14
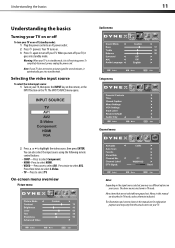
... can also select the input source using the following remote control buttons: • COMP-Press to select Component. • HDMI-Press to select HDMI. • VIDEO-Press once to select TV. Press three times to select S-Video. • TV-Press to select AV1. The above menus are for several minutes, it... mode. The INPUT SOURCE menu opens. Selecting the video input source To select the video input source: 1 Turn on your TV, then press the INPUT key on the remote, or the INPUT button on your screen. Press twice to highlight the video source, then press ENTER. When you may vary...
... can also select the input source using the following remote control buttons: • COMP-Press to select Component. • HDMI-Press to select HDMI. • VIDEO-Press once to select TV. Press three times to select S-Video. • TV-Press to select AV1. The above menus are for several minutes, it... mode. The INPUT SOURCE menu opens. Selecting the video input source To select the video input source: 1 Turn on your TV, then press the INPUT key on the remote, or the INPUT button on your screen. Press twice to highlight the video source, then press ENTER. When you may vary...
User Manual (English)
Page 16
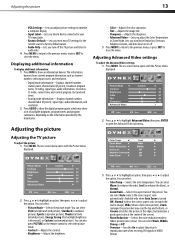
... picture), Energy Saving (the backlight brightness is turned ON), Normal (selects the correct aspect ratio to close the menu. The on the remote control to select the picture mode. • Contrast-Adjusts the contrast. • Brightness-Adjusts the brightness. 3 Press or to highlight ...video input source, and resolution. • Digital mode information-Displays channel number, station name, channel label (if preset), broadcast program name, TV rating, signal type, audio information, resolution, CC mode, current time, and current program start and end times. • Analog mode ...
... picture), Energy Saving (the backlight brightness is turned ON), Normal (selects the correct aspect ratio to close the menu. The on the remote control to select the picture mode. • Contrast-Adjusts the contrast. • Brightness-Adjusts the brightness. 3 Press or to highlight ...video input source, and resolution. • Digital mode information-Displays channel number, station name, channel label (if preset), broadcast program name, TV rating, signal type, audio information, resolution, CC mode, current time, and current program start and end times. • Analog mode ...
User Manual (English)
Page 18
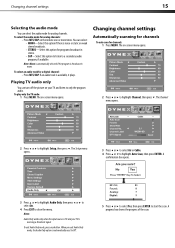
... or to select On. 4 Press EXIT to only the program audio. The on the remote one or more times. The Setup menu opens. You can turn off the picture on your TV is available, it plays. Playing TV audio only You can select: • MONO-Select this option if there is noise or... audio mode for analog channels: • Press MTS/SAP on -screen menu opens. If an audio track is receiving a broadcast signal. To play only the TV audio: 1 Press MENU. The on weak stereo broadcasts. • STEREO-Select this option for analog channels. Notes: Audio Only works only when the input source...
... or to select On. 4 Press EXIT to only the program audio. The on the remote one or more times. The Setup menu opens. You can turn off the picture on your TV is available, it plays. Playing TV audio only You can select: • MONO-Select this option if there is noise or... audio mode for analog channels: • Press MTS/SAP on -screen menu opens. If an audio track is receiving a broadcast signal. To play only the TV audio: 1 Press MENU. The on weak stereo broadcasts. • STEREO-Select this option for analog channels. Notes: Audio Only works only when the input source...
User Manual (English)
Page 28
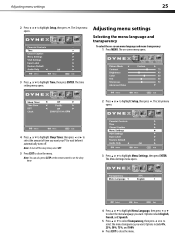
...Setup menu opens. The Menu Settings menu opens. 4 Press or to highlight Menu Language, then press or to select the menu language you want your TV to wait before it automatically turns off the sleep timer, select Off. 5 Press EXIT to select the amount of time you want. Note: To ... menu. Options include 0%, 25%, 50%, 75%, and 100% 6 Press EXIT to highlight Time, then press ENTER. Note: You can also press SLEEP on the remote control to set the sleep timer. 2 Press or to highlight Menu Settings, then press ENTER. Options include English, French, and Spanish. 5 Press or to select...
...Setup menu opens. The Menu Settings menu opens. 4 Press or to highlight Menu Language, then press or to select the menu language you want your TV to wait before it automatically turns off the sleep timer, select Off. 5 Press EXIT to select the amount of time you want. Note: To ... menu. Options include 0%, 25%, 50%, 75%, and 100% 6 Press EXIT to highlight Time, then press ENTER. Note: You can also press SLEEP on the remote control to set the sleep timer. 2 Press or to highlight Menu Settings, then press ENTER. Options include English, French, and Spanish. 5 Press or to select...
User Manual (English)
Page 30
..."Connecting an antenna, cable TV, or satellite TV box" on page 8. • Try another channel. TV type LCD TV panel 15-inch (DX-L15-10A) TFT LCD 19-inch (DX-L19-10A) TFT LCD TV system Channels 22-inch (DX-L22-10A) TFT LCD NTSC-M, ATSC VHF: 2... - 13 UHF: 14 - 69 CATV: 1 - 125 CADTV: 1-135 DTV: 2 - 69 Audio multiplex BTSC system Audio output 3W × 2 Power requirement AC 120 V, 60 Hz For more information, see "Installing remote...
..."Connecting an antenna, cable TV, or satellite TV box" on page 8. • Try another channel. TV type LCD TV panel 15-inch (DX-L15-10A) TFT LCD 19-inch (DX-L19-10A) TFT LCD TV system Channels 22-inch (DX-L22-10A) TFT LCD NTSC-M, ATSC VHF: 2... - 13 UHF: 14 - 69 CATV: 1 - 125 CADTV: 1-135 DTV: 2 - 69 Audio multiplex BTSC system Audio output 3W × 2 Power requirement AC 120 V, 60 Hz For more information, see "Installing remote...


