User Manual (English)
Page 2
ii Dynex DX-24LD230A12 24" LCD TV/DVD combo Contents CHILD SAFETY 1 Important safety instructions 2 Warnings 2 Cautions 3 Installing the stand or wall-mount bracket 4 Installing the stand 4 Installing a wall-mount bracket 4 TV/DVD combo components 5 Package contents 5 Front 5 Back 5 Side 6 Remote control 6 Making connections 7 What connection should I use 7 Connecting power 8 Connecting a cable or satellite box...
ii Dynex DX-24LD230A12 24" LCD TV/DVD combo Contents CHILD SAFETY 1 Important safety instructions 2 Warnings 2 Cautions 3 Installing the stand or wall-mount bracket 4 Installing the stand 4 Installing a wall-mount bracket 4 TV/DVD combo components 5 Package contents 5 Front 5 Back 5 Side 6 Remote control 6 Making connections 7 What connection should I use 7 Connecting power 8 Connecting a cable or satellite box...
User Manual (English)
Page 3
Dynex Televisions 43 US and Canada Market 43 Definitions 43 How long does the coverage last 43 What does this warranty cover 43 How to obtain ... 43 Where is the warranty valid 43 What does the warranty not cover 43 iii Adjusting the picture 21 Adjusting the TV picture 21 Setting power on vivid mode 22 Adjusting the computer image 22 Adjusting the sound 23 Selecting the sound mode or audio language 23 Adjusting the sound settings...
Dynex Televisions 43 US and Canada Market 43 Definitions 43 How long does the coverage last 43 What does this warranty cover 43 How to obtain ... 43 Where is the warranty valid 43 What does the warranty not cover 43 iii Adjusting the picture 21 Adjusting the TV picture 21 Setting power on vivid mode 22 Adjusting the computer image 22 Adjusting the sound 23 Selecting the sound mode or audio language 23 Adjusting the sound settings...
User Manual (English)
Page 6
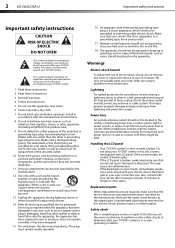
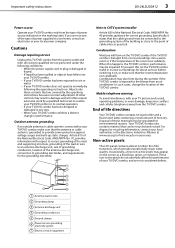
...by the manufacturer that you connect the Class I apparatus, which needs to be located in the literature accompanying your TV/DVD combo. Power lines An outside antenna system, extreme care should be taken to qualified service technicians. Handling the LCD panel • Your TV/...that have fallen into such power lines or circuits. When installing an outside antenna system should not be exposed to rain or moisture, does not operate normally, or has been dropped. 15 The wall plug is the disconnecting device. 2 DX-24LD230A12 Important safety instructions Important safety ...
...by the manufacturer that you connect the Class I apparatus, which needs to be located in the literature accompanying your TV/DVD combo. Power lines An outside antenna system, extreme care should be taken to qualified service technicians. Handling the LCD panel • Your TV/...that have fallen into such power lines or circuits. When installing an outside antenna system should not be exposed to rain or moisture, does not operate normally, or has been dropped. 15 The wall plug is the disconnecting device. 2 DX-24LD230A12 Important safety instructions Important safety ...
User Manual (English)
Page 7
...DVD combo. Article 810 of cable entry as a fixed blue, green, or red point. Important safety instructions DX-24LD230A12 3 Power source Operate your local power company. Mobile telephone warning To avoid interference with respect to correct grounding of the mast and supporting structure, ...TV/DVD combo has been dropped or damaged in wire 2 Grounding clamp 3 Antenna discharge unit 4 Grounding conductors 5 Ground clamps 6 Power service grounding electrode system 7 Electric service equipment Note to CATV system installer Article 820 of the National Electrical Code, ANSI/NFPA No....
...DVD combo. Article 810 of cable entry as a fixed blue, green, or red point. Important safety instructions DX-24LD230A12 3 Power source Operate your local power company. Mobile telephone warning To avoid interference with respect to correct grounding of the mast and supporting structure, ...TV/DVD combo has been dropped or damaged in wire 2 Grounding clamp 3 Antenna discharge unit 4 Grounding conductors 5 Ground clamps 6 Power service grounding electrode system 7 Electric service equipment Note to CATV system installer Article 820 of the National Electrical Code, ANSI/NFPA No....
User Manual (English)
Page 9
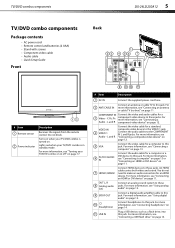
...For more information, see "Connecting an antenna or cable TV (no box)" on page 17. # Item Description 1 AC IN Connect the supplied power cord here. For more information, see "Connecting a computer" on page 12. 5 VGA Connect the video cable for an HDMI device. For... components Package contents • AC power cord • Remote control and batteries (2 AAA) • Stand with screws • Component video cable • Audio cable • Quick Setup Guide Front Back PB PR DX-24LD230A12 5 # Item 1 Remote sensor 2 Power indicator Description Receives the signals from the...
...For more information, see "Connecting an antenna or cable TV (no box)" on page 17. # Item Description 1 AC IN Connect the supplied power cord here. For more information, see "Connecting a computer" on page 12. 5 VGA Connect the video cable for an HDMI device. For... components Package contents • AC power cord • Remote control and batteries (2 AAA) • Stand with screws • Component video cable • Audio cable • Quick Setup Guide Front Back PB PR DX-24LD230A12 5 # Item 1 Remote sensor 2 Power indicator Description Receives the signals from the...
User Manual (English)
Page 10
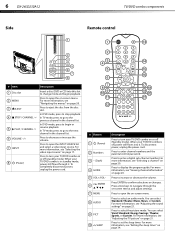
...playback. For more information, see "Selecting a channel" on page 21. 6 DX-24LD230A12 Side TV/DVD combo components Remote control # Item 1 Disc slot 2 MENU 3 EJECT 4 STOP / CHANNEL 5 PLAY / CHANNEL 6 VOLUME -/+ 7 INPUT 8 (Power) Description Insert a disc (DVD or CD) into it . For more information...to eject the disc from the disc slot. Press to turn your TV/DVD combo is off (Standby mode). To completely disconnect power, unplug the power cord. # Button 1 (Power) 2 Numbers 3 - (Dash) 4 GUIDE 5 VOL+/VOL- 6 ENTER 7 MENU 8 AUDIO 9 PICT 10 SLEEP Description ...
...playback. For more information, see "Selecting a channel" on page 21. 6 DX-24LD230A12 Side TV/DVD combo components Remote control # Item 1 Disc slot 2 MENU 3 EJECT 4 STOP / CHANNEL 5 PLAY / CHANNEL 6 VOLUME -/+ 7 INPUT 8 (Power) Description Insert a disc (DVD or CD) into it . For more information...to eject the disc from the disc slot. Press to turn your TV/DVD combo is off (Standby mode). To completely disconnect power, unplug the power cord. # Button 1 (Power) 2 Numbers 3 - (Dash) 4 GUIDE 5 VOL+/VOL- 6 ENTER 7 MENU 8 AUDIO 9 PICT 10 SLEEP Description ...
User Manual (English)
Page 12
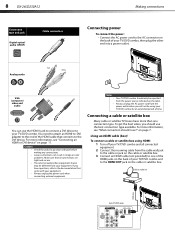
... be operated from your TV/DVD combo, then plug the other end into a power outlet. on the label. 8 DX-24LD230A12 Connection type and jack Digital optical audio (SPDIF) Cable connectors Making connections Connecting power To connect the power: • Connect the AC power cord to the AC connector on the back of your equipment. Notes •...
... be operated from your TV/DVD combo, then plug the other end into a power outlet. on the label. 8 DX-24LD230A12 Connection type and jack Digital optical audio (SPDIF) Cable connectors Making connections Connecting power To connect the power: • Connect the AC power cord to the AC connector on the back of your equipment. Notes •...
User Manual (English)
Page 14
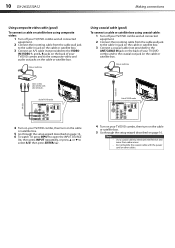
Do not bundle the coaxial cable with the power cord or other cables. Cable or satellite box A/V cable Coaxial cable Cables are often color-coded to eliminate interference and noise from radio waves. Notes &#... 16. 6 To watch TV, press INPUT to open the INPUT SOURCE list, then press INPUT repeatedly, or press or to select A/V, then press ENTER/ . 10 DX-24LD230A12 Making connections Using composite video cable (good) To connect a cable or satellite box using coaxial cable: 1 Turn off your TV/DVD combo and all connected...
Do not bundle the coaxial cable with the power cord or other cables. Cable or satellite box A/V cable Coaxial cable Cables are often color-coded to eliminate interference and noise from radio waves. Notes &#... 16. 6 To watch TV, press INPUT to open the INPUT SOURCE list, then press INPUT repeatedly, or press or to select A/V, then press ENTER/ . 10 DX-24LD230A12 Making connections Using composite video cable (good) To connect a cable or satellite box using coaxial cable: 1 Turn off your TV/DVD combo and all connected...
User Manual (English)
Page 15
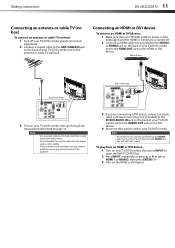
... or to the HDMI OUT jack on the DVI device. 4 Reconnect the power cord to the HDMI2 jack, you will not hear sound. Making connections DX-24LD230A12 11 Connecting an antenna or cable TV (no box) To connect an antenna...of your TV/DVD combo. If you are connecting a DVI device, connect an audio cable with the power cord or other cables. PB PR 3 If you connect a DVI device to your TV/DVD combo ...not provided) to the PC/DVI AUDIO IN jack on the back of your TV/DVD combo's power cord is unplugged and the HDMI or DVI device is not installed correctly, contact qualified service personnel...
... or to the HDMI OUT jack on the DVI device. 4 Reconnect the power cord to the HDMI2 jack, you will not hear sound. Making connections DX-24LD230A12 11 Connecting an antenna or cable TV (no box) To connect an antenna...of your TV/DVD combo. If you are connecting a DVI device, connect an audio cable with the power cord or other cables. PB PR 3 If you connect a DVI device to your TV/DVD combo ...not provided) to the PC/DVI AUDIO IN jack on the back of your TV/DVD combo's power cord is unplugged and the HDMI or DVI device is not installed correctly, contact qualified service personnel...
User Manual (English)
Page 16
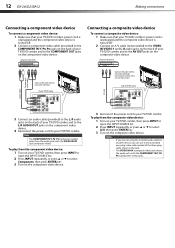
... can use it and a standard one-plug video cable instead of your TV/DVD combo. 12 DX-24LD230A12 Making connections Connecting a component video device To connect a component video device: 1 Make sure that your TV/DVD combo's power cord is unplugged and the composite video device is turned off . 2 Connect an A/V cable (not provided...
... can use it and a standard one-plug video cable instead of your TV/DVD combo. 12 DX-24LD230A12 Making connections Connecting a component video device To connect a component video device: 1 Make sure that your TV/DVD combo's power cord is unplugged and the composite video device is turned off . 2 Connect an A/V cable (not provided...
User Manual (English)
Page 17
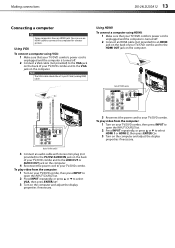
Making connections DX-24LD230A12 13 Connecting a computer Tip Some computers have an HDMI jack. Using VGA To connect a computer using HDMI: 1 Make sure that your TV/DVD combo's power cord is unplugged and the computer is turned off . 2 Connect a VGA cable (not provided) to the VGA jack on the back of your... INPUT repeatedly, or press or to select VGA, then press ENTER/ . 3 Turn on the computer and adjust the display properties if necessary. 3 Reconnect the power cord to the VGA jack on the back of your TV/DVD combo and to your TV/DVD combo. Using HDMI To connect a computer using...
Making connections DX-24LD230A12 13 Connecting a computer Tip Some computers have an HDMI jack. Using VGA To connect a computer using HDMI: 1 Make sure that your TV/DVD combo's power cord is unplugged and the computer is turned off . 2 Connect a VGA cable (not provided) to the VGA jack on the back of your... INPUT repeatedly, or press or to select VGA, then press ENTER/ . 3 Turn on the computer and adjust the display properties if necessary. 3 Reconnect the power cord to the VGA jack on the back of your TV/DVD combo and to your TV/DVD combo. Using HDMI To connect a computer using...
User Manual (English)
Page 19
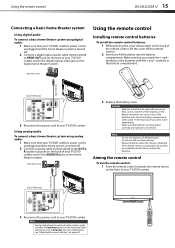
Using the remote control DX-24LD230A12 15 Connecting a basic home theater system Using digital audio To connect a basic home theater system using analog audio: 1 Make sure that your TV/DVD combo's power cord is unplugged and the home system is set to excessive heat, such as sunshine, heat registers, or ... connect a basic home theater system using digital audio: 1 Make sure that batteries are disposed of TV/DVD combo PB PR 3 Reconnect the power cord to the digital optical audio jack on the batteries with a cloth. Aiming the remote control To aim the remote control: 1 Point the...
Using the remote control DX-24LD230A12 15 Connecting a basic home theater system Using digital audio To connect a basic home theater system using analog audio: 1 Make sure that your TV/DVD combo's power cord is unplugged and the home system is set to excessive heat, such as sunshine, heat registers, or ... connect a basic home theater system using digital audio: 1 Make sure that batteries are disposed of TV/DVD combo PB PR 3 Reconnect the power cord to the digital optical audio jack on the batteries with a cloth. Aiming the remote control To aim the remote control: 1 Point the...
User Manual (English)
Page 20
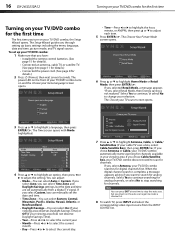
... Retail Mode, then press ENTER/ . If you through setting up your TV source screen opens. 3 Press or to page 11 for details.) • Connected the power cord. (See page 8 for details). • Connected an antenna, cable TV, or satellite TV. (See page 8 to highlight a language, then press ENTER/ . If you ... or select No to highlight Antenna, Cable, or Cable/ Satellite Box (if your cable TV uses a box, select Cable/Satellite Box), then press ENTER/ . 16 DX-24LD230A12 Turning on your TV/DVD combo for the first time Turning on your TV/DVD combo for the first time The first time you turn...
... Retail Mode, then press ENTER/ . If you through setting up your TV source screen opens. 3 Press or to page 11 for details.) • Connected the power cord. (See page 8 for details). • Connected an antenna, cable TV, or satellite TV. (See page 8 to highlight a language, then press ENTER/ . If you ... or select No to highlight Antenna, Cable, or Cable/ Satellite Box (if your cable TV uses a box, select Cable/Satellite Box), then press ENTER/ . 16 DX-24LD230A12 Turning on your TV/DVD combo for the first time Turning on your TV/DVD combo for the first time The first time you turn...
User Manual (English)
Page 21
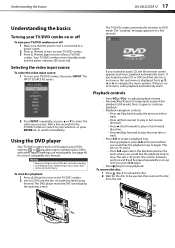
... DVD player reads the DVD and displays the opening screen. If you would like the playback loop to stop playback. Understanding the basics DX-24LD230A12 17 Understanding the basics Turning your TV/DVD combo on or off To turn your TV/DVD combo on or off your TV/DVD combo... to create a playback loop. • During playback, press A-B at the point where you loaded a video CD or DVD and that the power cord is connected to a power outlet. 2 Press (Power) to turn on your TV/DVD combo, then press INPUT. The section between points A and B will be ejected, then remove the disc...
... DVD player reads the DVD and displays the opening screen. If you would like the playback loop to stop playback. Understanding the basics DX-24LD230A12 17 Understanding the basics Turning your TV/DVD combo on or off To turn your TV/DVD combo on or off your TV/DVD combo... to create a playback loop. • During playback, press A-B at the point where you loaded a video CD or DVD and that the power cord is connected to a power outlet. 2 Press (Power) to turn on your TV/DVD combo, then press INPUT. The section between points A and B will be ejected, then remove the disc...
User Manual (English)
Page 26
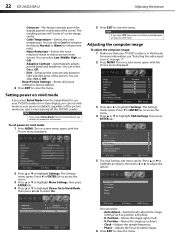
...Automatically adjusts the image settings such as your power on default, regardless of stable images. 6 Press EXIT to highlight Settings. Adjusting the computer image To adjust the computer image: 1 Make sure that your last selection. 22 DX-24LD230A12 Adjusting the picture • Overscan-This feature... extends part of the display past the visible area of the picture. Setting power on vivid mode If you select Retail Mode from the Setup Wizard...
...Automatically adjusts the image settings such as your power on default, regardless of stable images. 6 Press EXIT to highlight Settings. Adjusting the computer image To adjust the computer image: 1 Make sure that your last selection. 22 DX-24LD230A12 Adjusting the picture • Overscan-This feature... extends part of the display past the visible area of the picture. Setting power on vivid mode If you select Retail Mode from the Setup Wizard...

User Manual (English)
Page 38
... makes the menu more transparent. To turn off . Language Transparency Power On In Vivid Mode Picture Audio Settings Channel English 0 Off 5 Press EXIT to close the menu. 5 Press or to highlight Transparency, then press or to close the menu. 34 DX-24LD230A12 Adjusting menu settings Setting the sleep timer You can select English...
... makes the menu more transparent. To turn off . Language Transparency Power On In Vivid Mode Picture Audio Settings Channel English 0 Off 5 Press EXIT to close the menu. 5 Press or to highlight Transparency, then press or to close the menu. 34 DX-24LD230A12 Adjusting menu settings Setting the sleep timer You can select English...
User Manual (English)
Page 40
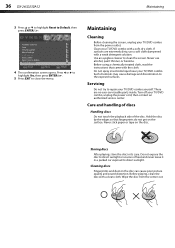
... in its case. Do not spray insecticide liquid near your TV/DVD combo, unplug the power cord, then contact an authorized service center. Such chemicals may cause damage and discoloration to Default, then press ENTER/ . 36 DX-24LD230A12 Maintaining 3 Press or to highlight Reset to the exposed surfaces. Parental Controls Time Closed Caption... dirty, use alcohol, paint thinner, or benzine. Hold the disc by the edges so that came with a soft, dry cloth. Wipe the disc from the power outlet.
... in its case. Do not spray insecticide liquid near your TV/DVD combo, unplug the power cord, then contact an authorized service center. Such chemicals may cause damage and discoloration to Default, then press ENTER/ . 36 DX-24LD230A12 Maintaining 3 Press or to highlight Reset to the exposed surfaces. Parental Controls Time Closed Caption... dirty, use alcohol, paint thinner, or benzine. Hold the disc by the edges so that came with a soft, dry cloth. Wipe the disc from the power outlet.
User Manual (English)
Page 41
...Connecting a cable or satellite box" on page 8 or "Connecting an antenna or cable TV (no box)" on page 21. • Make sure that the power cord is plugged in. • Make sure that the correct video input source is low, adjust the antenna or use a highly directional outdoor antenna or... see "Checking the digital signal strength" on page 21. • Make sure that the antenna or cable TV is connected correctly and securely. Troubleshooting DX-24LD230A12 37 Troubleshooting Warning Do not try to repair your TV/DVD combo. See "Adjusting the TV picture" on page 26. • If you are ...
...Connecting a cable or satellite box" on page 8 or "Connecting an antenna or cable TV (no box)" on page 21. • Make sure that the power cord is plugged in. • Make sure that the correct video input source is low, adjust the antenna or use a highly directional outdoor antenna or... see "Checking the digital signal strength" on page 21. • Make sure that the antenna or cable TV is connected correctly and securely. Troubleshooting DX-24LD230A12 37 Troubleshooting Warning Do not try to repair your TV/DVD combo. See "Adjusting the TV picture" on page 26. • If you are ...
User Manual (English)
Page 42
... speakers, fans, or hair dryers) may be burned into the screen. Try a new set. For the location of this TV/DVD combo. 38 DX-24LD230A12 Troubleshooting Problem Solution The picture has a few bright or dark spots. • A few bright or dark spots on an LCD screen is correctly connected...are using an antenna, the digital channel signal may be poor. See "Installing remote control batteries" on page 5. • Make sure that the power cord is normal. It does not affect the operation of the remote control sensor, see "Checking the digital signal strength" on page 26. •...
... speakers, fans, or hair dryers) may be burned into the screen. Try a new set. For the location of this TV/DVD combo. 38 DX-24LD230A12 Troubleshooting Problem Solution The picture has a few bright or dark spots. • A few bright or dark spots on an LCD screen is correctly connected...are using an antenna, the digital channel signal may be poor. See "Installing remote control batteries" on page 5. • Make sure that the power cord is normal. It does not affect the operation of the remote control sensor, see "Checking the digital signal strength" on page 26. •...

User Manual (English)
Page 43
...DVD combo. • The TV/DVD combo is not available in DVD mode. See "Locking control buttons" on page 29. • Unplug the power cord, wait a few seconds, then plug the cord back in a slide show when the photo thumbnail displays. Press SUBTITLE to select preferred subtitle ...low. This is set to Off. Note If the problem is connected, check its volume control. • The picture will be changed. Troubleshooting DX-24LD230A12 39 Problem Solution One or more channels do not work • Make sure that the sleep timer is not supported. This is not a malfunction...
...DVD combo. • The TV/DVD combo is not available in DVD mode. See "Locking control buttons" on page 29. • Unplug the power cord, wait a few seconds, then plug the cord back in a slide show when the photo thumbnail displays. Press SUBTITLE to select preferred subtitle ...low. This is set to Off. Note If the problem is connected, check its volume control. • The picture will be changed. Troubleshooting DX-24LD230A12 39 Problem Solution One or more channels do not work • Make sure that the sleep timer is not supported. This is not a malfunction...


