Owners Manual
Page 4
...the unit when it is provided. 3) Keep the unit away from the radiator heat sources. 4) Avoid using the SKIP buttons H G 18 Time Search 18 Marker Setup Screen 18 Supplied Accessories 5 Repeat 19 Symbols Used in this Manual 5 I ABOUT THE DISCS 6 Playable Discs 6 I FEATURES 7 I FUNCTIONAL OVERVIEW 8 FRONT ...the Remote Control 9 Front Panel Display 10 Displays During Operation 10 HDMI Modes and Actual Output Signals 10 Loading the Batteries 10 I DVD SETUP 25 Connection to a TV with wet hands. • Do not pull on the power cord when disconnecting it turns off whilst the...
...the unit when it is provided. 3) Keep the unit away from the radiator heat sources. 4) Avoid using the SKIP buttons H G 18 Time Search 18 Marker Setup Screen 18 Supplied Accessories 5 Repeat 19 Symbols Used in this Manual 5 I ABOUT THE DISCS 6 Playable Discs 6 I FEATURES 7 I FUNCTIONAL OVERVIEW 8 FRONT ...the Remote Control 9 Front Panel Display 10 Displays During Operation 10 HDMI Modes and Actual Output Signals 10 Loading the Batteries 10 I DVD SETUP 25 Connection to a TV with wet hands. • Do not pull on the power cord when disconnecting it turns off whilst the...

Owners Manual
Page 8
...OVERVIEW FRONT PANEL 1 2 6/25 3 4 5 7/29 ON / STANDBY REMOTE CONTROL 1 14 15 16 17 18 19 20 21 22 23 6 24 5 25 26 27 1920 10 8 13 12 11 9 1. H(SKIP DOWN) Button [page 18] 7. Display, Remote Sensor Window 32 13. REPEAT Button [page 19] 16. PURE DIRECT Button [page... G(SKIP UP) Button [page 18] 35 8. DIMMER Button [page 16] 9. A-B REPEAT Button [page 19] 15. GROUP Button [page 17] 11 27. SUPER AUDIO CD SETUP Button [page 24] 28. STOP Button [page 16] 6. PAGE Buttons [page 17] 29. ON/STANDBY (POWER ON/OFF) Buttons [page 16] 2. Disc loading tray 36 ...
...OVERVIEW FRONT PANEL 1 2 6/25 3 4 5 7/29 ON / STANDBY REMOTE CONTROL 1 14 15 16 17 18 19 20 21 22 23 6 24 5 25 26 27 1920 10 8 13 12 11 9 1. H(SKIP DOWN) Button [page 18] 7. Display, Remote Sensor Window 32 13. REPEAT Button [page 19] 16. PURE DIRECT Button [page... G(SKIP UP) Button [page 18] 35 8. DIMMER Button [page 16] 9. A-B REPEAT Button [page 19] 15. GROUP Button [page 17] 11 27. SUPER AUDIO CD SETUP Button [page 24] 28. STOP Button [page 16] 6. PAGE Buttons [page 17] 29. ON/STANDBY (POWER ON/OFF) Buttons [page 16] 2. Disc loading tray 36 ...

Owners Manual
Page 9
...) · To set Picture Control. · To set Dialog Speed. · To program a specific playback order. (DVD-Audio) · To play back tracks in the setup menu. · To call up the setup menu. · To skip tracks. · To begin fast forward/reverse search. (except JPEG) · To stop playback. SUBTITLE Button...
...) · To set Picture Control. · To set Dialog Speed. · To program a specific playback order. (DVD-Audio) · To play back tracks in the setup menu. · To call up the setup menu. · To skip tracks. · To begin fast forward/reverse search. (except JPEG) · To stop playback. SUBTITLE Button...
Owners Manual
Page 12
... OUT jacks. By hooking up the player to page 26). CONNECTIONS The following shows examples of connections commonly used currently. Playing back a DVD using incorrect settings may generate noise distortion, and may be heard in DTS is played while using an AV amplifier with a built in ...be damaged when bent at sharp angles. Use a commercially available audio optical or coaxial digital cable (not included) for audio output in the setup mode (refer to a Dolby Digital or DTS decoder, you set DOLBY DIGITAL or DTS to BITSTREAM accordingly for the audio connections. Optical cable ...
... OUT jacks. By hooking up the player to page 26). CONNECTIONS The following shows examples of connections commonly used currently. Playing back a DVD using incorrect settings may generate noise distortion, and may be heard in DTS is played while using an AV amplifier with a built in ...be damaged when bent at sharp angles. Use a commercially available audio optical or coaxial digital cable (not included) for audio output in the setup mode (refer to a Dolby Digital or DTS decoder, you set DOLBY DIGITAL or DTS to BITSTREAM accordingly for the audio connections. Optical cable ...

Owners Manual
Page 13
The multichannel audio signals recorded in the setup mode and adjust Speaker Configuration, DELAY TIME and CHANNEL LEVEL settings (refer to 5.1-channel Surround Sound System Analog 5.1-channel audio signals can be played ...speaker (left) Front speaker (right) AUDIO To 5.1-channel Audio Input Jacks Subwoofer Surround speaker (left) AV amplifier with 5.1-channel audio input jacks Surround speaker (right) DVD Speaker Cable (commercially available) 5.1ch AUDIO OUT NOTES: • For 5.1-channel connections, set ANALOG AUDIO to MULTI CHANNEL in packed PCM and the multichannel Super...
The multichannel audio signals recorded in the setup mode and adjust Speaker Configuration, DELAY TIME and CHANNEL LEVEL settings (refer to 5.1-channel Surround Sound System Analog 5.1-channel audio signals can be played ...speaker (left) Front speaker (right) AUDIO To 5.1-channel Audio Input Jacks Subwoofer Surround speaker (left) AV amplifier with 5.1-channel audio input jacks Surround speaker (right) DVD Speaker Cable (commercially available) 5.1ch AUDIO OUT NOTES: • For 5.1-channel connections, set ANALOG AUDIO to MULTI CHANNEL in packed PCM and the multichannel Super...
Owners Manual
Page 16
...• A "prohibited icon" may appear at 1080i. Refer to /from the setup menu. NOTES: • When pressed the buttons below, the pure direct mode will be as described on page 22. - 16 - General Features DVD-V DVD-A DVD may contain menus to output an analog audio signal only (no HDMI cable. &#...appear. The higher quality sound will not function while displaying the setup menu. • If you play back DVDs with a title menu, it may stop playback. OPEN/CLOSE button (on both the remote and the front panel), SETUP or DISPLAY button (on the remote), ON/STANDBY or PURE ...
...• A "prohibited icon" may appear at 1080i. Refer to /from the setup menu. NOTES: • When pressed the buttons below, the pure direct mode will be as described on page 22. - 16 - General Features DVD-V DVD-A DVD may contain menus to output an analog audio signal only (no HDMI cable. &#...appear. The higher quality sound will not function while displaying the setup menu. • If you play back DVDs with a title menu, it may stop playback. OPEN/CLOSE button (on both the remote and the front panel), SETUP or DISPLAY button (on the remote), ON/STANDBY or PURE ...
Owners Manual
Page 18
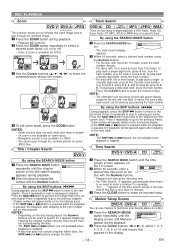
...during playback. • Playback will start at a specific track. NOTE: • The +10 button can use markers to subsequent tracks. Time Search DVD-V DVD-A CD Super Audio CD By using the Numeric buttons. • For the disc with 100 or more but less than 10 minutes. 3 Press the.... • Only x2 zoom is stopped. • A disc that appears in the time search screen if the total time of the current track. Marker Setup Screen DVD-V DVD-A CD Super Audio CD You can also bring up the track search display except for track 3, press 0, 3). for track 3, press 0, 0, 3, and ...
...during playback. • Playback will start at a specific track. NOTE: • The +10 button can use markers to subsequent tracks. Time Search DVD-V DVD-A CD Super Audio CD By using the Numeric buttons. • For the disc with 100 or more but less than 10 minutes. 3 Press the.... • Only x2 zoom is stopped. • A disc that appears in the time search screen if the total time of the current track. Marker Setup Screen DVD-V DVD-A CD Super Audio CD You can also bring up the track search display except for track 3, press 0, 3). for track 3, press 0, 0, 3, and ...

Owners Manual
Page 24
...channel is active STEREO Both right and left channels are "0". • The setting display will not appear. Super Audio CD 1 Press the SUPER AUDIO CD SETUP button repeatedly to select among items. 3 Press the ENTER button or the Cursor buttons (s or B) to adjust the selected item to a desired level. &#...; -6, -5, -4, -3, -2, -1, 0, +1, +2, +3, +4, +5, +6 can be used during Dialog Speed (refer to page 23). - 24 - Virtual Surround DVD-V DVD-A CD MP3 WMA You can only be used during Dialog Speed (refer to page 23). NOTE: • This function cannot be output when playing back...
...channel is active STEREO Both right and left channels are "0". • The setting display will not appear. Super Audio CD 1 Press the SUPER AUDIO CD SETUP button repeatedly to select among items. 3 Press the ENTER button or the Cursor buttons (s or B) to adjust the selected item to a desired level. &#...; -6, -5, -4, -3, -2, -1, 0, +1, +2, +3, +4, +5, +6 can be used during Dialog Speed (refer to page 23). - 24 - Virtual Surround DVD-V DVD-A CD MP3 WMA You can only be used during Dialog Speed (refer to page 23). NOTE: • This function cannot be output when playing back...

Owners Manual
Page 25
...8226; This setting is connected to ON or OFF, then press the ENTER button. QUICK mode consists of the DVD display screens, still mode setting, Progressive and HDMI settings. 1 Press the SETUP button in higher resolution. Then use the AUDIO and SUBTITLE buttons. FRAME improves the pic- NOTE: • ...PROG.MODE (Default: AUTO1) • Press the Cursor buttons (K or L) to exit and activate the new settings. - 25 - DVD SETUP English In Setup menu, QUICK mode, CUSTOM mode and INITIALIZE mode are not available with some discs. You can change certain aspects of the setting menus...
...8226; This setting is connected to ON or OFF, then press the ENTER button. QUICK mode consists of the DVD display screens, still mode setting, Progressive and HDMI settings. 1 Press the SETUP button in higher resolution. Then use the AUDIO and SUBTITLE buttons. FRAME improves the pic- NOTE: • ...PROG.MODE (Default: AUTO1) • Press the Cursor buttons (K or L) to exit and activate the new settings. - 25 - DVD SETUP English In Setup menu, QUICK mode, CUSTOM mode and INITIALIZE mode are not available with some discs. You can change certain aspects of the setting menus...

Owners Manual
Page 26
...SELECT DOLBY DIGITAL DTS BASS ENHANCER AUDIO MODE HDMI AUDIO ON OFF BITSTREAM BITSTREAM OFF HDMI 2 CHANNEL • Select the number of DVD discs. 1 Press the SETUP button in over 96kHz (or 88.2kHz). ANALOG AUDIO (Default : 2 CHANNEL) • Set AUDIO MODE to ANALOG beforehand to...) QUICK AUDIO • Set to BITSTREAM when the unit is connected to select an item, then press the ENTER button. connections. EN DVD SETUP Audio Setting You can change some speaker settings will be required. • Set AUDIO MODE to ANALOG beforehand to perform this setting. 1 ...
...SELECT DOLBY DIGITAL DTS BASS ENHANCER AUDIO MODE HDMI AUDIO ON OFF BITSTREAM BITSTREAM OFF HDMI 2 CHANNEL • Select the number of DVD discs. 1 Press the SETUP button in over 96kHz (or 88.2kHz). ANALOG AUDIO (Default : 2 CHANNEL) • Set AUDIO MODE to ANALOG beforehand to...) QUICK AUDIO • Set to BITSTREAM when the unit is connected to select an item, then press the ENTER button. connections. EN DVD SETUP Audio Setting You can change some speaker settings will be required. • Set AUDIO MODE to ANALOG beforehand to perform this setting. 1 ...
Owners Manual
Page 27
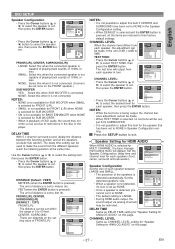
...for SUB WOOFER. • ON is not available for BASS ENHANCER when NONE is set due to restrictions in Speaker Configuration setting. 3 Press the SETUP button to exit. FRONT(L/R), CENTER, SURROUND(L/R) (DEFAULT : 12FT) FRONT(L/R): The distance can be set none on this item if CENTER and SURROUND... the ENTER button. The delay time setting can be set to NONE in the disc or the player. The test tone will appear. EN English DVD SETUP Speaker Configuration • Press the Cursor buttons (K or L) to select the speaker to set to meters (m). TEST TONE: • Press the Cursor ...
...for SUB WOOFER. • ON is not available for BASS ENHANCER when NONE is set due to restrictions in Speaker Configuration setting. 3 Press the SETUP button to exit. FRONT(L/R), CENTER, SURROUND(L/R) (DEFAULT : 12FT) FRONT(L/R): The distance can be set none on this item if CENTER and SURROUND... the ENTER button. The delay time setting can be set to NONE in the disc or the player. The test tone will appear. EN English DVD SETUP Speaker Configuration • Press the Cursor buttons (K or L) to select the speaker to set to meters (m). TEST TONE: • Press the Cursor ...

Owners Manual
Page 28
...password. Others Setting This function allows you to adjust Angle Icon availability, Auto Power off the DVD player automatically after 30 minutes of the Player's display panel and slide show mode. 1 Press the SETUP button in stop mode. 2 Press the Cursor buttons (s or B) to select CUSTOM, then...This adjusts the playback speed of any four-digit number by pressing the Numeric buttons (except for 4737), then press the ENTER button. DVD SETUP Ratings Control Ratings Control allows you to set a limit, which prevents your children from the second time onward. CONTROL LEVELS • ...
...password. Others Setting This function allows you to adjust Angle Icon availability, Auto Power off the DVD player automatically after 30 minutes of the Player's display panel and slide show mode. 1 Press the SETUP button in stop mode. 2 Press the Cursor buttons (s or B) to select CUSTOM, then...This adjusts the playback speed of any four-digit number by pressing the Numeric buttons (except for 4737), then press the ENTER button. DVD SETUP Ratings Control Ratings Control allows you to set a limit, which prevents your children from the second time onward. CONTROL LEVELS • ...
