Auto Setup Specifications
Page 1
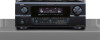
...-DENON Microphone Use for AVR-3805 Auto Setup and Room EQ Function Required Microphone Specifications for DENON Auto-Setup and Room EQ • Element : Electric Condenser Microphone • Polar Pattern : Omni-directional • Sensitivity : -40 dBV (0dB = 1V/1Pa) • Frequency Response : 20-20kHz Flat Response (Ex: BEHRINGER ECM-8000) Required Microphone Amplifier Specification for DENON...
...-DENON Microphone Use for AVR-3805 Auto Setup and Room EQ Function Required Microphone Specifications for DENON Auto-Setup and Room EQ • Element : Electric Condenser Microphone • Polar Pattern : Omni-directional • Sensitivity : -40 dBV (0dB = 1V/1Pa) • Frequency Response : 20-20kHz Flat Response (Ex: BEHRINGER ECM-8000) Required Microphone Amplifier Specification for DENON...
Auto Setup Specifications
Page 2
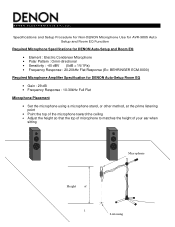
... S A ), LLC. Measure the Sound Pressure Level with the microphone amplifier • Turn on the AVR-3805 and the "microphone amplifier" • Turn on the "Phantom Supply" on the microphone amplifier AVR3805 Speaker Use the internal test tones for the on-screen display) with the AVR-3805 • Connect the microphone with SPL meter at the Microphone point.... Microphone Amplifier Gain Setting using a RMS volt meter. 2 Adjust AVR volume SPL meter = 80dB(c) Microphone MIC...
... S A ), LLC. Measure the Sound Pressure Level with the microphone amplifier • Turn on the AVR-3805 and the "microphone amplifier" • Turn on the "Phantom Supply" on the microphone amplifier AVR3805 Speaker Use the internal test tones for the on-screen display) with the AVR-3805 • Connect the microphone with SPL meter at the Microphone point.... Microphone Amplifier Gain Setting using a RMS volt meter. 2 Adjust AVR volume SPL meter = 80dB(c) Microphone MIC...

Auto Setup Specifications
Page 4
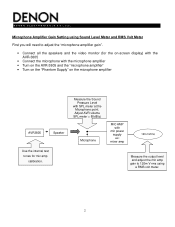
... , connect the output of 'System Setup' and turn off the AVR-3805 4 D E N O N E L E C T R O N I C S ( U S A ), LLC. • Set the Parameter "Test Tone" to 'Manual' and "Test Tone Start" to the RMS Volt Meter • Adjust the "microphone amplifier's gain" as been set , exit out of microphone amplifier to 'Yes' • Once the test tone for the Front...
... , connect the output of 'System Setup' and turn off the AVR-3805 4 D E N O N E L E C T R O N I C S ( U S A ), LLC. • Set the Parameter "Test Tone" to 'Manual' and "Test Tone Start" to the RMS Volt Meter • Adjust the "microphone amplifier's gain" as been set , exit out of microphone amplifier to 'Yes' • Once the test tone for the Front...
Auto Setup Specifications
Page 5
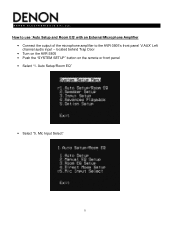
located behind Trap Door • Turn on the AVR-3805 • Push the "SYSTEM SETUP" button on the remote or front panel • Select "1. D E N O N E L E C T R O N I C S ( U S A ), LLC. Auto Setup/Room EQ" • Select "5. How to use 'Auto Setup and Room EQ' with an External Microphone Amplifier • Connect the output of the microphone amplifier to the AVR-3805's front panel 'V.AUX' Left channel audio input - Mic Input Select" 5
located behind Trap Door • Turn on the AVR-3805 • Push the "SYSTEM SETUP" button on the remote or front panel • Select "1. D E N O N E L E C T R O N I C S ( U S A ), LLC. Auto Setup/Room EQ" • Select "5. How to use 'Auto Setup and Room EQ' with an External Microphone Amplifier • Connect the output of the microphone amplifier to the AVR-3805's front panel 'V.AUX' Left channel audio input - Mic Input Select" 5
Literature/Product Sheet
Page 1
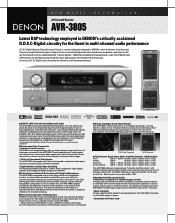
...the input of uncompressed Super Audio CD digital signals as well as DENON LINK. Also, the AVR-3805 analyzes and adjusts the frequency response of the speakers to the room with identical amplifier design featuring high current discrete output devices on all video gear ... ohms, 20Hz - 20kHz, 0.05 % THD) The AVR-3805 features an equal power 7-channel amplifier section, with an 8 band parametric equalizer. Depending on input signal type, Pure Direct will experience the absolute finest in audio playback between the AVR-3805 and a DENON LINK featured DVD player. *The 3rd Edition for DVD/...
...the input of uncompressed Super Audio CD digital signals as well as DENON LINK. Also, the AVR-3805 analyzes and adjusts the frequency response of the speakers to the room with identical amplifier design featuring high current discrete output devices on all video gear ... ohms, 20Hz - 20kHz, 0.05 % THD) The AVR-3805 features an equal power 7-channel amplifier section, with an 8 band parametric equalizer. Depending on input signal type, Pure Direct will experience the absolute finest in audio playback between the AVR-3805 and a DENON LINK featured DVD player. *The 3rd Edition for DVD/...
Literature/Product Sheet
Page 2
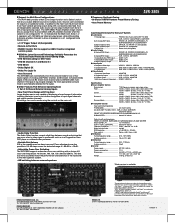
..., ONTARIO L3R 5B1 CANADA TEL: 905-475-4085 www.denon.ca *Design and specifications are power amp stage values. NEW MODEL I N F O R M A T I O N AVR-3805 ■ Support for Multi Zone Configurations • The AVR-3805 provides a Multi Zone Output function and a Select function ...Output VCR-1, VCR-2, MONITOR 1 Multi Zone Composite Video output ..... The AVR-3805's Power Amplifier Assign function lets you output different sources to support an AMX, Crestron integrated control system ■ DENON's Latest Surround Technology Faithfully Recreates the Surround Sound Produced at the Dubbing...
..., ONTARIO L3R 5B1 CANADA TEL: 905-475-4085 www.denon.ca *Design and specifications are power amp stage values. NEW MODEL I N F O R M A T I O N AVR-3805 ■ Support for Multi Zone Configurations • The AVR-3805 provides a Multi Zone Output function and a Select function ...Output VCR-1, VCR-2, MONITOR 1 Multi Zone Composite Video output ..... The AVR-3805's Power Amplifier Assign function lets you output different sources to support an AMX, Crestron integrated control system ■ DENON's Latest Surround Technology Faithfully Recreates the Surround Sound Produced at the Dubbing...

Owners Manual
Page 3
... qualified service personnel. 21. If you to dangerous voltage or other controls may be placed in a built-in fire, electric shock, or other products (including amplifiers) that produce heat. 3 This will fit into the product, c) If the product has been exposed to rain or water, d) If the product does not operate...
... qualified service personnel. 21. If you to dangerous voltage or other controls may be placed in a built-in fire, electric shock, or other products (including amplifiers) that produce heat. 3 This will fit into the product, c) If the product has been exposed to rain or water, d) If the product does not operate...
Owners Manual
Page 7
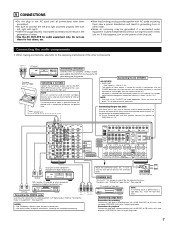
...player's analog output jacks (ANALOG OUTPUT) to this unit's tape playback (CDR/TAPE IN) jacks using pin plug cords. 7 Use a separate head amplifier or step-up transformer. Refer to "Setting the Digital in the generation of noise. • Use the AC OUTLETS for audio equipment only. Connections... input/output jacks B R LR L INPUT OUTPUT OPTICAL Connecting the DIGITAL jacks RL INPUT Use these jacks if you wish to connect external power amplifier(s) to increase the power of the this unit on. For details, see "Setting the Trigger Setup". (See page 46) CD recorder or Tape...
...player's analog output jacks (ANALOG OUTPUT) to this unit's tape playback (CDR/TAPE IN) jacks using pin plug cords. 7 Use a separate head amplifier or step-up transformer. Refer to "Setting the Digital in the generation of noise. • Use the AC OUTLETS for audio equipment only. Connections... input/output jacks B R LR L INPUT OUTPUT OPTICAL Connecting the DIGITAL jacks RL INPUT Use these jacks if you wish to connect external power amplifier(s) to increase the power of the this unit on. For details, see "Setting the Trigger Setup". (See page 46) CD recorder or Tape...

Owners Manual
Page 12
...(variable/fixed level) jacks can be used to play a different program source in ZONE3 the same time. (See page 71) ZONE3 Pre-main amplifier B RC-617 INFRARED SENSOROUTPUT INPUT + + RC-616 INFRARED RETRANSMITTER AUX OUT RL Extension jacks for future use . 12 Perform the operation to ... following operation before using the MULTI ZONE FUNCTIONS. (See page 69 ~ 71) [1] ZONE 2 preout CONNECTIONS • If another pre-main (integrated) amplifier is connected, the ZONE3 Fixed-OUT jacks can be used to the standby mode. Check that the product has been set the unit to turn...
...(variable/fixed level) jacks can be used to play a different program source in ZONE3 the same time. (See page 71) ZONE3 Pre-main amplifier B RC-617 INFRARED SENSOROUTPUT INPUT + + RC-616 INFRARED RETRANSMITTER AUX OUT RL Extension jacks for future use . 12 Perform the operation to ... following operation before using the MULTI ZONE FUNCTIONS. (See page 69 ~ 71) [1] ZONE 2 preout CONNECTIONS • If another pre-main (integrated) amplifier is connected, the ZONE3 Fixed-OUT jacks can be used to the standby mode. Check that the product has been set the unit to turn...
Owners Manual
Page 13
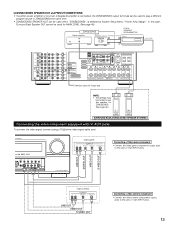
...In this speaker for future use this case , Surround Back Speaker OUT cannot be used for MAIN ZONE. (See page 45) ZONE2/ZONE3 Power amplifier RC-617 INFRARED SENSOR OUTPUT INPUT + + RC-616 INFRARED RETRANSMITTER AUX OUT L R Extension jacks for ZONE2/ZONE3. (See page 45.) (L) ... output jacks to this unit's V. AUX INPUT jacks. [3] ZONE2/ZONE3 SPEAKER OUT and PREOUT CONNECTIONS • If another power amplifier or pre-main (integrated) amplifier is connected, the ZONE2/ZONE3 output terminals can be used to play a different program source in ZONE2/ZONE3 the same time. ...
...In this speaker for future use this case , Surround Back Speaker OUT cannot be used for MAIN ZONE. (See page 45) ZONE2/ZONE3 Power amplifier RC-617 INFRARED SENSOR OUTPUT INPUT + + RC-616 INFRARED RETRANSMITTER AUX OUT L R Extension jacks for ZONE2/ZONE3. (See page 45.) (L) ... output jacks to this unit's V. AUX INPUT jacks. [3] ZONE2/ZONE3 SPEAKER OUT and PREOUT CONNECTIONS • If another power amplifier or pre-main (integrated) amplifier is connected, the ZONE2/ZONE3 output terminals can be used to play a different program source in ZONE2/ZONE3 the same time. ...

Owners Manual
Page 15
... 45. NOTES: • To use Surround back with one speaker, connect the speaker to tighten, then insert the banana plug. Doing so could result in amplifier (super woofer), etc. Either tightly twist or terminate the core wires. BACK L CH. • The settings must be disturbed by the speaker's magnetism. Insert the...
... 45. NOTES: • To use Surround back with one speaker, connect the speaker to tighten, then insert the banana plug. Doing so could result in amplifier (super woofer), etc. Either tightly twist or terminate the core wires. BACK L CH. • The settings must be disturbed by the speaker's magnetism. Insert the...
Owners Manual
Page 16
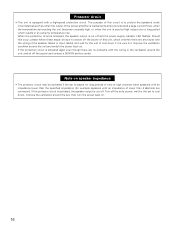
... be sure to switch off the power of this circuit is to protect the speakers under circumstances such as when the output of the power amplifier is inadvertently short-circuited and a large current flows, when the temperature surrounding the unit becomes unusually high, or when the unit is used at high... around the set is played for the unit to cool down if it is very hot. Note on . 16 Turn off the power and contact a DENON service center. Protector circuit • This unit is equipped with the wiring or the ventilation around the unit and switch the power back on.
... be sure to switch off the power of this circuit is to protect the speakers under circumstances such as when the output of the power amplifier is inadvertently short-circuited and a large current flows, when the temperature surrounding the unit becomes unusually high, or when the unit is used at high... around the set is played for the unit to cool down if it is very hot. Note on . 16 Turn off the power and contact a DENON service center. Protector circuit • This unit is equipped with the wiring or the ventilation around the unit and switch the power back on.
Owners Manual
Page 20
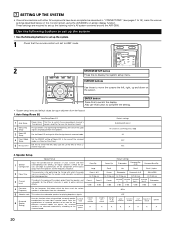
Also use this function when using the AVR-3805's on-screen display function. Once the combinations of the surround mode is to be used for ...Setup/Room EQ Auto Setup/Room EQ 1 Auto Setup Power Amp Set this to switch the surround back channel's Assignment power amplifier for use for each surround mode. 4 Direct Mode Setup Set the ON/OFF setting of Room EQ, in the case of... described in "CONNECTIONS" (see pages 7 to set up the listening room's AV system centered around the AVR-3805. Default settings SURROUND BACK All Channel and Frequency=0dB All OFF Mic 2. A / B Surround Back Sp.
Also use this function when using the AVR-3805's on-screen display function. Once the combinations of the surround mode is to be used for ...Setup/Room EQ Auto Setup/Room EQ 1 Auto Setup Power Amp Set this to switch the surround back channel's Assignment power amplifier for use for each surround mode. 4 Direct Mode Setup Set the ON/OFF setting of Room EQ, in the case of... described in "CONNECTIONS" (see pages 7 to set up the listening room's AV system centered around the AVR-3805. Default settings SURROUND BACK All Channel and Frequency=0dB All OFF Mic 2. A / B Surround Back Sp.
Owners Manual
Page 21
... ON / Mode 1 Setup Lock = OFF NOTES: • The on -screen display signals are output with priority to switch the surround back channel's power amplifier for the each input sources. Subwoofer = +15 dB DVD VDP TV DBS VCR-1 VCR-2 V. Default settings 0 ms OFF Auto Surround Mode = ON 5.... characters on TVs with the picture. 2 Dolby Digital Setup Turn the audio compression on -screen display function is connected to both the AVR-3805's S-Video and video monitor output jacks and signals are input to the S-VIDEO MONITOR OUT jack during playback of attenuation at Option Setup...
... ON / Mode 1 Setup Lock = OFF NOTES: • The on -screen display signals are output with priority to switch the surround back channel's power amplifier for the each input sources. Subwoofer = +15 dB DVD VDP TV DBS VCR-1 VCR-2 V. Default settings 0 ms OFF Auto Surround Mode = ON 5.... characters on TVs with the picture. 2 Dolby Digital Setup Turn the audio compression on -screen display function is connected to both the AVR-3805's S-Video and video monitor output jacks and signals are input to the S-VIDEO MONITOR OUT jack during playback of attenuation at Option Setup...
Owners Manual
Page 45
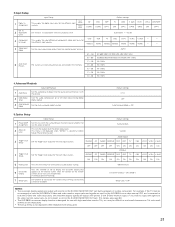
... The Option Setup Menu reappear. (Remote control unit) (Main unit) When "Zone3" is selected 5-2 Setting the Zone2 vol. 5-1 Setting the Power Amplifier Assignment Make this setting to switch the power amplifier for the surround back channel to use as Zone2 out, Zone3 to ZONE2 or ZONE3. CH SEL ENTER CH SEL ENTER...
... The Option Setup Menu reappear. (Remote control unit) (Main unit) When "Zone3" is selected 5-2 Setting the Zone2 vol. 5-1 Setting the Power Amplifier Assignment Make this setting to switch the power amplifier for the surround back channel to use as Zone2 out, Zone3 to ZONE2 or ZONE3. CH SEL ENTER CH SEL ENTER...
Owners Manual
Page 57
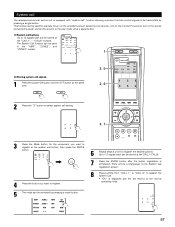
... the OFF button at the same time. 3, 5 2, 6 2 Press the "3" button to select system call setting. 3, 7 3 Press the Mode button for example to turn on the amplifier's power, select the input source, turn on the monitor TV's power, turn on the source component's power and set the source to the play mode...
... the OFF button at the same time. 3, 5 2, 6 2 Press the "3" button to select system call setting. 3, 7 3 Press the Mode button for example to turn on the amplifier's power, select the input source, turn on the monitor TV's power, turn on the source component's power and set the source to the play mode...
Owners Manual
Page 69
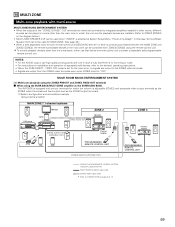
... SURROUND BACK. The AVR-3805 is equipped with multi-source MULTI ZONE MUSIC ENTERTAINMENT SYSTEM • When the outputs of separately sold devices, refer to the devices' operating instructions. • When the PURE DIRECT , VIDEO OFF mode is set to "OFF". Using external amplifier MAIN ZONE 7.1-channel ...AUDIO OUT(FIXED OUT) PROGRAMMABLE REMOTE CONTROL UNIT ROOM-TO-ROOM REMOTE CONTROL SYSTEM (separately sold separately room-to-room remote control unit (DENON RC-616, 617 or 618) is wired and connected between the MAIN ZONE and ZONE2 (ZONE3), the remote-controllable devices in such a...
... SURROUND BACK. The AVR-3805 is equipped with multi-source MULTI ZONE MUSIC ENTERTAINMENT SYSTEM • When the outputs of separately sold devices, refer to the devices' operating instructions. • When the PURE DIRECT , VIDEO OFF mode is set to "OFF". Using external amplifier MAIN ZONE 7.1-channel ...AUDIO OUT(FIXED OUT) PROGRAMMABLE REMOTE CONTROL UNIT ROOM-TO-ROOM REMOTE CONTROL SYSTEM (separately sold separately room-to-room remote control unit (DENON RC-616, 617 or 618) is wired and connected between the MAIN ZONE and ZONE2 (ZONE3), the remote-controllable devices in such a...

Owners Manual
Page 70
... OUT SR SYSTEM REMOTE CONTROL UNIT RC-969 ZONE 3 AUDIO OUT (FIXED OUT) ZONE 2 VIDEO OUT Monitor RC-617 B Power Amplifier or Premain Amplifier PROGRAMMABLE REMOTE CONTROL UNIT ZONE 2 RC-617 PROGRAMMABLE REMOTE CONTROL UNIT ZONE 3 ROOM-TO-ROOM REMOTE CONTROL SYSTEM (separately sold) control ...REMOTE CONTROL UNIT ZONE 2 B RC-617 Premain Amplifier PROGRAMMABLE REMOTE CONTROL UNIT ZONE 3 70 Using external amplifier as the ZONE2 and using this case, Surround Back PREOUT and speaker out cannot be used for MAIN ZONE. • The AVR-3805 is equipped with preout terminals for which the ...
... OUT SR SYSTEM REMOTE CONTROL UNIT RC-969 ZONE 3 AUDIO OUT (FIXED OUT) ZONE 2 VIDEO OUT Monitor RC-617 B Power Amplifier or Premain Amplifier PROGRAMMABLE REMOTE CONTROL UNIT ZONE 2 RC-617 PROGRAMMABLE REMOTE CONTROL UNIT ZONE 3 ROOM-TO-ROOM REMOTE CONTROL SYSTEM (separately sold) control ...REMOTE CONTROL UNIT ZONE 2 B RC-617 Premain Amplifier PROGRAMMABLE REMOTE CONTROL UNIT ZONE 3 70 Using external amplifier as the ZONE2 and using this case, Surround Back PREOUT and speaker out cannot be used for MAIN ZONE. • The AVR-3805 is equipped with preout terminals for which the ...

Owners Manual
Page 71
... "SOURCE ON/OFF"button (AMP mode) 71 The output level of the respective components. • ZONE3 can also be set with a method similar to an amplifier, etc., in System Setup Menu. (see page 45,46) DEFAULT SETTING (ZONE2 VOLUME LEVEL) : - - - [1] Outputting a program source to the above . 5 4 NOTE: • The main zone...
... "SOURCE ON/OFF"button (AMP mode) 71 The output level of the respective components. • ZONE3 can also be set with a method similar to an amplifier, etc., in System Setup Menu. (see page 45,46) DEFAULT SETTING (ZONE2 VOLUME LEVEL) : - - - [1] Outputting a program source to the above . 5 4 NOTE: • The main zone...

Owners Manual
Page 88
... are being pressed. • Press the proper button. - • < and > ends of the power cord plug. • Turn the power on with insulators, use a head 7 amplifier or step-up to suitable level. 64 • MUTING is cooled down , turn the power back on. • Turn off on the • Set "on...
... are being pressed. • Press the proper button. - • < and > ends of the power cord plug. • Turn the power on with insulators, use a head 7 amplifier or step-up to suitable level. 64 • MUTING is cooled down , turn the power back on. • Turn off on the • Set "on...


