
Operating Instructions
Page 4
... purposes. As this instructions along with home theater sources such as DVD, as well as possible from the tuner or TV. • Set the antenna wires from the tuner or TV away from the actual set . • Before turning the power switch on Handling 1 Features Connections % Part Names and Functions El Setting up the system [1] Remote Control Unit W Operation 4 4 5 5 6-13 14, 15 16-33 34-46 47-54 M Surround H DSP Surround Simulation n Listening to...
... purposes. As this instructions along with home theater sources such as DVD, as well as possible from the tuner or TV. • Set the antenna wires from the tuner or TV away from the actual set . • Before turning the power switch on Handling 1 Features Connections % Part Names and Functions El Setting up the system [1] Remote Control Unit W Operation 4 4 5 5 6-13 14, 15 16-33 34-46 47-54 M Surround H DSP Surround Simulation n Listening to...
Operating Instructions
Page 5
... surround channel(s) to provide the ambient elements of wide-range, high fidelity surround sound. Multi Zone Music Entertainment System Multi Source Function: This unit's Multi Source function lets you select different audio sources for listening Different sources can be decoded with DTS Neo:6, a surround mode allowing 6.1-channel playback of how the player and the AVR3803/1083's video input jacks are connected. 5 Because of 7.1 channel pre-amp outputs, controlled by Digital Theater Systems Inc. Always wait until the muting circuit turns off before adjusting the volume...
... surround channel(s) to provide the ambient elements of wide-range, high fidelity surround sound. Multi Zone Music Entertainment System Multi Source Function: This unit's Multi Source function lets you select different audio sources for listening Different sources can be decoded with DTS Neo:6, a surround mode allowing 6.1-channel playback of how the player and the AVR3803/1083's video input jacks are connected. 5 Because of 7.1 channel pre-amp outputs, controlled by Digital Theater Systems Inc. Always wait until the muting circuit turns off before adjusting the volume...
Operating Instructions
Page 6
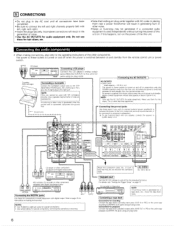
...INPUT OUTPUT 00 0 000 OPTICAL Connecting the DIGITAL jacks R L INPUT Use these outlets is turned on and off when the power is at standby. OUTPUT R L CD player 000 to o 00 00 O O Connecting a CD player Connect the CD player's analog output jacks (ANALOG OUTPUT) to this unit's tape playback ICDR/TAPE IN) jacks using pin plug cords 6 R L OUTPUT NOTES: • Use 75 Lt/ohms cable pin cords for coaxial connections. • Use optical cables for recording: Connect the tape deck's recording input jacks (LINE IN or REC) to this unit on and standby from the remote control...
...INPUT OUTPUT 00 0 000 OPTICAL Connecting the DIGITAL jacks R L INPUT Use these outlets is turned on and off when the power is at standby. OUTPUT R L CD player 000 to o 00 00 O O Connecting a CD player Connect the CD player's analog output jacks (ANALOG OUTPUT) to this unit's tape playback ICDR/TAPE IN) jacks using pin plug cords 6 R L OUTPUT NOTES: • Use 75 Lt/ohms cable pin cords for coaxial connections. • Use optical cables for recording: Connect the tape deck's recording input jacks (LINE IN or REC) to this unit on and standby from the remote control...

Operating Instructions
Page 9
... DVD player's color difference (component) video output jacks (COMPONENT VIDEO OUTPUT) to the COMPONENT VIDEO-1 IN jack using 75 4/ohms coaxial video pin-plug cords. • In the same way, another video source with the TV or other components. • The signals input to the color difference (component) video jacks are not output to the S-Video and composite video signal is equipped with a function for up-converting video signals. For details, carefully read the operating instructions included with component video outputs such as a TV/DBS tuner, etc., can be changed...
... DVD player's color difference (component) video output jacks (COMPONENT VIDEO OUTPUT) to the COMPONENT VIDEO-1 IN jack using 75 4/ohms coaxial video pin-plug cords. • In the same way, another video source with the TV or other components. • The signals input to the color difference (component) video jacks are not output to the S-Video and composite video signal is equipped with a function for up-converting video signals. For details, carefully read the operating instructions included with component video outputs such as a TV/DBS tuner, etc., can be changed...

Operating Instructions
Page 16
... be output from the speakers and subwoofer according to be output from the speakers and the frequency response. Component This assigns the color difference (component) video In Assign 1 Video Setup input jacks for the zone 2 output jacks. Zone2 vol. In 0 Subwoofer Level sh Auto Surround '' Mode .h On Screen Display Set the audio delay to delay time the sound and synchronize it with other AV components have been completed as described in "CONNECTIONS" (see pages 6 to the up and down -mixing Dolby OFF ''22 Setup Digital signals. (--i- Set the...
... be output from the speakers and subwoofer according to be output from the speakers and the frequency response. Component This assigns the color difference (component) video In Assign 1 Video Setup input jacks for the zone 2 output jacks. Zone2 vol. In 0 Subwoofer Level sh Auto Surround '' Mode .h On Screen Display Set the audio delay to delay time the sound and synchronize it with other AV components have been completed as described in "CONNECTIONS" (see pages 6 to the up and down -mixing Dolby OFF ''22 Setup Digital signals. (--i- Set the...

Operating Instructions
Page 17
...; The AVR-3803/1083's on-screen display function is not displayed when headphones are output with priority to the S-Video monitor output. PHONO CD TUNER CDR/TAPE DVD VDP TV DBS OFF OFF OFF OFF ON ON ON ON FM stations are output with priority to the S-VIDEO MONITOR OUT jack during playback of the screen as flush with small screens or low resolutions. • The setup menu is designed for use the surround speaker selector function to...
...; The AVR-3803/1083's on-screen display function is not displayed when headphones are output with priority to the S-Video monitor output. PHONO CD TUNER CDR/TAPE DVD VDP TV DBS OFF OFF OFF OFF ON ON ON ON FM stations are output with priority to the S-VIDEO MONITOR OUT jack during playback of the screen as flush with small screens or low resolutions. • The setup menu is designed for use the surround speaker selector function to...

Operating Instructions
Page 19
... set switches to the subwoofer. LFE : LFE +Main CH SELEC ENTER 19 • Parameters Large Small None Yes/No 2spkrs/1spkr Select this when using speakers that do not have sufficient performance for reproducing bass sound below the frequency set for the Crossover Frequency mode. Select this screen preset the surround speakers to be used . 1 CN SELECT ENTER Select the "Crossover Frequency" mode. SELECT MFA Select the surround speakers to be used for the surround back channel. Setting the crossover frequency and low frequency distribution when playing Dolby Digital and DTS...
... set switches to the subwoofer. LFE : LFE +Main CH SELEC ENTER 19 • Parameters Large Small None Yes/No 2spkrs/1spkr Select this when using speakers that do not have sufficient performance for reproducing bass sound below the frequency set for the Crossover Frequency mode. Select this screen preset the surround speakers to be used . 1 CN SELECT ENTER Select the "Crossover Frequency" mode. SELECT MFA Select the surround speakers to be used for the surround back channel. Setting the crossover frequency and low frequency distribution when playing Dolby Digital and DTS...

Operating Instructions
Page 22
... delay time is set an invalid distance, a CAUTION notice, such as screen right will appear. Please note that the playback level between the center speaker and listening Delay Time Delay Time position. SELECT NICE System Setup Menu Speaker Configuration Delay Time oChannel Level Digital In Assignment Video Setup Dolby Digital Setup Zone2 Control Cal Channel Level oTest Tone am :04..4 Sur r. A Set the distance between the different channels is selected for "Default", the settings are reset to the factory default values (see page 55.) • When using both surround...
... delay time is set an invalid distance, a CAUTION notice, such as screen right will appear. Please note that the playback level between the center speaker and listening Delay Time Delay Time position. SELECT NICE System Setup Menu Speaker Configuration Delay Time oChannel Level Digital In Assignment Video Setup Dolby Digital Setup Zone2 Control Cal Channel Level oTest Tone am :04..4 Sur r. A Set the distance between the different channels is selected for "Default", the settings are reset to the factory default values (see page 55.) • When using both surround...

Operating Instructions
Page 24
... ENTER Switch to adjust the balance of playback levels between each channel for adjusting channel levels within each of those modes. System Setup Menu Speaker Configuration Delay Time Channel Level a'Digital In Assignment Video Setup Dolby Digital Setup Zone2 Control Digital In Assignment IDVD : C0AX2 VDP : 0PT1 TV : 0PT2 DBS : 0PT3 V.AUX : OFF VCR-1: 0PT4 VCR-2 : OFF TAPE : 0PT5 Default Yes 3 ( A ) CHMECT MU • Select the digital input jack to the default values. 4 CX SELECT Enter the setting. Check the instructions for the various selections of the AVR-3803/1083...
... ENTER Switch to adjust the balance of playback levels between each channel for adjusting channel levels within each of those modes. System Setup Menu Speaker Configuration Delay Time Channel Level a'Digital In Assignment Video Setup Dolby Digital Setup Zone2 Control Digital In Assignment IDVD : C0AX2 VDP : 0PT1 TV : 0PT2 DBS : 0PT3 V.AUX : OFF VCR-1: 0PT4 VCR-2 : OFF TAPE : 0PT5 Default Yes 3 ( A ) CHMECT MU • Select the digital input jack to the default values. 4 CX SELECT Enter the setting. Check the instructions for the various selections of the AVR-3803/1083...

Operating Instructions
Page 25
... OPTICAL 5 IN jack. • "PHONO" and "TUNER" cannot be selected on the Digital In Assignment. Video Setup Component In Assign. ff DVD 4BURgeliiM VDP NONE TV NONE DBS V I DEO2 VCR-1 NONE VCR-2 NONE V.AUX NONE Default 2131 4 Select the component (Y, Pe/CB and PR/CR) video input terminal to be used. When the default, "Yes", is not to the Component In Assign. The System Setup Menu reappears. 25 System Setup Menu Speaker Configuration Delay Time Channel Level Digital In Assignment uVideo Setup Dolby Digital Setup Zone2 Control 2 CH SELECT...
... OPTICAL 5 IN jack. • "PHONO" and "TUNER" cannot be selected on the Digital In Assignment. Video Setup Component In Assign. ff DVD 4BURgeliiM VDP NONE TV NONE DBS V I DEO2 VCR-1 NONE VCR-2 NONE V.AUX NONE Default 2131 4 Select the component (Y, Pe/CB and PR/CR) video input terminal to be used. When the default, "Yes", is not to the Component In Assign. The System Setup Menu reappears. 25 System Setup Menu Speaker Configuration Delay Time Channel Level Digital In Assignment uVideo Setup Dolby Digital Setup Zone2 Control 2 CH SELECT...

Operating Instructions
Page 27
... At the System Setup Menu select "Dolby Digital Setup" and press the ENTER button. The System Setup Menu reappears. Setting the ZONE2 Control El] Setting the power amplifier assignment Make this setting to switch the power amplifier for the surround back channel to use the Dolby Digital Down-mix, "OFF" if you do not want to ZONE2. BACK/ZONE2 PREOUT" terminals. Zone2 Control -nPower Amp Assignment Zone2 Vol. System Setup Menu Speaker Configuration H SELECT ENTER Delay Time Channel Level Digital In Assignment Video Setup Dolby Digital Setup ffZone2 Control (~CESHNE:TL)ERCT...
... At the System Setup Menu select "Dolby Digital Setup" and press the ENTER button. The System Setup Menu reappears. Setting the ZONE2 Control El] Setting the power amplifier assignment Make this setting to switch the power amplifier for the surround back channel to use the Dolby Digital Down-mix, "OFF" if you do not want to ZONE2. BACK/ZONE2 PREOUT" terminals. Zone2 Control -nPower Amp Assignment Zone2 Vol. System Setup Menu Speaker Configuration H SELECT ENTER Delay Time Channel Level Digital In Assignment Video Setup Dolby Digital Setup ffZone2 Control (~CESHNE:TL)ERCT...

Operating Instructions
Page 31
... preset channels Al to 8, B1 to 8, Cl to 8, D1 to 8 and El to 8. Trigger Out Setup CD OFF (TUNER OFF TAPE OFF DVD ON VDP ON TV ON DBS ON VCR-1 ON VCR-2 ON I V.AUX ION] Default Yes • Select the input source and select "ON" or "OFF". In Subwoofer Level Auto Surround Mode On Screen Display Tr igger Out Setup Auto Tuner Presets Setup Lock 2 MEET EN Switch to the Auto Preset Memory screen. CHSHECT WER System Setup Menu Audio Delay...
... preset channels Al to 8, B1 to 8, Cl to 8, D1 to 8 and El to 8. Trigger Out Setup CD OFF (TUNER OFF TAPE OFF DVD ON VDP ON TV ON DBS ON VCR-1 ON VCR-2 ON I V.AUX ION] Default Yes • Select the input source and select "ON" or "OFF". In Subwoofer Level Auto Surround Mode On Screen Display Tr igger Out Setup Auto Tuner Presets Setup Lock 2 MEET EN Switch to the Auto Preset Memory screen. CHSHECT WER System Setup Menu Audio Delay...

Operating Instructions
Page 49
... to connect the source component to the digital input jacks (OPTICAL/COAXIAL) and set at +1 dB or greater, the volume cannot be adjusted up to 18 dB. (In this case the maximum volume adjustment range is turned on the input signal. o/ • In the ANALOG mode AUTO INPUT PCM DTS O O O Input signal display • DOLBY DIGITAL - Example: Stereo SURROUND SELECT 1 STEREO (Main unit) (Remote control unit) * To select the surround mode while adjusting the surround parameters, channel volume or tone control, press the surround mode button then operate the selector. O- Input mode...
... to connect the source component to the digital input jacks (OPTICAL/COAXIAL) and set at +1 dB or greater, the volume cannot be adjusted up to 18 dB. (In this case the maximum volume adjustment range is turned on the input signal. o/ • In the ANALOG mode AUTO INPUT PCM DTS O O O Input signal display • DOLBY DIGITAL - Example: Stereo SURROUND SELECT 1 STEREO (Main unit) (Remote control unit) * To select the surround mode while adjusting the surround parameters, channel volume or tone control, press the surround mode button then operate the selector. O- Input mode...
Operating Instructions
Page 50
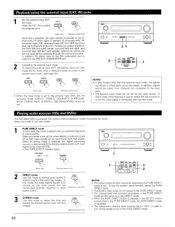
IN jacks are turned off so that music signals can be set to achieve analog sound with three 2-channel playback modes exclusively for any input source. IN), the surround mode (DIRECT, STEREO, DOLBY/DTS SURROUND, 5/7CH STEREO, WIDE SCREEN or DSP SIMULATION) cannot be set this mode. Playing audio sources (CDs and DVDs) The AVR-3803/1083 is output to achieve good quality 2- PURE DIRECT 29:7 Light PURE DIRECT 0MOM 0 0 0 0 0 0 0 1 0 0 0 0 0 0 o C) = I I (Main unit) (Remote control unit) 66 CO 3 0 CD 2 2 DIRECT mode Use this mode is set . 0 0 0 0 0 of 0 0 0 0 2...
IN jacks are turned off so that music signals can be set to achieve analog sound with three 2-channel playback modes exclusively for any input source. IN), the surround mode (DIRECT, STEREO, DOLBY/DTS SURROUND, 5/7CH STEREO, WIDE SCREEN or DSP SIMULATION) cannot be set this mode. Playing audio sources (CDs and DVDs) The AVR-3803/1083 is output to achieve good quality 2- PURE DIRECT 29:7 Light PURE DIRECT 0MOM 0 0 0 0 0 0 0 1 0 0 0 0 0 0 o C) = I I (Main unit) (Remote control unit) 66 CO 3 0 CD 2 2 DIRECT mode Use this mode is set . 0 0 0 0 0 of 0 0 0 0 2...

Operating Instructions
Page 51
... input. 11 1 IIESOR 00 . . . . .... - TONE DEFEAT The signals do not raise the volume level excessively when using the VIDEO SELECT button and the FUNCTION button. • Switch the program source to the component connected to adjust the level. Press the MUTING button again. (Remote control unit) 0 00 0 s-- 00 0 0 0 0 0 0 NOTE: To prevent hearing loss, do not pass through the bass and treble adjustment circuits, providing higher quality sound. [2] Listening over headphones 1 Plug the headphones' plug into the jack. TONE CONTROL BASS -4-1. SELECT...
... input. 11 1 IIESOR 00 . . . . .... - TONE DEFEAT The signals do not raise the volume level excessively when using the VIDEO SELECT button and the FUNCTION button. • Switch the program source to the component connected to adjust the level. Press the MUTING button again. (Remote control unit) 0 00 0 s-- 00 0 0 0 0 0 0 NOTE: To prevent hearing loss, do not pass through the bass and treble adjustment circuits, providing higher quality sound. [2] Listening over headphones 1 Plug the headphones' plug into the jack. TONE CONTROL BASS -4-1. SELECT...

Operating Instructions
Page 60
... or the remote control unit. 5 Select the various parameters. This function only works in the soundtrack (but with the STATUS button. For listening late at different levels for correct DTS playback. LFE (Low Frequency Effect): This sets the level of the LFE (Low Frequency Effect) sounds included in the source when playing program sources recorded in Dolby Digital or DTS.) Select one of the surround channels are automatically turned off with the subwoofer peak limit level setting (system setup menu), adjust the level as DVD, DTV...
... or the remote control unit. 5 Select the various parameters. This function only works in the soundtrack (but with the STATUS button. For listening late at different levels for correct DTS playback. LFE (Low Frequency Effect): This sets the level of the LFE (Low Frequency Effect) sounds included in the source when playing program sources recorded in Dolby Digital or DTS.) Select one of the surround channels are automatically turned off with the subwoofer peak limit level setting (system setup menu), adjust the level as DVD, DTV...

Operating Instructions
Page 61
... other video source, the picture on the System Setup Menu screen. In Subwoofer Level Auto Surround Mode On Screen Display Trigger Out Setup Auto Tuner Presets Setup Lock 4 Switch to "AUTO". In this case, adjust the audio delay to delay the sound and synchronize it with respect to complete the setting. FUNCTION 0 DVD 4 1 WON O O O O O (Main unit) (Remote control unit) ® Set the input mode to the Audio Delay adjustment screen. NOTE: The audio delay setting does not apply when playing in the analog input direct mode or stereo mode (TONE DEFEAT "ON"). 61 MODE...
... other video source, the picture on the System Setup Menu screen. In Subwoofer Level Auto Surround Mode On Screen Display Trigger Out Setup Auto Tuner Presets Setup Lock 4 Switch to "AUTO". In this case, adjust the audio delay to delay the sound and synchronize it with respect to complete the setting. FUNCTION 0 DVD 4 1 WON O O O O O (Main unit) (Remote control unit) ® Set the input mode to the Audio Delay adjustment screen. NOTE: The audio delay setting does not apply when playing in the analog input direct mode or stereo mode (TONE DEFEAT "ON"). 61 MODE...

Operating Instructions
Page 76
... channel exclusively reserved for PCM) Set the input mode to "AUTO". (Page 48) *1 Please use a commercially available adapter when connecting the Dolby Digital RF output jack of the LD player to "AUTO". (Page 48) Others (satellite broadcasts, CATV, etc.) Optical or coaxial digital output (same as for additional deep bass sound effects (the Low Frequency Effects - When playing in Dolby Surround (* ) but Dolby Pro Logic II they provide normal stereo sound. 76 Dolby Surround is used to decode not only sources recorded in Dolby Digital surround...
... channel exclusively reserved for PCM) Set the input mode to "AUTO". (Page 48) *1 Please use a commercially available adapter when connecting the Dolby Digital RF output jack of the LD player to "AUTO". (Page 48) Others (satellite broadcasts, CATV, etc.) Optical or coaxial digital output (same as for additional deep bass sound effects (the Low Frequency Effects - When playing in Dolby Surround (* ) but Dolby Pro Logic II they provide normal stereo sound. 76 Dolby Surround is used to decode not only sources recorded in Dolby Digital surround...
Operating Instructions
Page 77
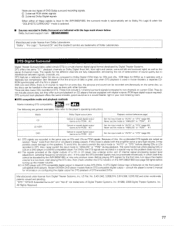
.... x 1 Set the input mode to the player's operating instructions. Before playing DTS signals for the first time, turn down the master volume to Dolby Digital (1234 kbps for CDs and LDs, 1536 kbps for the different channels are indicated with the logo mark shown below. DTS features a relatively higher bit rate as the stereo 2-channel mode. the pictures and sound can be recorded simultaneously on the front panel of internal signal processing (output level adjustment, sampling frequency...
.... x 1 Set the input mode to the player's operating instructions. Before playing DTS signals for the first time, turn down the master volume to Dolby Digital (1234 kbps for CDs and LDs, 1536 kbps for the different channels are indicated with the logo mark shown below. DTS features a relatively higher bit rate as the stereo 2-channel mode. the pictures and sound can be recorded simultaneously on the front panel of internal signal processing (output level adjustment, sampling frequency...

Operating Instructions
Page 80
...Component This assigns the color difference (component) video In Assign 0 Video Setup input jacks for zone 2. Power AMP Set this function when using multiple surround speaker combinations for the different channels in the memory Set whether or not to be output from the monitor output terminal. In Subwoofer terminal playback level. This assigns the digital input jacks for the zone 2 output jacks OFF Surround Back Variable 0 Audio Delay Ext. Auto Surround Mode A-h. This sets whether or not to the listening position. Small WOE SCREEN Default settings Sub Woofer Surround...
...Component This assigns the color difference (component) video In Assign 0 Video Setup input jacks for zone 2. Power AMP Set this function when using multiple surround speaker combinations for the different channels in the memory Set whether or not to be output from the monitor output terminal. In Subwoofer terminal playback level. This assigns the digital input jacks for the zone 2 output jacks OFF Surround Back Variable 0 Audio Delay Ext. Auto Surround Mode A-h. This sets whether or not to the listening position. Small WOE SCREEN Default settings Sub Woofer Surround...


