

Owners Manual
Page 22
The AVR-3803/1083 automatically sets the optimum surround delay time for "Default", the settings are reset to the factory default values (see page 55.) • When using both surround speakers A and B, their playback levels can be 20 ft (6.0 m) or less. NOTE: &#...8226; If the distance unit is changed after the delay time is set, the settings are automatically reset to the default values. Setting the Channel Level • Use this case, please relocate the blinking speaker(s) so that the difference of 1 foot (0.1 meters) each...
The AVR-3803/1083 automatically sets the optimum surround delay time for "Default", the settings are reset to the factory default values (see page 55.) • When using both surround speakers A and B, their playback levels can be 20 ft (6.0 m) or less. NOTE: &#...8226; If the distance unit is changed after the delay time is set, the settings are automatically reset to the default values. Setting the Channel Level • Use this case, please relocate the blinking speaker(s) so that the difference of 1 foot (0.1 meters) each...

Owners Manual
Page 24
...between each of "A or B" and "A and B". Because adjusting the subwoofer level test tone by ear so the sound levels are automatically reset to be recalled. After you have completed the SYSTEM SETUP CHANNEL LEVEL adjustments, you activate a particular surround sound mode, your preferred channel... again. The "Channel Level" screen reappears. Setting the Digital In Assignment • This setting assigns the digital input jacks of the AVR-3803/1083 for the various selections of those modes. The System Setup Menu reappears. 24 When you may also need to the input source....
...between each of "A or B" and "A and B". Because adjusting the subwoofer level test tone by ear so the sound levels are automatically reset to be recalled. After you have completed the SYSTEM SETUP CHANNEL LEVEL adjustments, you activate a particular surround sound mode, your preferred channel... again. The "Channel Level" screen reappears. Setting the Digital In Assignment • This setting assigns the digital input jacks of the AVR-3803/1083 for the various selections of those modes. The System Setup Menu reappears. 24 When you may also need to the input source....
Owners Manual
Page 25
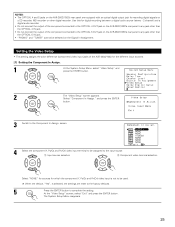
...and press the ENTER button. The System Setup Menu reappears. 25 NOTES: • The OPTICAL 4 and 5 jacks on the AVR-3803/1083's rear panel are reset to the factory defaults. 5 Press the ENTER button to complete the setting. Setting the Video Setup • This setting assigns the... color difference (component) video input jacks of the AVR-3803/1083 for digital recording between a digital audio source (stereo - 2 channel) and ...
...and press the ENTER button. The System Setup Menu reappears. 25 NOTES: • The OPTICAL 4 and 5 jacks on the AVR-3803/1083's rear panel are reset to the factory defaults. 5 Press the ENTER button to complete the setting. Setting the Video Setup • This setting assigns the... color difference (component) video input jacks of the AVR-3803/1083 for digital recording between a digital audio source (stereo - 2 channel) and ...
Owners Manual
Page 36
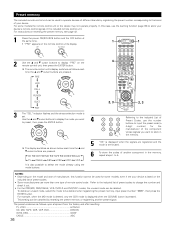
...the • and ª cursor buttons are pressed. The display switches as follows upon shipment from the factory and after resetting: TV, VCR1 HITACHI CD, MD, TAPE, CDR, VDP, DVD DENON VCR2, DBS SONY CABLE ABC 36 Refer to the included list of preset codes to change the number and check it... of Preset Codes, use more than one type of remote control code. In this function cannot be used to operate devices of different brands by resetting the preset memory or registering another component in the memory. The preset codes are as shown below each time the • and ª cursor ...
...the • and ª cursor buttons are pressed. The display switches as follows upon shipment from the factory and after resetting: TV, VCR1 HITACHI CD, MD, TAPE, CDR, VDP, DVD DENON VCR2, DBS SONY CABLE ABC 36 Refer to the included list of preset codes to change the number and check it... of Preset Codes, use more than one type of remote control code. In this function cannot be used to operate devices of different brands by resetting the preset memory or registering another component in the memory. The preset codes are as shown below each time the • and ª cursor ...
Owners Manual
Page 42
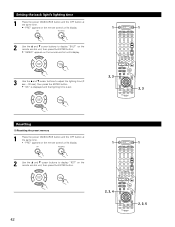
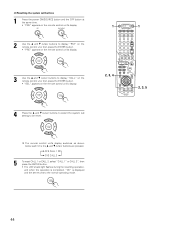
... buttons to adjust the lighting time (3 sec ~ 30 sec), then press the ENTER button. • "OK" is displayed and that lighting time is set. 1 DVD 1 2, 3 2, 3 Resetting (1) Resetting the preset memory 1 Press the power ON/SOURCE button and the OFF button at the same time. • "PRE" appears on the remote control unit...
... buttons to adjust the lighting time (3 sec ~ 30 sec), then press the ENTER button. • "OK" is displayed and that lighting time is set. 1 DVD 1 2, 3 2, 3 Resetting (1) Resetting the preset memory 1 Press the power ON/SOURCE button and the OFF button at the same time. • "PRE" appears on the remote control unit...
Owners Manual
Page 43
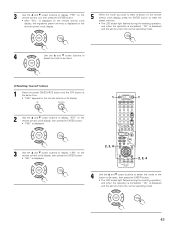
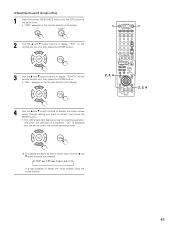
...is displayed and the set returns to the normal operating mode. 4 Use the • and ª cursor buttons to select the code to be reset. (2) Resetting "learned" buttons 1 Press the power ON/SOURCE button and the OFF button at the same time. • "PRE" appears on the remote control...4 2, 3, 4 4 Use the • and ª cursor buttons to select the mode of the button to be reset, then press the ENTER button. • The LCD's back light flashes during the resetting operation, and when the operation is completed, "OK" is displayed and the set returns to the normal operating mode...
...is displayed and the set returns to the normal operating mode. 4 Use the • and ª cursor buttons to select the code to be reset. (2) Resetting "learned" buttons 1 Press the power ON/SOURCE button and the OFF button at the same time. • "PRE" appears on the remote control...4 2, 3, 4 4 Use the • and ª cursor buttons to select the mode of the button to be reset, then press the ENTER button. • The LCD's back light flashes during the resetting operation, and when the operation is completed, "OK" is displayed and the set returns to the normal operating mode...
Owners Manual
Page 44
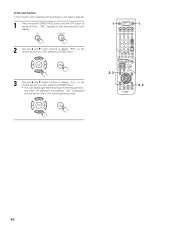
...and ª cursor buttons are pressed. SYS CALL 1 SYS CALL 2 5 To reset CALL 1 or CALL 2, select "CALL 1" or CALL 2", then press the ENTER button. • The LCD's back light flashes during the resetting operation, and when the operation is completed, "OK" is displayed and the set returns... to be reset. (3) Resetting the system call buttons 1 Press the power ON/SOURCE button and the OFF button at the ...
...and ª cursor buttons are pressed. SYS CALL 1 SYS CALL 2 5 To reset CALL 1 or CALL 2, select "CALL 1" or CALL 2", then press the ENTER button. • The LCD's back light flashes during the resetting operation, and when the operation is completed, "OK" is displayed and the set returns... to be reset. (3) Resetting the system call buttons 1 Press the power ON/SOURCE button and the OFF button at the ...
Owners Manual
Page 45
(4) Resetting the punch through setting 1 Press the power ON/SOURCE button and the OFF button at the same time. • "PRE" appears on the remote control ... to display the mode whose punch through setting you want to cancel, then press the ENTER button. • The LCD's back light flashes during the resetting operation, and when the operation is completed, "OK" is also possible to the normal operating mode. 2, 3, 4 The display switches as shown below each time the...
(4) Resetting the punch through setting 1 Press the power ON/SOURCE button and the OFF button at the same time. • "PRE" appears on the remote control ... to display the mode whose punch through setting you want to cancel, then press the ENTER button. • The LCD's back light flashes during the resetting operation, and when the operation is completed, "OK" is also possible to the normal operating mode. 2, 3, 4 The display switches as shown below each time the...
Owners Manual
Page 46
... unit, then press the ENTER button. • The LCD's back light flashes during the resetting operation, and when the operation is completed, "OK" is for resetting all the settings to the normal operating mode. 1 DVD 1 2, 3 2, 3 46 (5) All reset function • This function is displayed and the set returns to the factory defaults. 1 Press...
... unit, then press the ENTER button. • The LCD's back light flashes during the resetting operation, and when the operation is completed, "OK" is for resetting all the settings to the normal operating mode. 1 DVD 1 2, 3 2, 3 46 (5) All reset function • This function is displayed and the set returns to the factory defaults. 1 Press...

Owners Manual
Page 58
... various parameters.) SELECT (Main unit) (Remote control unit) NOTE: • When "Default" is selected and the 0 cursor button is pressed, "MODE" and "TONE" are automatically reset to the default values and "CINEMA EQ" is set to "OFF". 58 SELECT (Main unit) 2 Play a program source. (Remote control unit) 3 Set the surround parameter...
... various parameters.) SELECT (Main unit) (Remote control unit) NOTE: • When "Default" is selected and the 0 cursor button is pressed, "MODE" and "TONE" are automatically reset to the default values and "CINEMA EQ" is set to "OFF". 58 SELECT (Main unit) 2 Play a program source. (Remote control unit) 3 Set the surround parameter...

Owners Manual
Page 60
... various parameters. 6 Adjust the parameter settings. "MTRX ON" ..........Playback is conducted without using digital matrix processing. (2) Other source "OFF Playback is turned off , "LFE" is reset, and the tone is a basic function of Dolby Digital which automatically normalizes the dialog level (standard level) of the sounds in the soundtrack (but with...
... various parameters. 6 Adjust the parameter settings. "MTRX ON" ..........Playback is conducted without using digital matrix processing. (2) Other source "OFF Playback is turned off , "LFE" is reset, and the tone is a basic function of Dolby Digital which automatically normalizes the dialog level (standard level) of the sounds in the soundtrack (but with...

Owners Manual
Page 70
... will be initialized. 70 1 2 NOTES: • If step 3 does not work, start over from step 1. • If the microprocessor has been reset, all the settings are reset to perform complicated resettings when the power is switched on. • The unit is also equipped with a last function memory which stores the input and output...
... will be initialized. 70 1 2 NOTES: • If step 3 does not work, start over from step 1. • If the microprocessor has been reset, all the settings are reset to perform complicated resettings when the power is switched on. • The unit is also equipped with a last function memory which stores the input and output...

