
Literature/Product Sheet
Page 2
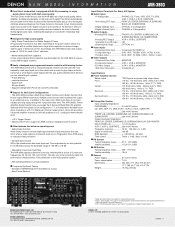
...Dolby Digital EX" and the double-D device are registered trademarks of power. ■ Newly redesigned pre-programmed remote controller with learning feature The AVR-3803 comes with a newly-developed remote controller with composite video feed. During analog audio input, power to -noise ratio 102 dB RIAA deviation 1 dB...video circuitry and the fluorescent lights also go off . A simple key operation on the audio circuit. Furthermore, Denon's AL24 processor for the AVR-3803 to the main speaker system. • A/B switching between sound and picture that let you more accurately match...
...Dolby Digital EX" and the double-D device are registered trademarks of power. ■ Newly redesigned pre-programmed remote controller with learning feature The AVR-3803 comes with a newly-developed remote controller with composite video feed. During analog audio input, power to -noise ratio 102 dB RIAA deviation 1 dB...video circuitry and the fluorescent lights also go off . A simple key operation on the audio circuit. Furthermore, Denon's AL24 processor for the AVR-3803 to the main speaker system. • A/B switching between sound and picture that let you more accurately match...
Owners Manual
Page 4
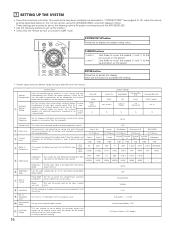
... the main unit: q Operating instructions.....1 w Warranty ( for North America model only 1 e Service station list...........1 t R6P/AA batteries 3 y AM loop antenna 1 u FM indoor antenna...1 r Remote control unit (RC-921 1 r t y u 1 BEFORE USING Pay attention to the standby position before connecting and disconnecting connection cords. • Store this instructions in a safe place. •...be generated if this unit or 4 inch/10 cm or more outdoor antennas and 75 Ω/ohms coaxial cables. Always set for choosing the DENON AVR-3803/1083 Digital A / V Surround Receiver.
... the main unit: q Operating instructions.....1 w Warranty ( for North America model only 1 e Service station list...........1 t R6P/AA batteries 3 y AM loop antenna 1 u FM indoor antenna...1 r Remote control unit (RC-921 1 r t y u 1 BEFORE USING Pay attention to the standby position before connecting and disconnecting connection cords. • Store this instructions in a safe place. •...be generated if this unit or 4 inch/10 cm or more outdoor antennas and 75 Ω/ohms coaxial cables. Always set for choosing the DENON AVR-3803/1083 Digital A / V Surround Receiver.

Owners Manual
Page 6
... for recording: Connect the tape deck's recording input jacks (LINE IN or REC) to this unit's power is switched between on and standby from the remote control unit. The power to these jacks if you wish to connect external power amplifier(s) to increase the power of this unit on setting this unit... AUDIO OPTICAL COAXIAL OUTPUT MD recorder, CD recorder or other noise is generated when the ground wire is switched between on and standby from the remote control unit or power switch.
... for recording: Connect the tape deck's recording input jacks (LINE IN or REC) to this unit's power is switched between on and standby from the remote control unit. The power to these jacks if you wish to connect external power amplifier(s) to increase the power of this unit on setting this unit... AUDIO OPTICAL COAXIAL OUTPUT MD recorder, CD recorder or other noise is generated when the ground wire is switched between on and standby from the remote control unit or power switch.
Owners Manual
Page 14
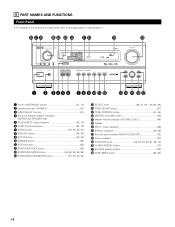
... Panel • For details on the functions of these parts, refer to the pages given in parentheses ( ). @8 @7 @6 @5 @4 @3 @2 @1 @0 !9 REMOTE SENSOR ON / STANDBY AUTO SIGNAL DIGITAL SURROUND BACK CH OUTPUT INPUT PCM DTS SIGNAL DETECT VOLUME LEVEL !8 q w er t y u i o !0 !1 !2 !3..., 64, 66) !6 TONE DEFEAT button 51) !7 TONE CONTROL button 51, 66) !8 MASTER VOLUME control 49) !9 Master volume indicator (VOLUME LEVEL 49) @0 Display @1 INPUT mode indicators 49) @2 SIGNAL indicators 49, 59) @3 Remote control sensor (REMOTE SENSOR 34) @4 Power indicator 47) @5 FUNCTION knob 48,...
... Panel • For details on the functions of these parts, refer to the pages given in parentheses ( ). @8 @7 @6 @5 @4 @3 @2 @1 @0 !9 REMOTE SENSOR ON / STANDBY AUTO SIGNAL DIGITAL SURROUND BACK CH OUTPUT INPUT PCM DTS SIGNAL DETECT VOLUME LEVEL !8 q w er t y u i o !0 !1 !2 !3..., 64, 66) !6 TONE DEFEAT button 51) !7 TONE CONTROL button 51, 66) !8 MASTER VOLUME control 49) !9 Master volume indicator (VOLUME LEVEL 49) @0 Display @1 INPUT mode indicators 49) @2 SIGNAL indicators 49, 59) @3 Remote control sensor (REMOTE SENSOR 34) @4 Power indicator 47) @5 FUNCTION knob 48,...
Owners Manual
Page 15
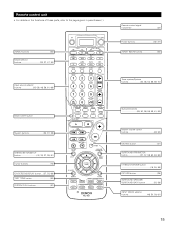
... pages given in parentheses ( ). ZONE 2 buttons 53) Mode selector buttons 35, 37, 47, 53) Input source selector buttons 35~38, 48, 59, 61, 68) Remote control signal transmitter 34) Power buttons 36~47) ZONE1 (MAIN) buttons 53) Tuner system/System buttons 35, 38, 53, 68, 69, 70) BACK LIGHT button System...DISPLAY button ....(37, 52, 69) TEST TONE button 55) SYSTEM CALL buttons 40) Surround buttons 49, 50, 56, 58, 59, 61, 63) Master volume control buttons 49, 53) MUTING button 51) SURROUND PARAMETER button 37, 57, 58, 60, 63, 65) CH SELECT/ENTER button 16, 55, 56) RETURN button 38...
... pages given in parentheses ( ). ZONE 2 buttons 53) Mode selector buttons 35, 37, 47, 53) Input source selector buttons 35~38, 48, 59, 61, 68) Remote control signal transmitter 34) Power buttons 36~47) ZONE1 (MAIN) buttons 53) Tuner system/System buttons 35, 38, 53, 68, 69, 70) BACK LIGHT button System...DISPLAY button ....(37, 52, 69) TEST TONE button 55) SYSTEM CALL buttons 40) Surround buttons 49, 50, 56, 58, 59, 61, 63) Master volume control buttons 49, 53) MUTING button 51) SURROUND PARAMETER button 37, 57, 58, 60, 63, 65) CH SELECT/ENTER button 16, 55, 56) RETURN button 38...
Owners Manual
Page 16
... (D and H) to the up the system: • Check that appears on the monitor screen when the controls on or off when down on the screen. Use this function when using the AVR-3803/1083's on-screen display function. AUX VCR-1 VCR-2 CDR/TAPE OPT1 OPT2 OPT3 OFF OPT4 OFF OPT5 DVD... the speakers and the frequency response. AUTO y Dolby Digital Setup Turn the audio compression on the remote control unit or main unit are operated. A setting to display the on-screen display that the remote control unit is to be used for fullsize, full-range) to automatically set up and down -mixing ...
... (D and H) to the up the system: • Check that appears on the monitor screen when the controls on or off when down on the screen. Use this function when using the AVR-3803/1083's on-screen display function. AUX VCR-1 VCR-2 CDR/TAPE OPT1 OPT2 OPT3 OFF OPT4 OFF OPT5 DVD... the speakers and the frequency response. AUTO y Dolby Digital Setup Turn the audio compression on the remote control unit or main unit are operated. A setting to display the on-screen display that the remote control unit is to be used for fullsize, full-range) to automatically set up and down -mixing ...

Owners Manual
Page 22
... line. 7 Enter the setting. The AVR-3803/1083 automatically sets the optimum surround delay time for "Default", the settings are reset to the factory default values (see page 55.) • When using both surround speakers A and B, their playback levels can also be adjusted directly from the remote control unit. (For details, see page 16...
... line. 7 Enter the setting. The AVR-3803/1083 automatically sets the optimum surround delay time for "Default", the settings are reset to the factory default values (see page 55.) • When using both surround speakers A and B, their playback levels can also be adjusted directly from the remote control unit. (For details, see page 16...

Owners Manual
Page 28
...and press the ENTER button. Setting the Audio Delay This function allows you to page 61. At the "Zone2 Control" screen, select "Exit" and press the ENTER button. For instructions on the remote control unit. 0 dB, -40 dB: The output level is fixed at the set level and the volume can ...be adjusted. 4 Enter the setting. level Set the Zone 2 pre-out output level adjustment. 1 At the System Setup Menu select "Zone2 Control" and press the ENTER button....
...and press the ENTER button. Setting the Audio Delay This function allows you to page 61. At the "Zone2 Control" screen, select "Exit" and press the ENTER button. For instructions on the remote control unit. 0 dB, -40 dB: The output level is fixed at the set level and the volume can ...be adjusted. 4 Enter the setting. level Set the Zone 2 pre-out output level adjustment. 1 At the System Setup Menu select "Zone2 Control" and press the ENTER button....
Owners Manual
Page 34
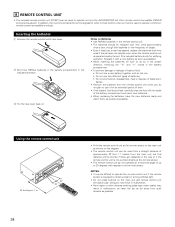
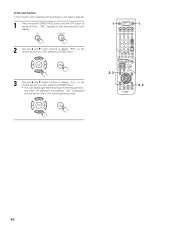
... main unit as possible. Replace it can be used to operate non-Denon remote control compatible products. 8 REMOTE CONTROL UNIT • The included remote control unit (RC-921) can be used to operate not only the AVR-3803/1083 but this depends on the main unit and remote control unit simultaneously. Notes on Batteries • Use R6P/AA batteries in flames...
... main unit as possible. Replace it can be used to operate non-Denon remote control compatible products. 8 REMOTE CONTROL UNIT • The included remote control unit (RC-921) can be used to operate not only the AVR-3803/1083 but this depends on the main unit and remote control unit simultaneously. Notes on Batteries • Use R6P/AA batteries in flames...
Owners Manual
Page 36
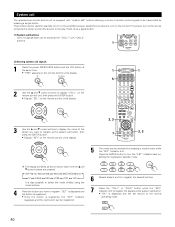
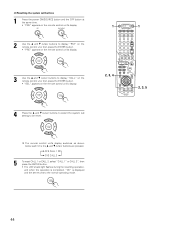
... (a 4-digit number) for some models the remote control unit or the device may not operate properly. The remote control unit's display switches as follows upon shipment from the factory and after resetting: TV, VCR1 HITACHI CD, MD, TAPE, CDR, VDP, DVD DENON VCR2, DBS SONY CABLE ABC 36 Refer to...signal. PRE LRN CALL PUNCH BLKT RST 3 The "SEL" indicator flashes and the device selection mode is pressed. Preset memory The included remote control unit can be used for the manufacturer of Preset Codes, use the learning function (page 39) to select the mode directly using the ...
... (a 4-digit number) for some models the remote control unit or the device may not operate properly. The remote control unit's display switches as follows upon shipment from the factory and after resetting: TV, VCR1 HITACHI CD, MD, TAPE, CDR, VDP, DVD DENON VCR2, DBS SONY CABLE ABC 36 Refer to...signal. PRE LRN CALL PUNCH BLKT RST 3 The "SEL" indicator flashes and the device selection mode is pressed. Preset memory The included remote control unit can be used for the manufacturer of Preset Codes, use the learning function (page 39) to select the mode directly using the ...

Owners Manual
Page 37
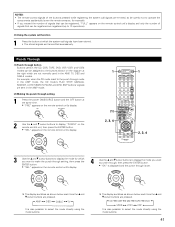
NOTE: • For the DVD player remote control buttons, function names may differ according to operate. Video disc player (VDP) system buttons POWER : Power on /standby DVD (ON/SOURCE) 6,7 : Manual ...SOURCE) 6,7 : Manual search (forward and reverse) 2 : Stop 1 : Play 8,9 : Auto search (cue) 3 : Pause 0~9, +10 : 10 key 37 Compare with this remote control unit. 1. Some models cannot be operated with the remote control operation of track) 3 : Pause 0 ~ 9, +10 : 10 key DISC SKIP +: Disc skip (for the component you want to manufacturer. Operating a component stored...
NOTE: • For the DVD player remote control buttons, function names may differ according to operate. Video disc player (VDP) system buttons POWER : Power on /standby DVD (ON/SOURCE) 6,7 : Manual ...SOURCE) 6,7 : Manual search (forward and reverse) 2 : Stop 1 : Play 8,9 : Auto search (cue) 3 : Pause 0~9, +10 : 10 key 37 Compare with this remote control unit. 1. Some models cannot be operated with the remote control operation of track) 3 : Pause 0 ~ 9, +10 : 10 key DISC SKIP +: Disc skip (for the component you want to manufacturer. Operating a component stored...
Owners Manual
Page 39
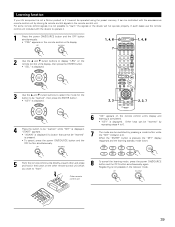
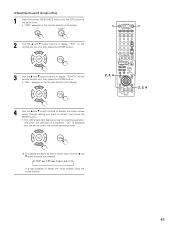
... be "learned" while "KEY" is displayed. Registering is not possible in the remote control unit. Learning function If your AV component is not a Denon product or if it cannot be operated using the preset memory, it can be controlled with the device to operate it is not possible to "learn " the signals... or the device will not operate properly. For some remote control signals it . 1 Press the power ...
... be "learned" while "KEY" is displayed. Registering is not possible in the remote control unit. Learning function If your AV component is not a Denon product or if it cannot be operated using the preset memory, it can be controlled with the device to operate it is not possible to "learn " the signals... or the device will not operate properly. For some remote control signals it . 1 Press the power ...
Owners Manual
Page 40
...turn the "KEY" indicator back on the remote control unit's display. 2, 3 7 2, 3 5 The mode can be switched by pressing a single button. System call The accessorious remote control unit is equipped with "system call" function allowing a series of remote control signals to turn on the source component's... the same time. • "PRE" appears on the remote control unit's display. 2 Use the • and ª cursor buttons to display "CALL" on the remote control unit, then press the ENTER button. • Display "SEL" on the remote control unit's display. 1 DVD 1 5 3 Use the &#...
...turn the "KEY" indicator back on the remote control unit's display. 2, 3 7 2, 3 5 The mode can be switched by pressing a single button. System call The accessorious remote control unit is equipped with "system call" function allowing a series of remote control signals to turn on the source component's... the same time. • "PRE" appears on the remote control unit's display. 2 Use the • and ª cursor buttons to display "CALL" on the remote control unit, then press the ENTER button. • Display "SEL" on the remote control unit's display. 1 DVD 1 5 3 Use the &#...
Owners Manual
Page 41
...which you want to the buttons shown on the diagram at which are pressed. NOTES: • The remote control signals of signals that can be registered, "FULL" appears on the remote control unit's display and only the number of the buttons pressed while registering the system call signals are emitted, ...mode for example). • If you want to make the punch through setting, then press the ENTER button. • "SEL" appears on the remote control unit's display. 4 Use the • and ª cursor buttons to display the mode you exceed the number of signals that can be registered ...
...which you want to the buttons shown on the diagram at which are pressed. NOTES: • The remote control signals of signals that can be registered, "FULL" appears on the remote control unit's display and only the number of the buttons pressed while registering the system call signals are emitted, ...mode for example). • If you want to make the punch through setting, then press the ENTER button. • "SEL" appears on the remote control unit's display. 4 Use the • and ª cursor buttons to display the mode you exceed the number of signals that can be registered ...
Owners Manual
Page 42
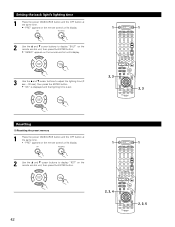
... the OFF button at the same time. • "PRE" appears on the remote control unit's display. 2 Use the • and ª cursor buttons to display "BKLT" on the remote control unit, then press the ENTER button. • "05SEC" appears on the remote control unit's display. 3 Use the • and ª cursor buttons to adjust...DVD 1 2, 3 2, 3 Resetting (1) Resetting the preset memory 1 Press the power ON/SOURCE button and the OFF button at the same time. • "PRE" appears on the remote control unit's display. 2 Use the • and ª cursor buttons to display "RST" on the...
... the OFF button at the same time. • "PRE" appears on the remote control unit's display. 2 Use the • and ª cursor buttons to display "BKLT" on the remote control unit, then press the ENTER button. • "05SEC" appears on the remote control unit's display. 3 Use the • and ª cursor buttons to adjust...DVD 1 2, 3 2, 3 Resetting (1) Resetting the preset memory 1 Press the power ON/SOURCE button and the OFF button at the same time. • "PRE" appears on the remote control unit's display. 2 Use the • and ª cursor buttons to display "RST" on the...
Owners Manual
Page 43
... power ON/SOURCE button and the OFF button at the same time. • "PRE" appears on the remote control unit's display. 2 Use the • and ª cursor buttons to display "RST" on the remote control unit's display, then press the ENTER button. • "PRE" is displayed. 1 DVD 1 3 Use... the • and ª cursor buttons to display "LRN" on the remote control unit's display, then press the ENTER button. • "SEL" is displayed. 2, 3, 4 2, 3, 4 4 Use the • and ª cursor buttons to...
... power ON/SOURCE button and the OFF button at the same time. • "PRE" appears on the remote control unit's display. 2 Use the • and ª cursor buttons to display "RST" on the remote control unit's display, then press the ENTER button. • "PRE" is displayed. 1 DVD 1 3 Use... the • and ª cursor buttons to display "LRN" on the remote control unit's display, then press the ENTER button. • "SEL" is displayed. 2, 3, 4 2, 3, 4 4 Use the • and ª cursor buttons to...
Owners Manual
Page 44
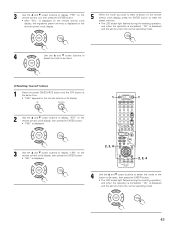
...at the same time. • "PRE" appears on the remote control unit's display. 2 Use the • and ª cursor buttons to display "RST" on the remote control unit, then press the ENTER button. • "PRE" appears on the remote control unit's display. 1 DVD 1 3 Use the • and... ª cursor buttons to display "CALL" on the remote control unit, then press the ENTER button. • "SEL...
...at the same time. • "PRE" appears on the remote control unit's display. 2 Use the • and ª cursor buttons to display "RST" on the remote control unit, then press the ENTER button. • "PRE" appears on the remote control unit's display. 1 DVD 1 3 Use the • and... ª cursor buttons to display "CALL" on the remote control unit, then press the ENTER button. • "SEL...
Owners Manual
Page 45
...power ON/SOURCE button and the OFF button at the same time. • "PRE" appears on the remote control unit's display. 2 Use the • and ª cursor buttons to display "RST" on the remote control unit, then press the ENTER button. 1 DVD 1 3 Use the • and ª cursor... buttons to display "PUNCH" on the remote control unit, then press the ENTER button. • "SEL" appears on the remote control unit's display. 2, 3, 4 4 Use the • and ª cursor buttons to display the mode whose punch through...
...power ON/SOURCE button and the OFF button at the same time. • "PRE" appears on the remote control unit's display. 2 Use the • and ª cursor buttons to display "RST" on the remote control unit, then press the ENTER button. 1 DVD 1 3 Use the • and ª cursor... buttons to display "PUNCH" on the remote control unit, then press the ENTER button. • "SEL" appears on the remote control unit's display. 2, 3, 4 4 Use the • and ª cursor buttons to display the mode whose punch through...
Owners Manual
Page 46
...Press the power ON/SOURCE button and the OFF button at the same time. "PRE" appears on the remote control unit's display. 2 Use the • and ª cursor buttons to display "RST" on the remote control unit, then press the ENTER button. 3 Use the • and ª cursor buttons to display ..."ALL" on the remote control unit, then press the ENTER button. • The LCD's back light flashes during the ...
...Press the power ON/SOURCE button and the OFF button at the same time. "PRE" appears on the remote control unit's display. 2 Use the • and ª cursor buttons to display "RST" on the remote control unit, then press the ENTER button. 3 Use the • and ª cursor buttons to display ..."ALL" on the remote control unit, then press the ENTER button. • The LCD's back light flashes during the ...
Owners Manual
Page 47
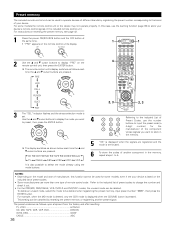
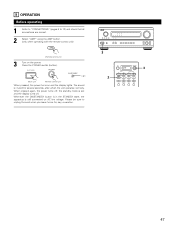
...sure to 13) and check that all connections are correct. 2 Select "AMP" using the AMP button. (only when operating with the remote control unit) 3 (Remote control unit) 3 Turn on and the display lights. Whenever the ON/STANDBY button is in the STANDBY state, the apparatus is set and ...the display turns off. Press the POWER switch (button). AMP 3 ON/STANDBY Light 2 (Main unit) (Remote control unit) When pressed, the power turns on the power. 9 OPERATION Before operating 1 Refer to "CONNECTIONS" (pages 6 to unplug the cord when you...
...sure to 13) and check that all connections are correct. 2 Select "AMP" using the AMP button. (only when operating with the remote control unit) 3 (Remote control unit) 3 Turn on and the display lights. Whenever the ON/STANDBY button is in the STANDBY state, the apparatus is set and ...the display turns off. Press the POWER switch (button). AMP 3 ON/STANDBY Light 2 (Main unit) (Remote control unit) When pressed, the power turns on the power. 9 OPERATION Before operating 1 Refer to "CONNECTIONS" (pages 6 to unplug the cord when you...


