
Literature/Product Sheet
Page 1
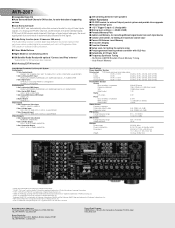
...,' for high sound quality ■ Digital interface receiver supporting 24-bit/192-kHz signals ■ Large-output power amp section and power supply configuration, for stable high-power output ■ Stable power supply for high-quality sound and picture playback ■ Pure Direct mode, for the pure enjoyment of multi-channel audio signals. *1) Version 1.1 compliant. Since HDCP is also supported, video cannot be controlled via a single cable regardless of the software.. ■ New Auto Set-up /down...
...,' for high sound quality ■ Digital interface receiver supporting 24-bit/192-kHz signals ■ Large-output power amp section and power supply configuration, for stable high-power output ■ Stable power supply for high-quality sound and picture playback ■ Pure Direct mode, for the pure enjoyment of multi-channel audio signals. *1) Version 1.1 compliant. Since HDCP is also supported, video cannot be controlled via a single cable regardless of the software.. ■ New Auto Set-up /down...
Literature/Product Sheet
Page 2
... IN terminal Input/Output Terminals For Every A/V System Audio Inputs 11 Sets Analog Inputs PHONO, CD, (TUNER), DVD, VDP, TV, DBS, VCR-1, VCR-2, CDR/TAPE, V.AUX (FRONT) 1 Set 8-ch Analog EXT. AVR-2807 ■ Assignable Room EQ ■ Auto Surround Back Channels ON function, for auto-detection of supporting sources ■ Auto Surround mode The AVR-2807 can automatically store the surround mode for any of three inputs signals: (1) Analog and PCM 2 channel, (2) Bit stream 2-channel (Dolby Digital, DTS) and (3) Bit stream multi-channel.If...
... IN terminal Input/Output Terminals For Every A/V System Audio Inputs 11 Sets Analog Inputs PHONO, CD, (TUNER), DVD, VDP, TV, DBS, VCR-1, VCR-2, CDR/TAPE, V.AUX (FRONT) 1 Set 8-ch Analog EXT. AVR-2807 ■ Assignable Room EQ ■ Auto Surround Back Channels ON function, for auto-detection of supporting sources ■ Auto Surround mode The AVR-2807 can automatically store the surround mode for any of three inputs signals: (1) Analog and PCM 2 channel, (2) Bit stream 2-channel (Dolby Digital, DTS) and (3) Bit stream multi-channel.If...

Owners Manual - English
Page 1
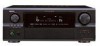
AV SURROUND RECEIVER AVR-2807 OPERATING INSTRUCTIONS
AV SURROUND RECEIVER AVR-2807 OPERATING INSTRUCTIONS
Owners Manual - English
Page 2
... has been exposed to operate from the wall outlet and disconnect the antenna or cable system. Do not defeat the safety purpose of power supply to qualified service personnel under the following the operating instructions. Power-Cord Protection - Outdoor Antenna Grounding - Article 810 of important operating and maintenance (servicing) instructions in fire, electric shock, or other sources, refer to overturn. 10. Adjust only those controls that may cause...
... has been exposed to operate from the wall outlet and disconnect the antenna or cable system. Do not defeat the safety purpose of power supply to qualified service personnel under the following the operating instructions. Power-Cord Protection - Outdoor Antenna Grounding - Article 810 of important operating and maintenance (servicing) instructions in fire, electric shock, or other sources, refer to overturn. 10. Adjust only those controls that may cause...

Owners Manual - English
Page 5
... to music 39 Viewing still pictures and videos (only for choosing the DENON AVR-2807 AV Surround Receiver. Contents Getting Started Accessories 3 Before using 3 Cautions on installation 3 About the remote control unit 3 Inserting the batteries 3 Operating range of the remote control unit 3 Part names and functions Front panel 4 Display 4 Rear panel 5 Remote control unit 5 Easy Setup Procedure Easy to setup flow 6 Speaker layout [Basic layout 6 Speaker connections 7 Connecting a DVD player and monitor 8 Auto Setup/Room Equalizer (Room EQ) Functions 9 q Connecting a microphone...
... to music 39 Viewing still pictures and videos (only for choosing the DENON AVR-2807 AV Surround Receiver. Contents Getting Started Accessories 3 Before using 3 Cautions on installation 3 About the remote control unit 3 Inserting the batteries 3 Operating range of the remote control unit 3 Part names and functions Front panel 4 Display 4 Rear panel 5 Remote control unit 5 Easy Setup Procedure Easy to setup flow 6 Speaker layout [Basic layout 6 Speaker connections 7 Connecting a DVD player and monitor 8 Auto Setup/Room Equalizer (Room EQ) Functions 9 q Connecting a microphone...

Owners Manual - English
Page 6
... 50 Setting the Video Convert 50 Setting the HDMI Out Setup 51 Setting the Audio Delay 51 Setting the On Screen Display (OSD 52 Advanced Playback Setting the 2ch Direct/Stereo 52 Setting the Dolby Digital Downmix Option Setup 53 Setting the Auto Surround Mode 53 Setting the Manual Equalizer Setup 53, 54 Option Setup Setting the Power Amplifier Assignment 54 Setting the Volume Control 55 Setting the Trigger Out 55 Setting the Setup Lock 56 Operating the remote control unit Operating DENON audio components 62 Setting the preset memory function 62 Operating a component stored...
... 50 Setting the Video Convert 50 Setting the HDMI Out Setup 51 Setting the Audio Delay 51 Setting the On Screen Display (OSD 52 Advanced Playback Setting the 2ch Direct/Stereo 52 Setting the Dolby Digital Downmix Option Setup 53 Setting the Auto Surround Mode 53 Setting the Manual Equalizer Setup 53, 54 Option Setup Setting the Power Amplifier Assignment 54 Setting the Volume Control 55 Setting the Trigger Out 55 Setting the Setup Lock 56 Operating the remote control unit Operating DENON audio components 62 Setting the preset memory function 62 Operating a component stored...

Owners Manual - English
Page 7
... if the set the power switch to the standby position before using the learning function ( page 64). Please be sure to turn off the inside of the remote control unit Before using Pay attention to control the following products: q DENON component products w Component products other than DENON: • Set using the preset memory function ( page 62, 63). • Set using this instructions along with the connection cables. Always set does not operate even when the remote control unit...
... if the set the power switch to the standby position before using the learning function ( page 64). Please be sure to turn off the inside of the remote control unit Before using Pay attention to control the following products: q DENON component products w Component products other than DENON: • Set using the preset memory function ( page 62, 63). • Set using this instructions along with the connection cables. Always set does not operate even when the remote control unit...
Owners Manual - English
Page 23
... compatible with a device having an HDMI (High-Definition Multimedia Interface) terminal allows digital transfer of the digital images of DVDVideo and other sources, and the multi-channel sound of DVD-Audio and DVD-Video. • To provide audio output from the TV, select "TV" at the "HDMI In Assign" ( page 49, 50). NOTE: • The audio signals on the AVR-2807's rear panel to poor contact with an HDMI/DVI-D conversion cable (adapter) • The HDMI video...
... compatible with a device having an HDMI (High-Definition Multimedia Interface) terminal allows digital transfer of the digital images of DVDVideo and other sources, and the multi-channel sound of DVD-Audio and DVD-Video. • To provide audio output from the TV, select "TV" at the "HDMI In Assign" ( page 49, 50). NOTE: • The audio signals on the AVR-2807's rear panel to poor contact with an HDMI/DVI-D conversion cable (adapter) • The HDMI video...

Owners Manual - English
Page 25
...) amplifier is connected, the ZONE2 out (fixed level) terminals can be used to play a different program source in such a way that the product has been set the unit to the operating mode. 2. For details, see "Playing the iPod" ( page 39). Perform the following operation before using an external controller connected to turn off for the individual functions and surround modes. Connecting the MULTI ZONE terminals For instructions on assigning the iPod to a specific terminal, see iPod "Setting the iPod Assignment...
...) amplifier is connected, the ZONE2 out (fixed level) terminals can be used to play a different program source in such a way that the product has been set the unit to the operating mode. 2. For details, see "Playing the iPod" ( page 39). Perform the following operation before using an external controller connected to turn off for the individual functions and surround modes. Connecting the MULTI ZONE terminals For instructions on assigning the iPod to a specific terminal, see iPod "Setting the iPod Assignment...
Owners Manual - English
Page 27
... the selected component. If so, play modes other than the external input mode, the signals connected to adjust the volume. • The volume level is switched automatically. The volume can be generated if you play . IN ANALOG Press to select "ANALOG", to the desired input mode. • To use the EXT. IN mode: Press INPUT MODE or to switch to select "EXT. To select the input source when ZONE2/REC SELECT, VIDEO SELECT or TUNING PRESET is set to DTS/ Dolby Digital/ PCM. For operating instructions, refer to play...
... the selected component. If so, play modes other than the external input mode, the signals connected to adjust the volume. • The volume level is switched automatically. The volume can be generated if you play . IN ANALOG Press to select "ANALOG", to the desired input mode. • To use the EXT. IN mode: Press INPUT MODE or to switch to select "EXT. To select the input source when ZONE2/REC SELECT, VIDEO SELECT or TUNING PRESET is set to DTS/ Dolby Digital/ PCM. For operating instructions, refer to play...

Owners Manual - English
Page 29
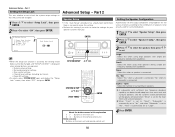
... Dolby Digital EX. To use the system setup function, cancel the PURE DIRECT mode. • If the HDMI input terminal is selected, video outputs are output in the PURE DIRECT mode. • The channel level and surround parameters in the PURE DIRECT mode are transmitted directly, without passing through the tone circuits, etc., and the display and surrounding circuits that could affect the audio signals are different for playing sources recorded in stereo or monaural. • The effects are turned...
... Dolby Digital EX. To use the system setup function, cancel the PURE DIRECT mode. • If the HDMI input terminal is selected, video outputs are output in the PURE DIRECT mode. • The channel level and surround parameters in the PURE DIRECT mode are transmitted directly, without passing through the tone circuits, etc., and the display and surrounding circuits that could affect the audio signals are different for playing sources recorded in stereo or monaural. • The effects are turned...
Owners Manual - English
Page 31
... "MUSIC" is selected) h 2 Dialog normalization function This operates automatically when playing Dolby Digital sources. This compensates for 2-channel audio sources. The surround mode is effective when the surround effect seems weak. PANORAMA: This is set "SB CH OUT" to "PLIIx Cinema" or "MTRX ON". 7 Press ENTER or SURROUND PARAMETER. • Select "Default Yes" and press F to the program source being played. If the playing mode does not switch automatically when the AFDM turns "ON" during playback, manually set...
... "MUSIC" is selected) h 2 Dialog normalization function This operates automatically when playing Dolby Digital sources. This compensates for 2-channel audio sources. The surround mode is effective when the surround effect seems weak. PANORAMA: This is set "SB CH OUT" to "PLIIx Cinema" or "MTRX ON". 7 Press ENTER or SURROUND PARAMETER. • Select "Default Yes" and press F to the program source being played. If the playing mode does not switch automatically when the AFDM turns "ON" during playback, manually set...
Owners Manual - English
Page 32
... OSD-2 : HDMI monitor information OSD-3 : Input/output settings OSD-4 : Auto surround mode OSD-5 ~ 7 : USER MODE 1 ~ 3 OSD-8 ~ 14 : Tuner preset stations 1 6 Press ENTER or SURROUND PARAMETER. 3 5 Example: Dolby Digital Example: DTS (When "MUSIC" is selected) 28 • "OSD-1" "FLAG" is not displayed if there is performed with emphasis on /off). "SURROUND" is selected: Press D H to "ANALOG" or "EXT. IN". fs: Displays the input signal's sampling frequency. CINEMA: This mode is set . FORMAT: Displays the input signal's number of the center channel can...
... OSD-2 : HDMI monitor information OSD-3 : Input/output settings OSD-4 : Auto surround mode OSD-5 ~ 7 : USER MODE 1 ~ 3 OSD-8 ~ 14 : Tuner preset stations 1 6 Press ENTER or SURROUND PARAMETER. 3 5 Example: Dolby Digital Example: DTS (When "MUSIC" is selected) 28 • "OSD-1" "FLAG" is not displayed if there is performed with emphasis on /off). "SURROUND" is selected: Press D H to "ANALOG" or "EXT. IN". fs: Displays the input signal's sampling frequency. CINEMA: This mode is set . FORMAT: Displays the input signal's number of the center channel can...

Owners Manual - English
Page 40
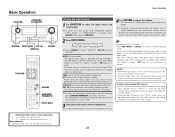
... fee may apply. All fees and programming subject to -coast coverage. Basic Operation D H F G [TUNER] [BAND] [SHIFT] [TUNING] [CHANNEL] D H F G [ON SCREEN] About the button names in this explanation < > : Buttons on the main unit [ ] : Buttons on the remote control unit Button name only : Buttons on the main unit and remote control unit Checking the preset stations Press [ON SCREEN] repeatedly until the "Tuner Preset Stations" screen appears on the radio. 2 A Warning Against Reverse Engineering It...
... fee may apply. All fees and programming subject to -coast coverage. Basic Operation D H F G [TUNER] [BAND] [SHIFT] [TUNING] [CHANNEL] D H F G [ON SCREEN] About the button names in this explanation < > : Buttons on the main unit [ ] : Buttons on the remote control unit Button name only : Buttons on the main unit and remote control unit Checking the preset stations Press [ON SCREEN] repeatedly until the "Tuner Preset Stations" screen appears on the radio. 2 A Warning Against Reverse Engineering It...
Owners Manual - English
Page 48
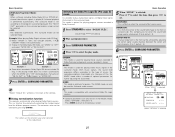
... set. 5 Audio Delay Adjust the time delay between the video and audio signals. 6 On Screen Display Set whether or not to the EXT. Name - 49 1 HDMI In Assign 2 Component In Assign 3 Video Convert Items The HDMI input terminals are not used , the format of the signal output from analog video signals to any input terminals on screen display for indications other than the menu screens. The playback level is used often can Preset Skip All preset channels = ON 49 The preset channels can be preset Auto Preset...
... set. 5 Audio Delay Adjust the time delay between the video and audio signals. 6 On Screen Display Set whether or not to the EXT. Name - 49 1 HDMI In Assign 2 Component In Assign 3 Video Convert Items The HDMI input terminals are not used , the format of the signal output from analog video signals to any input terminals on screen display for indications other than the menu screens. The playback level is used often can Preset Skip All preset channels = ON 49 The preset channels can be preset Auto Preset...
Owners Manual - English
Page 60
... using small speakers without ample low frequency reproduction capabilities. Part 1 Setting the Setup Lock This sets whether or not to lock the system setup settings so that they cannot be changed . 1 Press D H to select "Setup Lock", then press ENTER. 2 Press F to "No", "Front" is displayed when related buttons are operated. • System setup settings • Surround parameter settings • Tone control settings • Channel level settings (including test tones) • Room EQ settings • To unlock, press SYSTEM SETUP again and display the "Setup Lock" screen, then select...
... using small speakers without ample low frequency reproduction capabilities. Part 1 Setting the Setup Lock This sets whether or not to lock the system setup settings so that they cannot be changed . 1 Press D H to select "Setup Lock", then press ENTER. 2 Press F to "No", "Front" is displayed when related buttons are operated. • System setup settings • Surround parameter settings • Tone control settings • Channel level settings (including test tones) • Room EQ settings • To unlock, press SYSTEM SETUP again and display the "Setup Lock" screen, then select...
Owners Manual - English
Page 66
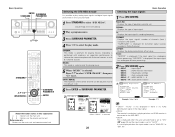
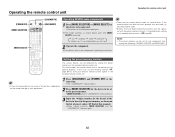
... selected mode lights. In this manual). • When stored correctly, [MODE SELECTOR] and the "LEARNED/TX" indicator lights. 62 If the remote control unit does not work properly with the preset memory function. Setting the preset memory function The various devices can be set with one component only among the following: CDR/MD, DVD/VDP and DBS/CABLE. Operating the remote control unit Operating the remote control unit [POWER OFF] [MODE SELECTOR] [MODE SELECT] [LEARNED/TX] [ON/SOURCE] Operating DENON audio components 1 Press [MODE...
... selected mode lights. In this manual). • When stored correctly, [MODE SELECTOR] and the "LEARNED/TX" indicator lights. 62 If the remote control unit does not work properly with the preset memory function. Setting the preset memory function The various devices can be set with one component only among the following: CDR/MD, DVD/VDP and DBS/CABLE. Operating the remote control unit Operating the remote control unit [POWER OFF] [MODE SELECTOR] [MODE SELECT] [LEARNED/TX] [ON/SOURCE] Operating DENON audio components 1 Press [MODE...
Owners Manual - English
Page 67
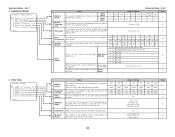
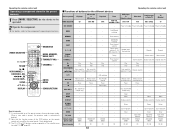
... is preset, the previous code is only possible to be assigned to the component's operating instructions. 2 Functions of the DVD buttons on /Standby MODE - - - Manual search Manual search - - (forward/reverse) (forward/reverse) Rewind (forward/reverse) (forward/reverse) 3 Pause Pause Pause - Menu Menu DISPLAY - - - - Operating the remote control unit Operating a component stored in the preset memory 1 Press [MODE SELECTOR] for the device to set the preset memory for one device per mode. BAND - - - Volume control Volume control CHANNEL + - - - - Play...
... is preset, the previous code is only possible to be assigned to the component's operating instructions. 2 Functions of the DVD buttons on /Standby MODE - - - Manual search Manual search - - (forward/reverse) (forward/reverse) Rewind (forward/reverse) (forward/reverse) 3 Pause Pause Pause - Menu Menu DISPLAY - - - - Operating the remote control unit Operating a component stored in the preset memory 1 Press [MODE SELECTOR] for the device to set the preset memory for one device per mode. BAND - - - Volume control Volume control CHANNEL + - - - - Play...
Owners Manual - English
Page 68
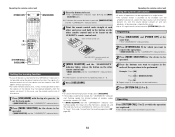
... turn the amplifier's power on, select the input source, turn the monitor power's on, turn the source device's power on the other than DENON or if operation is pressed, [MODE SELECTOR] and the "LEARNED/TX" indicator blinks. 4 Point the remote control units straight at which you want to register the desired buttons. 5 Press [SYSTEM CALL] (1 or 2). If a button that cannot be learnt is not possible using the preset memory function, the signals of a remote control...
... turn the amplifier's power on, select the input source, turn the monitor power's on, turn the source device's power on the other than DENON or if operation is pressed, [MODE SELECTOR] and the "LEARNED/TX" indicator blinks. 4 Point the remote control units straight at which you want to register the desired buttons. 5 Press [SYSTEM CALL] (1 or 2). If a button that cannot be learnt is not possible using the preset memory function, the signals of a remote control...

Owners Manual - English
Page 73
... DOLBY/DTS SURROUND mode. • When playing monaural sources, select a surround mode other than the PURE DIRECT mode. • Down-conversion is set . • Player connected with an HDMI connection. Make the interlace settings on . the AVR-2807's rear panel, activating the protection circuit. • AVR-2807 is not proper. output is not • Connect properly. 7, 22 "DOLBY DIGITAL" is not displayed. • DVD player's digital audio output • Check the DVD player's audio setting is malfunctioning. • Turn off MUTING. 24 • No digital signal...
... DOLBY/DTS SURROUND mode. • When playing monaural sources, select a surround mode other than the PURE DIRECT mode. • Down-conversion is set . • Player connected with an HDMI connection. Make the interlace settings on . the AVR-2807's rear panel, activating the protection circuit. • AVR-2807 is not proper. output is not • Connect properly. 7, 22 "DOLBY DIGITAL" is not displayed. • DVD player's digital audio output • Check the DVD player's audio setting is malfunctioning. • Turn off MUTING. 24 • No digital signal...


