
Owners Manual
Page 16
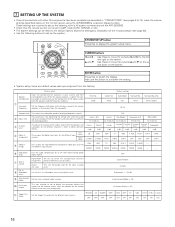
... to the up and down -mixing Dolby Digital signals. w Delay Time This parameter is set up the listening room's AV system centered around the AVR-2803/983. • Check that appears on the monitor screen when the controls on the screen. In i Subwoofer Level Set the Ext. o Auto ... different input sources. 7 SETTING UP THE SYSTEM • Once all connections with which the bass sound of the various speakers is to be reset to the default (factory shipment) settings by initialization of the microprocessor (see page 63). • Use the following buttons to set to AMP...
... to the up and down -mixing Dolby Digital signals. w Delay Time This parameter is set up the listening room's AV system centered around the AVR-2803/983. • Check that appears on the monitor screen when the controls on the screen. In i Subwoofer Level Set the Ext. o Auto ... different input sources. 7 SETTING UP THE SYSTEM • Once all connections with which the bass sound of the various speakers is to be reset to the default (factory shipment) settings by initialization of the microprocessor (see page 63). • Use the following buttons to set to AMP...

Owners Manual
Page 17
... Surround speaker systems Before setting up the system • Before setting up to that all playback devices connected to the AVR-2803/983 from the System Setup Menu screen. System setup can reset it is an example of the basic layout for use with high resolution monitor TVs, so it may be difficult...the signals to the video monitor output jack, do not connect a cord to the S-VIDEO MONITOR OUT jack. (For details, see page 30.) • The AVR-2803/983's on-screen display function is connected to both the S-Video and video input jacks, the on -screen display turns off the power of all...
... Surround speaker systems Before setting up the system • Before setting up to that all playback devices connected to the AVR-2803/983 from the System Setup Menu screen. System setup can reset it is an example of the basic layout for use with high resolution monitor TVs, so it may be difficult...the signals to the video monitor output jack, do not connect a cord to the S-VIDEO MONITOR OUT jack. (For details, see page 30.) • The AVR-2803/983's on-screen display function is connected to both the S-Video and video input jacks, the on -screen display turns off the power of all...

Owners Manual
Page 21
Example: When the distance is set to 12 feet for the center speaker If "Yes" is selected for "Default", the settings are reset to the default values. In this setting to adjust so that the playback level between the center speaker and listening position. NOTE: • ... of 1 foot (0.1 meters) each time the button is no larger than the value shown in units of distance for the listening room. The AVR-2803/983 automatically sets the optimum surround delay time for every speaker should be adjusted directly from the remote control unit. (For details, see page 16...
Example: When the distance is set to 12 feet for the center speaker If "Yes" is selected for "Default", the settings are reset to the default values. In this setting to adjust so that the playback level between the center speaker and listening position. NOTE: • ... of 1 foot (0.1 meters) each time the button is no larger than the value shown in units of distance for the listening room. The AVR-2803/983 automatically sets the optimum surround delay time for every speaker should be adjusted directly from the remote control unit. (For details, see page 16...
Owners Manual
Page 23
..."Yes" is selected for "Default", the settings are automatically reset to the input source. • To select the input ... cannot be remembered for each surround mode on page 49. NOTES: • The OPTICAL 4 jacks on the AVR-2803/983's rear panel are used. Then, whenever you activate a particular surround sound mode, your preferred channel level ...adjustments for just that will be selected on the AVR-2803/983's rear panel to any jack other digital recorder. Use this mode a Master Channel Level adjustment mode...
..."Yes" is selected for "Default", the settings are automatically reset to the input source. • To select the input ... cannot be remembered for each surround mode on page 49. NOTES: • The OPTICAL 4 jacks on the AVR-2803/983's rear panel are used. Then, whenever you activate a particular surround sound mode, your preferred channel level ...adjustments for just that will be selected on the AVR-2803/983's rear panel to any jack other digital recorder. Use this mode a Master Channel Level adjustment mode...

Owners Manual
Page 24
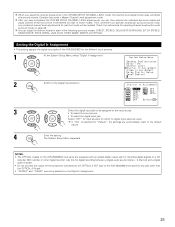
ON: The dynamic range is selected, the settings are reset to use it. The System Setup Menu reappears. When the default, "Yes", is compressed automatically according to the combination of the AVR-2803/983 for the different input sources. 1 At the System Setup Menu select "Video In Assignment". 2 Switch to the Video In Assignment...
ON: The dynamic range is selected, the settings are reset to use it. The System Setup Menu reappears. When the default, "Yes", is compressed automatically according to the combination of the AVR-2803/983 for the different input sources. 1 At the System Setup Menu select "Video In Assignment". 2 Switch to the Video In Assignment...

Owners Manual
Page 33
... some models, even if the your device. The preset codes are as follows upon shipment from the factory and after resetting: TV, VCR HITACHI CD, TAPE DENON CDR/MD DENON (CDR) DVD/VDP DENON (DVD) DBS/CABLE ABC (CABLE) DVD preset codes B Model No. 0000 DVD-900 DVD-1000 DVD-1500 DVD-2800 DVD...
... some models, even if the your device. The preset codes are as follows upon shipment from the factory and after resetting: TV, VCR HITACHI CD, TAPE DENON CDR/MD DENON (CDR) DVD/VDP DENON (DVD) DBS/CABLE ABC (CABLE) DVD preset codes B Model No. 0000 DVD-900 DVD-1000 DVD-1500 DVD-2800 DVD...

Owners Manual
Page 36
...device will not operate properly. For limited number of models, codes cannot be stored in the remote control unit. Check that code, first perform the resetting operation. (See page 39.) 36 For some remote control signals it is not possible to "learn " that the stored codes work properly. Learning ...function If your AV component is not a Denon product or if it cannot be operated using the preset memory, it can be controlled with the tip of the equipment for which you have...
...device will not operate properly. For limited number of models, codes cannot be stored in the remote control unit. Check that code, first perform the resetting operation. (See page 39.) 36 For some remote control signals it is not possible to "learn " that the stored codes work properly. Learning ...function If your AV component is not a Denon product or if it cannot be operated using the preset memory, it can be controlled with the tip of the equipment for which you have...

Owners Manual
Page 39
... 1 Press the USE/LEARN button with the tip of a pen, etc., to be reset and the ON/SOURCE button. • The mode button and the LEARNED/TX indicator will again flash, and the learned remote control signal of the ... the learn mode. • The mode selector buttons and LEARNED/TX indicator flash. Flashes 3 2, 3 2 Press the mode button of the equipment that is to be reset. • Mode button and LEARNED/TX indicator flash. 3 Hold for 4 seconds or longer the mode button of the selected equipment will be deleted. 4 Press the...
... 1 Press the USE/LEARN button with the tip of a pen, etc., to be reset and the ON/SOURCE button. • The mode button and the LEARNED/TX indicator will again flash, and the learned remote control signal of the ... the learn mode. • The mode selector buttons and LEARNED/TX indicator flash. Flashes 3 2, 3 2 Press the mode button of the equipment that is to be reset. • Mode button and LEARNED/TX indicator flash. 3 Hold for 4 seconds or longer the mode button of the selected equipment will be deleted. 4 Press the...

Owners Manual
Page 40
they will return to be reset. • The CD, CDR/MD, TAPE, DVD/VDP, and VCR mode buttons and TEARNED/TX indicator will flash. 4 Press the mode button of the equipment (TV or DBS/CABLE) that is to be reset again. • During the resetting operation, the selected mode button and ...the LEARNED/TX indicator will light; (2) Resetting the punch through setting 1 Press the power ON/SOURCE button and the OFF button at the same...
they will return to be reset. • The CD, CDR/MD, TAPE, DVD/VDP, and VCR mode buttons and TEARNED/TX indicator will flash. 4 Press the mode button of the equipment (TV or DBS/CABLE) that is to be reset again. • During the resetting operation, the selected mode button and ...the LEARNED/TX indicator will light; (2) Resetting the punch through setting 1 Press the power ON/SOURCE button and the OFF button at the same...

Owners Manual
Page 52
... input 2-channel signals. 1 1 3, 5 1, 4, 6 1 Select the DTS NEO:6 mode. SELECT (Main unit) (Main unit) (Remote control unit) 6 Set the various surround parameters. The settings are automatically reset to the default values and "CINEMA EQ" is the screen when operated with the remote control unit. 4 Select the play mode. When the settings are...
... input 2-channel signals. 1 1 3, 5 1, 4, 6 1 Select the DTS NEO:6 mode. SELECT (Main unit) (Main unit) (Remote control unit) 6 Set the various surround parameters. The settings are automatically reset to the default values and "CINEMA EQ" is the screen when operated with the remote control unit. 4 Select the play mode. When the settings are...

Owners Manual
Page 54
... the subwoofer sounds distorted due to the LFE signals when playing Dolby Digital or DTS sources when the peak limiter is turned off , "LFE" is reset, and the tone is set to the standard level. Surround parameters w CINEMA EQ. (Cinema Equalizer): The Cinema EQ function gently decreases the level of the...
... the subwoofer sounds distorted due to the LFE signals when playing Dolby Digital or DTS sources when the peak limiter is turned off , "LFE" is reset, and the tone is set to the standard level. Surround parameters w CINEMA EQ. (Cinema Equalizer): The Cinema EQ function gently decreases the level of the...

Owners Manual
Page 63
... the 2 buttons and the microprocessor will be initialized. 1 2 NOTES: • If step 3 does not work, start over from step 1. • If the microprocessor has been reset, all the settings are reset to perform complicated resettings when the power is switched on. • The unit is switched off.
... the 2 buttons and the microprocessor will be initialized. 1 2 NOTES: • If step 3 does not work, start over from step 1. • If the microprocessor has been reset, all the settings are reset to perform complicated resettings when the power is switched on. • The unit is switched off.

